When you click on links to various merchants on this site and make a purchase, this can result in this site earning a commission. Affiliate programs and affiliations include, but are not limited to, the eBay Partner Network.
need help with 5.0 S/C ignition Coil harness repair - spark plug change
Hi - posing question and need for help, but contributing a write up for affirmation of process steps to those wanting info
spark plugs swap effort- denso iridium to change out presumed factory plugs at 92,xxx miles. no known issues, just being proactive
Research as much as possible from workshop manual and i didn't find much on plug changes
Bigg Will's post and write up were encouraging enough for me to attempt this and I've read it 4x over past 2 years.
driver's side first - will attempt passenger side after i get driver's ignition coil harness boo boo fixed..
removed intake tube
disconnected small tube to coolant reservoir and flopped it out of the way, then moved reservoir itself - zip tie as needed to keep from damaging and spilling
lifted P.S. res off bracket and out of the way
disconnected s/c coolant pipes and placed out of way - another zip tie to keep em there
oil cap off and hole plugged
now - the rubber cover - heat gun, attempt to pull out, try harder, discouraged, try harder, pop, ??, last ignition coil harness looks broken off, can't see any other reason not to pull it rest of way and it came out just fine, have to deal with that new issue now..
T30 torx on 1st, 2nd, 3rd coil - 4th extremely discouraging as the bit will barely fit on. After 25 min with 1/8 turns using a bit and 1/4'' box end wrench realized that the cover for the master cylinder could come off
remove wiper blades and cowl and then strut bar. negotiate the cover in question out - *** for those of you attempting this - i guarantee this will improve your success on the driver's side - the rubber cover would have come out much easier
now a much less troublesome approach to gettign that last coil bolt out and pull the coil to see what i did to the harness connection. and this is where the assistance is needed - how to repair or replace this harness. the wires must be assembled into the harness somehow and perhaps the end can be sourced and the wires swapped? or maybe the harness and a pigtail of 3 wires can be sourced and cut the factory harness off to splice with butt connectors?? Naturally it's the worst to reach on driver's side, but it can be done
-- i also have to decide to try and use the coil that has good spade connectors but bad female housing or replace
-- and then if i replace can i buy just one or do they have to be a match set of 4 per side
-- and do ignitions coils need to be freshened anyway at 100k mile mark so ?? just go ahead and get it done as preventative maintenance?
pics as follows and i tried to tag as applicable - help with the harness would be appreciated
**numbers on harness on one side are top line: PA46 bottom line: 1718653-2 // on other side are only line: 1-1718644-5
before
drivers side stripped down
cover i mention removing over master cylinder area - have to remove wipers, cowl and strut brace to get it out, but a must do in my experience - i wouldn't have broken my coil harness..
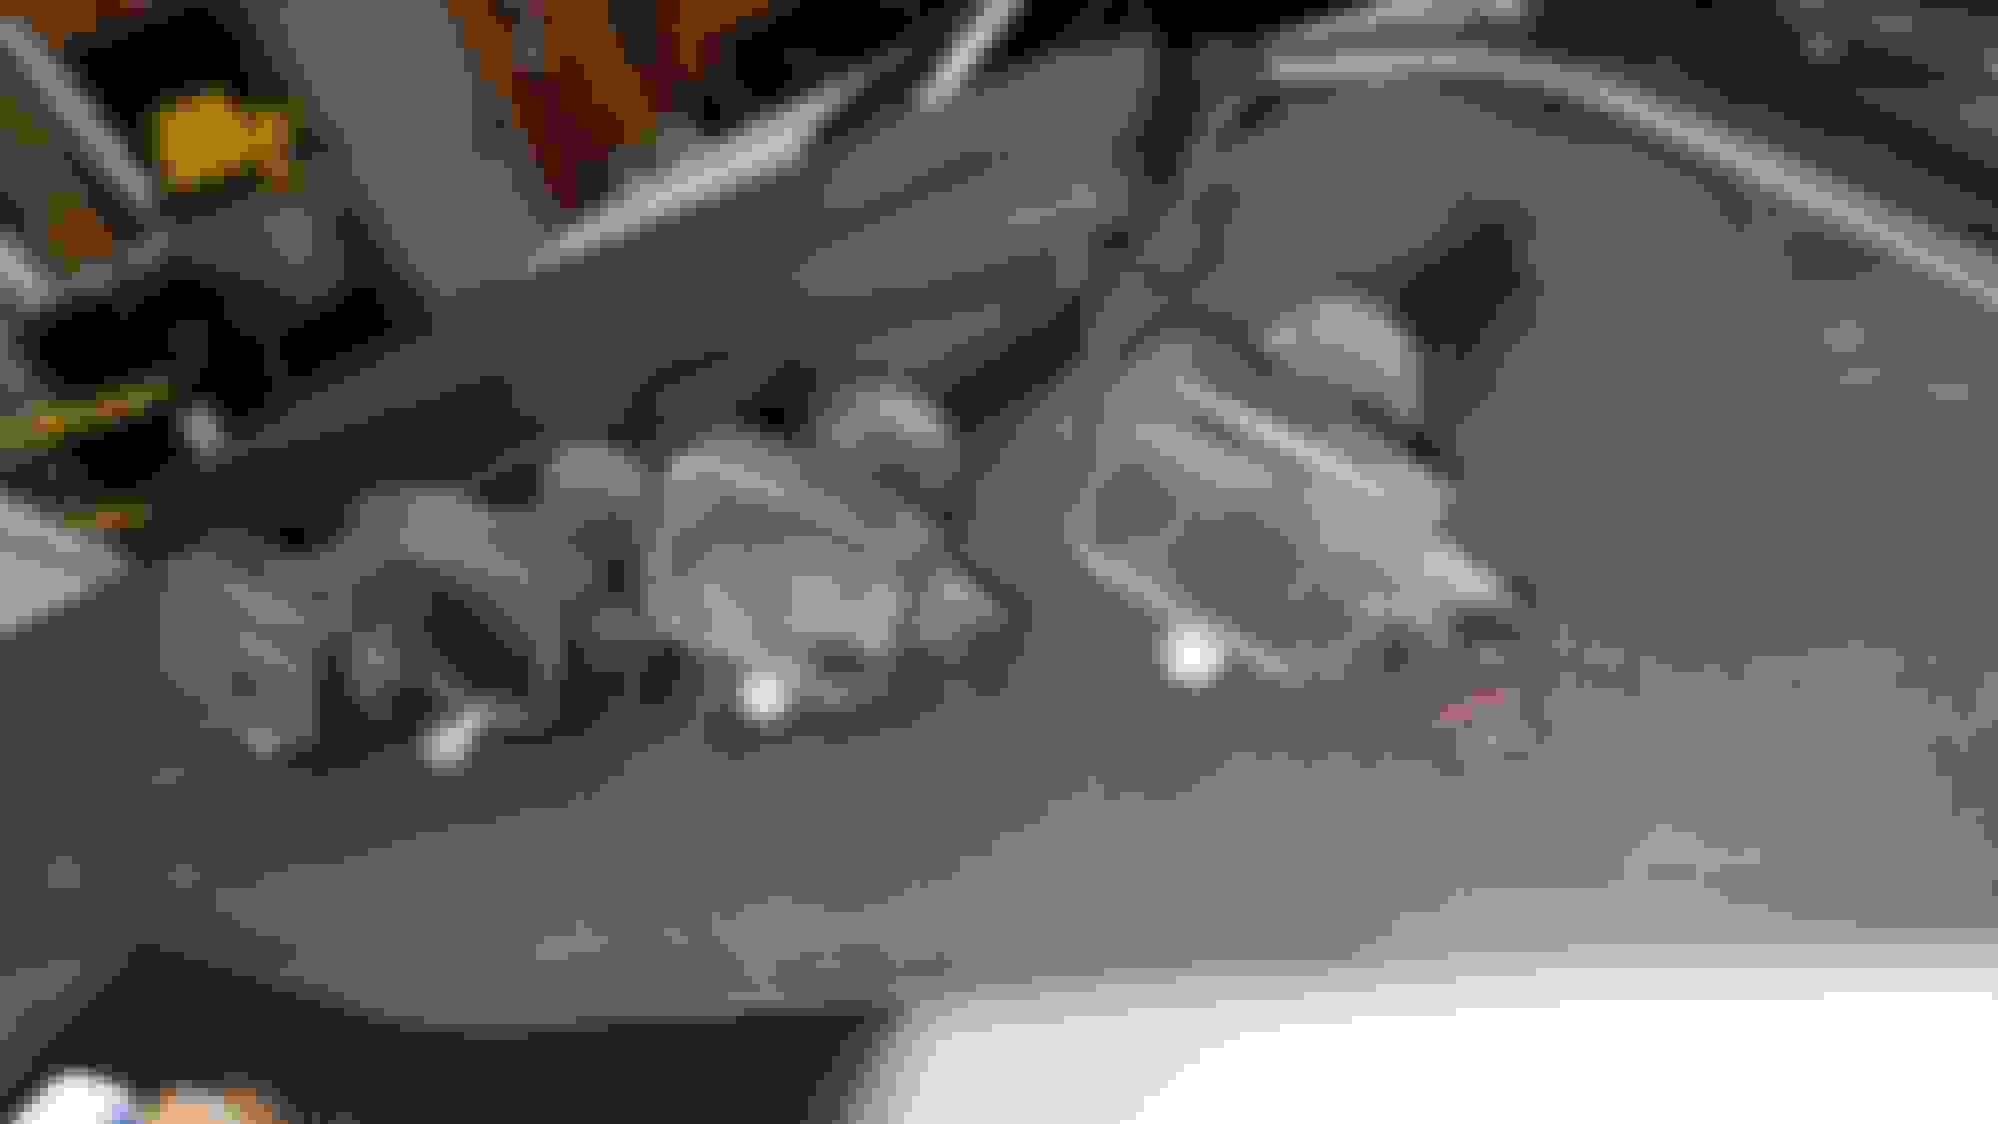
extracted coils
look at drivers plug galleys with coils removed - decent access to plugs with correct plug sockets and extensions
broken rear most ignition coil harness in background with good 3rd cylinder harness in foreground for reference - where / how to get this harness??
rear of harness where wires enter - can these be extracted and put into a new harness?
Ouch - unfortunately, the pins have broken off inside the piece of the connector that's broken. Jaguar do sell new connector housings for pretty much the whole loom, but they rely on you being able to remove the pins with wires attached from the old connector (using pin removal tools) and insert into the new connector housing. In your case, I think you have a few options:
Try and find a flylead replacement connector on the aftermarket - you may be able to find a connector that matches this but with a length of wire attached to each of the pins, which you can then join with your existing loom
Get a second-hand loom off eBay, chop the connector off it that you need and then join it to yours - possibly an expensive proposition
Try and find replacement pins that you can crimp/solder to your existing loom, and get a new connector housing from Jag. I've done this before with connectors but generally requires a pretty good length of wire, and things are already pretty tight in this area!
thanks Dave - I've got messages in to 2 jag parts sources and 1 auto electrical connector company. I also noticed a name on the harness "TYCO". Hopefully i can get a new pigtail harness and crimp it on the wire or some clean and functional alternative
hi all, wanted to contribute to share passenger side hints and tips to encourage and help any of you wanting to try.
Again, I'd say Bigg Will's write up is the OG and I'm parroting most of it
but, i cannot for the life of me find a way to fit tools into the spaces needed - just cannot..!
my inventive son volunteered the impossible - or at least i thought - "dad, can we remove that plastic panel?"
i said no way! then i started looking
pics will all be down below, but basically there's a fuse center on the pass side that can rotate up and 90* out of the way. then in front of that and in the way of the coils, plugs and fuel rail on pass side is a relatively large plastic panel. there's a couple fasteners easily seen and removed, but another back near firewall and yet another requiring lower pass air box removal to access it on the inside of the wheel well area. Lastly, there's a plastic retainer way down low. this sounds neanderthal on nature, but a long pry bar will take car of it if wedging between panels.
i broke nothing!!! it came out.
after unplugging the 4 coils, the wire loom was better able to move around for fastener extraction on the coils, then plug removal
here's the thing - and i kid you not - you can literally see down the plug holes on all 8 holes with the plastic pieces removed.
it's work and time to get them removed, but the job just became possible for an lesser experienced fellas like me and my boy.
anyway, i hope the pics help those attempting in future before project started
fuse center can lift and rotate
plastic piece between pass side fuse center and engine - give you all the access you are going to get
both side stripped out for the job
pass side after coils and plugs removed - notice decent accessibility
ngk plug out - was this factory or does this mean someone else changed plugs prior to my 79,000 mile purchase??? also, why do you think new denso plug is almost an 1/8'' taller??
**additional driver side notes: once i get the coil harness fixed on driver's side (noticed it says "TYCO" and have messages in to several potential resouces), should be able to get it all back together. one thing i didn't have to do on driver's side was disconnect the low pressure fuel line. i did so, but put it back together when i was able to remove the plastic that covers the master cylinder..**
Can you do me a favor and identify the bolts/screws/nuts you removed when pulling out the fuse box and secondary bulkhead, perhaps a picture with the items highlighted?
I removed my supercharger earlier in the year and removed the right hand (as you look into the engine bay) secondary bulkhead which made access to that side much easier but I didn't try with the fuse box side. Obviously it makes accessing the left bank plugs/coils/injectors much easier .
Thanks in advance.
arrow pointing towards firewall is a 10mm bolt holding the subject panel to the similar one that is parallel with firewall. there is another one 6'' lower that you can barely see, but can get to - you only need the upper one.. the lower one is unnecessary
middle arrow is approx location of plastic barbed push clip that i dispatched with a pry bar. not as bad as it sounds..
arrow towards front of car is the 10mm requiring lower air box removal to access
all other fasteners are logical as you do lower risk disassembly of the upper parts. as far a list list and sizes, that'll be your contribution to this tread sir - lol - i bet there's 30+ fasteners that need to come out.
the panel on dirver's side covering the master cylinder area AND the panel on passenger side dividing engine and fuse panel location CAN/WILL come out with some negotiation and make this job possible for mere mortals. take your time.
This almost looks doable. Bigg Will's original post on changing plugs still gives me nightmares - lol - I'm hitting 90K now - I may have to give it a try in the spring - Do you think this would be any easier on an NA engine. Anyone try it?
This almost looks doable. Bigg Will's original post on changing plugs still gives me nightmares - lol - I'm hitting 90K now - I may have to give it a try in the spring - Do you think this would be any easier on an NA engine. Anyone try it?
Thanks
huge thank you to you and big will alike for that lead ( there goes big will again - always having the answers before I have the questions)
I didn't use the correct search words to find that thread when I searched The Forum
so my mental clutter needs to be cleaned out because I know I've read that thread before...
I'll look them up and hopefully they also have a product with a pigtail kit because that's what I really need cuz I broke the middle part of the connector
regarding changing the plugs on a naturally-aspirated engine, yes it would be slightly easier than a supercharged model because you don't have to deal with the charge cooler pipe disconnections and leaking coolant
another thing I'm finding after consulting with my local AutoZone professional is that I believe the plugs I extracted were possibly a heat range hotter than OEM. (NGK ILKAR6C10) one of my pictures shows the NGK plug being much shorter than the Denso plug that I'm going to be installing
has anyone experienced this where they found a shorter and hotter heat range plug in their car? In my limited understanding of plug heat ranges all I can surmise is that this would be to better burn off carbon deposits on plugs??
thanks to posts, info contributions and reminders by BiggWill, Dave Tibbs and nsl1 !!!
all is done and back together properly. the wire harness swap out was fairly straighforward - just very tight at the rear most driver's side ignition coil.
i sourced the parts from Ballenger Motorsports. paid for the least expensive shipping option and it still came in 3 days. i used the: CONN-76079 ""3 Way Connector Plug Kit for BRZ / FRS Igntiion Coil, VW Crank/Cam/Ethanol sensor"" for $8.99 and they also have an assemble pigtail harness if you just want to do simple butt connectors and that's: CONN-86079 ""3 Way Connector Plug Pigtail for BRZ / FRS Ignition Coil, VW Crank/Cam/Ethanol sensor"". for what it's worth to someone, AutoZone can get you this repair harness too, but they want about $65 for (1)
car is back together and running smoothly, perhaps slightly more smoothly than before. the plugs i removed didn't look bad at all and the pistons also looked pretty decent as far as minimal carbon buildup.
so the plugs removed were NGK and I've corresponded with the company to verify that they are indeed an OEM supplier and the part number had been superseded by another with 1 step warmer heat range - he couldn't explain why, but that's how he responded
i installed Denso "3444" plugs for the new, on recommendation of a fella I've grown to trust and they seem good
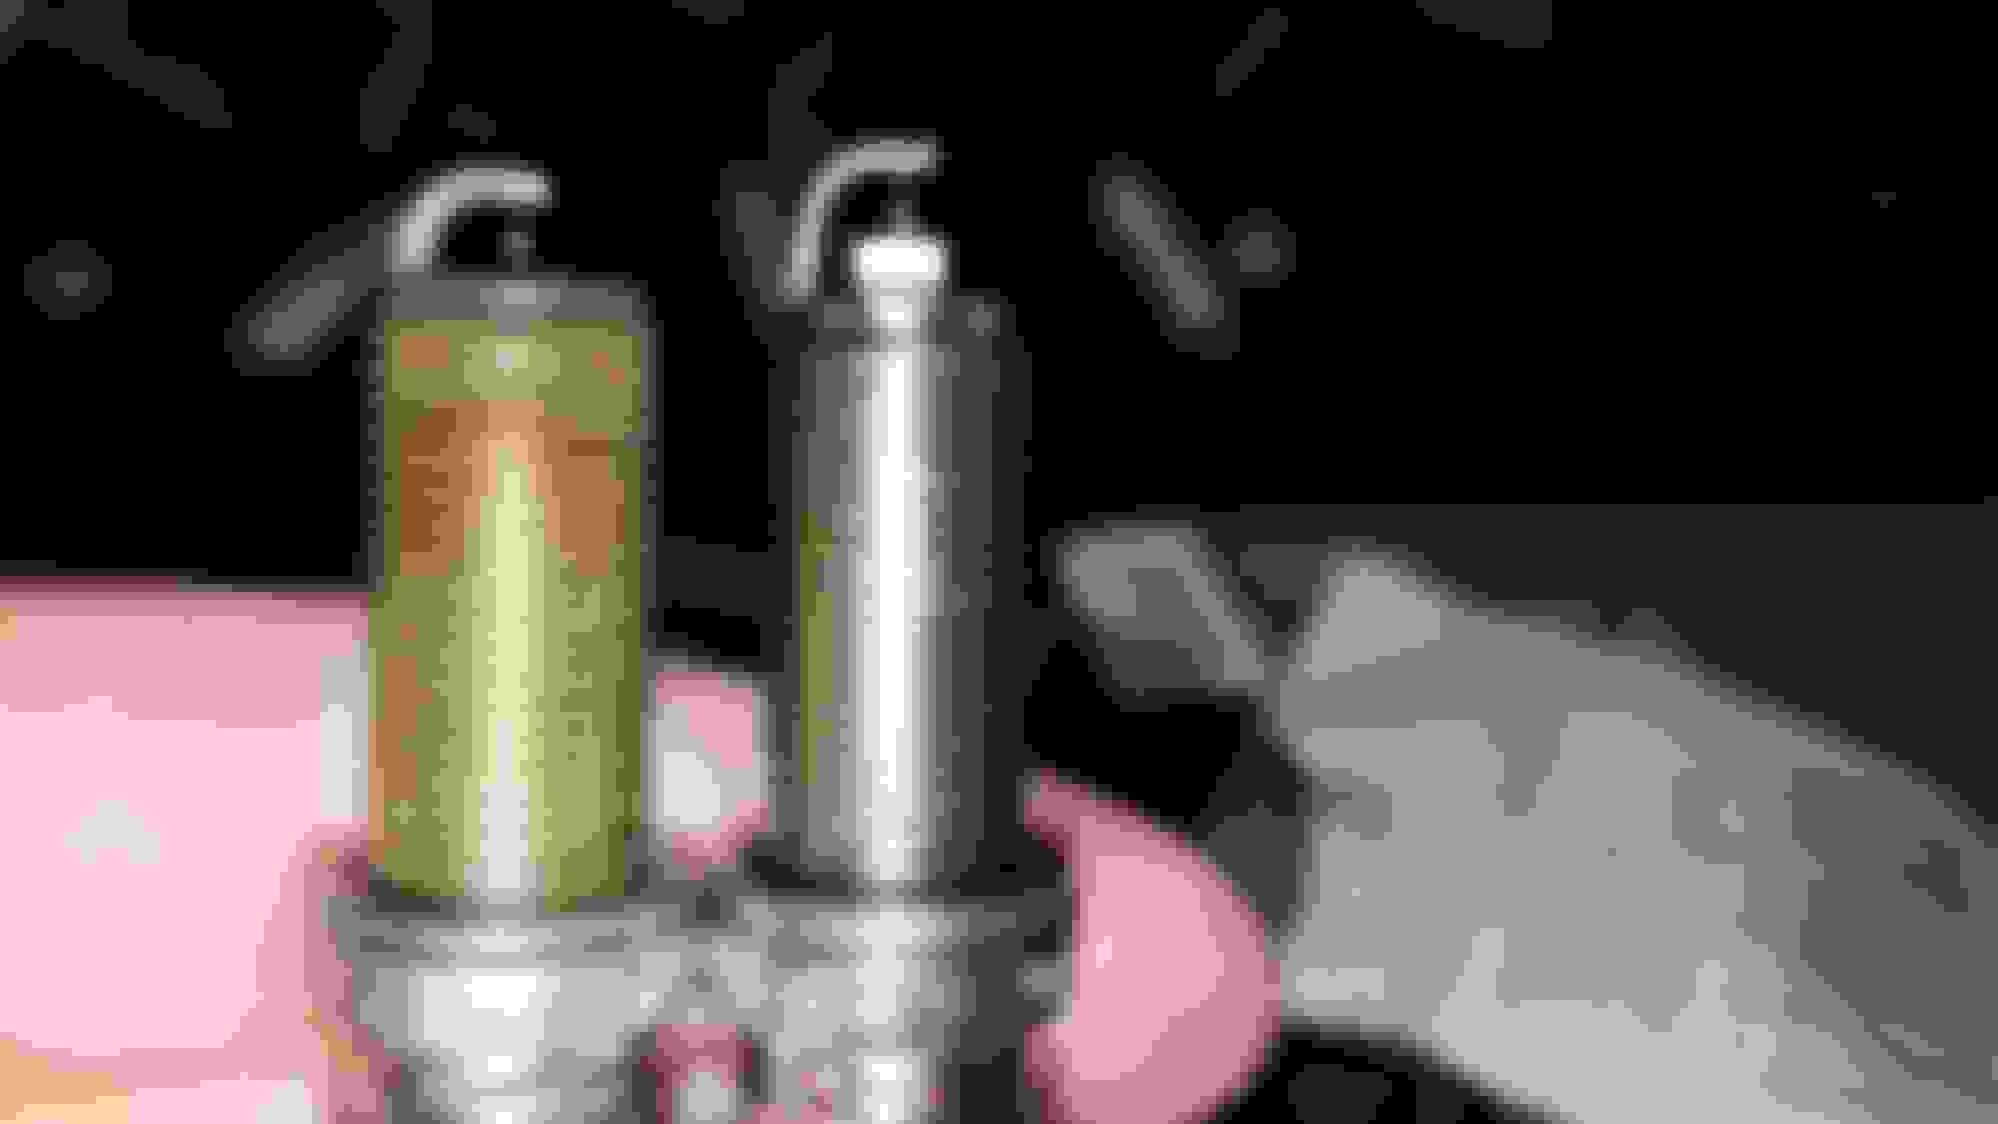
assembly process of harness - never did one before and pretty simple
rear of new harness with wire insulators on the wires that were pushed in
driver's side with new rear most ignition coil harness - note the bulkhead is removed around the brake fluid reservoir to provide the necessary clearance to do this job
what his end shows for part numbers.
I'll state again that this is a pretty straightforward project, but plan on 8-10 hrs to get it done after studying the posts and info out there to devise your best plan. as far as I'm concerned, the bulkheads i mention in posts above MUST be removed on each respective side and then the rubber cover can come off much better and the work is reasonably accessible. on the driver's side you have to move the coolant reservoir and power steering reservoir out of your way as needed. on the passenger side, you need to move the fuse station as needed - it's possible. ((to remove the bulkheads, you need to remove both windshield wipers, the cowl and the strut brace))
among others, a 10mm socket and T30 torx bit are the main fastener removers. you will need a 14mm spark plug socket and about 20'''of socket extension via wobble joint extensions. you'll need to top off the coolant reservoir when done, so grab some dexcool or other universal coolant that can be added to any color. I used a light coating of dielectric grease on inside of coil boots where they need to glide on and off the plugs
i used the: CONN-76079 ""3 Way Connector Plug Kit for BRZ / FRS Igntiion Coil, VW Crank/Cam/Ethanol sensor"" for $8.99 and they also have an assemble pigtail harness if you just want to do simple butt connectors and that's: CONN-86079 ""3 Way Connector Plug Pigtail for BRZ / FRS Ignition Coil, VW Crank/Cam/Ethanol sensor"". for what it's worth to someone, AutoZone can get you this repair harness too, but they want about $65 for (1)
Thanks for the valuable info. For anyone else, also available via Amazon now.