
headlamp lens pitting RESOLVED

Thread Starter
|
Veteran Member


Joined: Feb 2011
Posts: 1,219
Likes: 505
From: Raleigh, North Carolina
Recently noticed this pitting on the upper edge of my headlamp lenses. Didn't realize how bad it was until today when I was on the garage floor looking up at them. Strange that it's not on the face of the lens, just the upper edge. Looks like they've been sand blasted. Hardly any on the inner lens, mostly the outer. Maybe just the way the wind currents hit the lens?
Anyway, is this common? Tried a little plastic polish, helped a little, but not much. Will something like a 3M headlamp polishing kit take these out?
Thanks,
-Michael

Anyway, is this common? Tried a little plastic polish, helped a little, but not much. Will something like a 3M headlamp polishing kit take these out?
Thanks,
-Michael
Michael,
Check out my "How To" in the sticky section for head lamps.
Jason
https://www.jaguarforums.com/forum/x...ng-how-120294/
Check out my "How To" in the sticky section for head lamps.
Jason
https://www.jaguarforums.com/forum/x...ng-how-120294/
Thread Starter
|
Veteran Member
Joined: Feb 2011
Posts: 1,219
Likes: 505
From: Raleigh, North Carolina
Jason and Jim, thank you very much! Didn't realize it was a common issue, hadn't seen it come up before on this section.
Makes sense now that you say it's UV damage!
I'll give it a try and post back
-Michael
Makes sense now that you say it's UV damage!
I'll give it a try and post back
-Michael
Here's a few others that might help some....
https://www.jaguarforums.com/forum/d...light+restoral
https://www.jaguarforums.com/forum/d...light+restoral
https://www.jaguarforums.com/forum/d...light+restoral
Good luck
https://www.jaguarforums.com/forum/d...light+restoral
https://www.jaguarforums.com/forum/d...light+restoral
https://www.jaguarforums.com/forum/d...light+restoral
Good luck
Thread Starter
|
Veteran Member
Joined: Feb 2011
Posts: 1,219
Likes: 505
From: Raleigh, North Carolina
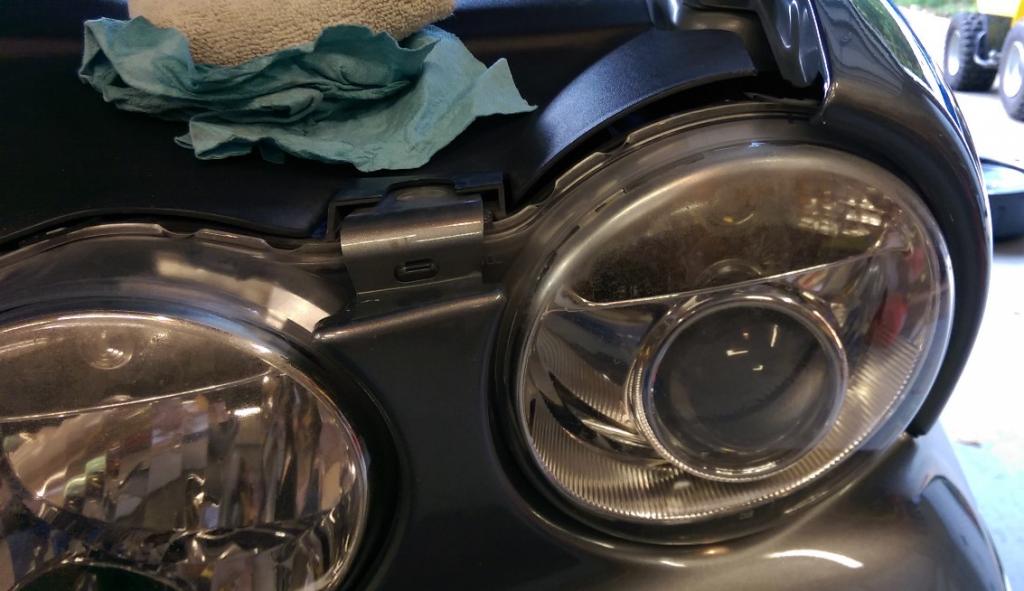
Wanted to update... got the 3M kit and my lights look like new! Was actually even more conservative than the instructions, I started with the middle grid on most of them, and wet sanded all grits to prevent damage. Really couldn't be happier with the results!
Before:

After:

Before:
After:
Trending Topics


Senior Member
Joined: Oct 2012
Posts: 853
Likes: 192
From: Panama City, Florida
05XJL. My lights look the same, but I believe what caused it on my car, was detailers. The previous owner must have used detailers to get the car looking new, but they used a BUFFER to polish the finish and the buffer came down on the lens and burnt them. All four are the same--alone the top portion of each lens.
A local collision center said they will make them look like new again and even clear coat them. Guareenteed for $185.00. May try the 3m product first.
Chuck 05/XJ8L
A local collision center said they will make them look like new again and even clear coat them. Guareenteed for $185.00. May try the 3m product first.
Chuck 05/XJ8L

Senior Member
Joined: Oct 2012
Posts: 853
Likes: 192
From: Panama City, Florida
Just to up date my post above, I used the 3M product and the results were just like MHamiltons above. Perfect. No need for additional photo's.
The secret is a light touch and use a directed. I was so amazed, I took the stuff over to my neighbors and did his wife's Van. She was tickled ----less.
Product has enough stuuf to do 6 headlights, with enough stuff left over, that their refill kit will more then enough fill.
One note: When I purchased the kit, the kit I picked up was $39 bucks. The good salesman said he had the same kit at the counter for $17 dollars. The only difference---a half dollar size of Blue Painters tape. $22 bucks for the tape? I don't think so. Just be informed when you buy.
Chuck
05/XJ8L
Senior Member

Joined: Aug 2012
Posts: 404
Likes: 157
From: Wake Forest, NC
Just to up date my post above, I used the 3M product and the results were just like MHamiltons above. Perfect. No need for additional photo's.
The secret is a light touch and use a directed. I was so amazed, I took the stuff over to my neighbors and did his wife's Van. She was tickled ----less.
Product has enough stuuf to do 6 headlights, with enough stuff left over, that their refill kit will more then enough fill.
One note: When I purchased the kit, the kit I picked up was $39 bucks. The good salesman said he had the same kit at the counter for $17 dollars. The only difference---a half dollar size of Blue Painters tape. $22 bucks for the tape? I don't think so. Just be informed when you buy.
Chuck
05/XJ8L
The secret is a light touch and use a directed. I was so amazed, I took the stuff over to my neighbors and did his wife's Van. She was tickled ----less.
Product has enough stuuf to do 6 headlights, with enough stuff left over, that their refill kit will more then enough fill.
One note: When I purchased the kit, the kit I picked up was $39 bucks. The good salesman said he had the same kit at the counter for $17 dollars. The only difference---a half dollar size of Blue Painters tape. $22 bucks for the tape? I don't think so. Just be informed when you buy.
Chuck
05/XJ8L
Worked a charm, and super results. From heavily pitted to clear as glass. Only issue I had was my Ni-Cad Batterry 18 Volt Drill ran down before I got all 4 lenses completed, and the passenger side needed to be gone back to. I only repeated the last 2 steps - the wet sand and the compound. I already had Meguiars Headlamp Preservative and it FURTHER clarified the lenses - which I would not have believed possible. I STRONGLY recommend the Meguiars if you go through all this polishing work to protect the lens at least from UV if not from the sandblasting effect of road debris. Another tip: Increase your following distance on the highway when possible and your front end won't GET sandblasted in the first place.
Note: Pics are from BEFORE applying preservative and it made the lens 50% clearer still. Take your time and don't rush the steps. Big Tip: If your Fog/Driving lamps are equally pitted (mine are) they should respond to the same treatment, but it will be tight quarters with the drill on those smaller lenses. I think with care I can do them, since removal looks to be a pain.
Last edited by Blairware; Nov 8, 2014 at 04:17 PM.

Thread
Thread Starter
Forum
Replies
Last Post
Currently Active Users Viewing This Thread: 1 (0 members and 1 guests)