When you click on links to various merchants on this site and make a purchase, this can result in this site earning a commission. Affiliate programs and affiliations include, but are not limited to, the eBay Partner Network.
X350 - How to vastly improve halogen headlight performance
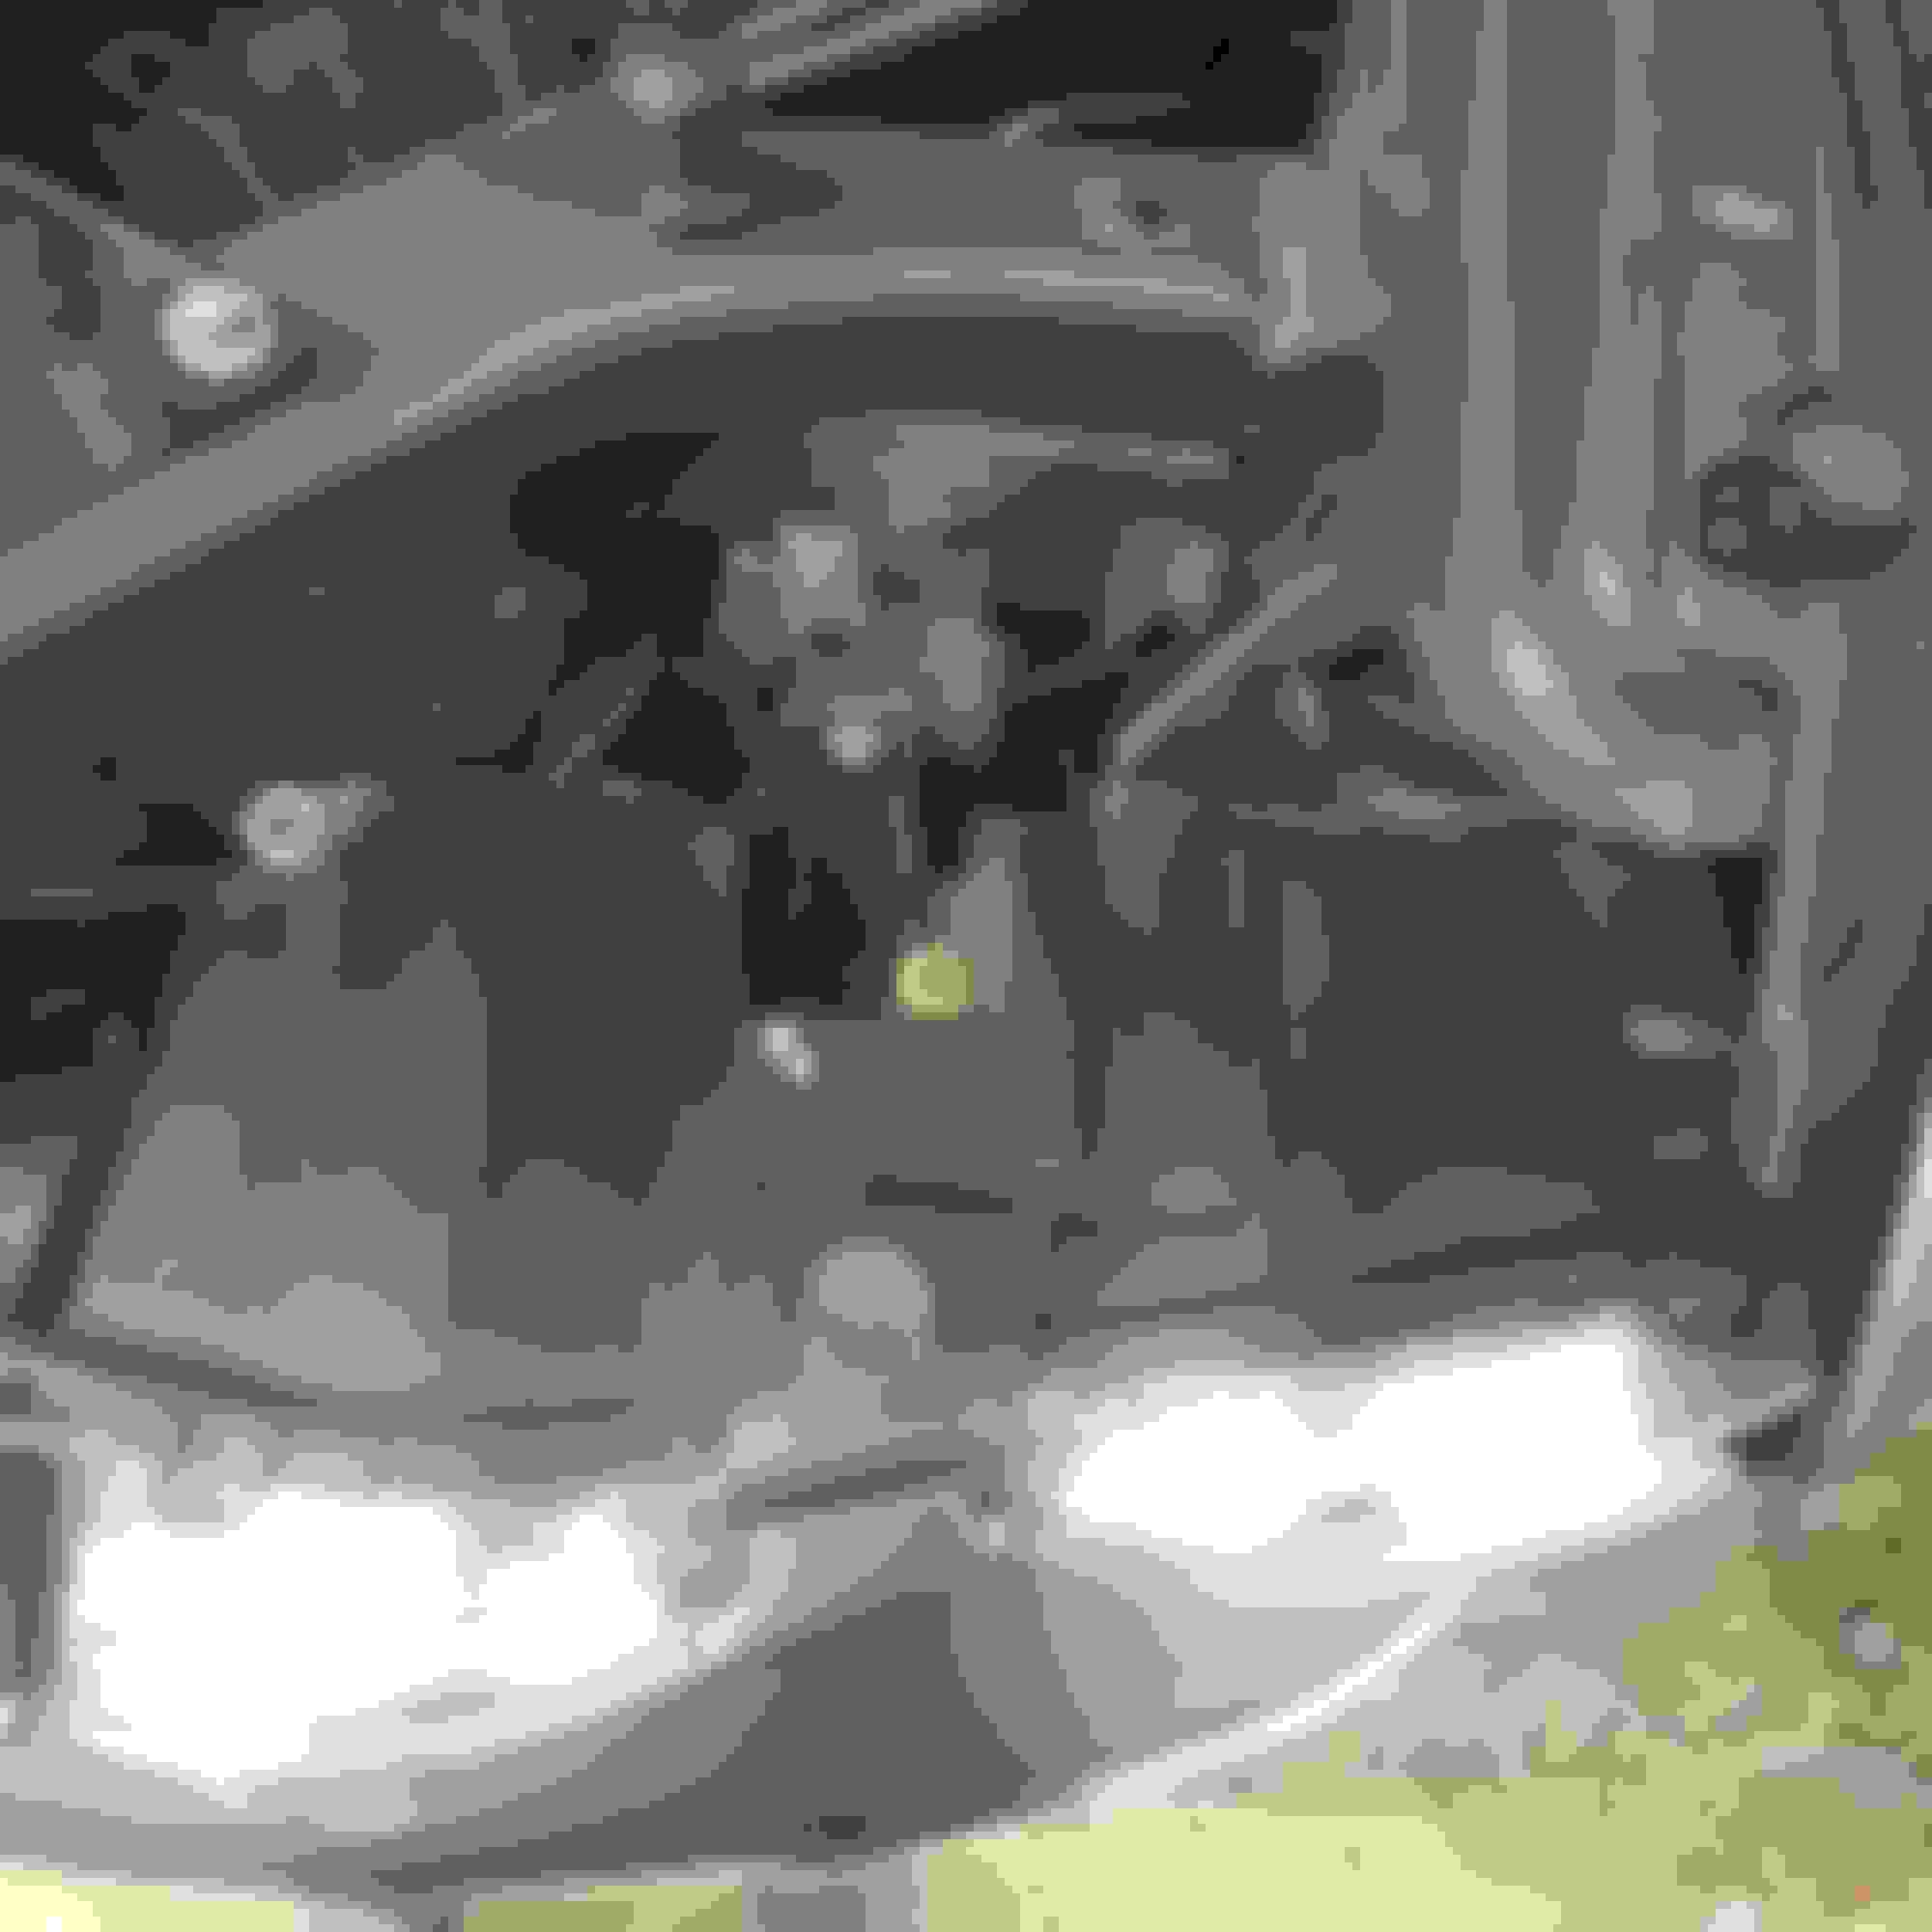
I am trying to adjust my headlights on my 04 XJ8 Nov 03 build date and H7 bulbs. According to the 04 workshop manual section 417-01 it shows a diagram that shows 2 adjustment screws but my car only has one on the low beam. When I adjust for good lowbeams, the highbeams are lighting the treetops and does not help visibility. See my car in pics below. The one on the left is not adjustable. Not sure what the plastic thing is for.
Hex adjust screw on right (lowbeam) This thing on the left (highbeam) What is it?
Last edited by GGG; Oct 14, 2020 at 02:30 AM.
Reason: Amend thread title at OP's request
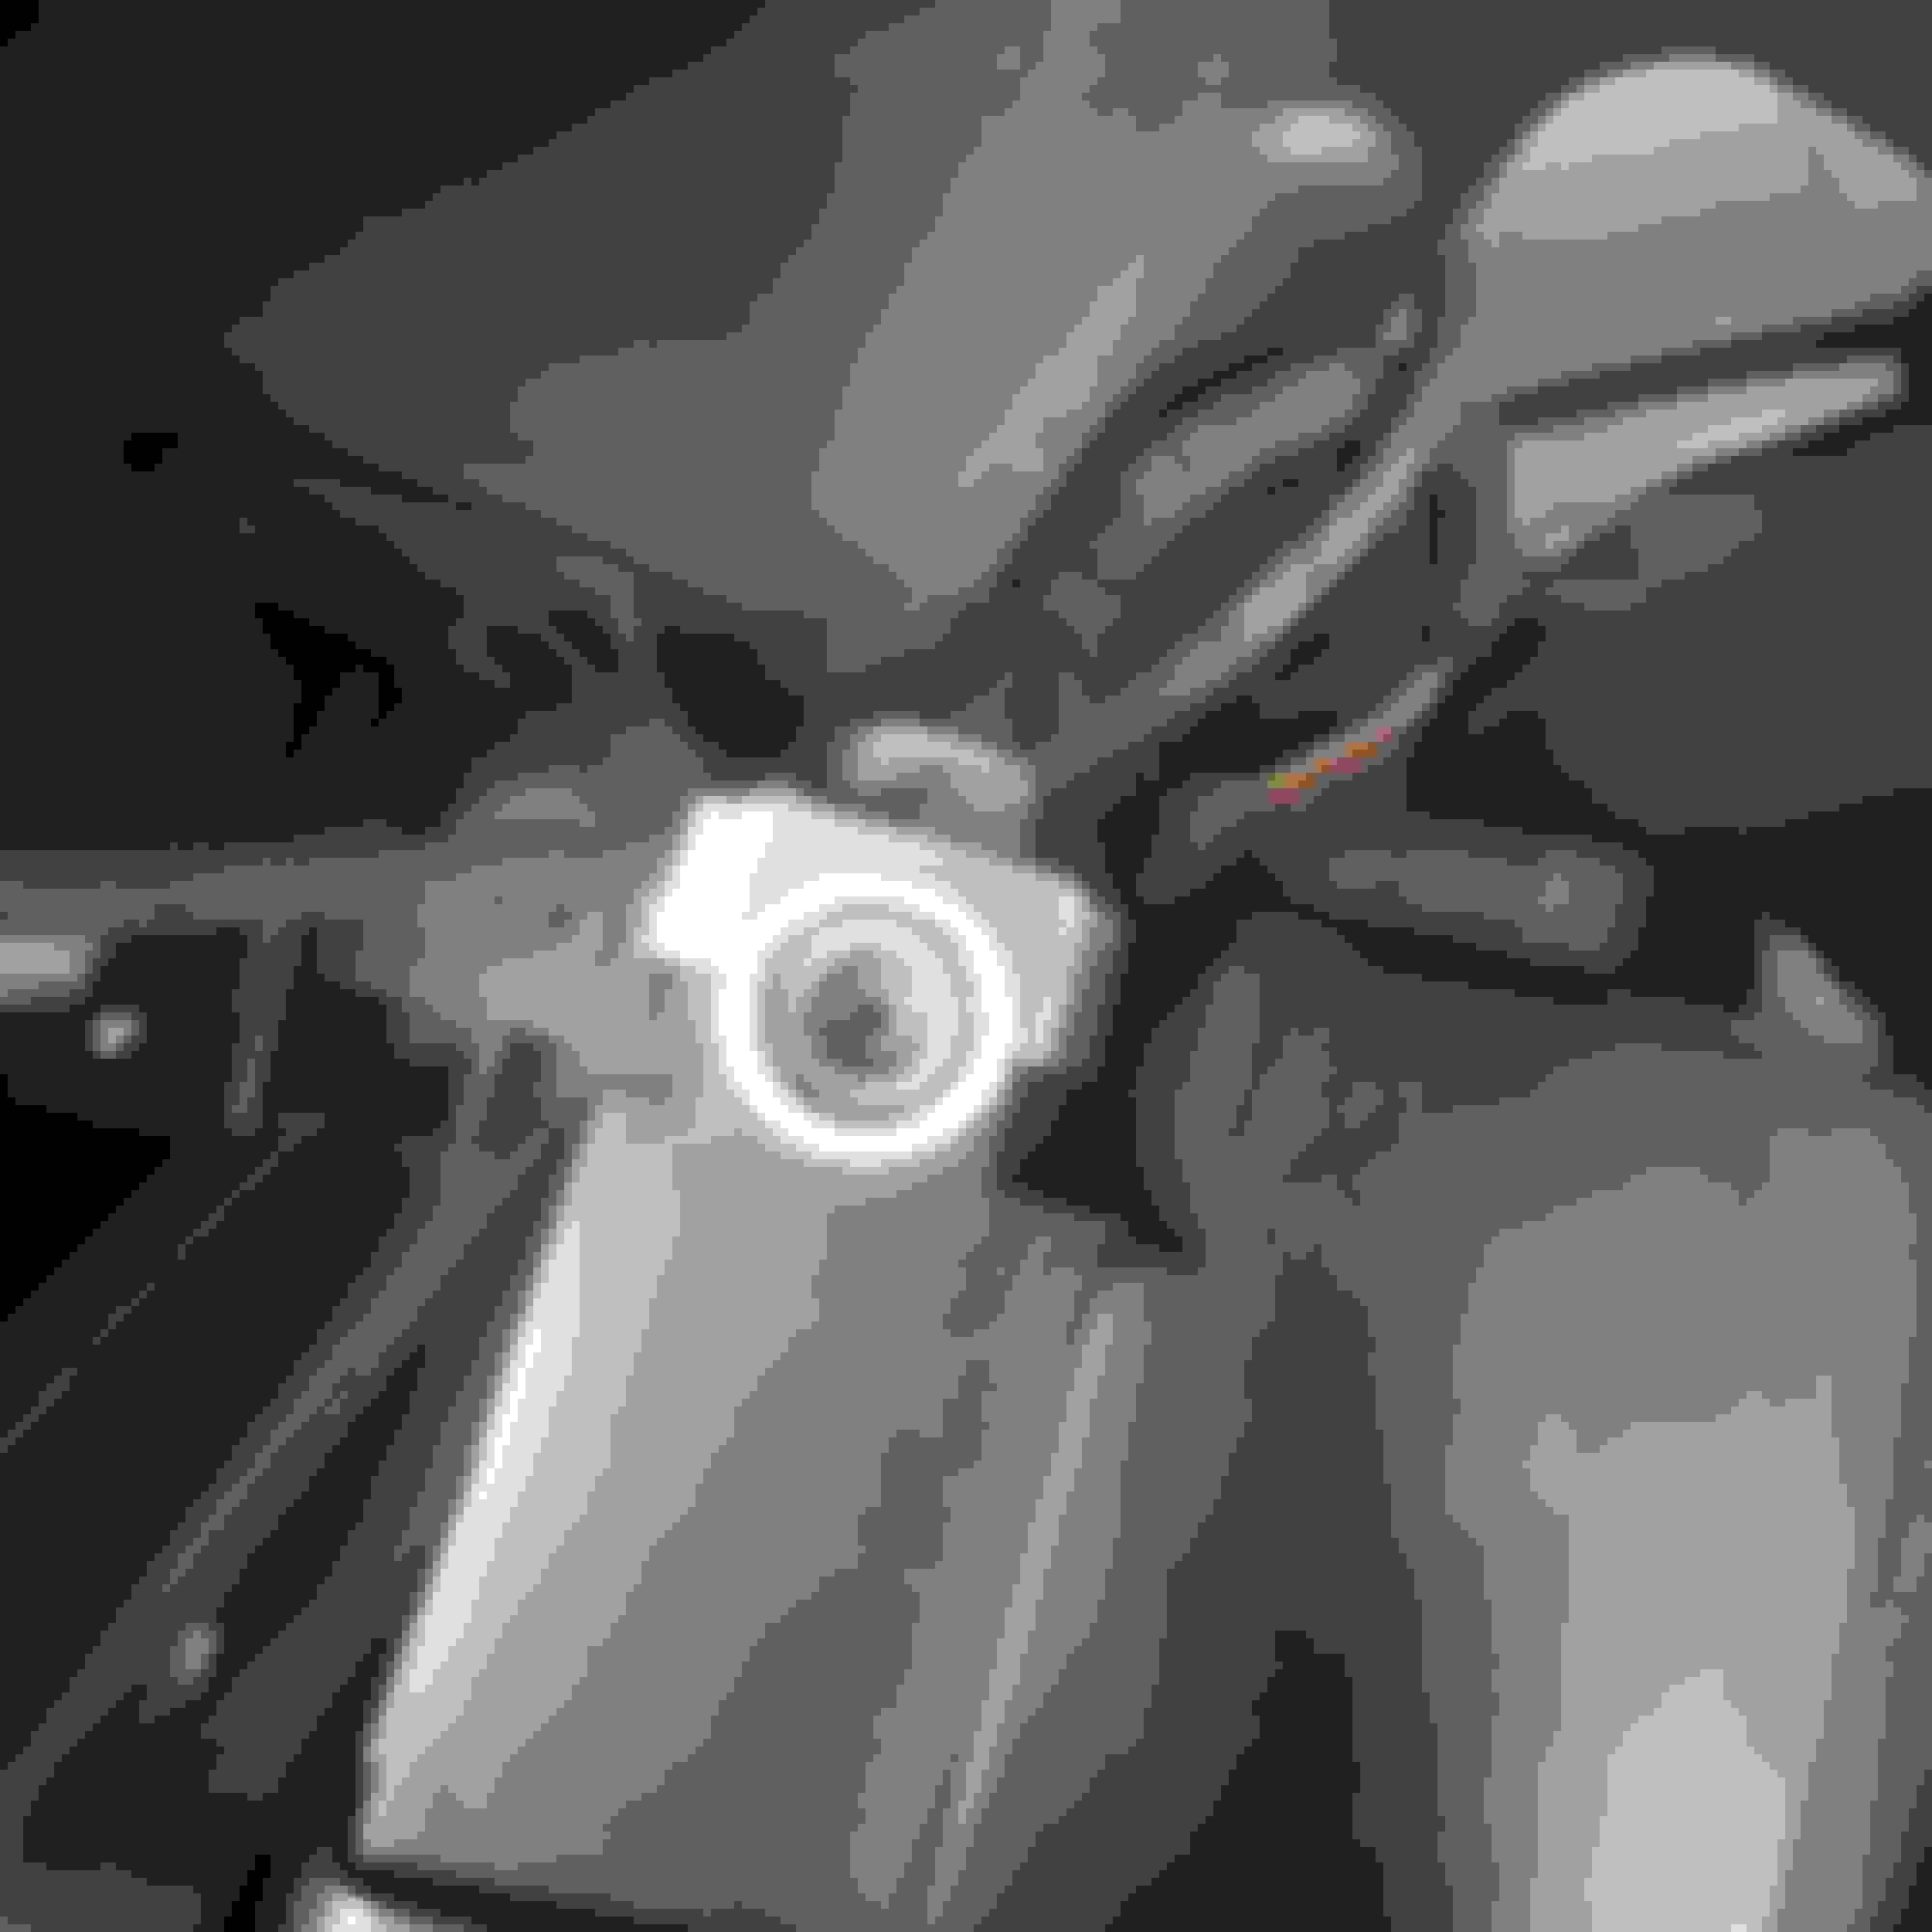
YOu have to take that cap off - the white part - it pulls straight back towards the engine. Then you will see the adjuster, but fair warning: I have the same issue with part of the beam shooting straight up. I GOT the issue by playing with that adjuster and I think I may have either broke it or sent the adjusting threads off the end of the mechanism. My only recourse, form what I can best determine is baking the headlight at 180-200 degrees or using a heat gun around the lens and pulling it apart.
Once you remove that cap (I only have one on may car, the other was missing when I bought it) - I would probably NOT do any adjusting until I found some documentation on which way to turn it for up/down motion. Then again if your are lighting the botoms of the tree branches,you are probably already in the same shape as me. I will do some further research and check back in the next few days. Please keep us posted (by which I mean ME, lol) on any progress. This has driven me crazy for about a year now, but I haven't made any effort to resolve it after finding no solution a while back...
Wishing you luck!
P.S. > Here is the thread I started on this issue:
I was wondering if that could be a cover but didn't want to tamper with it since I know how brittle plastic is when it gets old.
On my low beams, turning the outer screw clockwise raised the both beams . I took it to the limit (started clicking) to get the low beams correct since they were shooting very low. I removed the covers on my high beams and turned that screw 3 turns counter clockwise this morning and will check the results and let you know. I noticed that when I turned them there is also a hex head that spins on the backside of the light assemble right below the adjusting screw. The high beam adjustment wasn't at the end of the adjustment range and turned smoothly and quietly.
I had a similar issue with a pair of headlights I bought, the high beam and low beam cannot be adjusted independantly or so my searches led me to find, my problem was that the low beam was fine but the high beam was even lower, so to cut the story short, the adjusted in the centre alters the height, the other adjusts the light left to right.
After many hours of looking and head scratching I found that both the high beam bulb holders were not located properly, not the bulbs but the holders themselves, a little bit of firm pushing and pulling snapped them into place and they immediately showed the correct alignment. I suspect the previous owner of them had been a little heavy handed in replacing the bulbs and dislodged the fittings.I only found it because I had a spare to compare it with.
Can't say if this is your issue but it is worth checking.
I had a similar issue with a pair of headlights I bought, the high beam and low beam cannot be adjusted independently
I adjusted my headlights and this is what I found tonight: My screws do adjust the height independently: Screw in the center adjusted the height of the outer low beam. I had to adjust to end of range to bring it up high enough after which it just made a mild clicking noise..
******* Driver side low beam has a crescent shape in the cast light on my garage door that appears to be caused by the eyelid from the turn signal on top. When I look into it from 60ft away there is a clear difference from driver side and pass side. I think the dome shaped reflector that sticks out over the front of the bulb is not in correct location and it is reflecting some of the light up into the back of the eyelid. It is not horrible but causes what could be described as a darker area.
******* Pass side low beam shines a smooth cast of light without the distortion mentioned above. When looked at from 60ft in front it is a clear round circle of intense light... Can't even see the eyelid in the light from straight on. Dome shaped reflector in front of the bulb is positioned more level. This is how I would expect it to look.
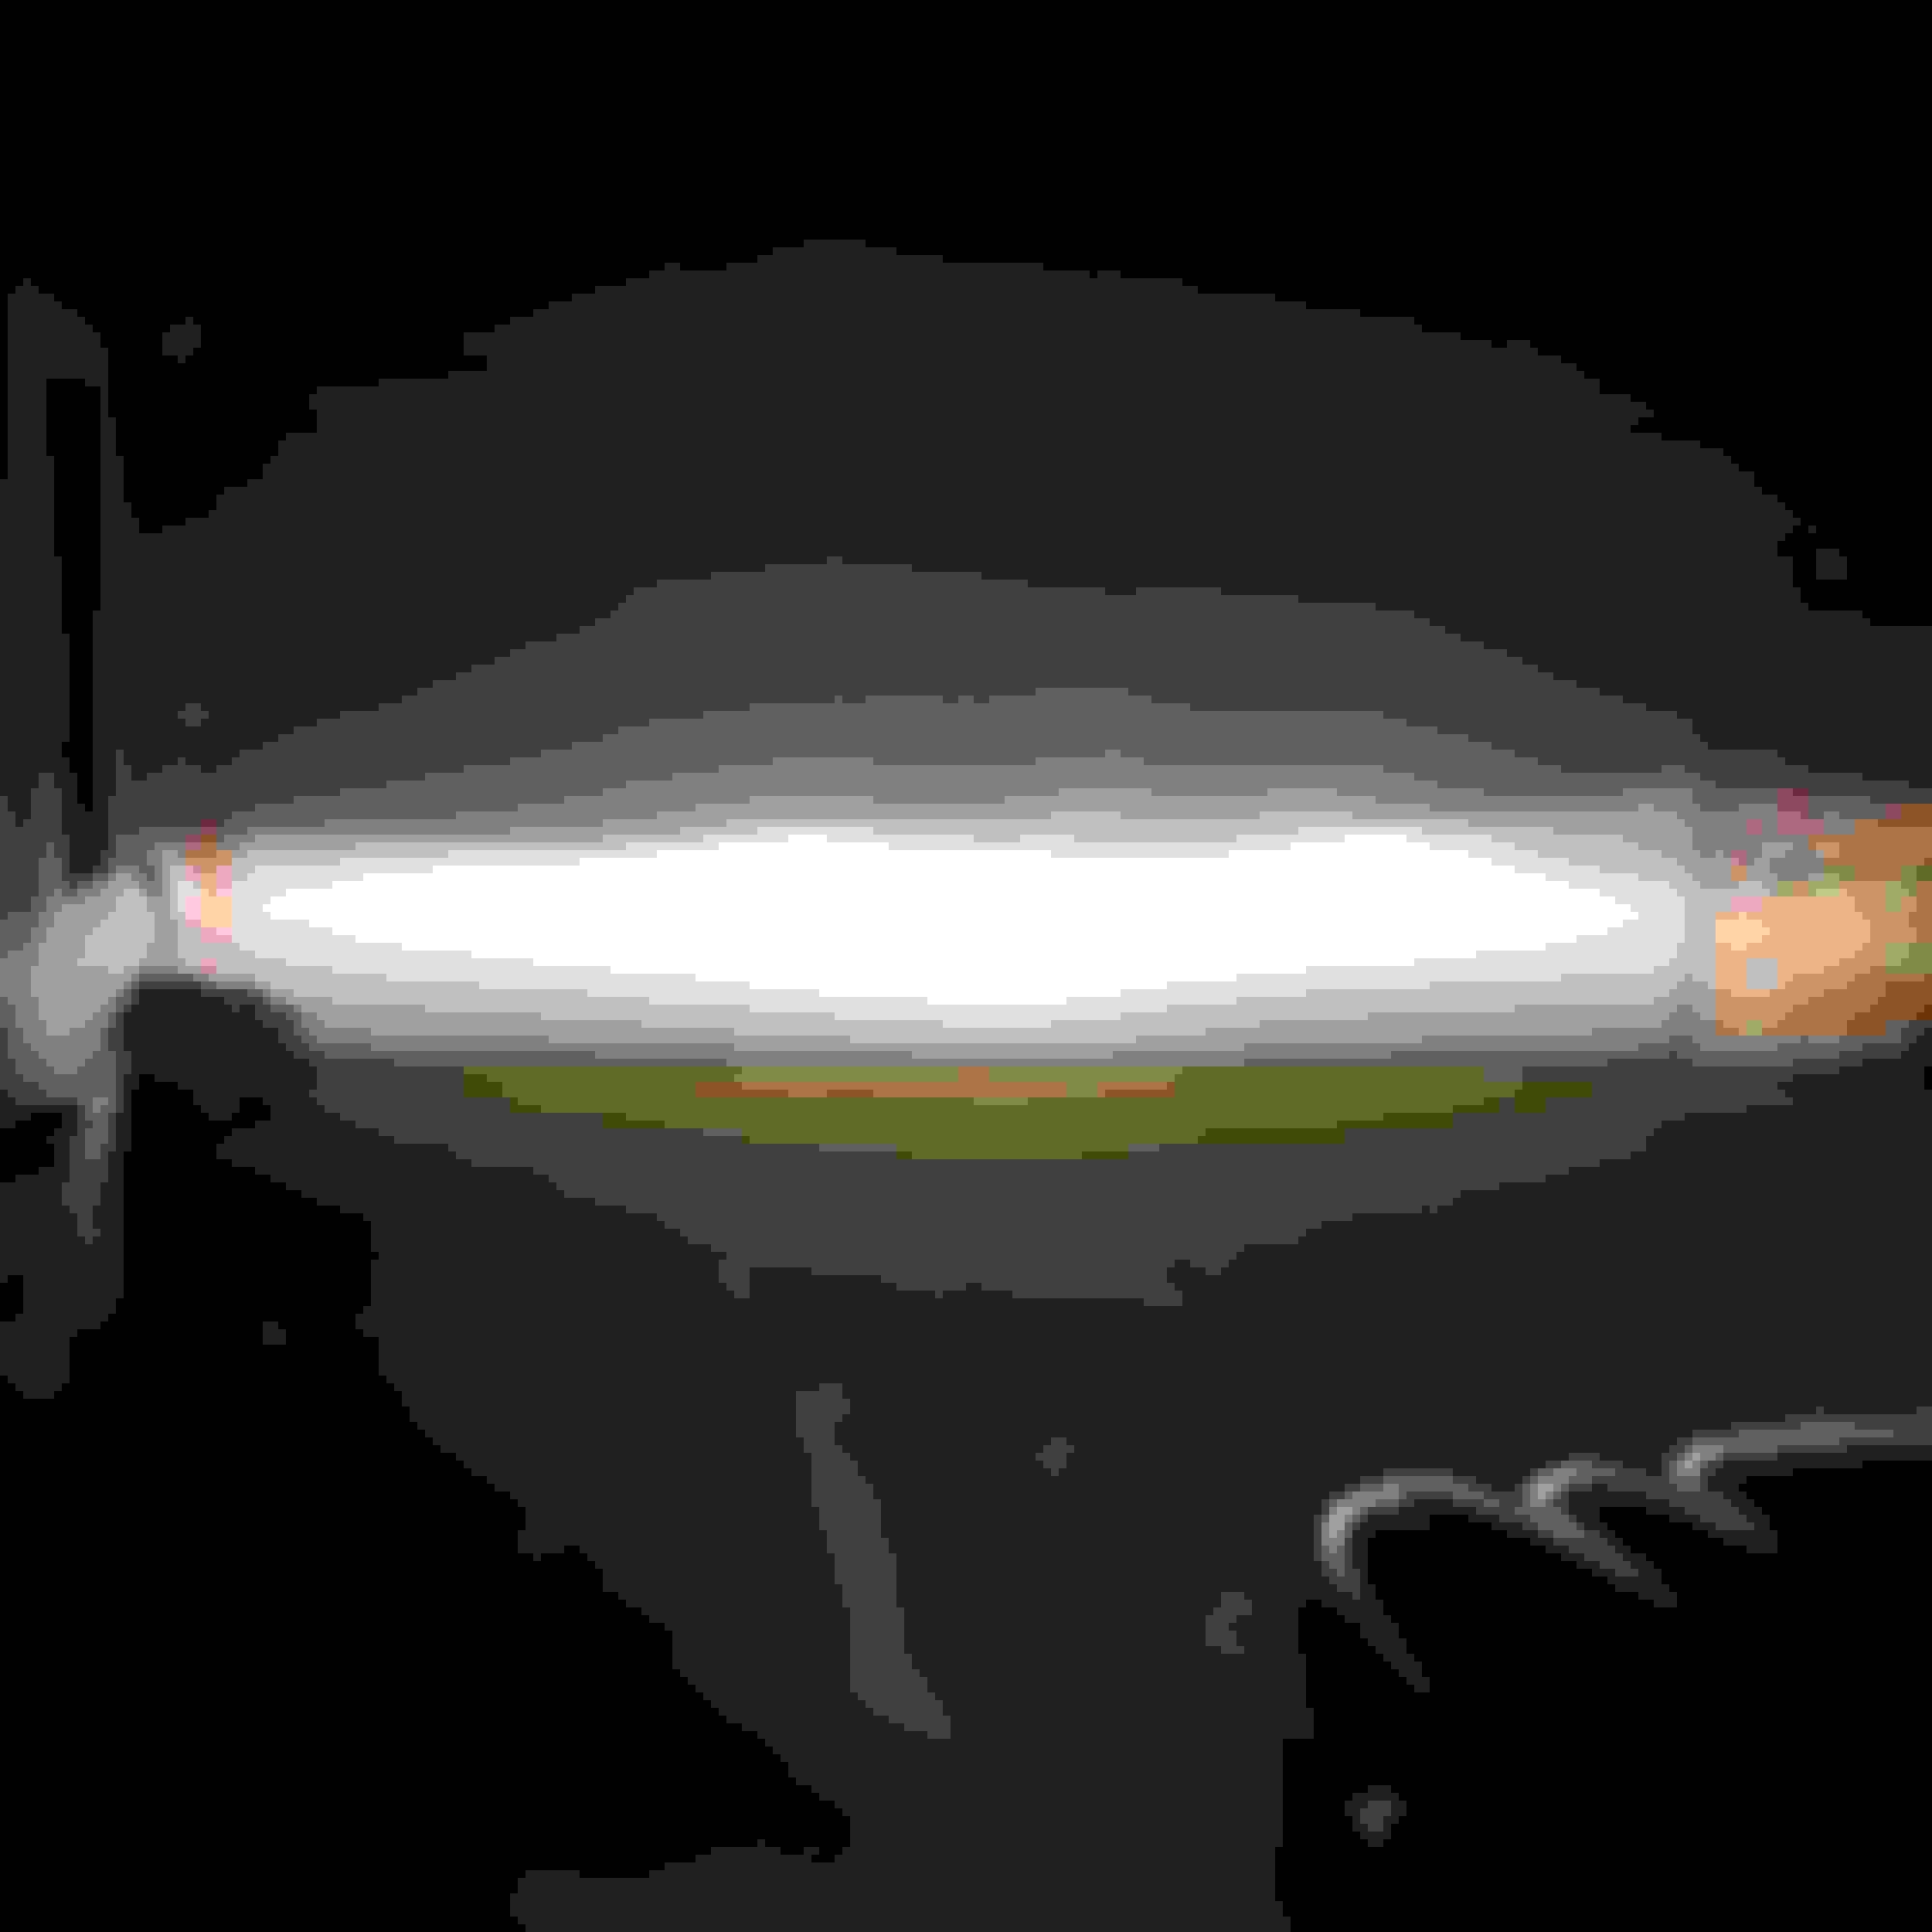
******** Both high beams together created a smooth bright uninterrupted horizontal ribbon of light on my garage door. I was able to adjust both sides to the extreme end of their range to bring the high beams down and much closer to low beam to actually be useful. Not shooting over the treetops when driving.
I inspected and adjusted each light with a heavy towel covering the other beams not being tweaked. I have not found any left right adjustment available. Maybe there will be if I take the bumper cover off.
Originally Posted by Richardhw
After many hours of looking and head scratching I found that both the high beam bulb holders were not located properly, not the bulbs but the holders themselves, a little bit of firm pushing and pulling snapped them into place and they immediately showed the correct alignment. I suspect the previous owner of them had been a little heavy handed in replacing the bulbs and dislodged the fittings.
Did you remove the headlight assembly from the car to firm pushing and pulling? I see where the covers come off the back but I can't imagine trying to do it while in the car.
Has anyone installed LED headlights in their car to replace the Halogen bulbs? I was thinking about replacing my low beams with a 10,000 lumen set but I just don't know if there is enough room or problems created w car electronics. I'm really happy with the BeamTech LEDS I put in my truck.
I would stay away form LED lights. The aftermarket lights are NOT designed for standard housings and produce too much light, poorly focused and WILL blind other drivers.
The best bet is a higher brightness Halogen bulb such as Philips Crystal Vision or Sylvania (Osram) Silverstar. They are substantially more expensive so perhaps just for low beams. They also have shorter life due to higher temps. but work well in halogen reflectors and are much whiter - not near xenon, even if they try to sell them as such. 3200Kelvin color I believe.
This answers my question that I was going to ask; if you have the Xenon HID lighting. I have it, and it is superb, even if newer cars have moved to LED and/or Laser lighting (not in the US of course - DOT is very slow about accepting new technologies. When quad lamps came out on 50's cars, DOT on many states wouldn't approve them - under the guise that they were too bright, lol. Same with Halogen. This is why the Jaguar XJS in 1975 had Quad Halogen instead of the single piece hex-shaped lights by Cibie.
I am going to try to adjust my High beams again - they are the same halogen as the non-HID setup in your car, but still pointing at the trees. I will try some clockwise adjustment as well as your towel technique to isolate the light. Not too confident though. I have tried before and gotten no change. This all STARTED when I played with the inner adjusters to try and aim them. My low beam Xenons adjusted easily - I also put new bulbs in the Xenon HID lamps bought cheaply on Amazon with low expectations. In stead they are 2 years old and still super bright, clear and white (I went up from the stock 4200 Kelvin Color temp to 5000k) I love them, but absolutely hate my mis-aimed high beams.
One thing I forgot to mention is that the adjustment took many many screw turns to make a difference. When I first started I thought it wasn't moving at but as I focused closely on the location on the garage door I could see it dropping slowly. This adjusting screw must be a very fine thread screw.
I did buy Silverstars and paid a mechanic shop to install them around 5 years ago but I don't know how they did it but only charged $50 for the labor. I think my problem with the driver side bulb is due to that reflector on front of bulb that is out of place or possibly the bulb isn't seated properly.
Another thing I did to clear he light lenses was the process of sanding with 800 - 1500 grit wet sandpaper and then buffing with polishing compound. That removed all the grunge off the lenses.
Don't get me wrong, the car is 100% drivable but since I started tinkering with the lights, it's hard to know when to stop....."I might be able to get it a little bit better" syndrome.
Oh I know the "I think I can get it even a bit better" syndrome well. I suffer from the detailers "The black finish could be deeper, slicker, more mirror like. While I look at all the defects, I pull into a gas station with bright fluorescents and the car is ridiculously detailed, lol. As to the headlight design, the reflector doesn't have any real motion or any way to move, that I can see. I am fairly certain you have a bulb that's not sitting perfectly on the rim of the reflector. They have a notch to get the orientation correct - and a spring clip that holds them against the rim of the opening in the reflector dish. You REALLY don't need to be paying for installation. Apart from needting small, dextrous hands/fingers these are beyond simple to install. The only other issue is you can only see part of the setup. You can release the spring: It's basically a piece of wire, made of metal no thicker than a pencil lead (graphite, lol) that is attached on one side and "swings" away after pressing it to release the pressure it applies across the rim of bulb. It catches in a little hook.
Procedure: Take off the radiator section cover - you already do this to get at the adjusters. - Take off the round black plastic cap of the light you are replacing or checking in this case. If replacing the bulb you would disconnect the wire clip now (some people keep in on and separate the clip after the bulb is released - here, I grabbed a pic to illustrate: Spring Clips outside of the housing look like these:
All in all an easy undertaking, I nearly fell off my seat when I saw your comment about hoe they only charged $50 for the labor. Not as bad as the current thread where he needs a radiator, thermostat housing, serpentine belt and hoses. Quoted price? $4700. Stuff like that is why depreciation is a used Jaguar buyers friend. I often start to tell people how a well maintained Jaguar XJ can be had for less than a comparable Toyota Camry. Then I stop myself and think: Why should I give that information away? Let then THINK I paid rich guy prices for my rich guys car.
Thanks for YOUR tips - I am filled with confidence and optimism, after feeling beaten and abused. I can DO this, lol! Go check that bulb that sitting in the housing wrong - You can see how it is sitting through the front lens as you do the work.
Last edited by Blairware; Oct 8, 2020 at 10:19 AM.
One quick thing: I have tried a few things to restore the UV light protection of these headlights after a sanding/polishing operation. I have done this car 2x - and while there are multiple ways to get UV protection on there; Glazes, a "wipe-on" liquid that slightly melts the surface and hardens (3m makes a good one) and polishes with protection in he formula, probably none last more than a few years. One method O bought the material for but need to pull the lights off the car to do is a 2K spray clear that is essentially a clear coat paint job with a strong UV filter that is as close to a new headlight as you are going to get. The company that makes 2K clear paints does NOT recommend their standard clear but a headlight specific formula (a way to charge more for the same product perhaps, but if you are going to do a job, a few bucks more shouldn't be an issue)
For a less intensive project there is a kit on Amazon called "OPT7 Headlight Restoration Kit with Ceramic Nu Coating" - I have this as well! They claim their coating is superior to others. Looks like EVERYTHING these days is "Ceramic this" and "ceramic that" I saw BRAKE FLUID wit "Ceramic formula" out of curiosity I looked and sure enough, the same company had a Ceramic Transmission formula. Same old Snake Oil, new name. I am waiting for a good Ceramic Barbeque Sauce to use on my chicken and ribs.
Also - it occurs to me: If the reflector you are referring to is the round one that blocks the bulb from shining directly forward, you might be able to move it back into position by pulling out the bulb and going in there with a plastic tool of the right size. I would be cautious of course. The last thing you need is to break if off and have it rattling around inside the housing.
I removed the light cover and took off the clip and straightened the reflector bulb dome w my finger. The problem now is I cannot get the spring clip into the two tabs. The picture you showed has them sticking out from a bright metal surface and mine are embedded into the black plastic housing somewhere as best I can tell from the top. Of course, since it's so crammed tight in there I cannot even see what I'm doing. Will try again later with a mirror to find the holes in the plastic. You can see the bulb and the reflector isn't positioned right in the picture below..... I'm afraid I will have to take off the bumper and remove the light assembly to get it right. Now I have to go further, no stopping now!
This is before I removed the bulb Both low beams only and you can see dark shadows on driver side.
BTW, I know the actual bulb replacement would have been a snap and I would not pay a shop to do so but I was ill at the time and couldn't work on cars and it was needed for inspection. I'm better now and ready to dig in
I removed the bumper and headlight assembly and learned a lot about the light assembly.
Looks like the same light assembly is used for multiple XJ levels of options. I see where the cars with auto leveling headlights would have the leveling motor installed.... Under the middle round cover. I saw how the headlights are adjusted not only up and down but left to right also if needed. Looks like the quality conscience mechanic who replaced my low beams many years back installed them upside down. Even though they are keyed to go in the correct way, this person found a way to wedge them in wrong and still force the holding clip over the top!!
SO, to make my headlights better than ever I removed them, wet sanded and polished them again since they were out of the car and I was waiting for darkness to test things, Installed the same bulbs back in the correct orientation and readjusted them using the 2 screws. I noticed the driver side low beam was pointing too much into oncoming traffic so I removed the bulb, put the handle end of a small long screwdriver in the hole and moved the metal dome cap that is in front of the bulb more towards the middle of the car. That did the trick and now the beam focus is more into my lane of the road. Just be careful because this piece has to be bent so just do little adjustments.
By looking into my light housing I can see the white nylon screw shaft that turns to move the light assemblies up and down. Being that it is nylon it could be a potential crack/break issue but mine are good as I am able to adjust both beams to align correctly. The high beam has a nylon gear that is used to make a 90 deg turn and will be more likely to strip. When the screw hits the end it just makes a small pop as it rolls off the top of thread but the assembly doesn't come loose or apart as previously thought.
I actually placed an order today for some 6500K 10,000 Lumen LED H7 replacements but just cancelled my order since these halogens are so AWESOME now!
Amazing difference between the scattered patchy light beam before (see post below this one) and this new picture.
Now THAT is some good work! I am at once proud and envious! I had my bumper part way off to fix a parking sensor this summer (now the back is requiring the same, and I am not thrilled with the long side sections that snap off, fearing some tabs may break and it will never fit perfectly afterwards.. I'm building courage to attack it)
The earlier cars had the self levelling, until Jaguar realized they could use the air suspension to do the same job. When the car needs leveling up, it always does the rear first (if needed) before the front to avoid pointing the lights up and into oncoming corneas.
The sanding operation really needs the lights out to do properly, since the outside edge and sides are near impossible to sand on the car. Remember i said "Partway out"? This is because ONE bolt joining the splash panel, and some other plastic section stubbornly would not separate. I have since bought a tiny hacksaw and a dremel to cut that bolt in half next time. With the way your lights look now, next time is getting to be "soon"
Question: From the center section where self leveling used to be, could you see the mechanism for up down, in the event mine is truly broken? I am thinking I can manually adjust it or get the threaded section working again with a bit of access to that section through the center area.
Top job right there sir. You are an inspiration to procrastinators everywhere!
Also - I agree - you do NOT need new bulbs. Not anymore, lol! The work you did makes your halogens look close to the HID Bulbs. The Xenons are not much sharper, and perhaps a tiny bit whiter, but you brought yours back to "working as designed" and that's as good as it gets.
Now THAT is some good work! I am at once proud and envious! I had my bumper part way off to fix a parking sensor this summer (now the back is requiring the same, and I am not thrilled with the long side sections that snap off, fearing some tabs may break and it will never fit perfectly afterwards.. I'm building courage to attack it)
Thanks for the compliment I was pretty proud of the results if you couldn't tell.
I was also concerned with the tabs on bumper cover that snapped in/out of the fender. They are pretty thick and took some courage to pull apart but they came out and went back in place without any changes in fitment afterwards. Make sure you have a second pair of hands to hold the cover so it doesn't bend down and hit the ground when you are removing it. Also there was one wire bundle/connector on passenger side to disconnect so you don't over flex it. I didn't have the radiator splash shield to remove since ours was thrown away many years ago when my wife hit something and mangled it!! I just ordered a new one off eBay for $80.
Originally Posted by Blairware
Question: From the center section where self leveling used to be, could you see the mechanism for up down, in the event mine is truly broken? I am thinking I can manually adjust it or get the threaded section working again with a bit of access to that section through the center area.
Top job right there sir. You are an inspiration to procrastinators everywhere!
I took a picture of what I could see of the inside just in case you asked
As you can see in the picture the only view of the adjusting screw is the one on the far corner for the high beam. You can see enough to tell it's a nylon screw. From inside the middle cover I can see where the adjusting motor would have been mounted and there may have been a plate in there that could be removed or cut through or see pics below for bottom access possibility. I didn't mess around with the middle section because my low beam adjuster works fine. My problem was 2 fold. Misaligned bulbs and misaligned metal bulb cap reflectors which are both equally important IMO to get correct light focus.
Best inside view I could get of high beam adjuster screw. Low beam was not visible at all.
Maybe you cut through this section to view/repair.
Clear view that you can't see when installed in the car
Properly mounted bulb
Nice clean sanded/polished lenses. They were 30% covered with crust before I cleaned them.
Well, to bring this full circle, I put the issue on the back burner for a while. Then got inspired again. I found out why I have three giant light circles around my high beams and why adjusting them seemed futile. I noticed in pics that MBary had up that he has the bulb cover to block the bulb from shining directly forward on both high and low beams. Hmmm. Further looking around the interweb uncovered (literally) that the HID's are supposed to have them as well. Min do not, which provides evidence that either they weren't used on all headlamp models or some ham handed buffoon broke mine and then had to fish them out of the reflector bowl. and to complete a terrible job, went and threw them away vs. trying to solder or epoxy them back on. Nice. I will go with these were simply busted by some bozo. As for me getting replacement parts; not going to happen, Unless I could find broken lamps to cannibalize. My only move for now is to be extra cautious not to blind oncoming traffic. They actually work terribly without that shield. Light just disperses everywhere. If anyone has an old set they are willing to pull apart, please PM me.
Since the bulb and deflector are mounted to a metal assembly that can be removed from the plastic outer housing, you may be able to find used light housings on eBay where the plastic shell is damaged and get them at a reasonable price.
After all I did to get my headlights perfect, now I have water getting into my passenger side housing and it's condensing on the inside of the glass! Now I have to take it all apart again to inspect.. I suspect the sealing gasket is no longer available.


 .
.


 I was pretty proud of the results if you couldn't tell.


