When you click on links to various merchants on this site and make a purchase, this can result in this site earning a commission. Affiliate programs and affiliations include, but are not limited to, the eBay Partner Network.
All this and MORE in the large file download area That nobody can find????
I thought I just posted all these a few days ago??????
Bob,
The problem seems to be that neither the standard forum SEARCH or ADVANCED SEARCH functions find the files in the large download area, even if you search the exact title of the document. So unless members have some clue that the documents are available, they don't know to go looking for them. I'm hopeful that in the near future the forum tech gurus may be able to resolve this dilemma with expanded search capabilities.
I know I speak for all the other members when I express my gratitude for all the countless documents you have uploaded for our education and benefit.
All this and MORE in the large file download area That nobody can find????
I thought I just posted all these a few days ago??????
bob gauff
I am trying to find the entire process of removing and replacing my PAS pump that I'm sure is leaking. The links you posted have nothing to do with the procedure itself. Each one is just a one page cover for an update or something, but no other information.
I trust your knowledge and experience implicitly, but my searches have resulted in a few members who have started threads on doing the job....then no follow-up or sharing of information.
I'd really appreciate it if you could steer me to a manual reference and/or some threads that actually show me what has to be done.
Ken K.
Last edited by oldjaglover; Feb 25, 2022 at 02:02 PM.
I am trying to find the entire process of removing and replacing my PAS pump that I'm sure is leaking.
Hi Ken,
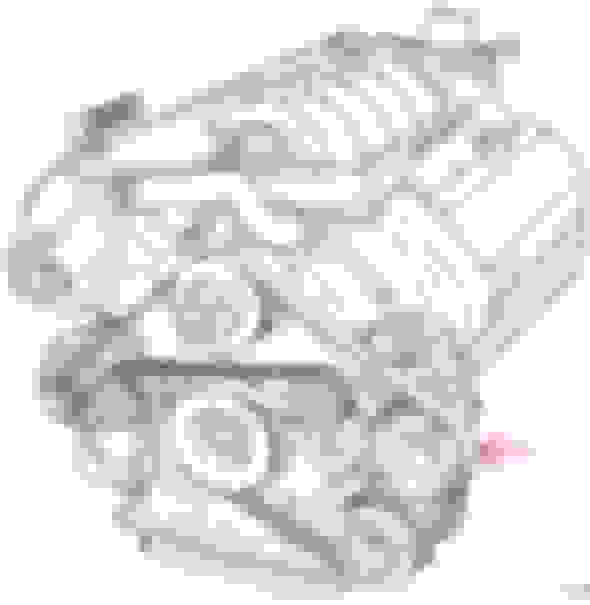
This is the forum for the X300 sedan with the AJ16 inline 6-cylinder engine. Your 1997 XK8 has the AJ26 V8 engine, and the power steering fluid pump is very different, driven by a belt in the conventional manner. The pump is located at the front left side of the engine above the air conditioning compressor (see the arrow in the diagram below):
You can download the Workshop Manual for your car at the link below. However, the 1999 Second Edition has a more detailed and complete procedure for replacing the power steering pump beginning on pdf page 709, so download both manuals for your library:
Replacing the pump isn't difficult, but the working position is awkward and getting the high pressure line disconnected and reconnected is fiddly. One way to approach it is to just loosen the high pressure hose fitting while the pump is still mounted, then remove the pump mounting bolts. This will give you some wiggle room for better access to unthread the high-pressure fitting and to access the low-pressure hose clamp.
Also, be careful with your oil dipstick tube once you disconnect its bracket. It's easy to bend, and if you move it too much, you may disturb the O-ring seal at the lower end of the tube which may then leak. Or better, plan on replacing the O-ring.
It's also a good idea to replace the low-pressure hose, since it tends to harden over time and lose its ability to seal at the reservoir and pump ends. In fact, before you commit to replacing the pump, clean the fluid off the low pressure hose and pump and drive the car for a day, then check to be sure the fluid leak is not actually from one or both ends of the low-pressure hose.
Cheers,
Don
do you have the same manual for the x300. I will also check the download section
do you have the same manual for the x300. I will also check the download section
Hi Phil,
You can download the X300 Workshop Manuals at the link below. After you unzip the files, click on the README file and follow its instructions. You'll go to the main folder and click on START, which will open up all of the documents with a menu tree on the left side. It's more primitive than the X308 and later manuals, but it's the best we have. As far as I know, Haynes never produced a manual for the X300. Don't forget to check the documents Bob attached in Post #2 of this thread.
My 97 VP just suffered a PAS pump pinion seal failure. It had been slow leaking for some time already and gave up the ghost yesterday.
I have shopped around for a refurbished pump, but they are thin on the ground and I have heard not so great things about the Cardone refurbs. So I decided re-do the seals myself.
I have removed the pump and am halfway brought cleaning it up before the seal kit arrives.
As mentioned by Don B, there is no Haynes workshop manual for the X300, however there is one for the XJ40.
Many repair instructions are the same for both XJ40 and X300, so the Haynes XJ40 manual can provide additional info in need.
The power steering pump is such an example, see section 10.10 in the attached Haynes manual.
Thank you for all the info. I don't know how I got to this forum since I was quite specific when I prompted my search for my XK8. But, I am going to continue watching this thread as it is very informative.
I just completed the seal refresh on my power steering pump and although I had never done this before, it was a straightforward enough job. I was concerned that I would need the 'Drive Dog Tool' as specified in the 10-04 PAS Pump tool Bulletin, but this only seems necessary if you are switching to a new pump and since I was only replacing the seals it was not needed.
In my case the PAS pump pinion seal had failed
Here is an excellent video on YouTube showing how to replace pump the seals, I recommend watching this before going ahead.
Drain the fluid by removing the reservoir and cooler hoses from the pump and seal the hose ends as best you can.
Remove the exhaust heat shield for access and visibility.
Use a 10mm wrench to loosen the 3 bolts from the pump flange. I also used a long extension and 10mm socket to remove the bolt closest to the engine block. This is a pain to get to but easily done once you get a socket on it
The pump can now be removed from the car. I was able to do this from above
Get the pump on a workbench (or dining table) with plenty of old newspaper to collect the oil
At this point I suggest watching/following the video
Remove the 2x 10mm pump flange bolts (you won't be able to remove the flange just yet)
Remove the 2x 13mm extension bolts and 2 regular bolts to open the pump
Remove the pump vane cover and vane assembly
Remove the shaft c-clip, this will release the shaft and the flange
Remove all of the seals (all mine were hardened and brittle)
Clean the the pump casing as best you can
Clean the pump internals to remove any oil dirt or debris
Replace the seals from the kit (once again to the video)
Reassemble the pump as it came apart (I forgot the shaft c-clip first time round)
Make sure the flange hole is pointing down
Reinstall the pump to the car making sure to properly align the drive dog to the engine side flange
Reconnect the hoses to the pump
Fill the reservoir with ATF or PS fluid (DexronIII recommended)
At this point I raised the car and went through the fluid bleeding procedure (engine off for step 3)
(From the x300 Haynes service manual)
To bleed the power steering system, begin by checking the power steering fluid level and adding fluid if necessary (see “Weekly checks” or Chapter 1, dependent on system fitted).
Raise and support the front of the vehicle on axle stands.
Turn the steering wheel from lock-to-lock several times and recheck the fluid level.
Start the engine. Turn the steering wheel from lock-to-lock again (three or four times) and recheck the fluid level one more time.
Lower the car to the ground. Run the engine and again turn the wheels from lock to- lock several more times. Set the wheels straight ahead and recheck the fluid level.
Once the system has removed any trapped air the steering should now be silent
Drop the car back down and go for a test drive
Check around the pump, rack and hoses for any leaks
Go to the fridge and grab a cold beer and relax.
Last edited by Nobeel Masri; Mar 3, 2022 at 12:10 PM.
It has been just over a week since I repaired the PS pump and I was getting a slight vibration and occasional minor whining from the steering. I figured it was air still in the system and would work itself out after a few days which it didn't. I tried bleeding and re-filling the system which seemed to help until the issue came back. After reading up as much as I could about power steering and possible noise and vibration causes, I took another look to see what I could find.
It turns out I had not properly tightened the clamp for the hose on the reservoir (reservoir to pump), which was causing a very slight leak creating an oily mist around the reservoir area. This was enough to allow air into the system and cause the noise and vibration.
The steering is now as perfect as it can be and I look forward to it being trouble free for the foreseeable future. (maybe tempting fate and just cursed it)
I feel like a dumb *** for missing it, but hopefully a lesson learned for us all. Remember to tighten up all of the hoses properly before finishing a job.
Hopefully the last entry in this mini saga.
I suspect age and renewed system pressure took it's toll on the high pressure hose, as it gave out about a week after refreshing the pump seals.
I have read here that it's recommended to change the hoses anyway, but mine had not until now (date stamps are from 1996).
So far I have replaced the reservoir to cooler and high pressure hoses, as well as the pump seal refresh.
I think my system is fully flushed by now, but I have been using Lucas ATF synthetic (DexronIII) fluid.
On my list of to do. Can someone give me a hand and tell me how you get to that far bolt on the power steering pump? The top and side are easy, but the far one, between the engine and the pump, is a bear.