
X300 rear view mirror questions

Thread Starter
|
Senior Member
Joined: Oct 2011
Posts: 326
Likes: 4
From: Fort Lauderdale
I have the stock oem rear view mirror on my xj6 96 car, and the dim is acting up, sometimes it works sometimes it does not. Could any rear view off any car work? Because I was looking at the newer XJ8 mirrors with the cumpus and auto dim and wanted to give that a shot. Anyone know if it would work?

Thread Starter
|
Senior Member
Joined: Oct 2011
Posts: 326
Likes: 4
From: Fort Lauderdale
thanks.... what about a 04 XJ8 mirror with a compass and auto dim? I see it on ebay for like 78. Will this fit the same bracket as on the XJ6 95-97 models. Are all rear view mirrors pretty much universal with the same kind of bracket? Here is a link to the ebay mirror
2004 04 Jaguar XJ8 Rear View Mirror OEM | eBay
2004 04 Jaguar XJ8 Rear View Mirror OEM | eBay
Senior Member
Joined: Jan 2012
Posts: 226
Likes: 33
From: Nashville, TN
daboss085,
I've been researching the rear view mirror situation for a few weeks now. Here's what I've learned: The X300 has a circular "camlock" mount attached (glued) to the windshield. Most American cars have a "wedge mount", so no, they aren't directly interchangeable.
The original Donnelly mirrors have a liquid activator, which is caustic and corrosive. They tend to leak, which will cause havoc to anything it touches. Sybesma's was repairing them for $95, but they no longer do the "slider" model mirror, which is probably the one in your car. They were replacing the liquid with a gel to eliminate the leakage problem.
(As a side note: Donnelly paid a $multi-million legal settlement for patent infringement to Gentex.)
I looked at the link to the mirror you found on ebay, and while not positive, I believe it to be a wedge mount, Gentex mirror. If you look at the back of that mirror, you'll see that the adjustment arm comes straight out the back of the mirror to the mount. I'll bet your car has the adjustment arm into an "L" bracket, so that the mount is a couple inches above the mirror, instead of directly behind it. If so, you'll have to replace the mount anyhow, and locate it a few inches lower on the windshield.
In my case, the liquid activator drained into the mirror housing, and, fortunately, did not leak out of the mirror. The adhesive on the button also failed, so leaving the mirror dangling by the wiring harness. As a result of my research, I decided to go for additional features, similar to what you seem to want. I was able to find a Gentex mirror, with compass and temperature, for $40 on ebay. The deal included the wiring pigtail and the temperature probe. I was also able to find the wiring info for both the failed OEM mirror and the replacement I just bought. The mirror should arrive sometime this week, and I'm confident I'll be able to install everything over the weekend.
Let me know if you need any more info.
Senior Member
Joined: Jan 2012
Posts: 226
Likes: 33
From: Nashville, TN
cstu, here it is, hoping I copied this right.
eBay - New & used electronics, cars, apparel, collectibles, sporting goods & more at low prices
eBay - New & used electronics, cars, apparel, collectibles, sporting goods & more at low prices
Trending Topics
Senior Member
Joined: Jan 2012
Posts: 226
Likes: 33
From: Nashville, TN
I guess I didn't...try this...
eBay - New & used electronics, cars, apparel, collectibles, sporting goods & more at low prices
eBay - New & used electronics, cars, apparel, collectibles, sporting goods & more at low prices

Member
Joined: Feb 2010
Posts: 92
Likes: 4
I guess I didn't...try this...
eBay - New & used electronics, cars, apparel, collectibles, sporting goods & more at low prices
eBay - New & used electronics, cars, apparel, collectibles, sporting goods & more at low prices
Id definetly like to hear your results about the mirror installation, i too would like to not only replace my failed rearview mirror but upgrade it as well with the compass\temp feature but i dont want to alter anything too much. Cant wait to hear how it goes!
Senior Member
Joined: Jan 2012
Posts: 226
Likes: 33
From: Nashville, TN
It was no trouble at all & works perfectly. I'll try to get a couple pics posted later today.
I made no alterations, not even for the wiring to the temperature probe.

Yes i would love to see pics! So you didnt have to change the attachment for the mirror either? the same thing on the windshield can be used? thats great! And its not plug and play i take it?
Senior Member
Joined: Jan 2012
Posts: 226
Likes: 33
From: Nashville, TN
No, it isn't plug & play. There was a little work involved.
Yes I did have to replace the attachment button, but in my case, the adhesive had already failed, so it wasn't a problem.
I'm trying to figure out how to load the pics I took.
Try photo bucket and then use the insert pic button and copy the link.
Senior Member
Joined: Jan 2012
Posts: 226
Likes: 33
From: Nashville, TN
My apologies that I'm having trouble loading the pics.
Here's how I did the installation, and I'll keep working on getting the pics to load.
A couple caveats: Mine is a '95 X300, and newer models have different mounting buttons and wiring pigtails. In my case, the auto-dim & adhesive holding the mounting to the windshield both failed. To disconnect the mirror assembly from the OEM mounting button, rotate the entire assembly 1/4 turn, pivoting on the button at the top of the windshield.
Here is my step-by-step:
Open the ceiling console by turning the lock screw inside the sunglasses compartment 1/4 turn. Pull the console straight back, parallel to the roof line. Disconnect the wire connector & set the console aside.
Disconnect the mirror wire connector, and the old mirror is free. At the top of the adjustment arm, at the entry of the wire pigtail, use a small screwdriver to pry off the cover from the arm, allowing you to cut a longer lead, if necessary.
Removal of the old button is problematic. I'm advised that applying heat (hair dryer) often softens the adhesive enough that using a razor blade to "scrape" against the windshield works. Extreme caution is advised. Anyway, my button was already off, so scraping the remaining adhesive was no problem. Mark the new button location on the outside of the windshield with a felt tip pen, about 3" below the OEM button. Attach the button to the windshield following the instructions that came with the adhesive (available at any parts store for about $3).
Run the wiring from the overhead console to the temperature probe. I discovered that there is enough space between both the headliner and the pillar cover without removing either. I used speaker wire (because 1 lead has a tracer) although I believe that lamp wire would also work. I also discovered that the wire will also fit under the junction of the pillar cover and dashboard, becoming exposed inside the door jamb near the weather seals between the door and pillar. A used piece of a door edge protector to cover the wire inside the door jamb acts a weather seal. The wire then runs under the corner of the fender & under the cowl cover, to the corner of the 2 hood (bonnet) weather seals. From there, it runs beneath the wire cover along the side of the fender to a small opening to the underside. The temperature probe was attached inside the fiber bumper cover at one of the screws connecting that cover to the splash shield. It is important to locate the probe outside the engine compartment, yet out of direct wind.
Connect the wires (using butt connectors) at the ceiling console & temperature probe. In the X300, slate/grey is 12v+, green/red is reverse inhibitor & black ground. On the Gentex 177 mirror (with a 7-pin connector) pink is 12v+, light green is reverse inhibit, black is ground, grey is auto-dim left outside mirror dim, pink is right outside mirror dim, dark green/white is temp probe & black/white is temp probe. The 2 outside mirror wires weren't used in my application. OK, there are 2 pink wires. I used my lawn mower battery to test the mirror prior to installation to determine which pink is 12v+.
That's about it! No holes drilled, no alterations made to any components & I didn't even have to remove any interior components, except the ceiling console.
Senior Member
Joined: Jan 2012
Posts: 226
Likes: 33
From: Nashville, TN
Ok, I think I figured out how to post the pics.
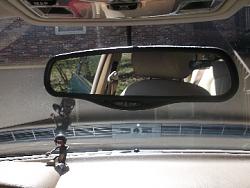
The first pic shows that the wire from the mirror to the headliner console merely replaces the OEM arm, and even a little less obtrusive.
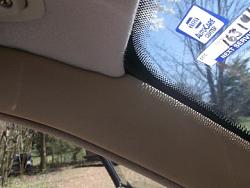
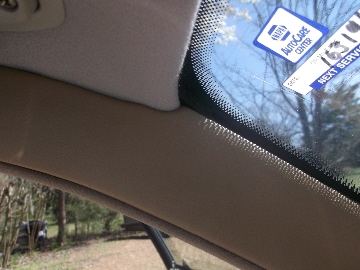
The second is of the top corner of the windshield. I used a piece of the door edge protector in the very corner to hold the temp wiring within both the headliner and the pillar cover. You can't see it well in the pic, but that bit of edge protector acts as a wedge, helping to hold the wire within both the headliner and the pillar, completely out of sight.
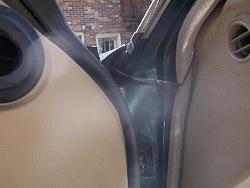
The third is of the temp wire exiting the pillar/dashboard juncture actually within the door jamb. Again, I used a bit of door edge protector on the wiring as weather protection & to keep the door seal from pinching the wire.
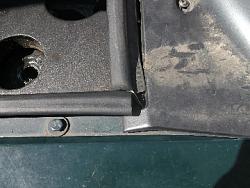
The fourth is under the bonnet, where you can see the wire as it exits the cowl cover just between the 2 sections of hood weather strips. From there is goes under the wire cover along side of the fender to the front.
Sorry that I didn't get a pic of under the car, where I attached the temp probe, but that is easy to figure out. It's attached inside the fiber bumper covering at one of the screws that holds the splash shield to the bumper cover.
Hope this helps.
The first pic shows that the wire from the mirror to the headliner console merely replaces the OEM arm, and even a little less obtrusive.

The second is of the top corner of the windshield. I used a piece of the door edge protector in the very corner to hold the temp wiring within both the headliner and the pillar cover. You can't see it well in the pic, but that bit of edge protector acts as a wedge, helping to hold the wire within both the headliner and the pillar, completely out of sight.
The third is of the temp wire exiting the pillar/dashboard juncture actually within the door jamb. Again, I used a bit of door edge protector on the wiring as weather protection & to keep the door seal from pinching the wire.

The fourth is under the bonnet, where you can see the wire as it exits the cowl cover just between the 2 sections of hood weather strips. From there is goes under the wire cover along side of the fender to the front.

Sorry that I didn't get a pic of under the car, where I attached the temp probe, but that is easy to figure out. It's attached inside the fiber bumper covering at one of the screws that holds the splash shield to the bumper cover.
Hope this helps.
Senior Member
Joined: Jan 2012
Posts: 226
Likes: 33
From: Nashville, TN
I'm not certain. If they're both Donnelly mirrors, I'd check to see if the auto-dim activator is liquid or gel. Otherwise, you could end up in the same predicament with a potential leakage issue.
Senior Member
Joined: Jan 2012
Posts: 226
Likes: 33
From: Nashville, TN
[quote=daboss085;481564]You are right... So I want a gel right? Any mirrors that fit the x300 that are gel?[/quote
Yes, you definitely want the gel. To my knowledge, you will have trouble finding a replacement that is simple plug & play. At the minimum, you'll probably have to cut & splice the wires.
Yes, you definitely want the gel. To my knowledge, you will have trouble finding a replacement that is simple plug & play. At the minimum, you'll probably have to cut & splice the wires.

Thread
Thread Starter
Forum
Replies
Last Post
Currently Active Users Viewing This Thread: 1 (0 members and 1 guests)