When you click on links to various merchants on this site and make a purchase, this can result in this site earning a commission. Affiliate programs and affiliations include, but are not limited to, the eBay Partner Network.
HI guys. I have a bit of an issue. Recently I bought a dimming interior rear view mirror as my old one gave in loosing the fluid. I went the easiest way (at least I thought I was) to buy a new one. So got the part number of the current one which was superseded by a new number from Jaguar and without thinking ordered one. As I got the new one and unpacked it I found a slightly different looking rear view mirror. Long story short - the new one has a 4 pin connector in white color (wires are black, white, gray and yellow). Whereas my old one has a 3 pin connector (wires white, black and gray). Now Jaguar could not explain me what I should do at this stage as there's no manufacturer instructions or any remarks. My current leaked one is obsolete and replaced with something that actualy does not fit. I could not even get any wiring diagrams or any help. Should I just use my old mirror connection with one wire insulated for the new mirror? Or someone has come accross this matter?
Thanks
Lawrence
Last edited by GGG; Dec 25, 2016 at 01:22 PM.
Reason: Edit typo in thread title
I was going to look at the electrical guide to see the differences in options but you do not provide a MAKE, MODEL, YEAR so guessing is all we can do.
I was also going to upload the electrical guide but Which One??
The base mirror is 'auto-dimming', then 'twilight-sentinal' option as well as 'rain-sensing' as another option in the later sedans.
The X300 mirror is likely NLA so the X308 looks like the replacement and that is what you might have.
More options equal more wires.
bob
Last edited by motorcarman; Nov 24, 2016 at 08:43 AM.
Right...sorry for not supplying more precise information. VIN: SAJHN1749TC769832. If you're able to get me the diagrams fot both type mirrors I guess that is enough to start combining something together. Thanks so far.
And you're right that the original 3 wire is NLA. The later one seems to be of a different option for the same X300 but with an extra feature that hey did not think through
If you've got the same style mirror(same size mirror glass) as the one your replacing then there may be an easier way to do this. The mirror housing will separate at the seem where there is a dividing line. Carefully pry it apart (like a clam) using some thin blade screwdrivers. Once open you'll find your old mirror will just lift out of the housing and there will be two wires attached to the mirror with a small plug that goes into the rear portion of the mirror housing. Most likely you can just swap out the mirror from the new one you purchased into your old housing. It can be done in less than five minutes. Once you swap mirror glass just make sure everything is lined up properly and snap the two portions back together and your done.
I have a 1995 XJR and a 1995 XJR parts car, rear view mirror fluid settled so I thought I would swap mirrors, turned out same year different bases, I used 95 Leaper suggestion and it worked great. THANKS
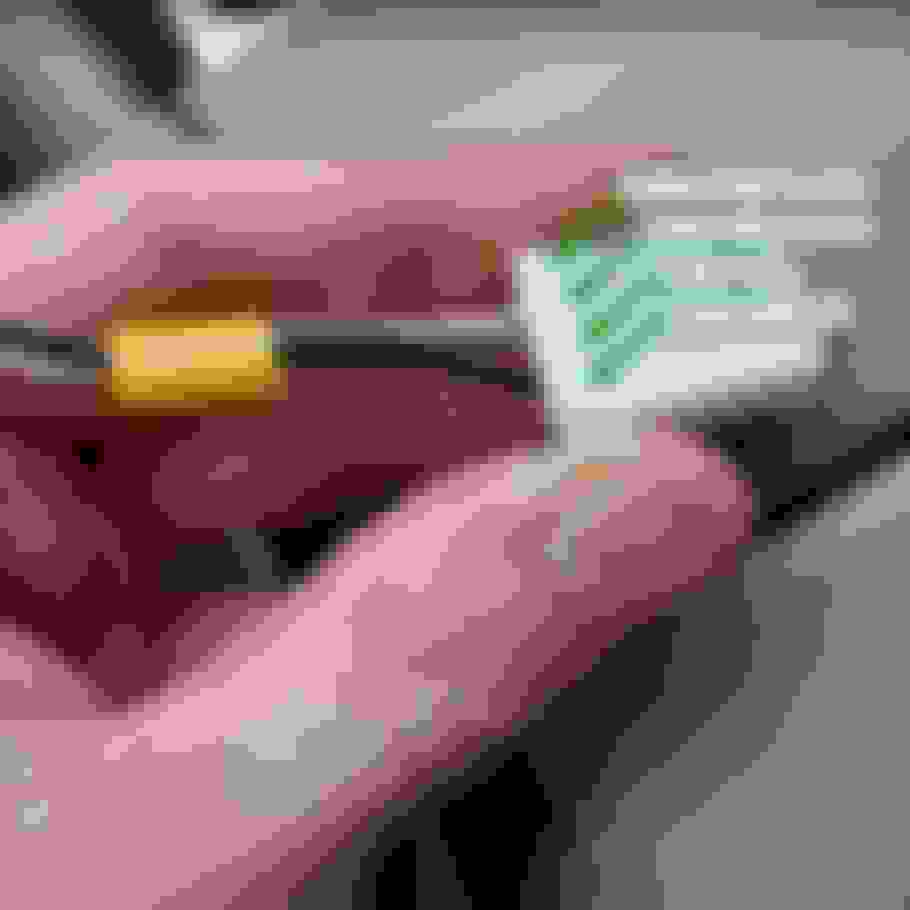
I wanted to add a bit of information to this thread to clarify the pinout in case it helps anyone in the future.
The replacement mirror I purchased had a 3-pin connector and the stock mirror in my 1997 XJ VDP had a 4-pin connector. (My 4-pin had one pin left unconnected. Based on the OP's photos, mine didn't include the yellow wire.) The 3-pin connector will not fit in the 4-pin receptacle.
If you look closely, you will notice that both connectors have pin numbers molded into them. The colours of the wires were different, but by keeping the same pin numbers when swapping the connectors, the new mirror worked perfectly.
Here is the pinout:
Pin 1: White or Light Brown
Pin 2: Grey or Dark Brown
Pin 3: Black
Pin 4: N/C or Yellow
I hope the additional clarification of the pins, and how to remove the pins from the connectors, may be helpful to someone!
Also this may help. 1996 model is a three wire mirror:
WS - power
GN - reverse light
B - ground
In 1997 it became a 4 wire mirror with the addition of dimming side mirrors. The three connections above are duplicated and this added:
PB - driver and passenger door mirrors.
So electrically the later mirror will work, just omit the PB wire and change the connector as somebody already suggested.
I attached the electrical diagram for both of the above configurations.