
$2 Cup Holder Fix Procedure with Pics


Thread Starter
|
Junior Member
Joined: Feb 2012
Posts: 12
Likes: 8
From: Green Bay, WI
I had a hard time finding a good guide and pictures for fixing the cup holder so I decided to make my own.
Tools and materials needed:
Grinder or file
Vise Grips or pliers
Dial or Digital Caliper
Drill with drill bits- I used a 1/16" bit (.060) and 17/64"(.066)
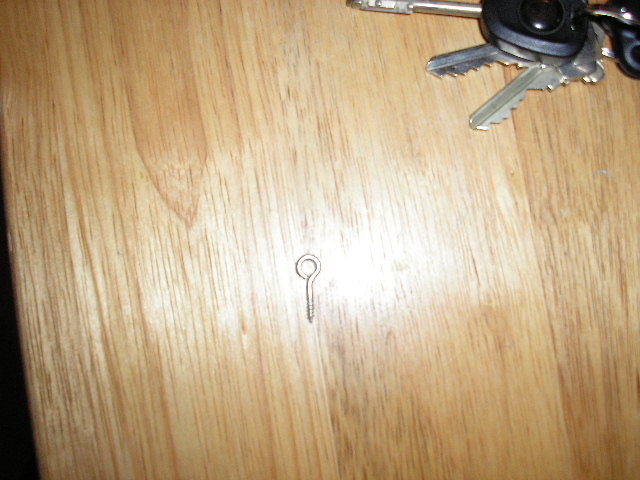
Screw Eyes- I got "National" brand size 214
1) The screw eyes i picked out are slightly smaller than the diameter of the cup holder hinges. The reason is that i wanted a nice and snug fit with minimal slop. You need to drill them out with the 17/64 drill bit. This also gives you more contact area against the plastic.
2) Take measurements of the hinge height location, preferably with a caliper.
3) Grind the old hinges down until they are flush with the base.
3) If you got the same screw eyes as me, you will need the 1/16 bit to drill pilot holes. Otherwise use a bit that is slightly smaller than the thread. Drill the pilot holes at the intersection where the grinding marks meet the the unscathed plastic and .175" from the bottom.
4) Screw in one of the screw eyes until it is between .460" to .500" high from the top of the screw eye to the base. I set mine at .460"
5) Screw in the second one to the same height, but then back off slightly so it is at a 45 degree angle to the first screw.
6) Insert the side with the 90 degree screw eye first. Then press in the second side. Once it's in, use pliers to rotate the 45 degree screw eye back to 90% in the clockwise direction.
7) You may need to do some final adjustments before you put it back together
Once it's done, it feels very strong. I probably don't need to do this, but for peace of mind, I will also add some epoxy to the exposed threads for extra strength.


Tools and materials needed:
Grinder or file
Vise Grips or pliers
Dial or Digital Caliper
Drill with drill bits- I used a 1/16" bit (.060) and 17/64"(.066)
Screw Eyes- I got "National" brand size 214
1) The screw eyes i picked out are slightly smaller than the diameter of the cup holder hinges. The reason is that i wanted a nice and snug fit with minimal slop. You need to drill them out with the 17/64 drill bit. This also gives you more contact area against the plastic.
2) Take measurements of the hinge height location, preferably with a caliper.
3) Grind the old hinges down until they are flush with the base.
3) If you got the same screw eyes as me, you will need the 1/16 bit to drill pilot holes. Otherwise use a bit that is slightly smaller than the thread. Drill the pilot holes at the intersection where the grinding marks meet the the unscathed plastic and .175" from the bottom.
4) Screw in one of the screw eyes until it is between .460" to .500" high from the top of the screw eye to the base. I set mine at .460"
5) Screw in the second one to the same height, but then back off slightly so it is at a 45 degree angle to the first screw.
6) Insert the side with the 90 degree screw eye first. Then press in the second side. Once it's in, use pliers to rotate the 45 degree screw eye back to 90% in the clockwise direction.
7) You may need to do some final adjustments before you put it back together
Once it's done, it feels very strong. I probably don't need to do this, but for peace of mind, I will also add some epoxy to the exposed threads for extra strength.
Last edited by joycesjag; Mar 3, 2012 at 06:29 AM. Reason: expanded pictures


Veteran Member
Joined: Feb 2011
Posts: 1,053
Likes: 80
From: NYC
Nice job - Lol, I wish you could fix my ashtray-door that well - a replacement is ridiculously expensive and about an hour of disassembly/reassembly since there are two screws on each side of it (both center console-box and shifter area needs to be removed to access)
Veteran Member
Joined: Feb 2011
Posts: 9,733
Likes: 2,201
From: on-the-edge
The process was explained in a posting by someone who does propeller repairs on ultra light aircraft.
apply the cyanoacrylate adhesive to the joint, sprinkle baking soda on area, wait a few seconds, blow/brush off excess, repeat as required to build up area.
It worked very well when used to repair an alignment tab on a tail lamp housing. The baking soda acts as a catalyst and filler in the presence of cyanoacrylate.

Senior Member
Joined: Feb 2010
Posts: 556
Likes: 46
From: TEXAS
Wow! You sir, are a genious! I am doing this as soon as I get some free time!
Also very cool info on the baking soda/super glue. I am going to try to remember to use that some time!
Also very cool info on the baking soda/super glue. I am going to try to remember to use that some time!
Trending Topics

Senior Member
Joined: Feb 2010
Posts: 556
Likes: 46
From: TEXAS
I wonder how well the cupholders will work for me now considering I threw the springs away when I recovered it in leather.
I suppose I could always pull it open since the hinging function would be restored.
I suppose I could always pull it open since the hinging function would be restored.
Thread Starter
|
Junior Member
Joined: Feb 2012
Posts: 12
Likes: 8
From: Green Bay, WI
I finally installed the cup holder in the car and it worked great. If you use epoxy to reinforce the screw eyes, you will need to leave about 1/8" gap from the bottom of the cup holder, otherwise it will not assemble properly. I found out the hard way and had to file it down.

Thread
Thread Starter
Forum
Replies
Last Post
aholbro1
XJ XJ6 / XJR6 ( X300 )
18
Dec 29, 2024 06:46 PM
Currently Active Users Viewing This Thread: 1 (0 members and 1 guests)