
Rebuilding a Series 1 rear end

Thread Starter
|
Member


Joined: Dec 2013
Posts: 62
Likes: 34
From: Australia
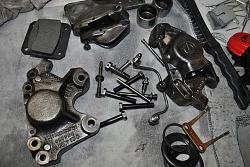
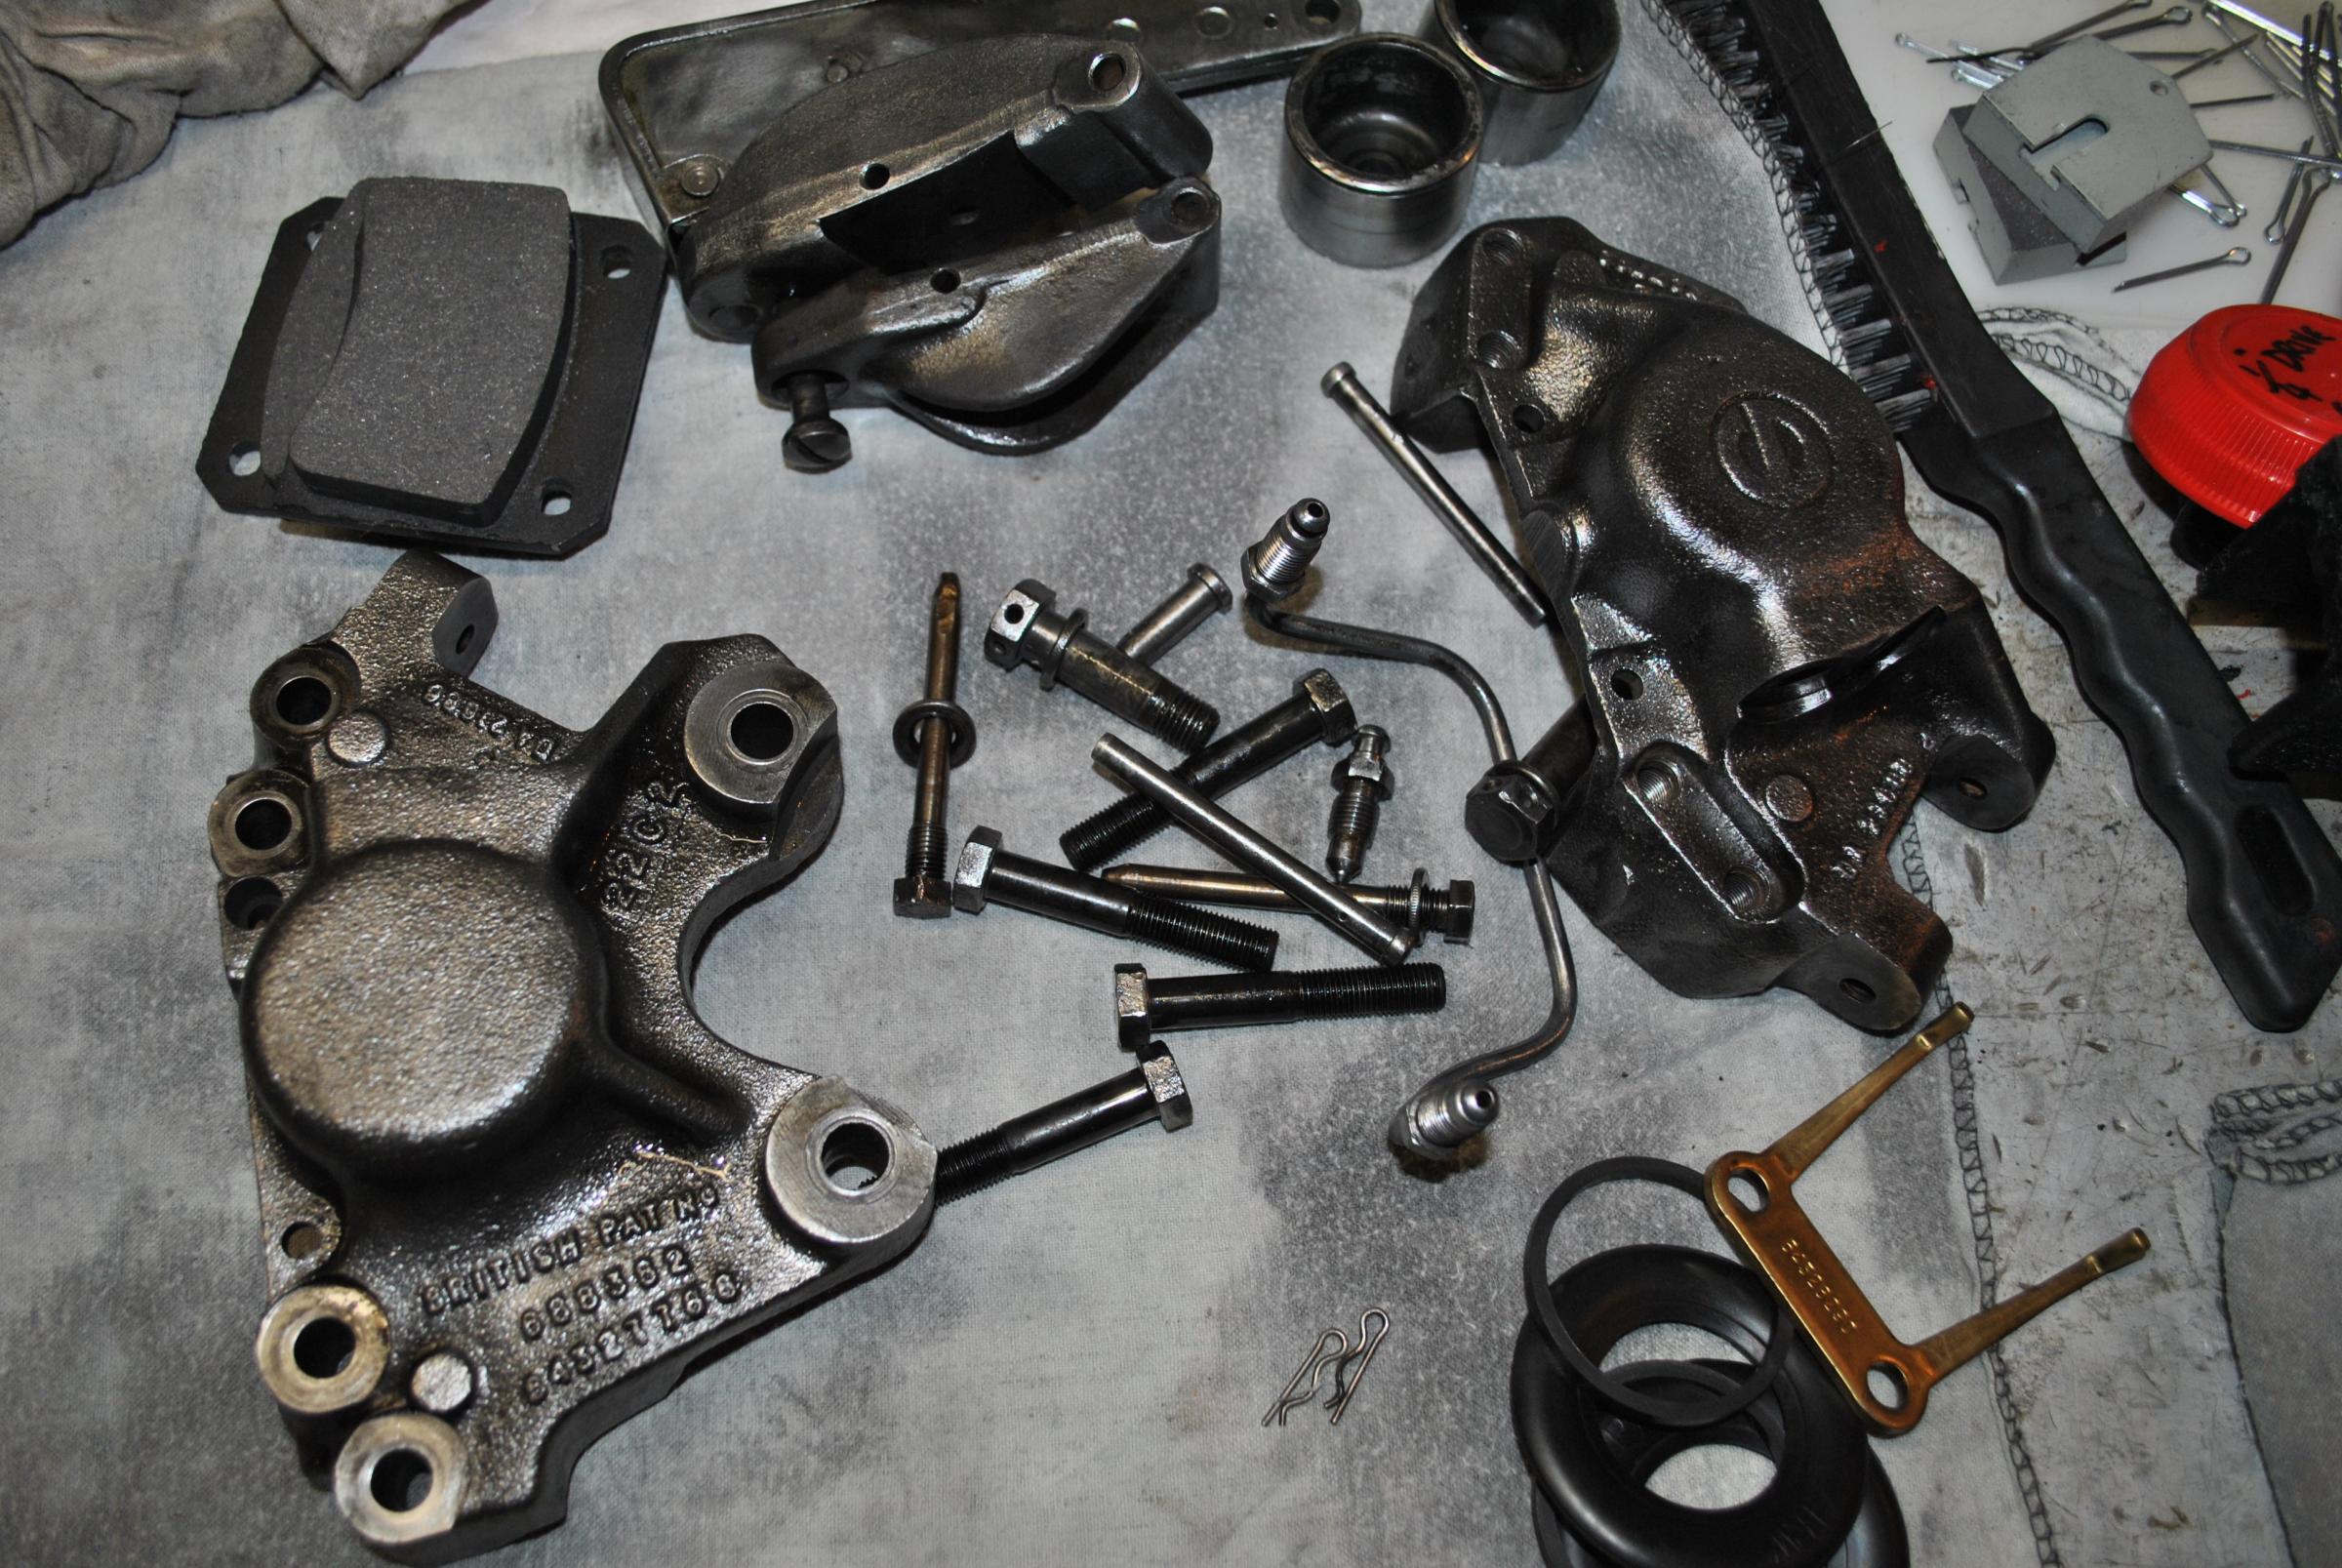
I have bitten the bullet and commenced a rebuild of a rear end for a XJ6 Series 1. The rear-end in the pics was on a parts car I dismantled a couple of years ago and has been sitting around taking up space. On my road running jag I have a rear end that has an issue with the brakes, so the plan is to do the spare up and make a one for one swap on completion.
As can be seen from the pics I have done the easy part and dismantled all the bits, now comes the fun part of cleaning, refurbishing and/or replacing all those bits and pieces to make it all shiny and new again.
So far I have purchased and have sitting and waiting the following bits and pieces;
I plan on purchasing GAZ GS6-2109 Adjustable shocks in the near future as well as a number of bearings, washers, spacers, nuts etc etc etc.
The first job I plan on undertaking is the rear caliper rebuild as I have all the parts needed for that.
Hopefuly I can keep up the enthusiasm and keep the sub-project going and take plenty of before and after shots for all and sundry to see, appraise and critique .
.
As can be seen from the pics I have done the easy part and dismantled all the bits, now comes the fun part of cleaning, refurbishing and/or replacing all those bits and pieces to make it all shiny and new again.
So far I have purchased and have sitting and waiting the following bits and pieces;
- King Springs KJRL-03 (3 cm lower than OEM) (I do have the corresponding lowered front springs to go with them as well).
- OEM rear caliper seal kit
- stainless steel caliper pistons x 4
- RDA slotted rotors - RDA75S
- Bendix DB521GCT brake pads
- SuperPro poly radius arm small bushes
- OEM radius arm Large bush
- Superpro Poly upper and lower shock bushings
I plan on purchasing GAZ GS6-2109 Adjustable shocks in the near future as well as a number of bearings, washers, spacers, nuts etc etc etc.
The first job I plan on undertaking is the rear caliper rebuild as I have all the parts needed for that.
Hopefuly I can keep up the enthusiasm and keep the sub-project going and take plenty of before and after shots for all and sundry to see, appraise and critique
.

Joined: Jan 2014
Posts: 28,386
Likes: 6,340
From: Delaneys Creek,Qld. Australia
Just check with those new rotors you may need spacers for the calipers.(if they are thicker than the old ones)
Are you rebuilding the diff? If so I have some part numbers for Harley bearings that are a lot cheaper than anything else you can get.
Are you rebuilding the diff? If so I have some part numbers for Harley bearings that are a lot cheaper than anything else you can get.
Thread Starter
|
Member
Joined: Dec 2013
Posts: 62
Likes: 34
From: Australia
The light blue car is the donor and that means the dark blue is the recipient.
The rear end that came out of the donor is a 3.07 (pity it is not an LSD otherwise known as a Powerlock), however beggars can't be choosers.
The rear end that came out of the donor is a 3.07 (pity it is not an LSD otherwise known as a Powerlock), however beggars can't be choosers.
Thread Starter
|
Member
Joined: Dec 2013
Posts: 62
Likes: 34
From: Australia
Hi Clarke
I am pretty sure they are they same - they are not vented simply the standard solid RDA replacement for OEM but with slots. But having said that, now that you mentioned it I will check make sure I double check before assemble.
regards
I am pretty sure they are they same - they are not vented simply the standard solid RDA replacement for OEM but with slots. But having said that, now that you mentioned it I will check make sure I double check before assemble.
regards
Thread Starter
|
Member
Joined: Dec 2013
Posts: 62
Likes: 34
From: Australia
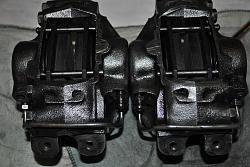
As I mentioned in my first post of this thread I was going to commence the rear-end rebuild by refurbishing the calipers. So far I have pulled them apart, cleaned them and getting them ready for a paint with Dupli-color Caliper Paint (Silver).
The before photos are the calipers themselves still attached to the diff - note in photo "before 2" the position of the handbrake retainer fork and the subsequent impact it had on the handbrake pad. I would have thought the owner might have noticed something amiss. Maybe they did and that is one of the reasons the car was no longer on the road and running.
Following on to the pulled apart pics - you can see that the brake pads themselves were very due for replacement, the pistons had begun to rust and the rubber was beginning to perish and loose its flexibility.
And then after a few hours with cleaning fluid (Shellite) and a dremel with various attachments the calipers are now a lot cleaner and a a bit more rust free. I will use a rust converter on the remaining spots of rust especially the bores.
more to come....maybe after the weekend
Joined: Jan 2014
Posts: 28,386
Likes: 6,340
From: Delaneys Creek,Qld. Australia
Hi Phil, my calipers and hand brake were in pretty bad shape when they came off too.
Cleaned them up with wire brush and steel wool,and used IPA as a solvent.
just an idea,instead of painting mine I left them bare metal and coated them with VHT caliper clear coat. I have done about 6000 miles since then and they look as good as the day I coated them.

VHT High Temperature Brake Caliper Drum Rotor Spray Paint Clear 11 OZ VHTSP730 | eBay


Cleaned them up with wire brush and steel wool,and used IPA as a solvent.
just an idea,instead of painting mine I left them bare metal and coated them with VHT caliper clear coat. I have done about 6000 miles since then and they look as good as the day I coated them.
VHT High Temperature Brake Caliper Drum Rotor Spray Paint Clear 11 OZ VHTSP730 | eBay

Trending Topics
Thread Starter
|
Member
Joined: Dec 2013
Posts: 62
Likes: 34
From: Australia
Not much to report on the rear-end rebuild ...basically caught up doing repairs to my daughter's and my daughter's boyfriend's car (a pair of Holden TS Astras).
Daughter's = new alternator
Daughter's Boyfriend's = ???, have swapped, coil packs, crankshaft sensor, still running like a hairy goat - next thing is an ECU swap (just for the hell of it). I read the OBD2 codes and basically pointed to one of the three....here's hoping).
I now know why I prefer old cars ....
Last edited by philg64; Aug 5, 2014 at 04:55 AM. Reason: just to add a bit more context

Thread Starter
|
Member
Joined: Dec 2013
Posts: 62
Likes: 34
From: Australia
Have managed to get the Astras out of the way ...and did some work on the calipers.
Am using the Fosseway Performance remote bleed setup (they have a website if anyone is interested Remote Bleed Kit for Jaguar IRS Brakes - Fosseway PerformanceFosseway Performance). Will make life so much eaier down the track.
Those with a keen eye will notice bleed nipples in the incorrect position...they are just there to keep crud out until these calipers a installed.
Was going to use the same brake pad retaining pins - but found a couple were bowed so have placed an order for new ones.
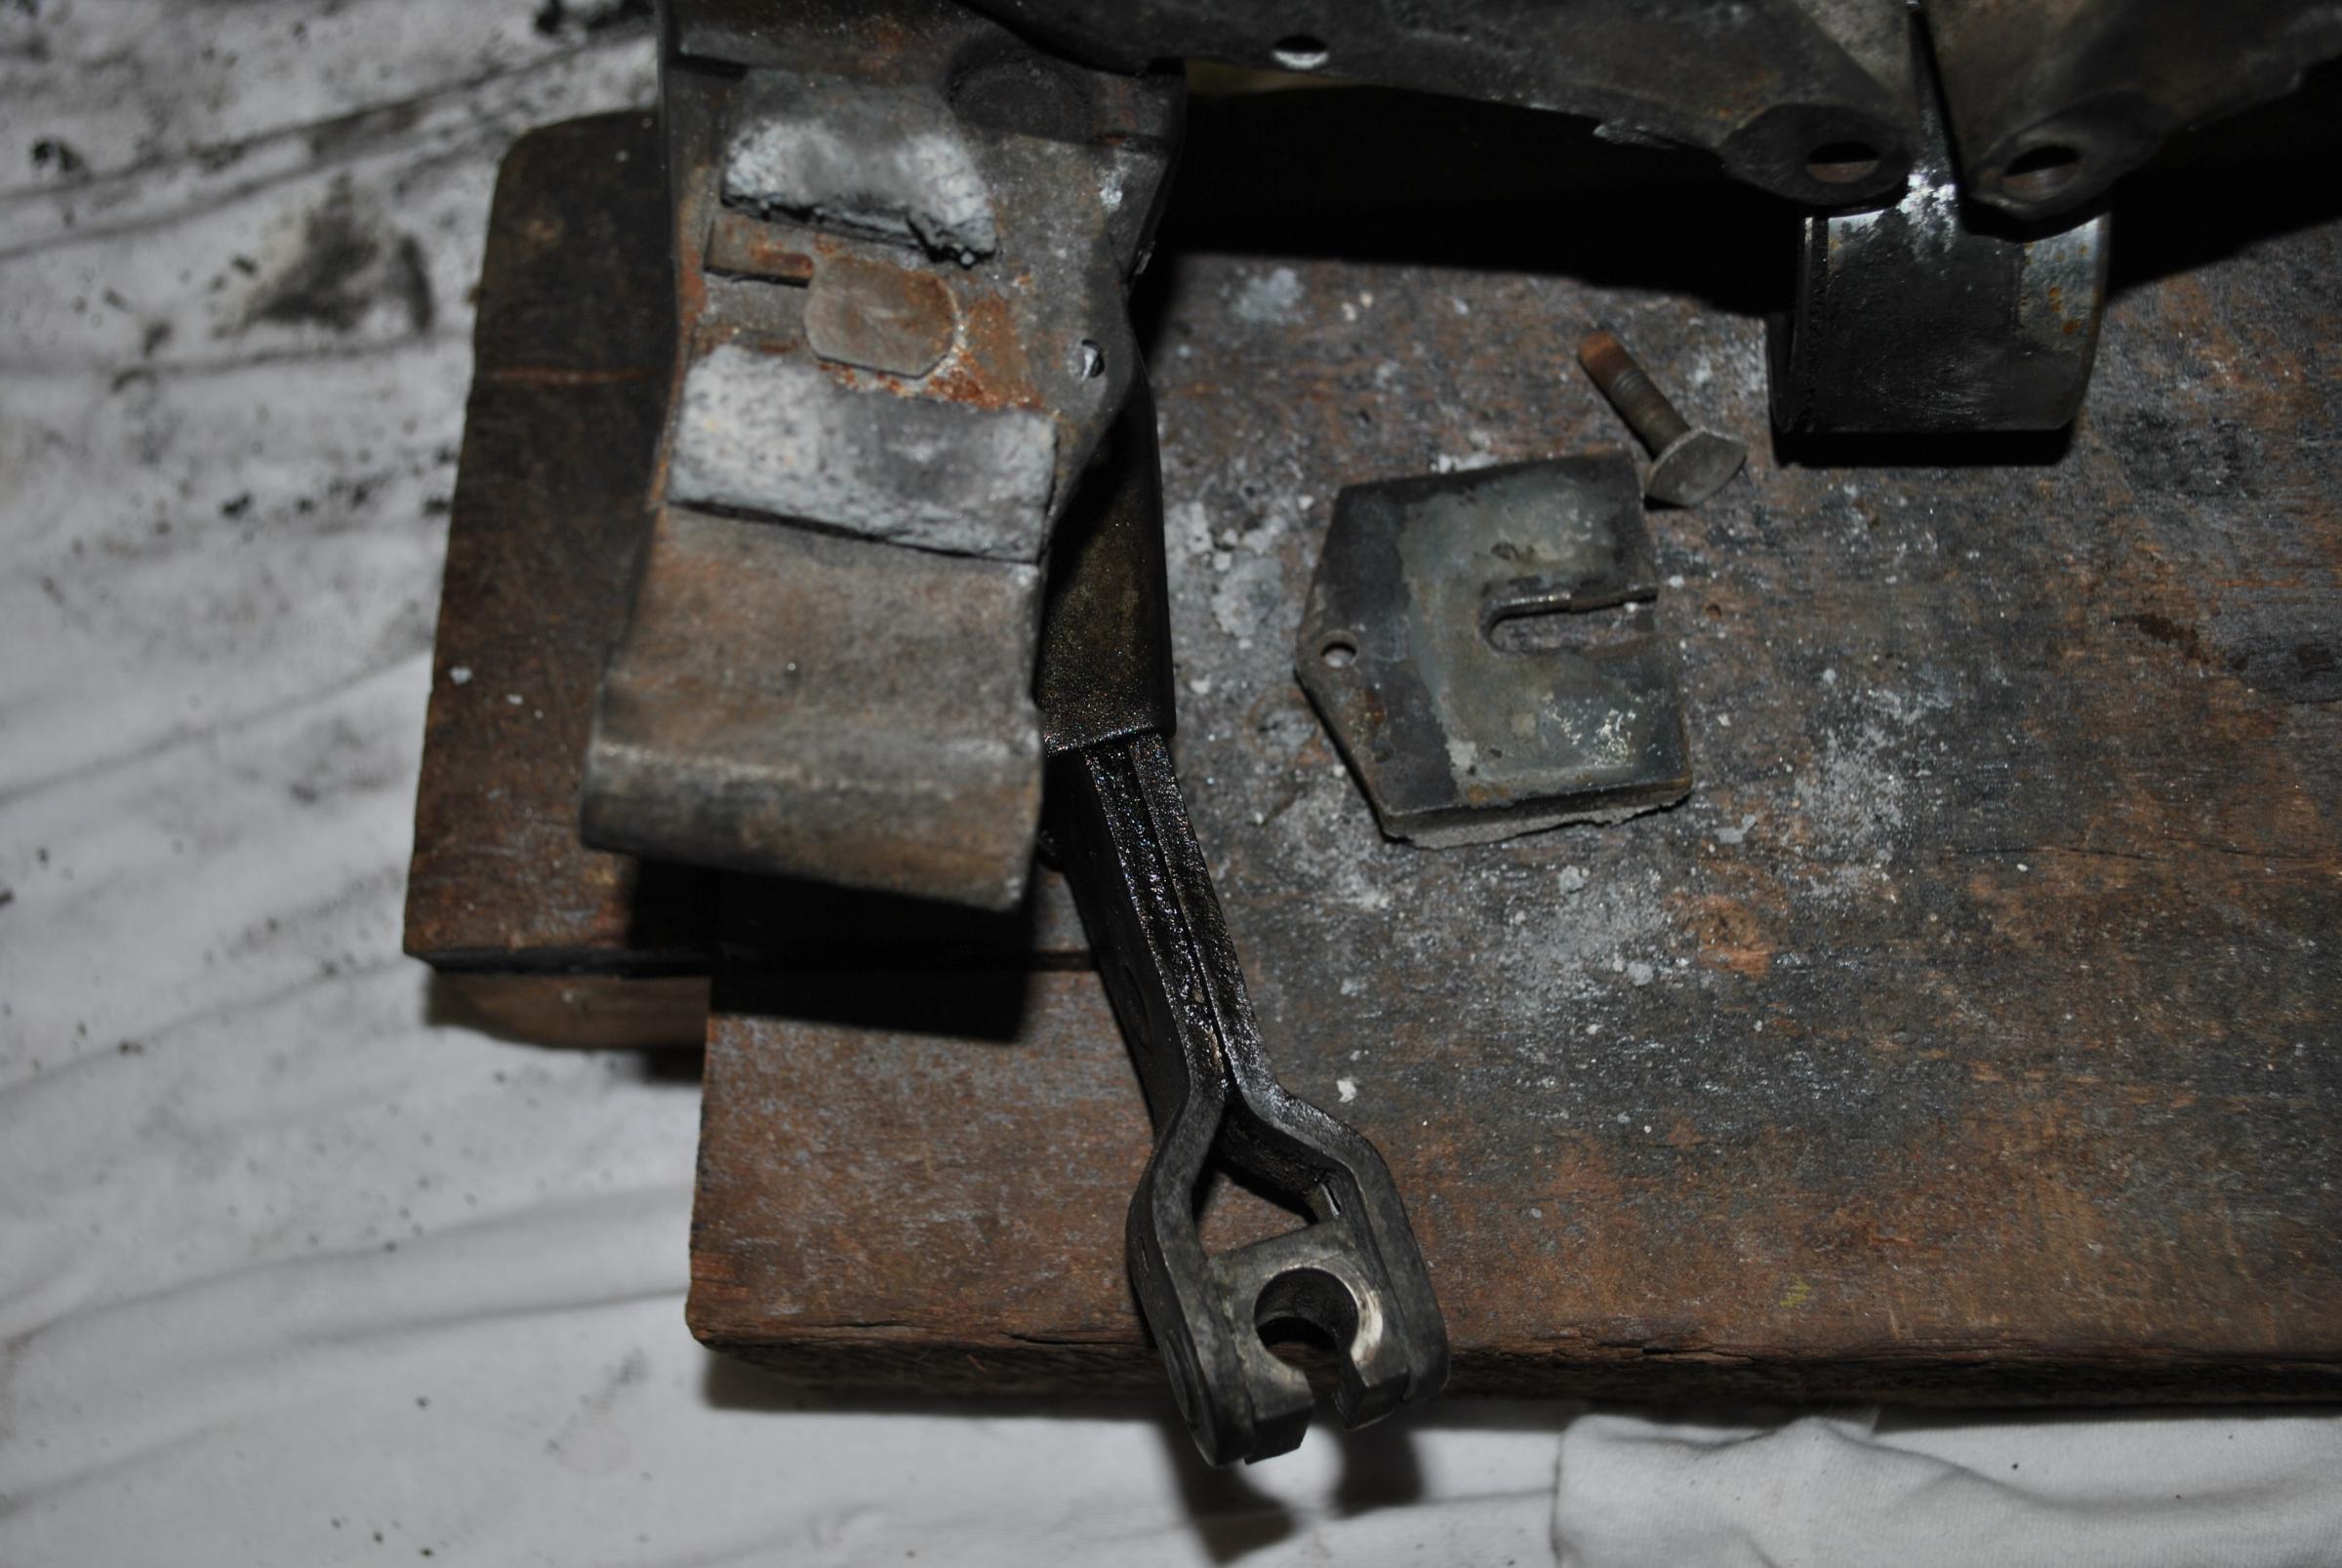
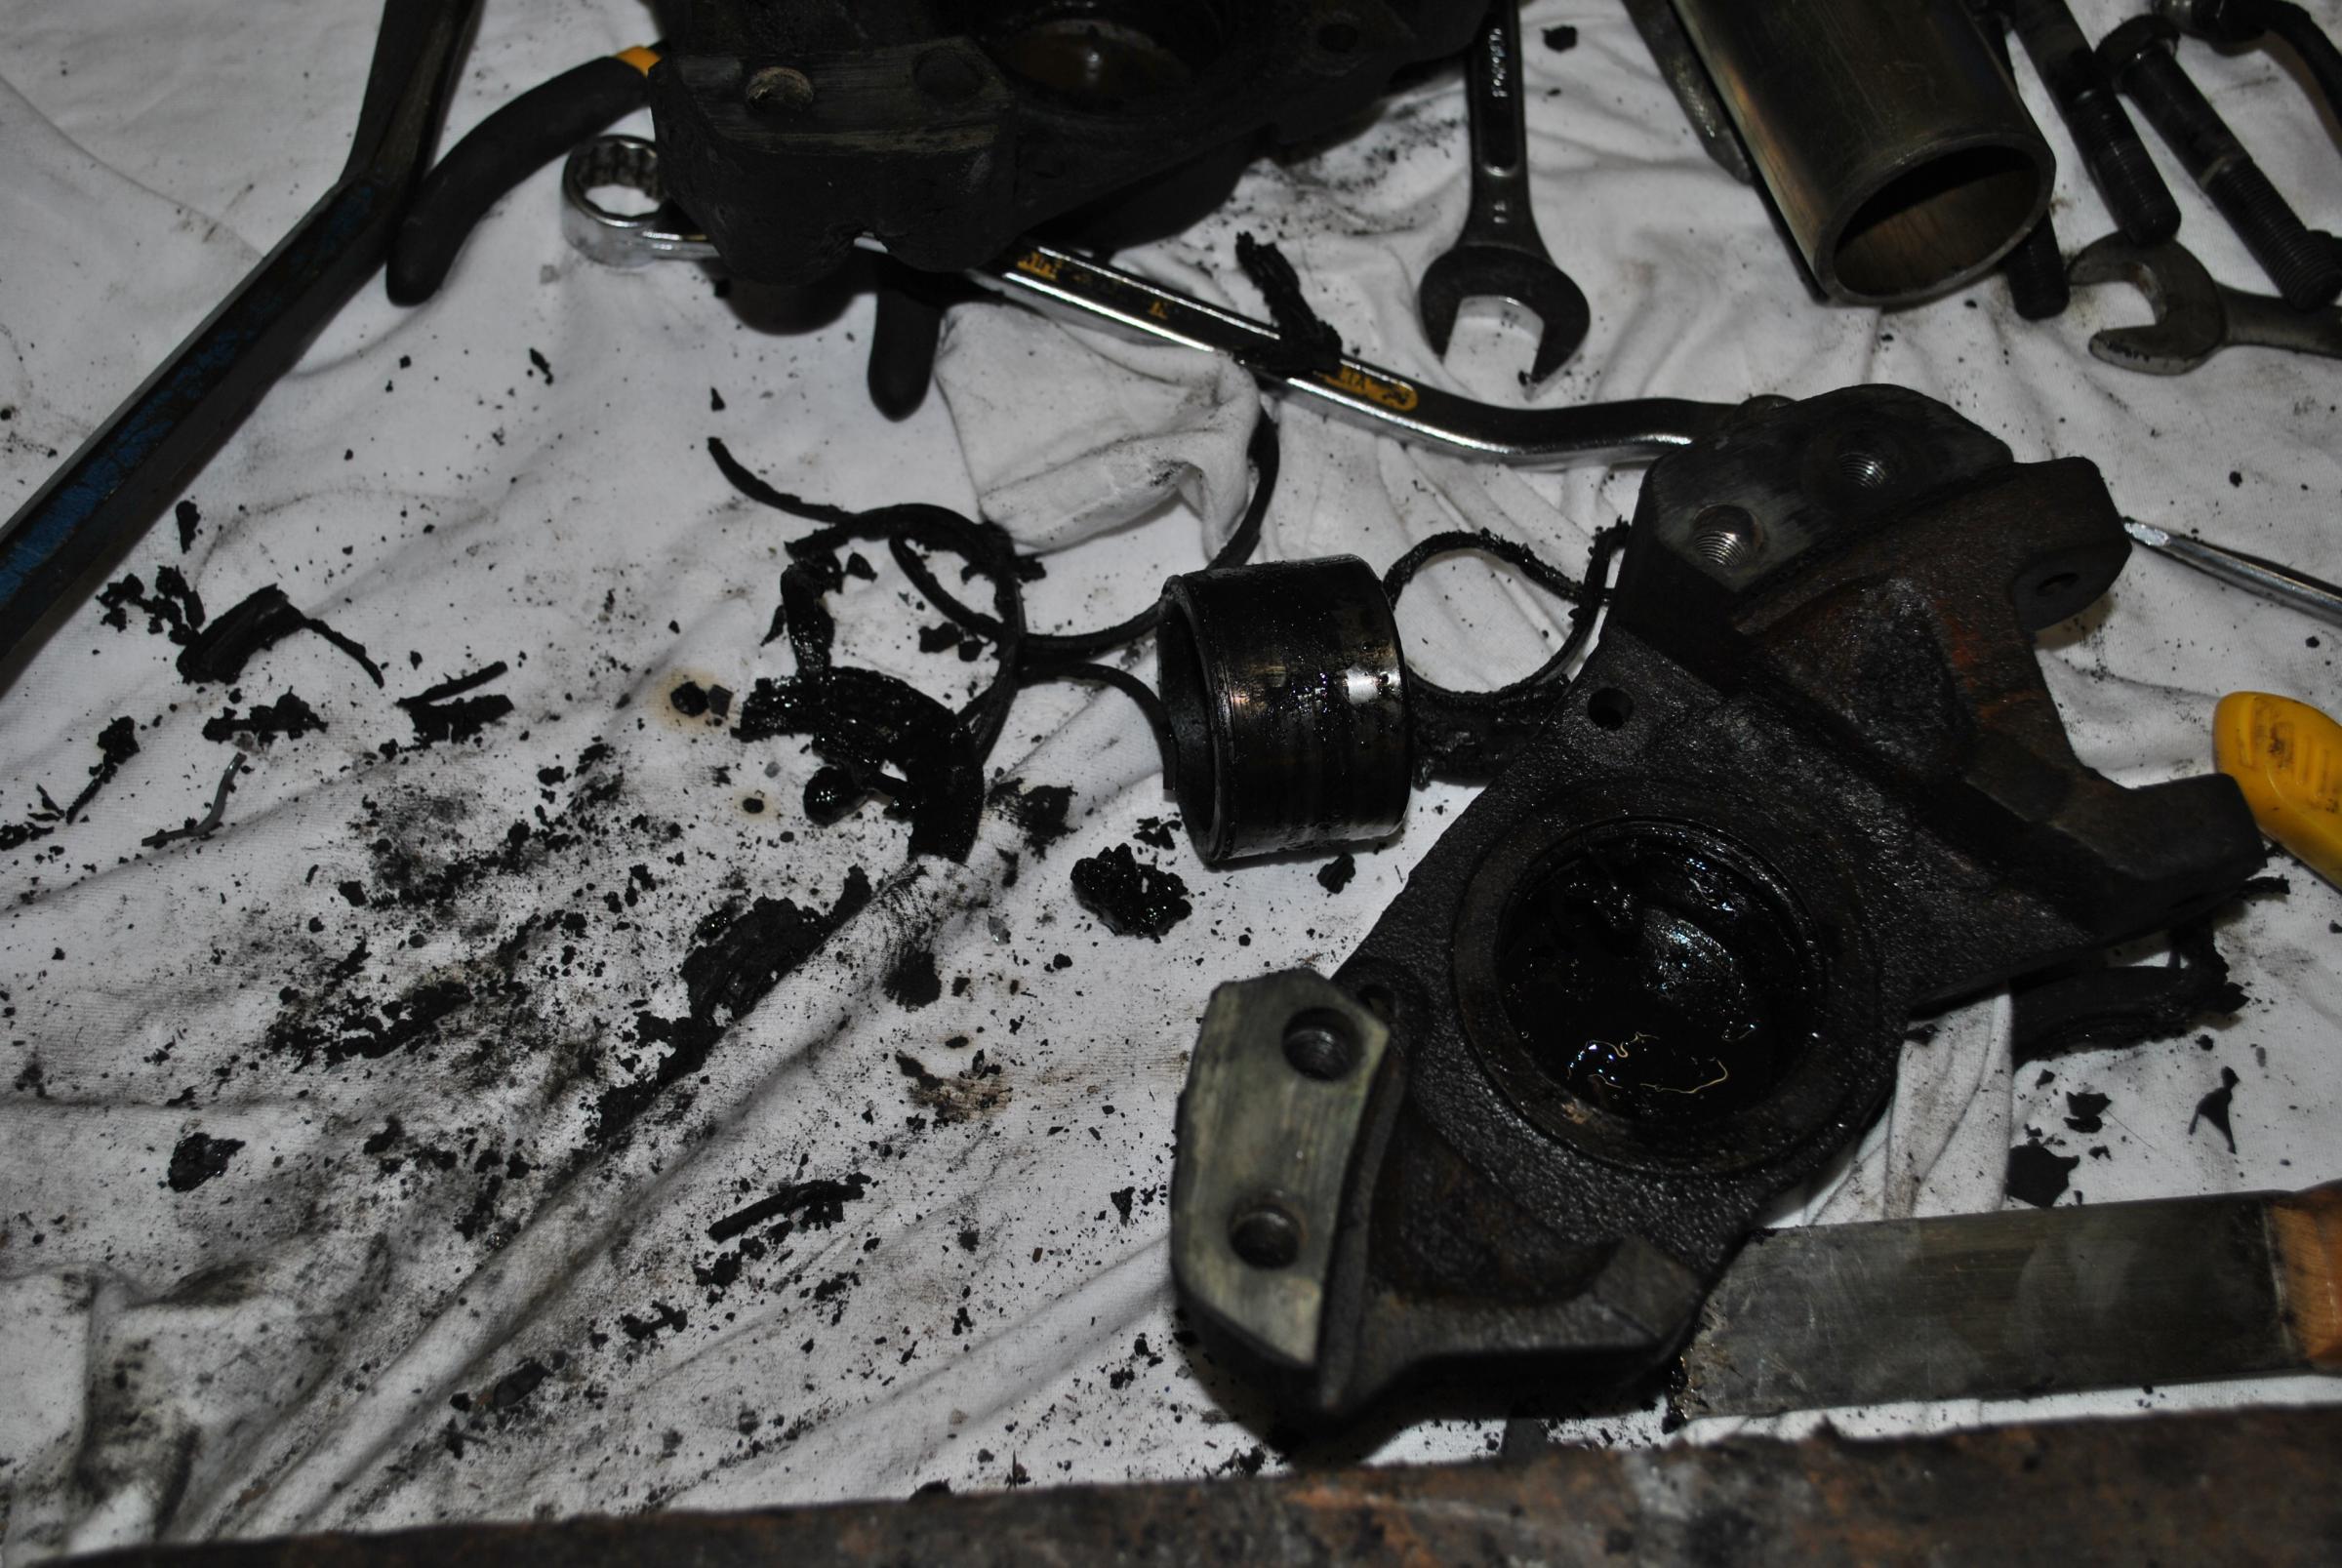
The next job to complete will be the radius arms - I have manages so far with some brute strength, swearing and bloody-mindedness to remove the large and small bushes. The attached pics are as they came off the rear-end. Will post pics of the finished product ..hopefully in the near future.
Am using the Fosseway Performance remote bleed setup (they have a website if anyone is interested Remote Bleed Kit for Jaguar IRS Brakes - Fosseway PerformanceFosseway Performance). Will make life so much eaier down the track.
Those with a keen eye will notice bleed nipples in the incorrect position...they are just there to keep crud out until these calipers a installed.
Was going to use the same brake pad retaining pins - but found a couple were bowed so have placed an order for new ones.
The next job to complete will be the radius arms - I have manages so far with some brute strength, swearing and bloody-mindedness to remove the large and small bushes. The attached pics are as they came off the rear-end. Will post pics of the finished product ..hopefully in the near future.
Thread Starter
|
Member
Joined: Dec 2013
Posts: 62
Likes: 34
From: Australia
My only justification I could come up with...."I will know how good they are".
Joined: Jan 2014
Posts: 28,386
Likes: 6,340
From: Delaneys Creek,Qld. Australia

Veteran Member


Joined: Mar 2014
Posts: 26,760
Likes: 10,311
From: Tehama County, California, USA
Very nice work!!
Either this coming Winter or the next one, I will doubtless be doing something similar. I'm sure all the rubber in my IRS should be renewed, so while I'm at it I might as well do the calipers. I don't work in the rain anyway (IF it ever rains here again).
They won't look as nice as yours when finished though, as growing up on the farm makes one more concerned how such hidden parts perform than how they look.
I'm hoping none of my bushings are in such poor condition as your last photo, but I won't be too shocked if some are.
(';')
Thread Starter
|
Member
Joined: Dec 2013
Posts: 62
Likes: 34
From: Australia
Well the arms are now stripped, rust converted, primed, painted and finally bushed.
Poly bushes for the small and metalastic for the large (rotated 90 degrees). Trying this combo to reduce that little bit of tramp on acceleration. I have a mate who has this combo on his S3 and it rides like dream. He tells me that TWR did the rotate the bush thing .
Others will say "nooooooo:, but I will suck it and see...I am trying to reduce some of the wallow but retain the smoothness.
Used a vice for the poly bushes and they went in nice and easy then tried the vice to pre-locate the large bushes before using the 6 ton press. Broke the vice...ooops...In the end the press made short work of the install (should have bitten the bullet in the first place). Oh well a new vice is required!!
Thread Starter
|
Member
Joined: Dec 2013
Posts: 62
Likes: 34
From: Australia
Well the GAZ shocks arrived today, already had the springs (bought a few months ago). King springs 30mmm lower than OEM.
I couldn't wait to put them both together.
If nothing else they look pretty
I couldn't wait to put them both together.
If nothing else they look pretty
Joined: Jan 2014
Posts: 28,386
Likes: 6,340
From: Delaneys Creek,Qld. Australia
Veteran Member
Joined: Mar 2014
Posts: 26,760
Likes: 10,311
From: Tehama County, California, USA
Pretty Springs!!
Mine aren't so pretty as yours, and they may not be of as high quality, but they'll certainly be better than the 38 year old springs currently in the car.
Husband discovered last night my right rear wheel bearing is a bit hinky. My IRS rebuild may have to be done this coming Winter whether I like it or not. We already have all the front end parts on hand, time to lay in the rear parts.
You're doing Very nice work. It's a pleasure to watch.
(';')