
Coolant on the engine filler cap and A/C compressor

Heh guys
For the last few days I have noticed coolant sitting on top of my Engine filler cap, dripped down the stem and also around the A/C compressor close to the fan belt. I wiped her down but the coolant is back again today, just not as much as when I first noticed.
My coolant levels appear fine (if leaking it would be minimal) and the engine has been running great, with temp sitting around or under the N on the gauge.
Im very new to this game so any advice would be greatly appreciated.
cheers


thanks Flint. That sounds feasible. I hope its only a minor thing like that. If I had to replace the cap, is it critical to get exact match? original? or is just so long as it seals properly?
Again new territory for me...
In the meantime, I might settle down for some light reading...
Again new territory for me...
In the meantime, I might settle down for some light reading...

Veteran Member


Joined: Apr 2014
Posts: 4,569
Likes: 3,515
From: Kent, UK
Paulyling,
You must buy the right cap. Do not ever do anything that might cause the v12 engine to overheat! Otherwise you have a bill of 000's coming your way!
It's easier just to buy the genuine jaguar cap. There are even debates over the 15psi or 16psi is the right one.
Good luck
Paul
You must buy the right cap. Do not ever do anything that might cause the v12 engine to overheat! Otherwise you have a bill of 000's coming your way!
It's easier just to buy the genuine jaguar cap. There are even debates over the 15psi or 16psi is the right one.
Good luck
Paul
Cool thanks man. I appreciate your advice. You reckon she can wait so I can order one online, or is it a sooner rather than later deal? I mean Im always checking fluid levels and inspecting her before a run but I guess the amount Im driving her she might start to deplete.
mmmm....might start hunting tomorrow.
mmmm....might start hunting tomorrow.
The center cap should not be a pressure relief one or should be higher than the side one on the header tank, like 20lb. Otherwise it will almost certainly leak and it does not ever need to relief. Only the side one needs to release pressure.
Just do not mix them up.
You can of course use a relief one in the center, but then you have to make the top seal if the relief valve lifts as there is nowhere for the pressure to go, by design.
Just do not mix them up.
You can of course use a relief one in the center, but then you have to make the top seal if the relief valve lifts as there is nowhere for the pressure to go, by design.
Trending Topics
Thanks for the input guys. It is most appreciated.
Today I swapped the center cap for a brand new cap identical (16PSI) as i noticed the seal wasnt great (although not real bad). After cruising around for a few more hours I noticed again though that she still had evidence of coolant on the cap.
I found out, outside of the forum, that this cap doesn't really need to be a pressure cap (only the side one does, which mine is 13 psi) and that you can use a blanking cap for the center one. (called the engine filler cap in the manual)
This was also the case for a mates XJ6 who had the exact same problem. Swapped his middle pressure cap for just a blanking cap, and he had no further problems.
Tomorrow I'm gonna try and source one and test out the theory. In the meantime I have been watching coolant levels and engine temp like a hawk but she has been fine.
Ill post if it fixes the problem.
Stay tuned...
Heh guys
Have to wait until Monday until I get the blanking cap.
BTW
I went and checked my coolant levels since i have been doing heaps of driving the past few days and.....I noticed my atmospheric overflow tank was empty.
It was handed over to me all sweet, and would sit about 2 inches when cold. I guess after this little issue I come across, plus the fact I lost a little when I opened up the header tank cap the otherday, it would make sense i guess.
The engine hasnt been driven since yesterday so I checked the level after removing the header tank cap, its down about 2 inches. It used to sit up around the neck, when there was 2 inches left in the atmospheric overflow.
Then I went and checked the engine filler cap (the one i wanna swap for a blanking cap) and it was actually about only 1 " away from the cap, so looks pretty sweet I guess.
I bought some Nulon R45 Concentrate. I just wanna top it up a little.
What is the best procedure to do this and is it best to follow the concentrate to water mixture from the ROM or is there a general rule of thumb? Should I just pop about 2 inches in the header tank entrance or should it only be done on the engine filler cap side? Does it make a difference? Got you pop it in via the atmospheric overflow?
Thank in advance
Last edited by paulyling; Aug 23, 2014 at 12:26 AM.
Veteran Member
Joined: Apr 2014
Posts: 4,569
Likes: 3,515
From: Kent, UK
paulyling,
See below from a good colleague of mine who knows these v12 engines well:
"Turn the inside heater to on and hot, to ensure full coolant flow round every system ,
Remove both filler caps , one at the front of the engine, and one on the expansion bottle tank on the left inner wing , using the correct coolant. Fill the system from the front engine cap , do this until the coolant runs out of the other cap on the wing , make sure you do this on level ground. then fit the cap on the wing , and then continue to fill the front engine pipe until the level is just below the cap , then fit this cap ,
Your system is now primed, you can start the engine, and let it tick over.
The coolant will now be being pumped round the system , with the mechanical thermostat shut , the coolant will bypass the radiator until the thermostat lets it through. Let it run for a few mins, just to distribute the coolant. Turn off the engine and then check the front filler tube again , if the level is low, then top it up , you can't put in too much as it will overflow automatically to the overflow tank and out onto the floor behind the passenger front wheel ,
keep doing this process until your confident that the coolant level is full as designed."
Hope that helps
Paul
Picked up the blanking cap today from Autobarn. Popped her on this evening. Noticed she doesnt screw up very tight, compared to the one on the header tank (The difference between a pressure cap and blanking cap?). I guess you could say it is " finger tight". Will monitor closely for the next few days.

Joined: Jan 2014
Posts: 28,386
Likes: 6,340
From: Delaneys Creek,Qld. Australia
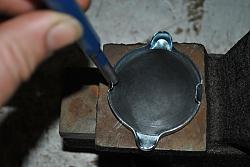
When I put a new one on It felt a bit loose so I turned it upside down on the bench and gave the locking tabs on it a couple of light taps with a punch. It felt a bit tighter after that and has never leaked.

Well I popped the blanking cap on but still getting some vapor droplet on the now blank, engine filler cap. ( only a little however)
The only thing I can think of is it wasnt the CPC part number, it was some other brand as Autobarn werent able to source the CPC part number.
Seems like it fits ok except it doesnt scew down as tight as a pressure cap. Are they supposed to?
Man the header tank cap I have to practically snap my forearm to get it off. Maybe its too tight?
Senior Member
Joined: Jan 2014
Posts: 126
Likes: 54
From: Swindon
Think of a pressure cap as a non return valve with a set release point (13psi). The blanking cap, if it fits properly should be totally watertight irrespective of pressure. Pressure caps always tend to feel a bit spongy as the seal is made by sprung flexible gasket material, the metal cap just holds in on top.
I had a similar problem to this and it turned out to be a perished seal washer on top corner of the rad which at tick over did not present. In the end I only found it when I had a friend rev it up for 10mins as I poked around and even then you could not clearly see it, I found it with a jet of hot coolant on my hand! Might be worth a look.
I had a similar problem to this and it turned out to be a perished seal washer on top corner of the rad which at tick over did not present. In the end I only found it when I had a friend rev it up for 10mins as I poked around and even then you could not clearly see it, I found it with a jet of hot coolant on my hand! Might be worth a look.
Last edited by Tyran66; Aug 28, 2014 at 07:08 PM. Reason: Ommission
Don't forget that the cap has to sit on a decent face to get it to seal. If the top of the filler neck is a little bit worn,distorted or covered in crud then the cap won't sit flush to it.
Stuff a rag in the filler pipe to keep the crud out and go over the top of the pipe witha fine file until you get a nice shiny ring all the way round it; the cap should fit properly now.
It worked on mine.
Don't forget when bleeding the system to crack open the bleed valve at the top left of the radiator.
Joined: Jan 2014
Posts: 28,386
Likes: 6,340
From: Delaneys Creek,Qld. Australia
Don't forget that the cap has to sit on a decent face to get it to seal. If the top of the filler neck is a little bit worn,distorted or covered in crud then the cap won't sit flush to it.
Stuff a rag in the filler pipe to keep the crud out and go over the top of the pipe witha fine file until you get a nice shiny ring all the way round it; the cap should fit properly now.
It worked on mine.
Don't forget when bleeding the system to crack open the bleed valve at the top left of the radiator.
Stuff a rag in the filler pipe to keep the crud out and go over the top of the pipe witha fine file until you get a nice shiny ring all the way round it; the cap should fit properly now.
It worked on mine.
Don't forget when bleeding the system to crack open the bleed valve at the top left of the radiator.
Guys many thanks again. After a big cruise today i checked her tonight and found a few trace elements of coolant still on the lid, however not like it was before I swapped out the pressure cap on the engine filler.
Think I'm getting closer to resolution. Clarke i bent the little guides on my blanking cap over to get a tighter fit however i didn't really check the condition of the surface it seals on so might look at that next.
Thanks again guys
Think I'm getting closer to resolution. Clarke i bent the little guides on my blanking cap over to get a tighter fit however i didn't really check the condition of the surface it seals on so might look at that next.
Thanks again guys
Well I gave her a good smoothing down today and was surprised to find how well she came up. I even think the blanking cap "feels" a little more snug.
Unfortunately....I took her for a spin and after checking on her she still is getting some vapor droplets. bugger!
I might try and get that CPC brand blanking cap and try from there.
Unfortunately....I took her for a spin and after checking on her she still is getting some vapor droplets. bugger!
I might try and get that CPC brand blanking cap and try from there.

