
How to properly change your oil (and basic service) your XJS and at what frequency?


Joined: Feb 2010
Posts: 28,795
Likes: 11,273
From: Adelaide Stralia
I usually do it at the 5 year mark.
Fresh oil reduces oil leaks, as it keeps the seals soft.
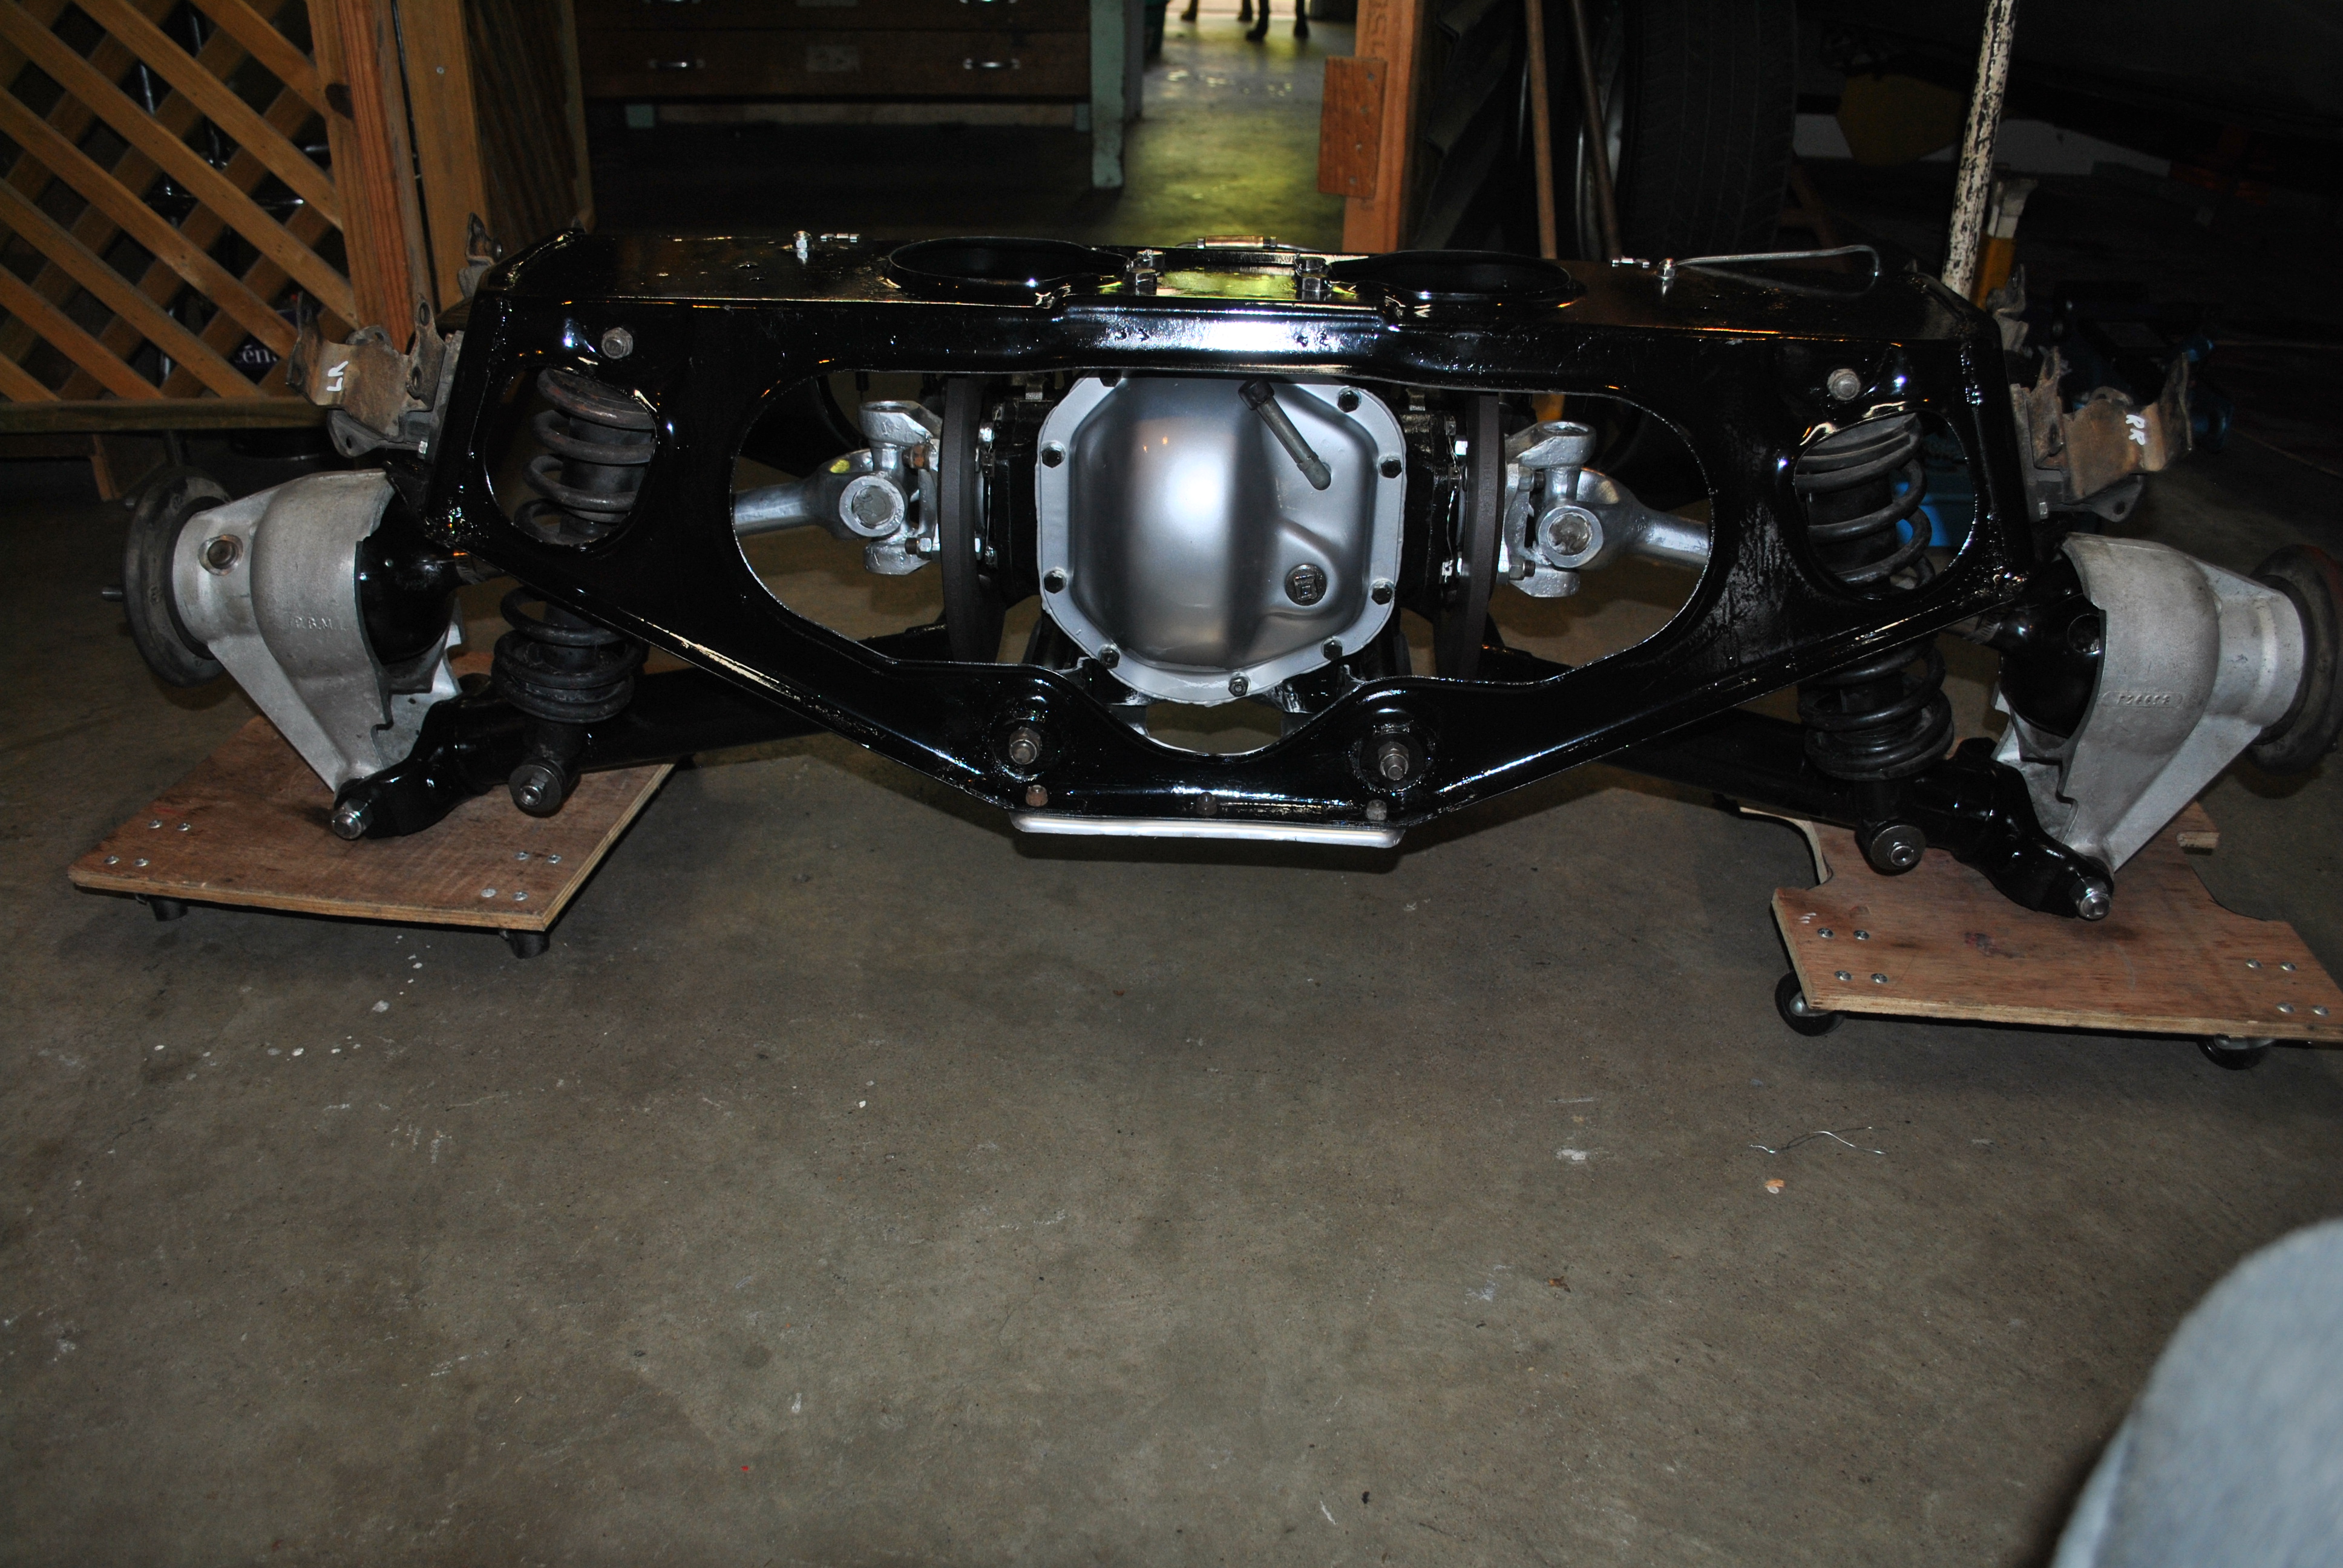
Dana is hard to get parts for, and a lot of people swap it out for a Salisbury style unit, which I did when the cradle was out for rebuild, and the Dana was starting to weep oil.
Only used 1984 to 1986ish, and I think only in the XJ-S cars.
Dont panic about it, it is a strong unit, and looked after it will outlive you.
When Clarke comes for another drink session, plan on sucking the oil out and refilling, just because.
Fresh oil reduces oil leaks, as it keeps the seals soft.
Dana is hard to get parts for, and a lot of people swap it out for a Salisbury style unit, which I did when the cradle was out for rebuild, and the Dana was starting to weep oil.
Only used 1984 to 1986ish, and I think only in the XJ-S cars.
Dont panic about it, it is a strong unit, and looked after it will outlive you.
When Clarke comes for another drink session, plan on sucking the oil out and refilling, just because.
Joined: Jan 2014
Posts: 28,386
Likes: 6,340
From: Delaneys Creek,Qld. Australia
I left the inner covers off when I rebuilt the IRS, much more pleasing to the eye and easy to grease. Outer covers have been removed since then.

Last edited by o1xjr; Feb 6, 2017 at 03:08 AM.

Ha ha ha....well....in my defence I was laying down an EFI harness and plugging in fuel sensors etc (Purely Electrical). That is why doing it on the Blue Goose was a solo project and I was comfortable doing it.
The mechanical side of things though...I am still quite the green prawn.
Still I don't mind "nerding out" looking at all the mechnical stuff and watching over the motor man's shoulder at times. I also get to plug in the laptop and do injector tests and simple stuff like that which is cool.
Check out these pistons:
Last edited by paulyling; Feb 24, 2017 at 09:26 AM.
Joined: Jan 2014
Posts: 28,386
Likes: 6,340
From: Delaneys Creek,Qld. Australia
G'day guys. Just a quick question.
How often would you recommend greasing the 10 Rear Axle grease points and the 4 Wheel Hubs?
I only did mine February this (see earlier in the thread) but I am in the process of making up an excel spreadsheet so I know when certain things are due.
cheers in advance!
How often would you recommend greasing the 10 Rear Axle grease points and the 4 Wheel Hubs?
I only did mine February this (see earlier in the thread) but I am in the process of making up an excel spreadsheet so I know when certain things are due.
cheers in advance!


Cheers Greg. I don't think I have done that many miles since the last greasing so I am in the clear for now. I'll add that to my spreadsheet 
This come about as I have to do my oil change when I am home next (September) as it is due. I know what oil and filter to use etc but I can't remember if there was any special procedure for filling it up again?
As far as I remember, I just pour the 10 litres down the spout until the dipstick shows me I am full. Crank the engine and I should be good correct?
From memory it was a divided opinion about pre filling the oil filter but everything else was pretty standard procedure as I recall.
Joined: Feb 2010
Posts: 28,795
Likes: 11,273
From: Adelaide Stralia
Paul.
MAAAAAATE.
Fill the oil filter, screw it on, pour the rest of the 10ltrs through the camcover hole, replace that cap, shut the bonnet and enjoy the car.
DIPSTICK???????, what dipstick.
ALL mine only ever got 10ltrs and a filter, FAITH mate, you put the drain plug back????? right????, so the engine is full, DRIVE it. Ya wasting drinking time checking the dipstick, really.
///////////////////////////FOR THE BEGINNERS////////////////////////////
G'day Guys. Seeing how I was a beginner not that long ago, I decided to take some snaps of my oil change last week and post it here for the next green prawn like myself
/////////////////////////////////////////////////////////////////////////////////////
Oil change. Pretty straight forward stuff. Before you start make sure you car has been off a while so you're not dealing with hot oil.
You'll need 10 Liters of 15W40. Over my way that is two 5L tubs. Got this on special the other day

Also oil filter, which is the Z133, 113 or equivalent. One of those is the fancy one with a nut on the bottom for ease of removal. I rang my local and just got the generic standard which is alot cheaper. Just means I gotta either puncture it with a screw driver or use a filter wrench.
Also grab an oil catch pan enough to take 10 liters. Grab two if need be.
Ok. We got we need. Now just jack the front end up and place some axle stands behind each tyre or where ever you normally prefer to place them so long as there is no possible way the car can fall on you.
We have to go under the car so we definitely don't want to rely on our jack for support. I have mine driven up on two wood sleepers under each front tyre and then supported by two axle stands. The jack is there as a 3rd backup also.
Once the car is safe to go underneath, grab a 7/8" spanner and slide yourself under. Locate the bolt for the oil sump:

Slide your catch pan underneath in preparation.
Start undoing the bolt and remove. Let the dirty black oil come out!

Now. Go and put that oil sump bolt somewhere you aren't gonna lose it. That would ruin your day!
The oil took me a good half an hour or more until it stop dribbling. Give it time. If you got another catch pan you can get to work on the oil filter.
Again, locate the oil filter and place the catch pan underneath....yeah it gets messy too.

I just use the standard oil filter. Sometimes I'm lucky and can twist it off with my hands. This time not so much so I stabbed it with a big flat blade screw driver and proceeded to turn it out. Let it too take its time to dribble out and discard the old filter.

Go and locate the new filter. I dip my finger in the clean oil and place a smear around the 0-Ring. I don't pre-fill the oil filter personally. Why...my mechanic mate at work told me not too! But there has been many a debate for those for and against. I won't get into it here.

Ok. If everything has stopped dribbling out underneath, you might wanna remove that old oil out the way.

Ok. Now it is time to put the sump bolt back in. You didn't lose it did you? I just checked the thread on mine and made sure there was no crap on that could pollute the sump. Ok screw her back in but make sure you don't over tighten it. I would imagine snapping this off or damaging the thread would be a heartache. The workshop manual has proper torque settings I am sure but I just used good judgement.

Ok so now move over to the oil filter and screw her in as well. I made sure I screwed it in as tight as I could be hand.
Time to get yourself out from underneath and fill her up. This is the spot here:


I just took my time knowing that I took approximately 10 liters out so I should be good to put back in 10 liters.
Ok....after that screw back the cap. I checked underneath one last time to make sure nothing was leaking, then proceeded to clear out underneath and get it off the axel stands.
Lastly I cranked the engine and watched the pressure gauge on the dash climb up to where she normally sits, which for me at idle is about 500kPa.
While she is running idle I had a quick look underneath to make sure there were no leaks. Sweet. All done.
Now. That waste oil. Here in Oz our local Auto Mart will take waste oil back (Supercheap Auto) all though they don't really advertise it. I simply used the sump pan I had with a spout to pour it back into the empty 15w40 containers and brought it down to Supercheap. Done deal.
Hope I didn't forget anything but this is just the layman's way of changing the oil no fuss for people like myself.
There is probably a few points of contention above but thats the gist of it. I hope it can help somebody
G'day Guys. Seeing how I was a beginner not that long ago, I decided to take some snaps of my oil change last week and post it here for the next green prawn like myself
/////////////////////////////////////////////////////////////////////////////////////
Oil change. Pretty straight forward stuff. Before you start make sure you car has been off a while so you're not dealing with hot oil.
You'll need 10 Liters of 15W40. Over my way that is two 5L tubs. Got this on special the other day
Also oil filter, which is the Z133, 113 or equivalent. One of those is the fancy one with a nut on the bottom for ease of removal. I rang my local and just got the generic standard which is alot cheaper. Just means I gotta either puncture it with a screw driver or use a filter wrench.
Also grab an oil catch pan enough to take 10 liters. Grab two if need be.
Ok. We got we need. Now just jack the front end up and place some axle stands behind each tyre or where ever you normally prefer to place them so long as there is no possible way the car can fall on you.
We have to go under the car so we definitely don't want to rely on our jack for support. I have mine driven up on two wood sleepers under each front tyre and then supported by two axle stands. The jack is there as a 3rd backup also.
Once the car is safe to go underneath, grab a 7/8" spanner and slide yourself under. Locate the bolt for the oil sump:
Slide your catch pan underneath in preparation.
Start undoing the bolt and remove. Let the dirty black oil come out!
Now. Go and put that oil sump bolt somewhere you aren't gonna lose it. That would ruin your day!
The oil took me a good half an hour or more until it stop dribbling. Give it time. If you got another catch pan you can get to work on the oil filter.
Again, locate the oil filter and place the catch pan underneath....yeah it gets messy too.
I just use the standard oil filter. Sometimes I'm lucky and can twist it off with my hands. This time not so much so I stabbed it with a big flat blade screw driver and proceeded to turn it out. Let it too take its time to dribble out and discard the old filter.
Go and locate the new filter. I dip my finger in the clean oil and place a smear around the 0-Ring. I don't pre-fill the oil filter personally. Why...my mechanic mate at work told me not too! But there has been many a debate for those for and against. I won't get into it here.
Ok. If everything has stopped dribbling out underneath, you might wanna remove that old oil out the way.
Ok. Now it is time to put the sump bolt back in. You didn't lose it did you? I just checked the thread on mine and made sure there was no crap on that could pollute the sump. Ok screw her back in but make sure you don't over tighten it. I would imagine snapping this off or damaging the thread would be a heartache. The workshop manual has proper torque settings I am sure but I just used good judgement.
Ok so now move over to the oil filter and screw her in as well. I made sure I screwed it in as tight as I could be hand.
Time to get yourself out from underneath and fill her up. This is the spot here:
I just took my time knowing that I took approximately 10 liters out so I should be good to put back in 10 liters.
Ok....after that screw back the cap. I checked underneath one last time to make sure nothing was leaking, then proceeded to clear out underneath and get it off the axel stands.
Lastly I cranked the engine and watched the pressure gauge on the dash climb up to where she normally sits, which for me at idle is about 500kPa.
While she is running idle I had a quick look underneath to make sure there were no leaks. Sweet. All done.
Now. That waste oil. Here in Oz our local Auto Mart will take waste oil back (Supercheap Auto) all though they don't really advertise it. I simply used the sump pan I had with a spout to pour it back into the empty 15w40 containers and brought it down to Supercheap. Done deal.
Hope I didn't forget anything but this is just the layman's way of changing the oil no fuss for people like myself.
There is probably a few points of contention above but thats the gist of it. I hope it can help somebody
Heh guys.
Being that I come from a maintenance background having some sort of schedule to look after my kitty is important for me. I recently made up service schedule spreadsheet using information I gathered mostly from this thread. I may have forgotten a few things but here is an example template if anybody would like it for their H.E XJS (or modify for other models)
Anything coming up I highlight in pink to give me a month or so to order fluids/filters etc.
Many thanks to the Jaguar Legends on this thread for their input
Last edited by paulyling; Sep 11, 2017 at 09:00 PM.
Veteran Member
Joined: Feb 2013
Posts: 17,809
Likes: 3,945
Hi Bro
Inspirational Bro!
Great write up and great Photos.
Which should help a lot of 'Newbies' out there, take their first steps in showing what can be achieved without the need of taking her into a Shop.
Inspirational Bro!
Great write up and great Photos.
Which should help a lot of 'Newbies' out there, take their first steps in showing what can be achieved without the need of taking her into a Shop.

Thread
Thread Starter
Forum
Replies
Last Post
BrentGardner
XJ XJ6 / XJ8 / XJR ( X350 & X358 )
29
Dec 16, 2024 12:13 AM
Currently Active Users Viewing This Thread: 1 (0 members and 1 guests)