When you click on links to various merchants on this site and make a purchase, this can result in this site earning a commission. Affiliate programs and affiliations include, but are not limited to, the eBay Partner Network.
I'm having a hard time removing my leaking AC expansion valve. The body of the exp valve can't rotate without obstruction, so I assume the big nut needs to be screwed back out on to the body? It's stuck (cross threaded perhaps) and does not want to unscrew counterclockwise, but I can turn it half a turn clockwise. Any suggestions?
I dont remember those flare nuts coming with the new valve. The one on that vertical pipe, is part of that pipe, and I reckon the back one is part of the evaporator pipe, the one that snaps with ease.
When the zones align, Greg in France will slide in and answer 100%, as he has recently done his.
Cross threading is generally not the isuue, lack of pre-assembly lube is the root cause.
Last edited by Grant Francis; Sep 13, 2015 at 05:03 AM.
Warlock
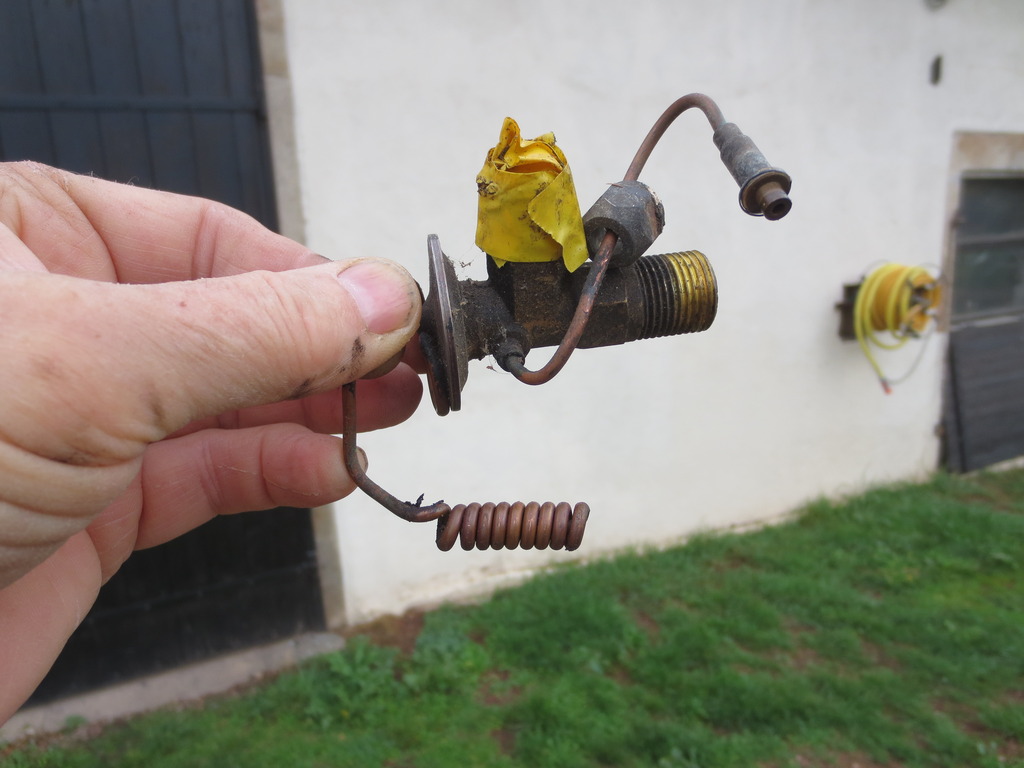
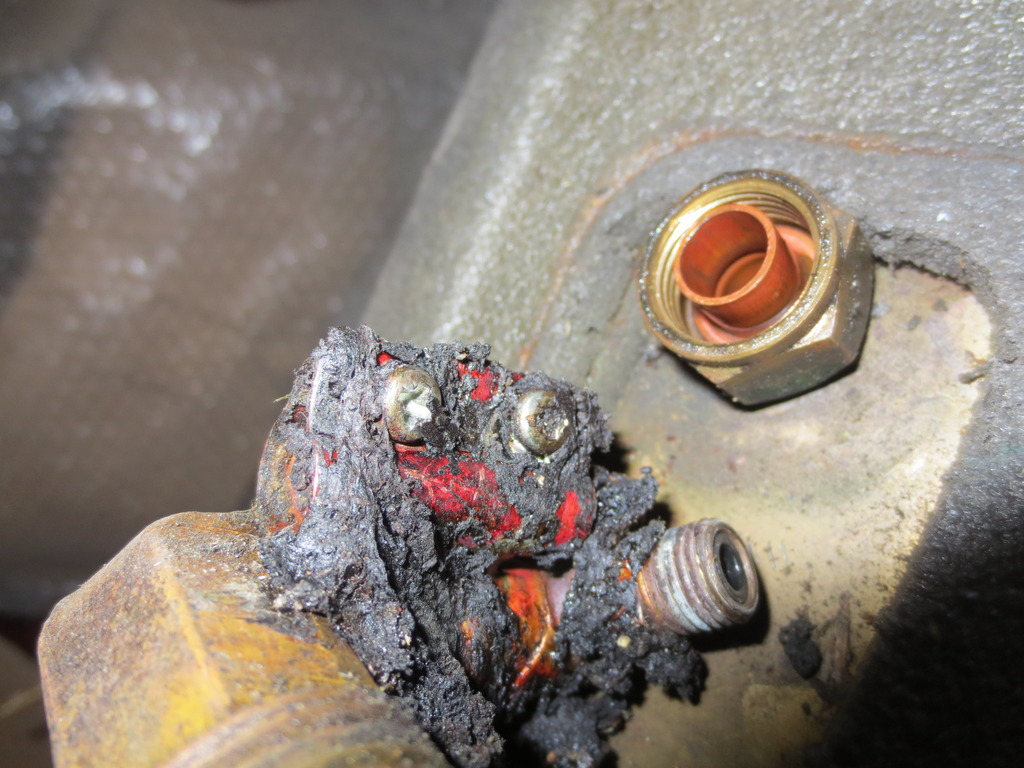
The Wizard has honoured me with a commission! First, here are some photos taken of my spare Delanaire Mk II unit's expansion valve:
The valve side view:
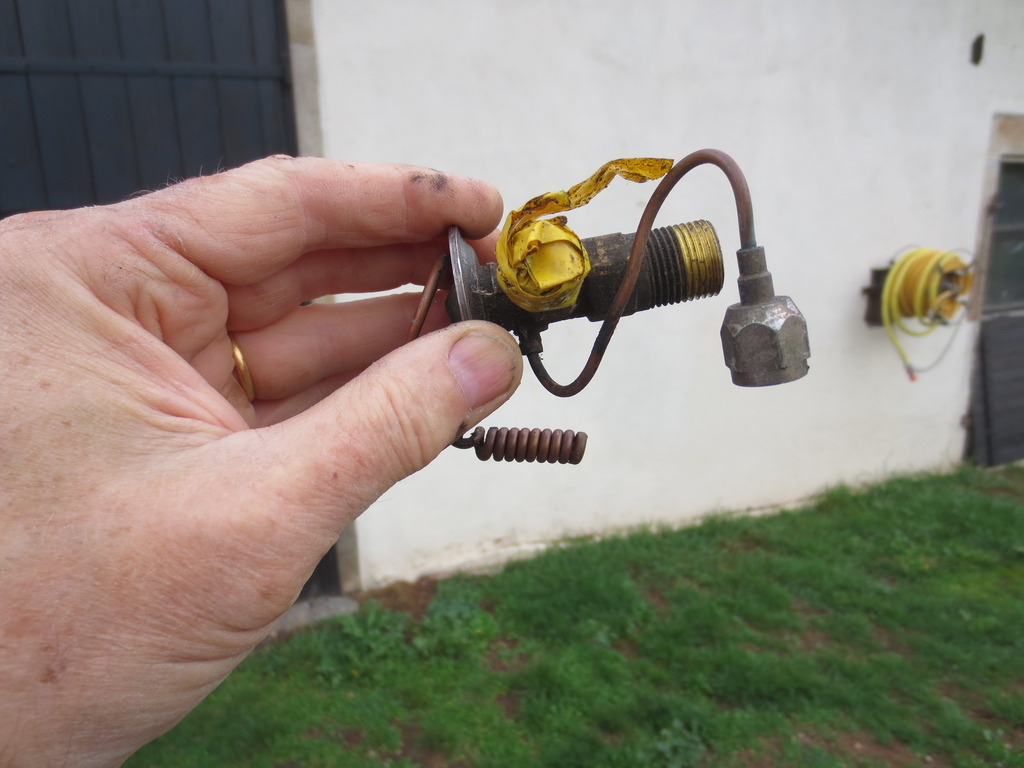
Top view
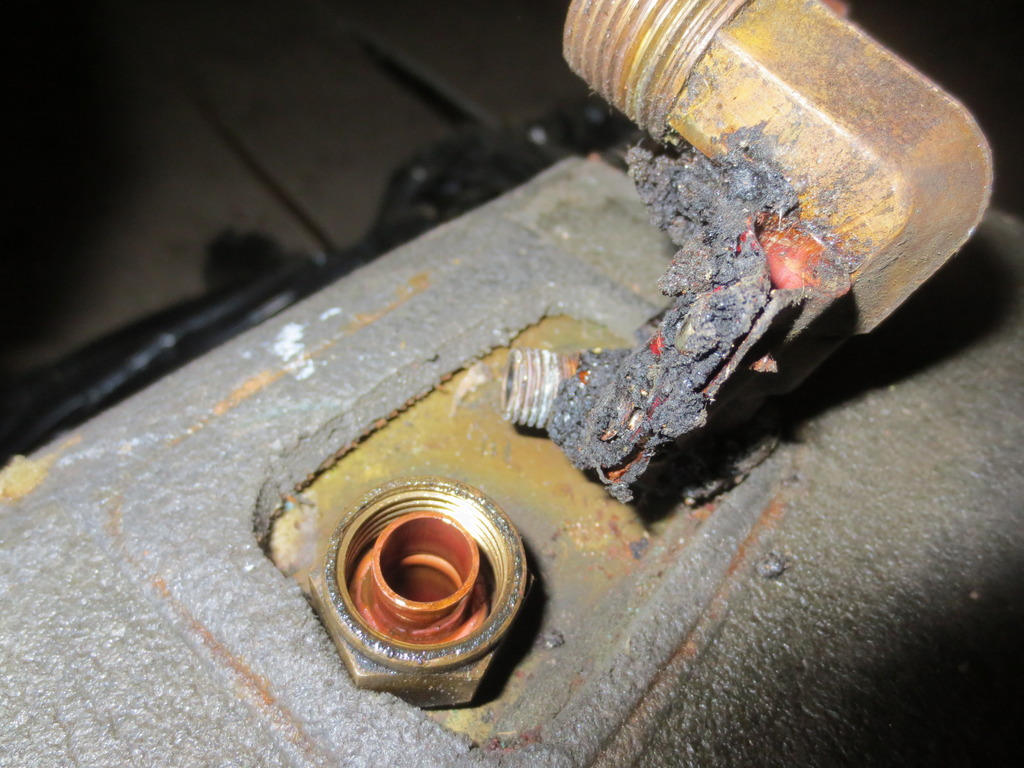
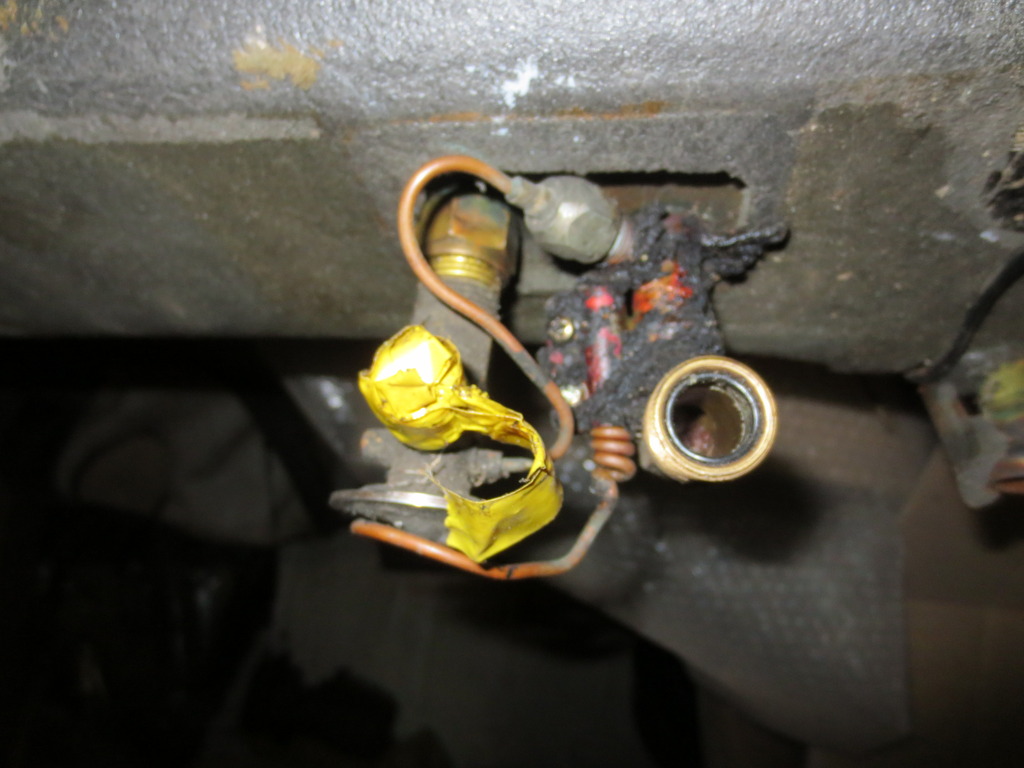
Captive nut on the evaporator pipe from the cabin Delanaire unit:
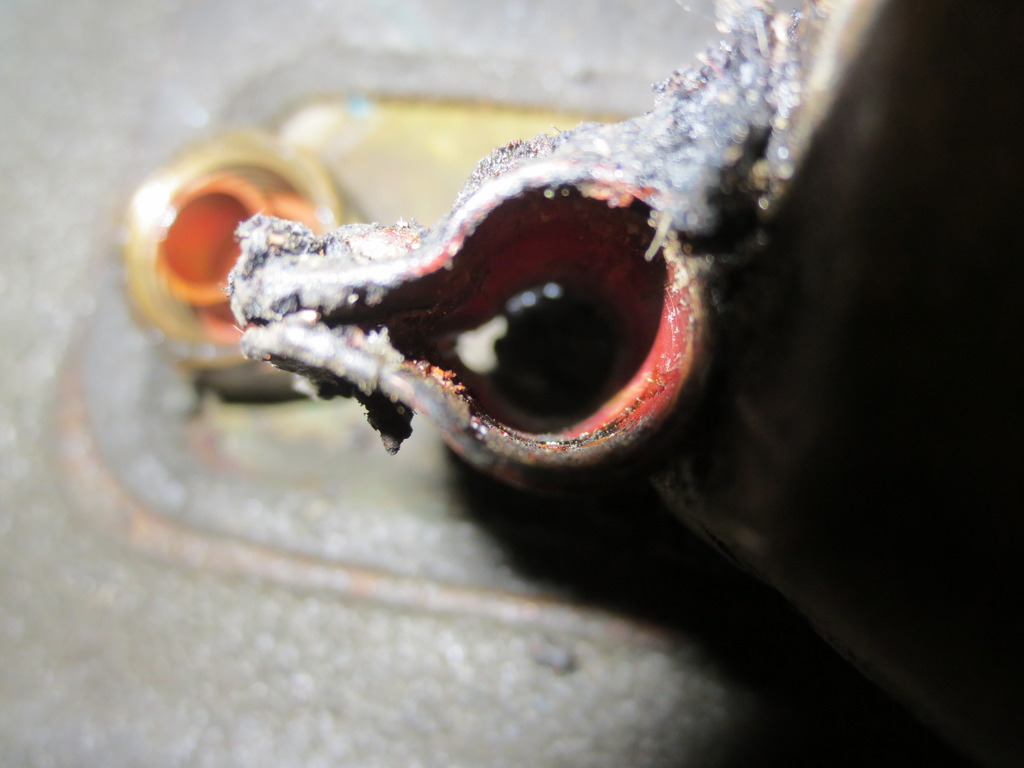
Unit small coil clamp top view:
Unit small coil clamp side view:
Basically there are three things to undo.
1) The big main nut is captive on the pipe coming out of the unit and to remove the expansion valve this must be screwed clockwise as you look at it from the engine bay TOWARDS to cabin. (ie the normal anti-clockwise direction to undo it if you were sitting in the cabin). Obviously support the valve body while undoing the captive.
2) There is a small coil on the end of a thin copper tube as shown in the first two pics. This is clamped into the system against the other fitting that exits the cabin , on my unit the clamp is held by two self tappers, and miraculously they are accessible from above, once you have removed all the bitumastic gunk that seals everything.
3) There is then a second small pipe with a small captive nut on it which also screws into the other fitting that exits the cabin. This is very hard to access as it is hard against the firewall hole the lot pokes through. I think it would need the manifold balance pipe removing, and the main aircon hoses removing, to get to it. It IS possible though as it has been done on mine without removing the engine. Do not forget to put the O ring in place on the expansion valve to cabin pipe join!
Mind you, if the engine is out, it is much, much easier! The Delanaire unit was installed by the factory with the expansion valve fitted in place, there is a specially made square hole so the lot can be poked through from the cabin side, and I actually did this when I did my rebuild. If anyone else has the unit out, my advice would be to fit a new expansion valve then.
Final pic of the valve in the back of the unit so you can see where all the bits go.
Greg
Last edited by Greg in France; Sep 13, 2015 at 02:29 AM.
Memory now a little less fuzzy, take the engine out, then that valve is a snap to change, perfect.
Sort all those pesky oil leaks at the same time.
Good weekend tempter.
LUV it.
Serious side now:
As Greg mentioned, SUPPORT that valve WELL when undoing that evaporator flare nut. The pipe from the in cabin evaporator will snap in a heart beat, and then the dash comes out, SERIOUSLY.
Last edited by Grant Francis; Sep 13, 2015 at 05:13 AM.
Thanks very much Greg, those photos are fantastic, exactly the info I was looking for so that I could understand how the sealing surfaces mate and the mechanics of the horizontal captive flare nut that you mention in point #1. All other nuts and the capillary tubes are out without too much of a problem.
I notice that my S3 has a metal "tray" underneath that apears to be part of the evaporator and that further limits access.
So I see that cutting off the captive nut is not a good option for me. I'm going to get some crows foot wrenches and maybe some angled wrenches and give it another go. Right now I'm using a 7/8" straight wrench on the captive nut, and I have very little freedom of movement. What did you use, Greg?
I will keep using PB Blaster penetrating oil, try heating the nut with a map gas torch (possibly igniting the black gasket sandwiched the firewall and evap and see. If anyone has other suggestions, you know how drowning men like straws
I don't suppose you changed out the orange rubber seal inside the captive nut?
A crows foot may do it, but the nut will never go 'fingers only' to undo, I suspect that if you can move it half a turn it is just a matter of patiently doing one flat at a time. If necessary buy another spanner and heat and bend it so between the two you can move it a flat at a time. If the nut really is jammed, and I doubt it, as Grant says as long as you support the valve you are removing, you can be pretty strong on the spanner. It is highly unlikely the unthreaded surfaces between the captive nut and the in-dash evaporator pipe are the trouble. Of course, just to cheer you up, nothing is impossible...
The O ring is easy to fit and I think you should use a new one!
Greg
I am about to try to repair my A/C
So any helpful info is appreciated.
My first step is to remove the Sanden SD709 compressor to try to rebuild assuming I can obtain parts. Unfortunately it looks like I will have to remove cooling system crossover pipe to gain access to compressor mounting bolts - no access even with water pressure cap removed........
Yippee, it's out. The crowsfoot wrench and stubby ratchet I ordered came in today and made the difference. The two days shipping time gave me a chance to spray penetrating oil daily and that must have helped too
For the next shade tree mechanic, you'll need a 7/8" for the captive nut, a 3/4" or 19 mm for the exp valve body and a 1 1/8 for the outlet hose. I think the capillary nut is 5/8". Get the slimmest wrenches you possibly can.
I removed the balance hose and the one way valve from the air rails to the air pump, detached the heater valve from the firewall but did not pull the hoses since I didn't feel like draining the coolant. The hoses flex enough to put your hand between the detached heater valve and the firewall.
I shouldn't be trying to turn the expansion valve itself, BUT the the captive nutt??? If I can secure the captive and twist on the expansion valve itself (which does have flats for a wrench) am I in danger? Is(nt) the same overall force exerted on the outlet/inlet pipe for the evaporator the same, either way? My brain hurts!
I shouldn't be trying to turn the expansion valve itself, BUT the the captive nutt??? If I can secure the captive and twist on the expansion valve itself (which does have flats for a wrench) am I in danger? Is(nt) the same overall force exerted on the outlet/inlet pipe for the evaporator the same, either way? My brain hurts!
The valve stays still, the captive nut is u#turned, but remember it is turned from your viewpoint clockwise (ie anti clockwise if you were looking at it through the firewall!
There are cast flats (or in the above photo a cast hex) on the valve brass body you get a spanner on to hold it against the torque.
Greg, you're amazing. Thank you.
I'm at the store now grabbing a crows foot set... Just off work. I'll go, give the thing a spray or two and save it for the morning. Cam covers are still off. The blaster makes it sound like he's wrestling with the paint removal (its been days) I'm getting frustrated. Will have a go at everything tomorrow...
More dumb questions. I see where the small captive nutt goes,,, what about that longer stretch of cooper. Or, will it become apparent when I get the old thing out?
Well that wasn't so bad, at all. Nothing to fear but fear itself.
But one serious question...!
Were there large quantities of good ol American high grade LSD moving around the UK during the 70s and 80s???
I took a bit of a different tact in removal. I am very lucky in that I have most of the top half of the engine off. Cam covers and intake. Throttle stand and a few other things out of the way... This is what worked for me and I never felt like I was putting a great amount of stress on the the area of the expansion valve just behind the captive nutt and the evaporator.
I was able to get a long handled 7/8ths,,, and YES it is a 7/8ths,,, on the captive nutt. At that, understanding what I think I understand about captives, and having sprayed liberally with PB over the last couple of days, I turned everything. When I saw I could turn the captive nutt, which also turned the entire expansion valve, I turned the entire two pieces clockwise (towards the LH fender) and then put a 17mm wrench (spanner) over the square body and top of the valve. I then held the captive in place with the spanner and turned the valve anti(counter) clockwise. The two came loose at that. Easily. I was relieved. I then repeated that process, with PB lube for fear of friction between the captive and evaporator tubing, not wanting the captive to slice thru or cut the tubing from the evaporator... All and all it took less time to do it than to write all of these nervous nelly posts...
I need some tranquilizers...made specially for new DIY XJS owners!!! If there's not a product there should be one
Ok, now to put it all back together, tomorrah...
Thank you OP and thank you Greg, Grant and all who added to this perfect thread!
Damnd messy back there and lots of stuff in the way...