When you click on links to various merchants on this site and make a purchase, this can result in this site earning a commission. Affiliate programs and affiliations include, but are not limited to, the eBay Partner Network.
I have a new steering rack; a later model w/ the 14mm shafts as opposed to the 16mm on the older (1978) for what it's worth.
I've replaced the upper & lower ball joints, control arm & sway bar bushings w/ polyurethane and also have polyurethane bushings for the steering rack.
New tie rod ball joints are ~ same distance as was on the original steering rack that was removed for a starting point.
Centering the rack questions and any general tips appreciated.
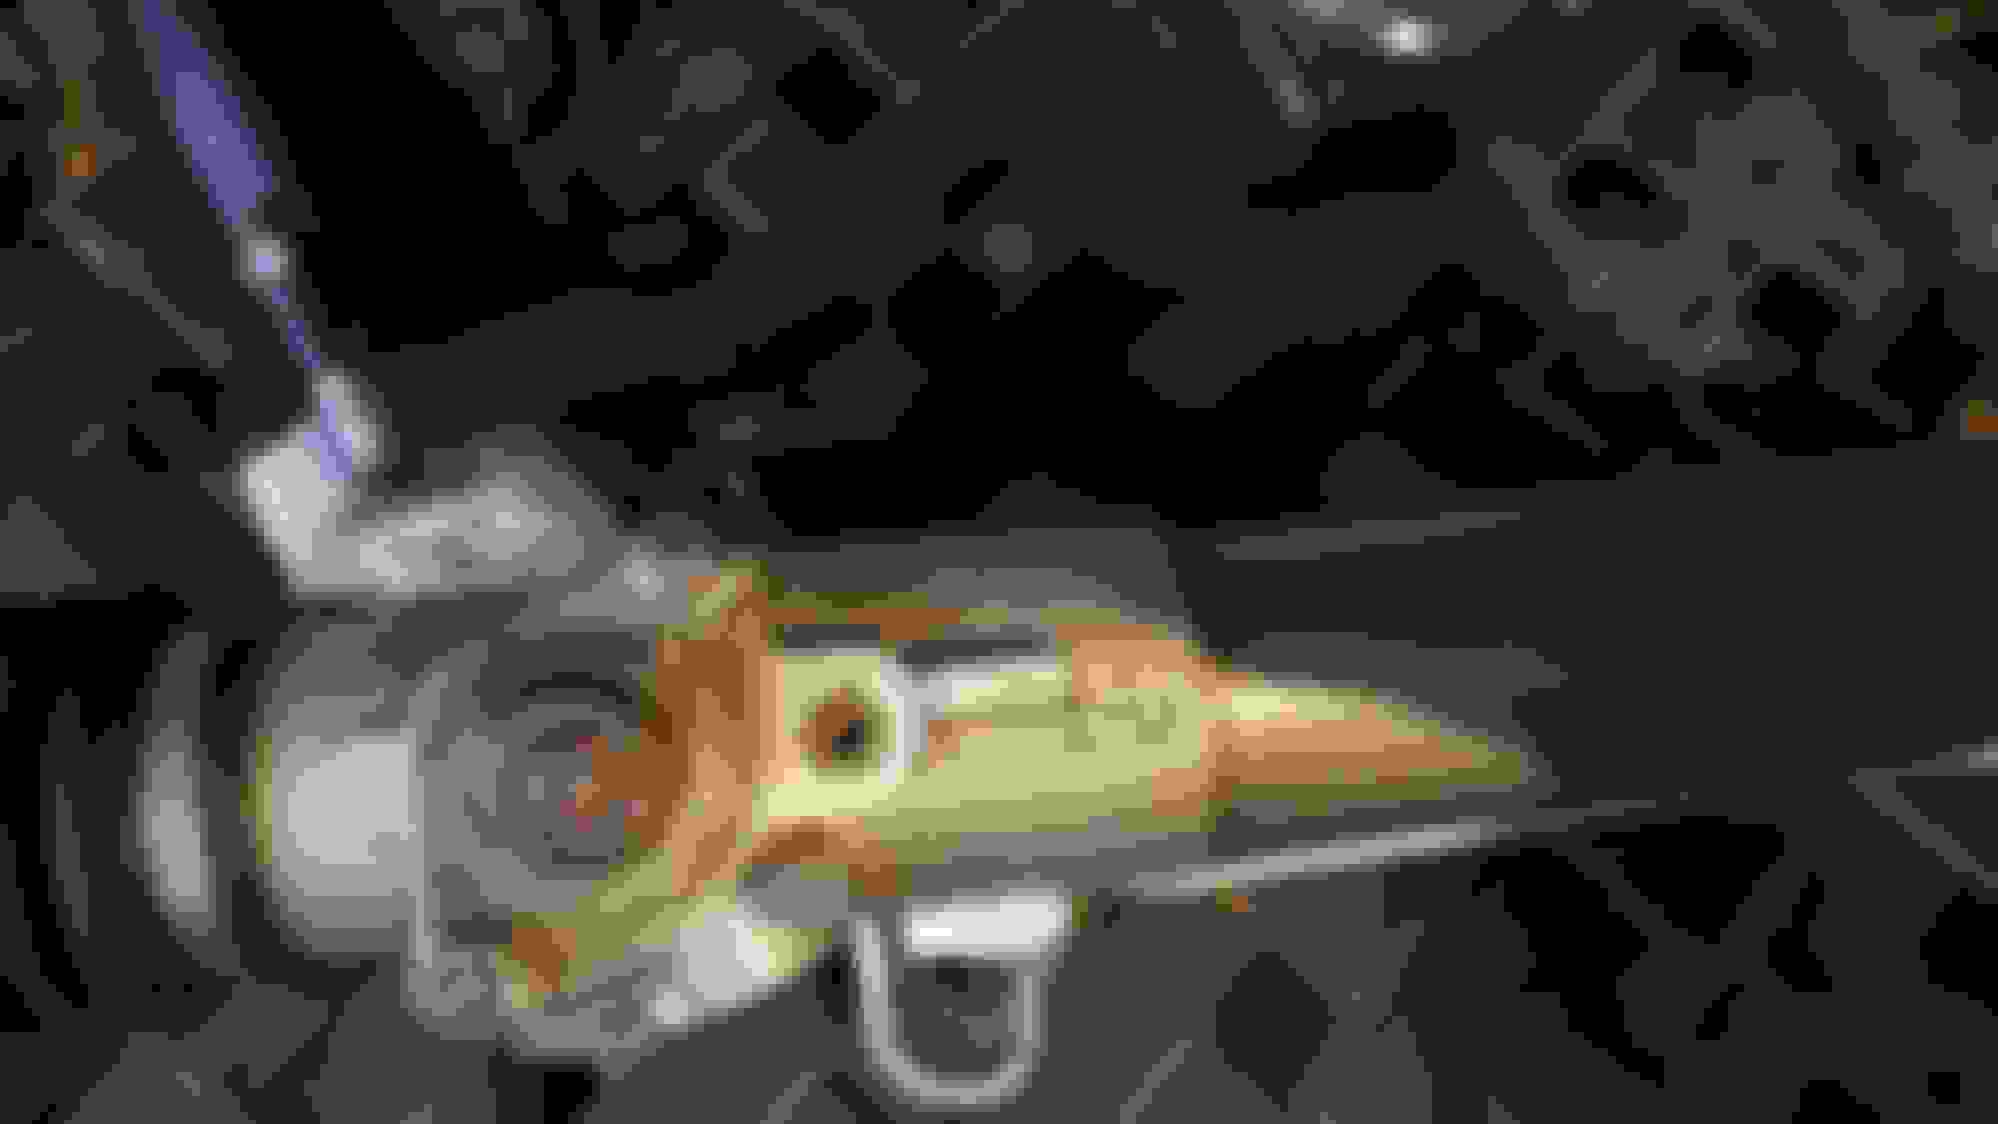
Correct that I remove the plug (6mm allen) as shown on the pic below and use this access to locate a notch in the rack shaft via a small screw driver?
I'm assuming it would be wise to go ahead and center the rack shaft while it's our of the car for ease of access - any suggestions on a temporary collar that matches the splines of the input shaft? Looking to use a vice-grip in this temporay collar in order to move easily in slow increments. I can move via the rack arms but it's very jerky this way and obviously do NOT want to attach a wrench to the splines without a collar to protect them.
OK, I'm now assuming the plug shown in the pics of my initial post is not the right plug - when moving the steering shafts back and forth with the plug removed the guts inside the housing cylinder does not move / slide at all.
I'm referring to the lug that's shown installed in the top pic and then removed in the bottom pic - the plug is the one is immediately left of the cast 'pow-a-rak' lettering and is a 6mm allen key.
I thought I read that the access plug in another thread is 4mm.
Anyone able to identify the plug location with a pic for a visual representation?
place fixed pointer against steering wheel pointing to mark on rim
turn wheel to other lock carefully counting the revolutions and part-revolutions and make mark no 2.
measure carefully the distance round the rim between mark 1 and mark 2 and/or calculate precisely half of (4)
turn wheel to the exact half position
This is how wheel geometry laser trackers find the mid point (obviously electronically), then lock the steering wheel with a gizmo, and it becomes their datum point for all the adjustments.
Racks are made fantastically accurately and this will always find the centre point if you cannot find/have not got any other method.
OK - sounds like I'm off track.
I removed the 6mm allen head that's in between the cast word of 'Pow-a-Rak' and the hex-head bolt that's shown in the pic below where Dukejag added the arrow to the my pic below.
Is this hex-head as shown w/ the arrow the spot for the site-hole for centering?
Thanks again for the assistance.
Best, Steve
Grant - did you remove the bolt and fit a grease nipple?
Please explain?
Correction: Concerning the small bolt with the arrow tip right on it in the photo in post No. 9.
On Jaguar Adwest racks this small bolt can be undone and a thin wire (eg coat hanger wire, or 2 mm probe) carefully inserted into the cavity thus revealed. Then with a friend moving the steering gently back and forth the wire will click down to the rack indentation, through a small hole on the nylon rack damping bush just visible under that small bolt.
But NOTE: the large threaded piece with the flats machined into it each side that the small bolt threads into, must NOT be moved, nor the large hex nut below it. These control the rack damper.
Last edited by Greg in France; Oct 2, 2019 at 05:01 AM.
Ok - Sounds like a plan!
Next question - When I undo that bolt am I correct to assume that fluid will flow out?
Better not.
There may be some old gooey liquid grease shiit if the Jaguar Gods are against yoou, but steer fluid, NOPE.
It is NOT, repeat, NOT a bolt. It is a plug, about 3 threads long, thats it. The early Jags had a nipple there, but service monkeys pumped grease in there until it filled the RH bellows, and the rack was unhappy.
Last edited by Grant Francis; Oct 2, 2019 at 05:36 AM.
OK - sounds like I'm off track.
I removed the 6mm allen head that's in between the cast word of 'Pow-a-Rak' and the hex-head bolt that's shown in the pic below where Dukejag added the arrow to the my pic below.
Is this hex-head as shown w/ the arrow the spot for the site-hole for centering?
Thanks again for the assistance.
Best, Steve
Grant - did you remove the bolt and fit a grease nipple?
Please explain?
The hex PLUG that is arrowed is the site hole, BUT, you will see ZERO.
I use a coathanger (what else is a coathanger for really?), opened up, and insert in the hole, rotate the rack as you apply SENSIBLE pressure to the probe, and when the hole drilled in the rack lines up, OOPS, it drops into that hole. You are NOW at rack central. It will OOPS about 2mm, so dont panic, nothing will disappear.
Yes, I fitted a grease nipple. Size etc, no bloody idea, I have a large coffee jar full of grease nipples, so just went rumaging, simple. It was time for a beer anyway.
Last edited by Grant Francis; Oct 2, 2019 at 05:37 AM.