
What's The Best Way To Fit The Spoiler? (XJS V12)

Thread Starter
|
Veteran Member
Joined: Feb 2013
Posts: 17,809
Likes: 3,945
While I'm not quite ready to put the Spoiler back, I've run into a 'Catch 22' Situation.
The 'Under Tray' and the 'Spoiler' are both off the Car and knowing what a pain it was to remove all those rusty Self Tapping Screws (which took me almost a day!)
I am intending to replace all of those Self Tapping Screws, with M6 Stainless Steel Bolts.
Now herein lies the problem!
Knowing the number of Bolts required, to bolt the 'Spoiler' to the 'Under Tray' It would make sense to me anyway, to bolt the 'Spoiler' to the 'Under Tray' first.
But then if I do that, how can I bolt the complete assembly back onto the Car, as the 'Under Tray' will get in the way, of bolting it onto the Body, as I won't
be able to get my hand inside it to do up the nuts.
If I bolted the 'Under Tray' on first, this could be even worse, as I wouldn't be able to bolt the 'Spoiler' on.
Ideas please Guys.
Last edited by orangeblossom; May 20, 2015 at 10:46 AM.

Veteran Member


Joined: Jan 2012
Posts: 14,571
Likes: 10,766
From: France
OB
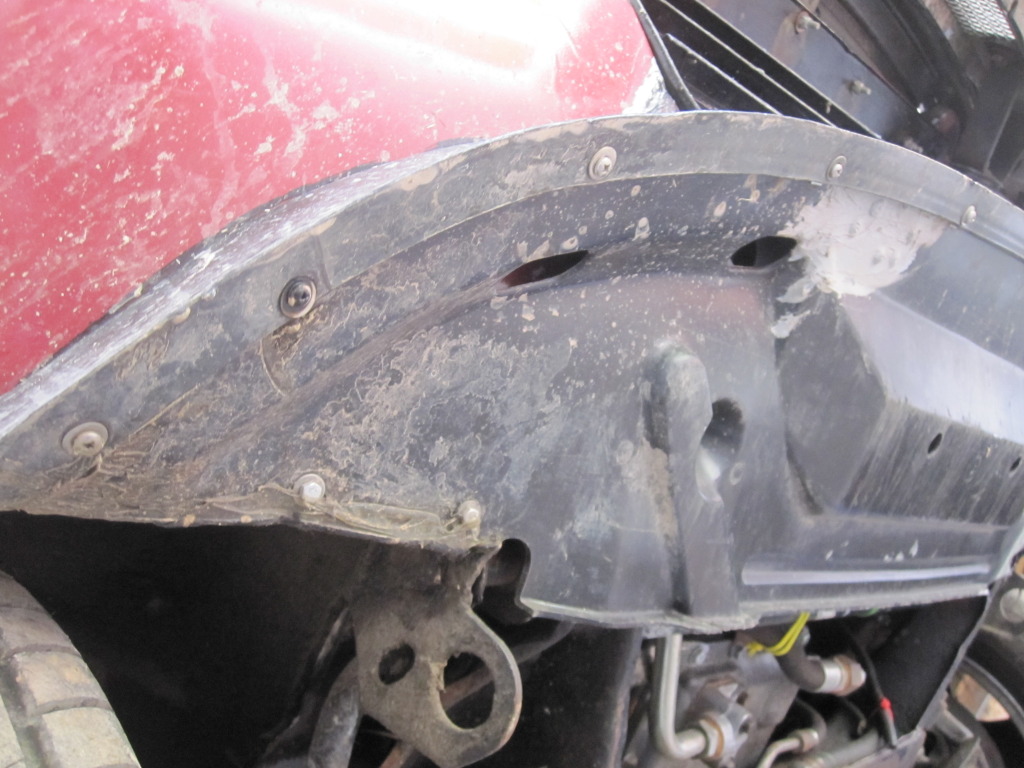
The spoiler has to go on first. The problem with using bolts to attach the undertray to the spoiler is the shape of the space on the spoiler. I puzzled with this myself and did not come up with a great solution.
As the spoiler fixing space is sort of sideways V shaped "<", so once the undertray is in the sideways V, getting the actual nut in and captive so you can do up the bolt is not easy. In fact getting a nut in at all is not easy. Similarly if you try to put the bolt through the undertray and then push it through the spoiler, basically impossible for the reason you mention.
Finally, a line of bolt heads sticking out the bottom front edge of the spoiler is asking for the whole caboosh to be ripper off on an obstruction. 5 mm of bolt head does not seem much, but it will catch on things in a way a roundhead self tapper will not.
So what I did was to use new j clips on the undertray, liberally waxoiled up, and stainless self tappers with stainless washers to secure from the outside. Essentially OEM. Knowing how ingenious you are, I would love a better idea. I did think of fixing clinch nuts into the undertray, but even these were too deep for the space available.
One important tip, fixing the rear of the tray to the wheelarch baffles and then liberally sealing all round is essential. This is a place where a bit of ally angle "iron" and clinch nuts works well. The undertray fixed by clinch nuts and bolt into them to one side of the angle iron and the baffle to the other. Followed by sealer all round the baffles and tray/baffle joins. keeping the cavity behind the baffles dry is seriously important and not hard with decent sealer trowelled on.
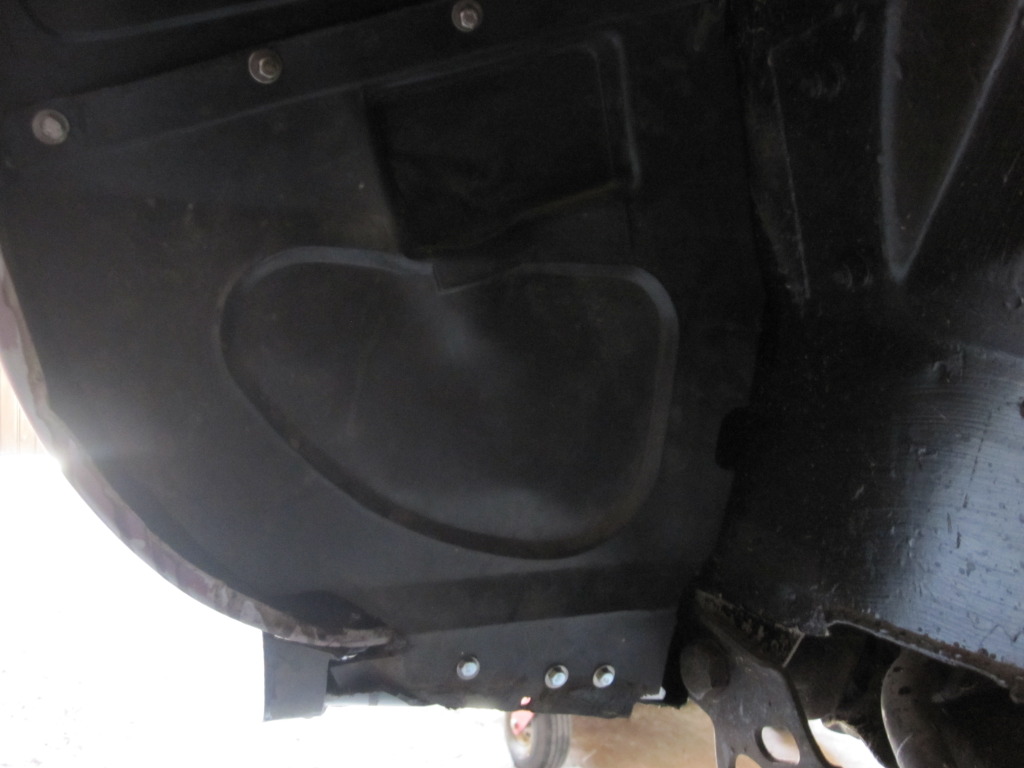
Also fixing the middle of the tray into the cross member is important for keeping it rigid, using the nylon inserts that should be there and self tappers with big washers to spread the load.
Greg
The spoiler has to go on first. The problem with using bolts to attach the undertray to the spoiler is the shape of the space on the spoiler. I puzzled with this myself and did not come up with a great solution.
As the spoiler fixing space is sort of sideways V shaped "<", so once the undertray is in the sideways V, getting the actual nut in and captive so you can do up the bolt is not easy. In fact getting a nut in at all is not easy. Similarly if you try to put the bolt through the undertray and then push it through the spoiler, basically impossible for the reason you mention.
Finally, a line of bolt heads sticking out the bottom front edge of the spoiler is asking for the whole caboosh to be ripper off on an obstruction. 5 mm of bolt head does not seem much, but it will catch on things in a way a roundhead self tapper will not.
So what I did was to use new j clips on the undertray, liberally waxoiled up, and stainless self tappers with stainless washers to secure from the outside. Essentially OEM. Knowing how ingenious you are, I would love a better idea. I did think of fixing clinch nuts into the undertray, but even these were too deep for the space available.

One important tip, fixing the rear of the tray to the wheelarch baffles and then liberally sealing all round is essential. This is a place where a bit of ally angle "iron" and clinch nuts works well. The undertray fixed by clinch nuts and bolt into them to one side of the angle iron and the baffle to the other. Followed by sealer all round the baffles and tray/baffle joins. keeping the cavity behind the baffles dry is seriously important and not hard with decent sealer trowelled on.

Also fixing the middle of the tray into the cross member is important for keeping it rigid, using the nylon inserts that should be there and self tappers with big washers to spread the load.
Greg
Last edited by Greg in France; May 20, 2015 at 11:18 AM.
Thread Starter
|
Veteran Member
Joined: Feb 2013
Posts: 17,809
Likes: 3,945
Hi Greg
Doh! Why didn't I think of that!
It very much looks like I will be back to Self Tappers, though Stainless Steel ones this time.
Unless I get a flash of inspiration, instead of the flashes of lightning, that we have been getting all day.
Its hard to make any real progress, with the Weather as bad as this but I will Soldier on regardless though no doubt will be needing more help.
I wonder if any potential owners have any idea what they're in for, as its one of those Cars that requires your total devotion, where being hands on is essential.
Unless of course you love to pay those massive garage bills these Cars attract.
PS Thanks for the Photo's (very useful)
Doh!
It very much looks like I will be back to Self Tappers, though Stainless Steel ones this time.
Unless I get a flash of inspiration, instead of the flashes of lightning, that we have been getting all day.
Its hard to make any real progress, with the Weather as bad as this but I will Soldier on regardless though no doubt will be needing more help.
I wonder if any potential owners have any idea what they're in for, as its one of those Cars that requires your total devotion, where being hands on is essential.
Unless of course you love to pay those massive garage bills these Cars attract.
PS Thanks for the Photo's (very useful)
Veteran Member
Joined: May 2013
Posts: 1,703
Likes: 470
From: Orlando
When l did mine I screwed the spoiler to the car then the tray. I had some SS sheet and made the 4 small angle brackets that fix the tray to the inner wing covers. Use plastic numberplate bolts for fixings. After cleaning and painting the crossmember I used some SS washers between the tray and it before screwing the tray up. This should give a small outlet for the water that before had nowhere to go.
Thread Starter
|
Veteran Member
Joined: Feb 2013
Posts: 17,809
Likes: 3,945
Hi Steve
As a matter of fact, rivets were crossing my mind, as they are very easy to drill out and so I might experiment with those.
As a matter of fact, rivets were crossing my mind, as they are very easy to drill out and so I might experiment with those.
Thread Starter
|
Veteran Member
Joined: Feb 2013
Posts: 17,809
Likes: 3,945
When l did mine I screwed the spoiler to the car then the tray. I had some SS sheet and made the 4 small angle brackets that fix the tray to the inner wing covers. Use plastic numberplate bolts for fixings. After cleaning and painting the crossmember I used some SS washers between the tray and it before screwing the tray up. This should give a small outlet for the water that before had nowhere to go.
To give me better access to the Engine, as I want to get to clean the parts I couldn't reach before.
Trending Topics
Thread Starter
|
Veteran Member
Joined: Feb 2013
Posts: 17,809
Likes: 3,945
I'm doing exactly the same and getting all the bits and pieces ready before I start to put it all back together.
One of the things I've been doing while waiting for the rain to stop, was to give a new lease of life to the Spoiler off my 'Scrapper' which was in better
condition than the one that I took off my Car.
Although before I got to work, it was looking like a basket case.
Fit for the Skip?

Time to get to work with the Angle Grinder.

Followed by a good clean.

And a bit of 'Spit and Polish'

Last edited by orangeblossom; May 22, 2015 at 03:24 AM.
Thread Starter
|
Veteran Member
Joined: Feb 2013
Posts: 17,809
Likes: 3,945
The lack of Spares for these Cars freaks me out.

Thread
Thread Starter
Forum
Replies
Last Post
Currently Active Users Viewing This Thread: 1 (0 members and 1 guests)