VVT Solenoid seal replacement question
#1
For those of you that have done it, someone in another sub-forum was talking about this very thing, and the question was raised - how do you disconnect the two wire lead from the top of the solenoid so that you can remove and replace the seal? He was saying he didn't see the standard "click and remove" connector like in other places. I have a 2007 XK, and don't want to tear anything up trying to disconnect it.
Last edited by Geosnooker2000; 01-24-2017 at 10:04 PM.
#2
#3
Join Date: Jan 2015
Location: Naperville, Illinois USA
Posts: 4,571
Received 1,894 Likes
on
1,285 Posts
That's one thing that I don't like about my XK, is that every electrical connector that I've encountered has been different. I've probably faced close to a dozen, and they're all different (squeeze this, push that, poke here). Either they got a bargain on odd-lots of connectors at Connectors-R-Us, and just randomly throw them in, or they designed a car that can be put together by monkeys, since any connector can only fit one place.
Just makes taking these things apart a real PITA!
Sorry, no experience with the VVT, just had to rant about the damn connectors.
Just makes taking these things apart a real PITA!
Sorry, no experience with the VVT, just had to rant about the damn connectors.
#4
That's one thing that I don't like about my XK, is that every electrical connector that I've encountered has been different. I've probably faced close to a dozen, and they're all different (squeeze this, push that, poke here). Either they got a bargain on odd-lots of connectors at Connectors-R-Us, and just randomly throw them in, or they designed a car that can be put together by monkeys, since any connector can only fit one place.
Just makes taking these things apart a real PITA!
Sorry, no experience with the VVT, just had to rant about the damn connectors.
Just makes taking these things apart a real PITA!
Sorry, no experience with the VVT, just had to rant about the damn connectors.
#5
#6
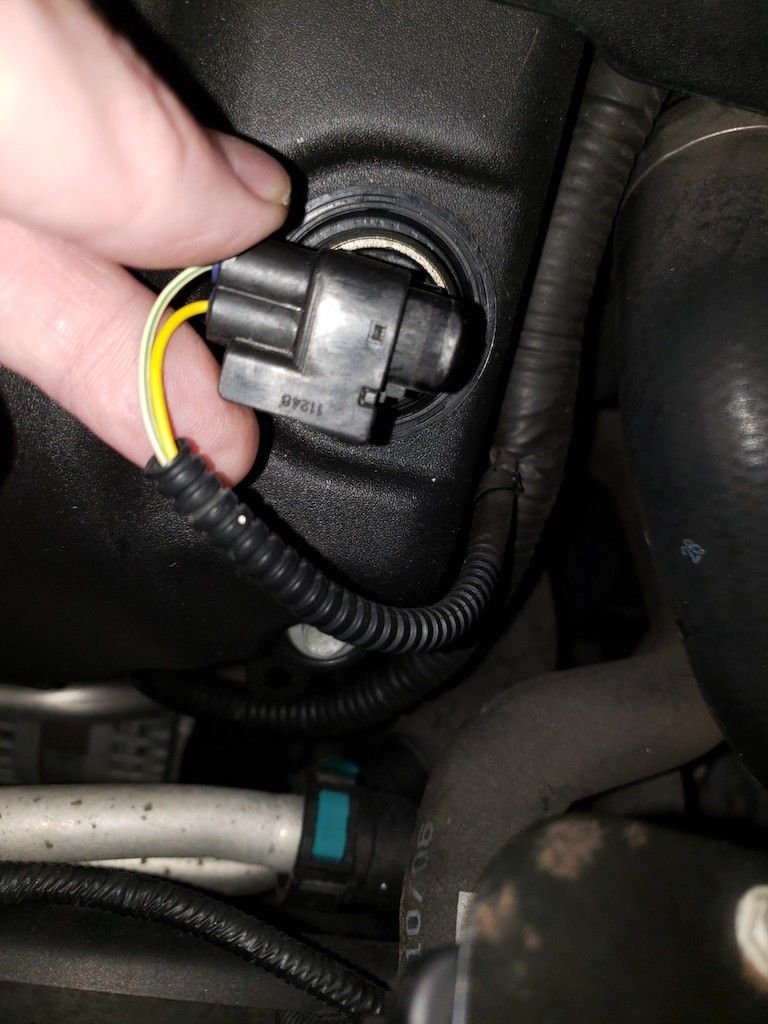
I figured it out without breaking anything. Use a small screwdriver to pry up tab at the head of the clip, not the tail of the clip, while pushing clip off with the screwdriver and pulling with the other hand (rocking back and forth).
#7
I need to replace the VVT solenoid seal on the passenger side. It requires removal of the valve cover. Then replacement of VC gasket certainly, spark plug aperture gaskets, PCV o-ring, the valve cover bolt ring seals. Does anyone know if these come as a kit or do I need to purchase separately?
Edit: Disregard, I found kits that include the valve cover gasket, spark plug and valve cover bolt seals. I can then just order the VVT solenoid seal and PCV o-ring separately. They didn't show up in my initial search which was weird because I see them on three local auto parts stores now. Maybe I misspelled "kit"
Edit: Disregard, I found kits that include the valve cover gasket, spark plug and valve cover bolt seals. I can then just order the VVT solenoid seal and PCV o-ring separately. They didn't show up in my initial search which was weird because I see them on three local auto parts stores now. Maybe I misspelled "kit"
Last edited by Sean W; 06-08-2019 at 12:37 PM.
Trending Topics
#8
I need to replace the VVT solenoid seal on the passenger side. It requires removal of the valve cover. Then replacement of VC gasket certainly, spark plug aperture gaskets, PCV o-ring, the valve cover bolt ring seals. Does anyone know if these come as a kit or do I need to purchase separately?
Edit: Disregard, I found kits that include the valve cover gasket, spark plug and valve cover bolt seals. I can then just order the VVT solenoid seal and PCV o-ring separately. They didn't show up in my initial search which was weird because I see them on three local auto parts stores now. Maybe I misspelled "kit"
Edit: Disregard, I found kits that include the valve cover gasket, spark plug and valve cover bolt seals. I can then just order the VVT solenoid seal and PCV o-ring separately. They didn't show up in my initial search which was weird because I see them on three local auto parts stores now. Maybe I misspelled "kit"
#9
If I do it, I'll take a few pics and pointers if necessary and some part numbers.
kj07XK did a nice write up on the left side (valve covers) and that's the tougher side.
I'm pulling the under scuttle tomorrow in part to replace the accessory drive belt. Although I'm going to do it from the top, it looks like it's better viewed from underneath. At any rate, I'll do the usual visual for leaks once I have it on the lift. If it's bad enough (for me), I'll order parts. From up top it just looks a bit wet, not dripping. Anyway, here's the write up.
https://www.jaguarforums.com/forum/x...l-leak-199975/
Last edited by Sean W; 06-08-2019 at 02:57 PM.
The following 2 users liked this post by Sean W:
kj07xk (06-08-2019),
myexcursion (06-08-2019)
#10
#11
Well, as I posted in post #6, there is no need to remove the valve covers to replace these seals. You just have to unplug the electrical connectors, pull the sensors, and replace the round seals. Put them back in, plug them up, and you are GTG. Mine are still leak-free. The date on the first post in this thread is how long ago I did it.
The following users liked this post:
kj07xk (06-09-2019)
#12
Well, as I posted in post #6, there is no need to remove the valve covers to replace these seals. You just have to unplug the electrical connectors, pull the sensors, and replace the round seals. Put them back in, plug them up, and you are GTG. Mine are still leak-free. The date on the first post in this thread is how long ago I did it.
The following users liked this post:
Geosnooker2000 (06-09-2019)
#13

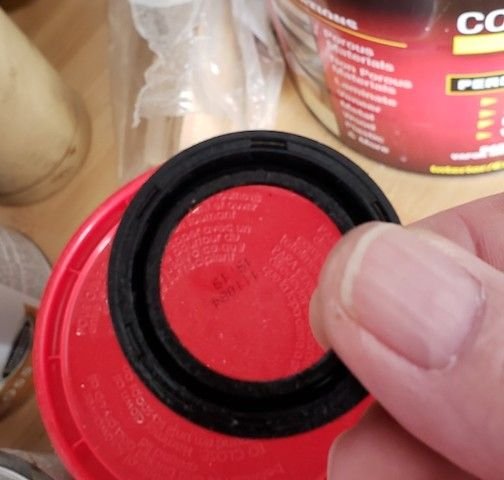
Here's the seal as it will sit in the valve cover

Side view

Remove plug by squeezing the tab at the bottom where my index finger is

Here's a good look at the seal with the VVT solenoid unplugged. As I mention above, the seal just pulls straight up.
Last edited by Sean W; 12-06-2019 at 02:18 PM.
#14
#15
#16
 In my case the seal poped out as soon as I tuched it with a screwdriver , wish all the maintenance items were this easy..
__________________
 2008 XKR Convertible, (mods: AlphaJagTuning ECU Tune , 1.5lb pulley, (200cel cats( are now melted), xpipe, Bosch 001 pump, 180 Thermostat.
Drag strip : 7.9sec 1/8mi 90 MPH . 1/4 mile 12.55 at 111.98mph
432rwh Dyno on Mustang Dynometer , Approx 511 crank HP.
2013 XJ 5.0 Supercharged, (stock with Alpha Jag ECU tune), estimated power: 600+ hp, 7.7sec 1.8th mi/95mph
#17
#19
The following users liked this post:
steve_k_xk (05-23-2023)

