
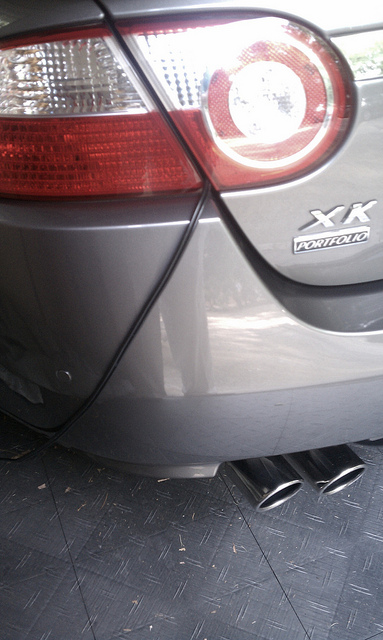
Wow what big exhaust tip I have

Thread Starter
|
Veteran Member
Joined: Sep 2013
Posts: 5,209
Likes: 1,847
From: NY
OK so today I'm going through the inspection and the insurance photo's and then started to do some more clean up. I got a note to the dealer on how I was not happy about the detailing on the car. Looks like they just washed it and wiped down the interior. So while cleaning I see the quad exhaust tips are 3 1/4" dia. Pretty big and I don't remember them being that big on the 2010 I drove. Next as I was trying to sync the garage door opener I got the BATTERY sign on the main screen. So I opened up the rear left vent panel in the trunk and put my 10 amp charger on it. Seems like it was drawn down at the dealers . I also noticed that the dealer had the battery cover off as the 4 screws were in a plastic bag. Next week I'll pull the battery cover and see what's going on and while I'm there will most likely put on a wire for the smart charger. I also had fun today but had a major problem. I am having a hard time keeping it under 70 , LOL

Veteran Member
Joined: May 2013
Posts: 3,294
Likes: 1,250
OK so today I'm going through the inspection and the insurance photo's and then started to do some more clean up. I got a note to the dealer on how I was not happy about the detailing on the car. Looks like they just washed it and wiped down the interior. So while cleaning I see the quad exhaust tips are 3 1/4" dia. Pretty big and I don't remember them being that big on the 2010 I drove. Next as I was trying to sync the garage door opener I got the BATTERY sign on the main screen. So I opened up the rear left vent panel in the trunk and put my 10 amp charger on it. Seems like it was drawn down at the dealers . I also noticed that the dealer had the battery cover off as the 4 screws were in a plastic bag. Next week I'll pull the battery cover and see what's going on and while I'm there will most likely put on a wire for the smart charger. I also had fun today but had a major problem. I am having a hard time keeping it under 70 , LOL
1) Hand wash it.
2) Clay Bar the entire car (1 hour) Buy the Mothers or Meguiars Gold Clay bar kit $20.00
3) Buy a can of Meguiars NXT Generation 2.0 Paste Wax and apply ($22.00) Buff the wax with microfiber towels.
4) Buy a few quality MicroFiber towels ($7.00 to $8.00 each)
5) Apply 303 High Tech Fabric Guard to the covertible top with a high quality paint brush. (303 High Tech Fabric Guard 32 oz bottle).
All of these products are available at Amazon.com
Your car will look great.... guarenteed.
Veteran Member
Joined: May 2013
Posts: 3,294
Likes: 1,250
OK so today I'm going through the inspection and the insurance photo's and then started to do some more clean up. I got a note to the dealer on how I was not happy about the detailing on the car. Looks like they just washed it and wiped down the interior. So while cleaning I see the quad exhaust tips are 3 1/4" dia. Pretty big and I don't remember them being that big on the 2010 I drove. Next as I was trying to sync the garage door opener I got the BATTERY sign on the main screen. So I opened up the rear left vent panel in the trunk and put my 10 amp charger on it. Seems like it was drawn down at the dealers . I also noticed that the dealer had the battery cover off as the 4 screws were in a plastic bag. Next week I'll pull the battery cover and see what's going on and while I'm there will most likely put on a wire for the smart charger. I also had fun today but had a major problem. I am having a hard time keeping it under 70 , LOL
Thread Starter
|
Veteran Member
Joined: Sep 2013
Posts: 5,209
Likes: 1,847
From: NY
If you decide to go with a smartcharger like a CTEK brand, the charger will come with a harness that has eyelets that will connect to the screw post of the positive side of the battery. Since your Jag is a 2012, I understand that you will need to put the black (neutral/negative) wire to a ground post on the chassis rather than the negative side battery terminal. I understand there is a ground post in the spare tire wheel well.
Veteran Member
Joined: May 2013
Posts: 3,294
Likes: 1,250
Thanks Rich. Today I used my 10Amp charger to bring the battery up to normal charge. I used the + stud in the left hand grill in the boot and the stud in the spare tire well. Had it on for 3 + hours and it is almost fully charged. I then put the smart float charger (2.2A) on and left it there for the night. Hopefully the dealer didn't toast the battery while it was sitting unused for almost a month. We'll just have to wait and see. As far as the detailing is concerned I don't have a problem doing it and my bet is it won't need claying. I'll look at that next week.
The paint surface is most likely NOT as smooth as you might want it to be. For a small price of $20.00 bucks for the clay bar kit, when the Jag is worth thousands, it is worth at least giving it a try.
My 2014 Porsche 981 only had 1400 miles on it when I clay barred the car. It sat outside on the dealers lot for several months. The surface of the paint is now smoother than a baby's butt. And that is pretty smooth. Adding a coat of good wax after clay barring will add to the beauty of the car, especially with the Italian Racing Red paint.

Veteran Member
Joined: May 2010
Posts: 6,290
Likes: 485
From: Arlington, VA USA
If you decide to go with a smartcharger like a CTEK brand, the charger will come with a harness that has eyelets that will connect to the screw post of the positive side of the battery. Since your Jag is a 2012, I understand that you will need to put the black (neutral/negative) wire to a ground post on the chassis rather than the negative side battery terminal. I understand there is a ground post in the spare tire wheel well.
Trending Topics
Veteran Member
Joined: May 2010
Posts: 6,290
Likes: 485
From: Arlington, VA USA
Regarding clay bar: make sure you are using a pretty mild clay if you are not going to do a machine polish afterwards. Some types (Meguiar's C-2000 Professional detailing clay, for example) are very harsh and marr the paint. These, however, are very good for removing paint overspray.
Probably any clay you find in the auto parts store is perfectly fine. Just keep it lubed up with lots of liquid (water or quick detailing spray).
Just FYI!
Probably any clay you find in the auto parts store is perfectly fine. Just keep it lubed up with lots of liquid (water or quick detailing spray).
Just FYI!
Veteran Member
Joined: May 2013
Posts: 3,294
Likes: 1,250
Regarding clay bar: make sure you are using a pretty mild clay if you are not going to do a machine polish afterwards. Some types (Meguiar's C-2000 Professional detailing clay, for example) are very harsh and marr the paint. These, however, are very good for removing paint overspray.
Probably any clay you find in the auto parts store is perfectly fine. Just keep it lubed up with lots of liquid (water or quick detailing spray).
Just FYI!
Probably any clay you find in the auto parts store is perfectly fine. Just keep it lubed up with lots of liquid (water or quick detailing spray).
Just FYI!
Both the Mothers and Meguiars Clay Bar kits ($20.00-$22.00) come with 2 bars that are "fine" clay, you get a bottle of "detailer lubricant" spray, and a microfiber cloth.
You are correct, water and the detail spray is needed. The results are awesome. Many people don't want to clay the paint surface, because they think it is abrasive and can ruin the paint. Also many people don't understand the clay bar process and how easy it is to use.
There are many contaminents that get on the paint. The only way to eliminate them is to clay bar the paint surface. For $20.00 and an hour of work, it is now my #1 recommendation, when a car owner opens up the topic of detailing.

Veteran Member


Joined: May 2013
Posts: 2,368
Likes: 697
From: Florida
I remember reading this as well somewhere about having the negative charger lead going to a ground rather than the battery negative pole.
Senior Member
Joined: Jul 2011
Posts: 103
Likes: 46
From: CA
Wonder why? In my 2012 it's connected to the negative post on the battery.
Veteran Member
Joined: Dec 2012
Posts: 3,054
Likes: 978
From: Canada
I have my pig tail wires connected to both terminals of the battery. My negative wire is connected to the negative battery terminal and not the negative post under the spare tire. Is this a problem? I haven't had any problems, so far.
Veteran Member


Joined: Aug 2010
Posts: 10,111
Likes: 7,120
From: Atlanta suburbs
Attaching the negative battery charger cable to the remote terminal under the spare tire is safer than attaching it directly to the negative battery terminal. How much safer is debatable.
All batteries emit hydrogen gas, which is highly explosive. Since the battery is in a small compartment there is a risk that hydrogen gas can build up even though the battery is vented to the outside. Hydrogen gas is colorless and odorless and you can't tell if it's there until it's too late. Connecting or disconnecting the (-)battery charger cable at the (-)battery terminal post can cause a spark and KABOOM! No such risk if you connect the (-)charger cable to the remote (-)terminal under the spare tire.
I connected my BatteryMINDer smart charger (+)cable to the remote (+)terminal behind the cover on the left side of the trunk and the (-)cable to the remote (-)terminal under the spare tire. I used the alligator clips that came with my charger and haven't had any problems for more than 2 years. Copied below are the detailed photos from my post #21 in this thread:
https://www.jaguarforums.com/forum/x...s-73471/page2/
Cover for battery remote access +terminal in left fender:
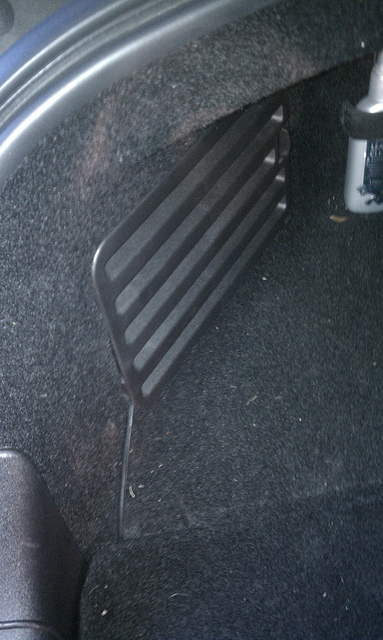
Note the black quick connect wire running from under the luggage panel floor to the remote access panel.
-----------------------------------------------------------------------
Quick connect + lead alligator clip attached to the remote access +terminal:

-----------------------------------------------------------------------
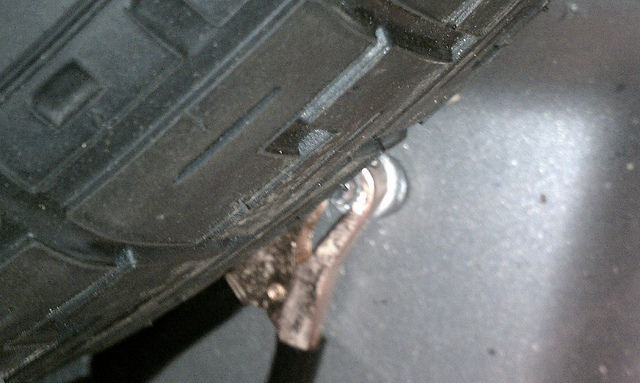
The quick connect - lead alligator clip is attached to the -remote terminal in the spare wheel well:
-----------------------------------------------------------------------
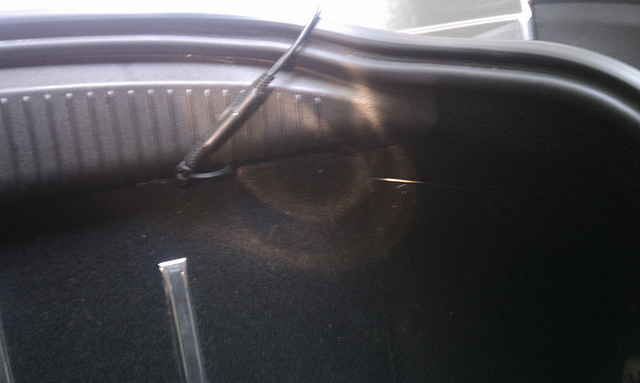
Quick connect leads connected together in the trunk:
-----------------------------------------------------------------------
Trunk lid closes over the wire with no problems:
Stuart
All batteries emit hydrogen gas, which is highly explosive. Since the battery is in a small compartment there is a risk that hydrogen gas can build up even though the battery is vented to the outside. Hydrogen gas is colorless and odorless and you can't tell if it's there until it's too late. Connecting or disconnecting the (-)battery charger cable at the (-)battery terminal post can cause a spark and KABOOM! No such risk if you connect the (-)charger cable to the remote (-)terminal under the spare tire.
I connected my BatteryMINDer smart charger (+)cable to the remote (+)terminal behind the cover on the left side of the trunk and the (-)cable to the remote (-)terminal under the spare tire. I used the alligator clips that came with my charger and haven't had any problems for more than 2 years. Copied below are the detailed photos from my post #21 in this thread:
https://www.jaguarforums.com/forum/x...s-73471/page2/
Cover for battery remote access +terminal in left fender:
Note the black quick connect wire running from under the luggage panel floor to the remote access panel.
-----------------------------------------------------------------------
Quick connect + lead alligator clip attached to the remote access +terminal:

-----------------------------------------------------------------------
The quick connect - lead alligator clip is attached to the -remote terminal in the spare wheel well:

-----------------------------------------------------------------------
Quick connect leads connected together in the trunk:

-----------------------------------------------------------------------
Trunk lid closes over the wire with no problems:

Stuart

Veteran Member
Joined: Jan 2010
Posts: 2,941
Likes: 1,511
From: New Zealand
When using a Jaguar-approved battery charger or maintainer, connect the charger to the recommended ground point to ensure that the charge flows through the BMS module instead of the negative battery terminal.
Failure to observe this will log a diagnostic trouble code (DTC), and incorrect battery condition information will be retained by the BMS module due to unmonitored current flow into the battery. However, the system will recognize and compensate for the change in the battery status after a period of time.
Clay bars are a dying breed. Products like NanoSkin AutoScrub Fine Wash Mitt are faster to decontaminate the surafce and can be used again if they fall on the ground. If using clay, consider using CarPro IronX before claying the car. Speeds the claying process significantly, plus is a really product.
Thread Starter
|
Veteran Member
Joined: Sep 2013
Posts: 5,209
Likes: 1,847
From: NY
[QUOTE=Stuart S;967141]Attaching the negative battery charger cable to the remote terminal under the spare tire is safer than attaching it directly to the negative battery terminal. How much safer is debatable.
All batteries emit hydrogen gas, which is highly explosive. Since the battery is in a small compartment there is a risk that hydrogen gas can build up even though the battery is vented to the outside. Hydrogen gas is colorless and odorless and you can't tell if it's there until it's too late. Connecting or disconnecting the (-)battery charger cable at the (-)battery terminal post can cause a spark and KABOOM! No such risk if you connect the (-)charger cable to the remote (-)terminal under the spare tire.
I connected my BatteryMINDer smart charger (+)cable to the remote (+)terminal behind the cover on the left side of the trunk and the (-)cable to the remote (-)terminal under the spare tire. I used the alligator clips that came with my charger and haven't had any problems for more than 2 years. Copied below are the detailed photos from my post #21 in this thread:
https://www.jaguarforums.com/forum/x...s-73471/page2/
Cover for battery remote access +terminal in left fender:
Note the black quick connect wire running from under the luggage panel floor to the remote access panel.
-----------------------------------------------------------------------
Quick connect + lead alligator clip attached to the remote access +terminal:
-----------------------------------------------------------------------
I attached my 10Amp charger to these points and there didn't seem to be a problem charging the battery. After it was charged I put my 2A smart charger on and it went to "float" state so no problem. That being said do I ASSUME that this remote + terminal is a straight wire going back to the + battery post. If so then there would be not reason to attach the charger to the battery other then convenience. I did notice that the 2 dealers I stopped at had the chargers hooked up in the trunk left grill. Even had them on the new F-type in the showroom. So I'll go with this approach until I have to remove the battery and then I'll hook up a lead direct to the + post on the battery. We'll see.
Veteran Member
Joined: May 2013
Posts: 3,425
Likes: 1,140
From: London, UK
It's all about the battery monitor on the 5.0 cars. it can get upset if the charging bypasses it by connecting direct to the -ve terminal. If you connect to ground elsewhere, the monitor 'sees' the charge going in. I asked Jaguar, and this was the response:
Battery conditioners supplied from Jaguar Features integrated wiring and a dedicated DIN socket within the loadspace area, providing convenience and ease of use. part number C2P24103. But yes if you are using a normal charging leads red leads goes on the positive post and black lead connects to a chassis ground point
Veteran Member
Joined: May 2013
Posts: 2,368
Likes: 697
From: Florida
I have a 5.0 car with the battery monitor and have the charger connected to both battery terminals with no issues so far. Should I be changing the negative connection to a ground in the trunk area or can I get by? Will I be looking at any problems down the road with my present hook up?
Veteran Member
Joined: May 2013
Posts: 3,294
Likes: 1,250
In addition Jaguar Part #C2P24103 has a cigarette plug in for the power. I would not use this is my car.
Ngarara provided the reason for not hooking the CTEK eyelet to the negative battery post due to the battery monitoring module. I have the 4.2L engine so my CTEK 3300 eyelet connectors are fastened directly to the battery terminal screw posts. Since I am NOT an electrical engineer, I am not sure of what the consequences might be by attaching the CTEK eyelets to the neg side of the battery in a 5.0L engine Jag with a battery monitor module. Perhaps someone else might know the potential ramifications. Certainly Ngarara and White XKR are the electronic experts here on the forum, so perhaps either member can shed some more light on this issue/topic/discussion.