
Alternator replacement - how to remove the drive belt ?


Thread Starter
|
Senior Member
Joined: Nov 2009
Posts: 185
Likes: 38
Hi folks
Got the dreaded red-light on the dash this weekend - "BATTERY IS NOT CHARGING".
The battery is quite old, so replaced it with a fresh one (which solved som other issues) however the error message is still coming up when the engine is anything <1200rpm.
So, I have a new alternator on order. I have replaced these on other cars, the process is quite simple. But can anyone tell me what the procedure is to remove, replace and install a new drive belt ?
Good pics here, but no description: JagRepair.com - Jaguar Repair Information Resource
Thanks
Frank
Veteran Member


Joined: Feb 2012
Posts: 2,997
Likes: 714
From: Waco, Texas, US
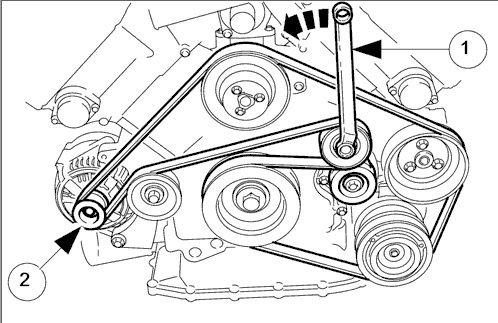
The belt comes off very easily. You will need a break over bar or long-handled socket drive. Put your socket on the nut for the tensioner (see the picture at the link you posted) and push the pulley to one side to relieve the tension on the belt. You can then slip it off the pulleys by hand.
Remove your socket and bar. The belt can then be removed from the engine bay. Replacement is the reverse of removal. Check the stickies for a diagram of the belt routing. (do this before removal and you will thank yourself later)
Remove your socket and bar. The belt can then be removed from the engine bay. Replacement is the reverse of removal. Check the stickies for a diagram of the belt routing. (do this before removal and you will thank yourself later)
Veteran Member
Joined: Jul 2012
Posts: 2,069
Likes: 666
From: Uk
Franksm,
I have just looked in my manual, it may be the same for yours, and it says:
1. remove the engine cover
2. using a 3/8 inch square drive bar, rotate the accessory drive belt tensioner counter clockwise and detach the belt.
Hope this helps.
I have just looked in my manual, it may be the same for yours, and it says:
1. remove the engine cover
2. using a 3/8 inch square drive bar, rotate the accessory drive belt tensioner counter clockwise and detach the belt.
Hope this helps.
Thread Starter
|
Senior Member
Joined: Nov 2009
Posts: 185
Likes: 38
Thanks lads, just awaiting delivery of the replacement alternator now.
I guess the belt tensioner is a simple thing then, just spring-assisted tensioner, nothing more nothing less. The tensioner on other cars I have worked on has been the alternator itself, being mounted on a hinge of sorts.
Cant's wait to get the '8 back on the road, it's too icy and baltic here for the MX5 ;-)

Thread Starter
|
Senior Member
Joined: Nov 2009
Posts: 185
Likes: 38
Hi folks
Well, removing the drivebelt turned out to be ridiculously easy - the tensioner has enough movement in it, it really does just need pulled with a strong hand & spanner. Didn't even need to remove the fanpack, the top hose or anything other than the airbox.
Got the alternator out, it's just two bolts. However there's a plastic bush on the inboard side of the lower bolt that needed maneuvered around. Ended up levering the alternator out, it wasn't about to just 'fall out' once the bolts were removed.
The main worry was the electrical connector on the back of the alternator - the secondary one with two wires, not the main earth or 12V lines. The secondary connector was practically welded to the unit, and isn't in good condition internally as can be seen from my pic. I might look at splicing in a new one at some stage if I can identify an exact replacement.
In the meantime, still waiting for the replacement part, so fingers crossed it goes in okay.
Adding pics here anyway, as it might be handy for someone down the line. It's rare to see these alternators in the wild.
http://s192.beta.photobucket.com/use...Jag/alternator
Cheers
Frank
 front view of the alternator
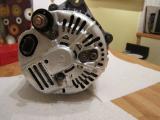 rear view
 rectifier board (or whatever it's called)
 other side
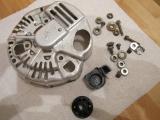 board cover etc
 brushes - these were uneven lengths on mine, dunno if that's normal
 cleaned up
 alternator with rectifier board removed
 alternator bracket, bolt on top right, larger bolt on bottom with nut on the left, and earth bracket attached
 Main +ve lead
 secondary connector - looks badly worn on mine
Well, removing the drivebelt turned out to be ridiculously easy - the tensioner has enough movement in it, it really does just need pulled with a strong hand & spanner. Didn't even need to remove the fanpack, the top hose or anything other than the airbox.
Got the alternator out, it's just two bolts. However there's a plastic bush on the inboard side of the lower bolt that needed maneuvered around. Ended up levering the alternator out, it wasn't about to just 'fall out' once the bolts were removed.
The main worry was the electrical connector on the back of the alternator - the secondary one with two wires, not the main earth or 12V lines. The secondary connector was practically welded to the unit, and isn't in good condition internally as can be seen from my pic. I might look at splicing in a new one at some stage if I can identify an exact replacement.
In the meantime, still waiting for the replacement part, so fingers crossed it goes in okay.
Adding pics here anyway, as it might be handy for someone down the line. It's rare to see these alternators in the wild.
http://s192.beta.photobucket.com/use...Jag/alternator
Cheers
Frank
front view of the alternator rear view rectifier board (or whatever it's called) other side board cover etc brushes - these were uneven lengths on mine, dunno if that's normal cleaned up alternator with rectifier board removed alternator bracket, bolt on top right, larger bolt on bottom with nut on the left, and earth bracket attached Main +ve lead secondary connector - looks badly worn on mine
Last edited by franksm; Dec 16, 2012 at 02:18 PM.
Veteran Member
Joined: Feb 2012
Posts: 2,997
Likes: 714
From: Waco, Texas, US
Looks like you're well on your way. I also had to lever (pry) out my alternator. It was a PITA! Turns out that short bush inside the bottom mounting bracket was the issue. It had moved out maybe 1/16 of an inch...just enough to make the already snug ears catch hard.
Make sure you push this bush back in place before reinstall. It has to be flush. I think there is a diagram of this in the DIY section or maybe in the parts section.
Make sure you push this bush back in place before reinstall. It has to be flush. I think there is a diagram of this in the DIY section or maybe in the parts section.
Trending Topics
Thread Starter
|
Senior Member
Joined: Nov 2009
Posts: 185
Likes: 38
Replacement unit arrived today - it was described on Ebay as a brand-new OE alternator, but half the price of the real Jaguar one. More expensive than a recon'd alternator but not hugely so.
Anyway, looks like it's the Nippondenso part but without tha 'Jaguar' badge. Pasting the info here in case anyone wants to go this route with a Denso supplier in future


Anyway, looks like it's the Nippondenso part but without tha 'Jaguar' badge. Pasting the info here in case anyone wants to go this route with a Denso supplier in future
You needed to look a little harder on my page
Link JagRepair.com - Jaguar Repair Information Resource
Link JagRepair.com - Jaguar Repair Information Resource
Hi folks
Got the dreaded red-light on the dash this weekend - "BATTERY IS NOT CHARGING".
The battery is quite old, so replaced it with a fresh one (which solved som other issues) however the error message is still coming up when the engine is anything <1200rpm.
So, I have a new alternator on order. I have replaced these on other cars, the process is quite simple. But can anyone tell me what the procedure is to remove, replace and install a new drive belt ?
Good pics here, but no description: JagRepair.com - Jaguar Repair Information Resource
Thanks
Frank
Thread Starter
|
Senior Member
Joined: Nov 2009
Posts: 185
Likes: 38
Got the new alternator in today, it's all fine and the car (and me) are happy once again. Putting the drivebelt on was a complete nonissue, there's tons of travel in the tensioner once you have a lever on it.
Thanks for the help and moral support, all !

Thanks for the help and moral support, all !

Member
Joined: Feb 2010
Posts: 96
Likes: 4
From: lake bluff il
Gus
On an 02 XJR just how did you get the top bolt out, tired a universal but can't get the right angle, I can get a 10mm gear wrench but there's not enough of an arc to make do.
Any advice?
thanks
On an 02 XJR just how did you get the top bolt out, tired a universal but can't get the right angle, I can get a 10mm gear wrench but there's not enough of an arc to make do.
Any advice?
thanks
Member
Joined: Sep 2014
Posts: 64
Likes: 4
From: London
Waking a really old thread but has anyone tried replacing just the rectifier? REGULATORS FOR DENSO ALTERNATORS

Senior Member
Joined: Aug 2012
Posts: 818
Likes: 83
From: Berlin
You needed to look a little harder on my page
Link JagRepair.com - Jaguar Repair Information Resource
Link JagRepair.com - Jaguar Repair Information Resource
One question after viewing the photos:
where is the suppression module?

Member
Joined: Feb 2018
Posts: 35
Likes: 6
Hi folks
Well, removing the drivebelt turned out to be ridiculously easy - the tensioner has enough movement in it, it really does just need pulled with a strong hand & spanner. Didn't even need to remove the fanpack, the top hose or anything other than the airbox.
Got the alternator out, it's just two bolts. However there's a plastic bush on the inboard side of the lower bolt that needed maneuvered around. Ended up levering the alternator out, it wasn't about to just 'fall out' once the bolts were removed.
The main worry was the electrical connector on the back of the alternator - the secondary one with two wires, not the main earth or 12V lines. The secondary connector was practically welded to the unit, and isn't in good condition internally as can be seen from my pic. I might look at splicing in a new one at some stage if I can identify an exact replacement.
In the meantime, still waiting for the replacement part, so fingers crossed it goes in okay.
Adding pics here anyway, as it might be handy for someone down the line. It's rare to see these alternators in the wild.
http://s192.beta.photobucket.com/use...Jag/alternator
Cheers
Frank
front view of the alternator
rear view
rectifier board (or whatever it's called)
other side
board cover etc
brushes - these were uneven lengths on mine, dunno if that's normal
cleaned up
alternator with rectifier board removed
alternator bracket, bolt on top right, larger bolt on bottom with nut on the left, and earth bracket attached
Main +ve lead
secondary connector - looks badly worn on mine
Well, removing the drivebelt turned out to be ridiculously easy - the tensioner has enough movement in it, it really does just need pulled with a strong hand & spanner. Didn't even need to remove the fanpack, the top hose or anything other than the airbox.
Got the alternator out, it's just two bolts. However there's a plastic bush on the inboard side of the lower bolt that needed maneuvered around. Ended up levering the alternator out, it wasn't about to just 'fall out' once the bolts were removed.
The main worry was the electrical connector on the back of the alternator - the secondary one with two wires, not the main earth or 12V lines. The secondary connector was practically welded to the unit, and isn't in good condition internally as can be seen from my pic. I might look at splicing in a new one at some stage if I can identify an exact replacement.
In the meantime, still waiting for the replacement part, so fingers crossed it goes in okay.
Adding pics here anyway, as it might be handy for someone down the line. It's rare to see these alternators in the wild.
http://s192.beta.photobucket.com/use...Jag/alternator
Cheers
Frank
front view of the alternator rear view rectifier board (or whatever it's called) other side board cover etc brushes - these were uneven lengths on mine, dunno if that's normal cleaned up alternator with rectifier board removed alternator bracket, bolt on top right, larger bolt on bottom with nut on the left, and earth bracket attached Main +ve lead secondary connector - looks badly worn on mine
Senior Member

Joined: Jun 2009
Posts: 332
Likes: 145
From: Boston, MA
You're in the wrong forum for a 2004 XJ8. You want the X350 subforum.https://www.jaguarforums.com/forum/x...-x350-x358-28/

Thread
Thread Starter
Forum
Replies
Last Post
BrentGardner
XJ XJ6 / XJ8 / XJR ( X350 & X358 )
29
Dec 16, 2024 12:13 AM
Isoruku
XJ XJ6 / XJ8 / XJR ( X350 & X358 )
10
Jun 19, 2020 12:54 PM
Currently Active Users Viewing This Thread: 1 (0 members and 1 guests)