When you click on links to various merchants on this site and make a purchase, this can result in this site earning a commission. Affiliate programs and affiliations include, but are not limited to, the eBay Partner Network.
'97 XK8. No documentation of prior service. I do know that both cylinder heads have been off at least once, possibly due to a secondary chain failure on the right bank.
The photo shows the mismatch between the top of the front cover and the top of a cylinder head. The step measures 0.035"! It's bad enough that the front cover bolts that fit into the cylinder heads all bind in their holes and are difficult to install. The head gaskets are stock 0.050" thickness. The cover is doweled to the block, so I'm assuming that the misalignment is caused entirely by material having been removed from either the deck surface of the block, or the bottoms of the heads.
I suspect that someone removed about 0.030" from both heads. This probably puts the static compression up to about 12:1.
I don't really want to replace the heads, but may consider a custom thickness head gasket to get everything back closer to stock dimensions.
I can't find any dimensional specifications (deck height, cylinder head height) to verify the problem.
Does anyone happen to have a stock, unmodified AJ26 or AJ27 cylinder head that can measure the top-to-bottom overall thickness with a caliper?
You could go a few ways with this, but have a look at the info below. I can't find any deck height specs, so may have to go off the measurement below. Have you tried talking to a head shop to see what you're options are?
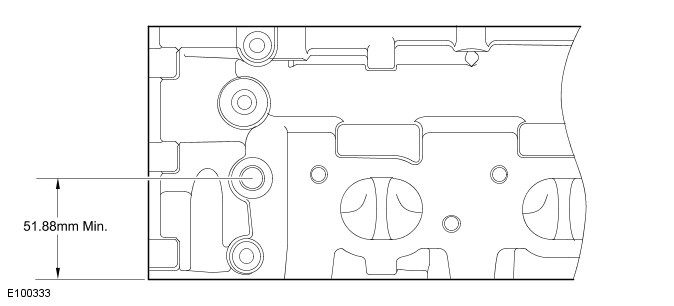
NOTE:
For cylinder head with distortion above the maximum allowance, the cylinder head material must be measured.
Measure the cylinder head material.
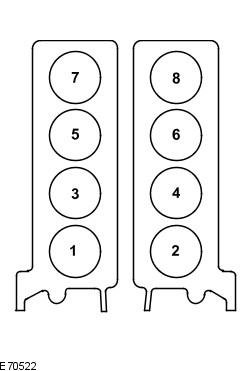
Front of EngineBank 1 — Bank 2Firing Order:1, 2, 7, 3, 4, 5, 6, 8.Sealants and Adhesives
UnitSpecificationSealant-Engine Block-to-Bedplate and Sump-to-Bedplate (RTV Silicone)Loctite 5699 Ultra GreySealant-Engine Core Plugs and Block Stub Pipe (Anaerobic Sealant)Loctite 648
Cylinder Head
ItemSpecificationMaximum permitted cylinder head warp (mm)0.125
Valve Clearances
Cold EngineInletExhaustValve Clearance0.18 - 0.22 mm0.23 - 0.27 mm
Thanks. That's the kind of information I was looking for. Can you tell me where you found it? I don't see it in JTIS or the 168 Engine Repair Course pdf.
Also, my heads don't have these dowels as shown in this illustation. There is only a single 12mm rivet plug toward the top of the head. Could this be for a later version of the V8?
I have access to Topix, but since I don't have the VIN, I just looked it up as a 97 XK8 with 4.0L NA. There might be a VIN break in production of the cylinder heads, and may be why yours isn't showing the dowel. I'll have another look and see what else I can find as I did the first search rather quickly.
I forgot that the dowel is for the brackets for the front accessory drive. For the left side of the engine, should be a bracket for the p/s pump. For right side, it would be the alternator bracket. I'm guessing you'd have to gain access to these brackets and remove them to measure it properly.
What about if you had the breast plate machined on the top edges to suit the height of the heads?
Darn sight cheaper to machine the breast plate than replace the heads if there is nothing else wrong with them.
What about the other side? Is that the same?
But now I'm thinking about the timing chain and tensioners and guides.
If the heads are that much lower, does anything show up on the primary timing chain guides or tensioners? Like a more curved than normal sweep of the chain set-up?
If I were in your situation this is what I would try.
I'm going by yous measurements. You need .035" to bring the head up to the height of the timing cover. If the headgasket is .050" and if I remember correctly the MLS headgasket is 3 layers. Remove one layer and it will give uou ~ .035". Add that to another new headgasket and it will give you 5 layers total. That should bring the head up to the height of the timing cover.
I don't like the idea of machining the timing cover. You mentioned that the bolts don't line up now. Raising the head will take care of that.
My initial thought was to machine the front cover to fit, but that doesn't really address the underlying problem. The chain guides look OK, and of course, the cams could still be timed properly.
Cometic can supply custom head gaskets with an assortment of available thicknesses. For example, I could order a set that is 0.086" thick.
Right now, my only reference for measurement is the front cover, which seems a little sketchy. Measuring all four "steps" at the tops of the heads, I get (right to left) 0.026", 0.035", 0.034" and 0.043". That averages to 0.035".
It would be ideal to get some measurements from an unmolested cylinder head. Probably 6 top-to-bottom thickness measurements to average...