
Good stocking stuffer...for us of course

Member
Joined: May 2014
Posts: 64
Likes: 14
From: Texas / New York


Rgds, Fred
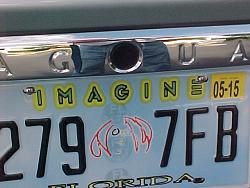
I bought 4 of these........ 2 black and 2 red........ I still have the green which was fitted over 3 years ago and still looks good, but I wanted red to match the car so rather than remove the badge I'm going to swap the switch
Senior Member


Joined: Jul 2013
Posts: 557
Likes: 144
From: N. Palm Beach, FL / NYC, NY
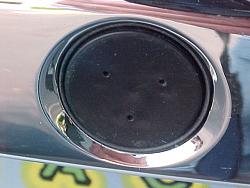
Unless I don't understand installation, the trunk button on mine appears to be different. Based on the second photo, with the 3 holes, it looks as if the logo was on a cap, which came off.


Last edited by MediaBobNY; Nov 15, 2014 at 02:08 PM.
Member
Joined: May 2014
Posts: 64
Likes: 14
From: Texas / New York
+1 - that's how mine looked after I took the old button top off. Just clean and stick a new 2.2 cm on there!
Rgds, Fred
Rgds, Fred

Senior Member
Joined: Oct 2012
Posts: 853
Likes: 192
From: Panama City, Florida
Hi guys.
You might consider what I did.
Wiggle out the button, use a wash cloth, put a few oz's of cleaner (soft scrub or the like), on the cloth, (hold the cloth flat on a table top) hold face down on the button and rub. Cleaned my button back to like new. Cleaned the button with soap and water, dried well, then sprayed face of button with a shot of clear lacquer and let dry. Made sure face was oriented correctly and push it back home. Make sure you don't drop the spring. Total time, about ten minutes. Add about a good cup of coffee for drying time. Cost--nothing. I took the cleaner and cloth from mama's kitchen. She'll never know how the cloth got the black smudges on it, so will just chunk it in the washer.
Chuck
05/XK8 vert C.F.

Junior Member
Joined: Oct 2014
Posts: 14
Likes: 1
From: CA
Here is an update! Old vs. new.
This was literally the simplest upgrade I've ever done! Peeled the old one off with the help of a swiss army blade, it came of pretty clean. Slapped the new one on, and done! (I added 1 drop of crazy glue on the back for good measure).
This was literally the simplest upgrade I've ever done! Peeled the old one off with the help of a swiss army blade, it came of pretty clean. Slapped the new one on, and done! (I added 1 drop of crazy glue on the back for good measure).
Thread Starter
|
Veteran member


Joined: Mar 2007
Posts: 11,344
Likes: 1,164
From: Oak Ridge, TN
Looks great!
Member
Joined: Mar 2015
Posts: 40
Likes: 10
From: California
Hi guys.
You might consider what I did.
Wiggle out the button, use a wash cloth, put a few oz's of cleaner (soft scrub or the like), on the cloth, (hold the cloth flat on a table top) hold face down on the button and rub. Cleaned my button back to like new. Cleaned the button with soap and water, dried well, then sprayed face of button with a shot of clear lacquer and let dry. Made sure face was oriented correctly and push it back home. Make sure you don't drop the spring. Total time, about ten minutes. Add about a good cup of coffee for drying time. Cost--nothing. I took the cleaner and cloth from mama's kitchen. She'll never know how the cloth got the black smudges on it, so will just chunk it in the washer.
Chuck
05/XK8 vert C.F.
You might consider what I did.
Wiggle out the button, use a wash cloth, put a few oz's of cleaner (soft scrub or the like), on the cloth, (hold the cloth flat on a table top) hold face down on the button and rub. Cleaned my button back to like new. Cleaned the button with soap and water, dried well, then sprayed face of button with a shot of clear lacquer and let dry. Made sure face was oriented correctly and push it back home. Make sure you don't drop the spring. Total time, about ten minutes. Add about a good cup of coffee for drying time. Cost--nothing. I took the cleaner and cloth from mama's kitchen. She'll never know how the cloth got the black smudges on it, so will just chunk it in the washer.
Chuck
05/XK8 vert C.F.
Veteran Member
Joined: Mar 2014
Posts: 2,173
Likes: 605
From: Goldsboro, NC
See here, for $8 with shipping hardly worth the trouble to clen...
https://www.jaguarforums.com/forum/x...source-139714/
https://www.jaguarforums.com/forum/x...source-139714/
Member
Joined: Mar 2015
Posts: 40
Likes: 10
From: California
Hi guys.
You might consider what I did.
Wiggle out the button, use a wash cloth, put a few oz's of cleaner (soft scrub or the like), on the cloth, (hold the cloth flat on a table top) hold face down on the button and rub. Cleaned my button back to like new. Cleaned the button with soap and water, dried well, then sprayed face of button with a shot of clear lacquer and let dry. Made sure face was oriented correctly and push it back home. Make sure you don't drop the spring. Total time, about ten minutes. Add about a good cup of coffee for drying time. Cost--nothing. I took the cleaner and cloth from mama's kitchen. She'll never know how the cloth got the black smudges on it, so will just chunk it in the washer.
Chuck
05/XK8 vert C.F.
You might consider what I did.
Wiggle out the button, use a wash cloth, put a few oz's of cleaner (soft scrub or the like), on the cloth, (hold the cloth flat on a table top) hold face down on the button and rub. Cleaned my button back to like new. Cleaned the button with soap and water, dried well, then sprayed face of button with a shot of clear lacquer and let dry. Made sure face was oriented correctly and push it back home. Make sure you don't drop the spring. Total time, about ten minutes. Add about a good cup of coffee for drying time. Cost--nothing. I took the cleaner and cloth from mama's kitchen. She'll never know how the cloth got the black smudges on it, so will just chunk it in the washer.
Chuck
05/XK8 vert C.F.
Scrubbed the jelly button with tide, then used sandpaper to remove the black grime. It worked but was now 'blurry' and opaque. Decided I'd live with it, but as I superglued it back to the base, I noticed I got some on the front face. Typical sloppy me.
But then I noticed it was the only glossy part of the button. It illuminated the cool green jelly interior. So I took the glue's advice and got krazy. covered my finger with packing tape, slathered it with glue and proceeded to COVER THE FACE OF THE BUTTON WITH KRAZY GLUE. Quickly put a glass over it to protect it from dust as it dried...
VOI-f*ing-LA!
Senior Member
Joined: Aug 2012
Posts: 552
Likes: 228
From: Tauranga, New Zealand
Here was me thinking it was a black button with a faint Jag emblem. Just went and cleaned mine with some light cutting compound, turns out it is green with a gold Jag face.
Great tips thanks all.
Great tips thanks all.

Thread
Thread Starter
Forum
Replies
Last Post
FS[Western US]: XJS Wiper Motor Upgrade- 76-88 - Electrolux Style
XJsc-guy
PRIVATE For Sale / Trade or Buy Classifieds
0
Sep 2, 2015 11:43 AM
Currently Active Users Viewing This Thread: 1 (0 members and 1 guests)

