
XK8 rear bumper adjustment


Thread Starter
|
Senior Member
Joined: Jun 2013
Posts: 112
Likes: 12
From: New Jersey, USA
My 1998 XK8 needs a slight rear bumper adjustment.
Has anyone had to adjust their rear bumper?
It looks like the previous owner caught a high curb or something with the rear bumper and pulled it toward the rear slightly.
It's not damaged at all, just needs to be adjusted forward so that it lines up properly with the wheel wells and the plastic rivets under the trunk lid aren't quite so visible.
I looked and didn't see any bolts that would allow adjustment.
Any help would be appreciated.
Thanks,
Dave B.


Joined: Dec 2011
Posts: 120,439
Likes: 17,014
From: Durham, UK
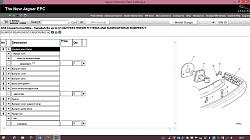
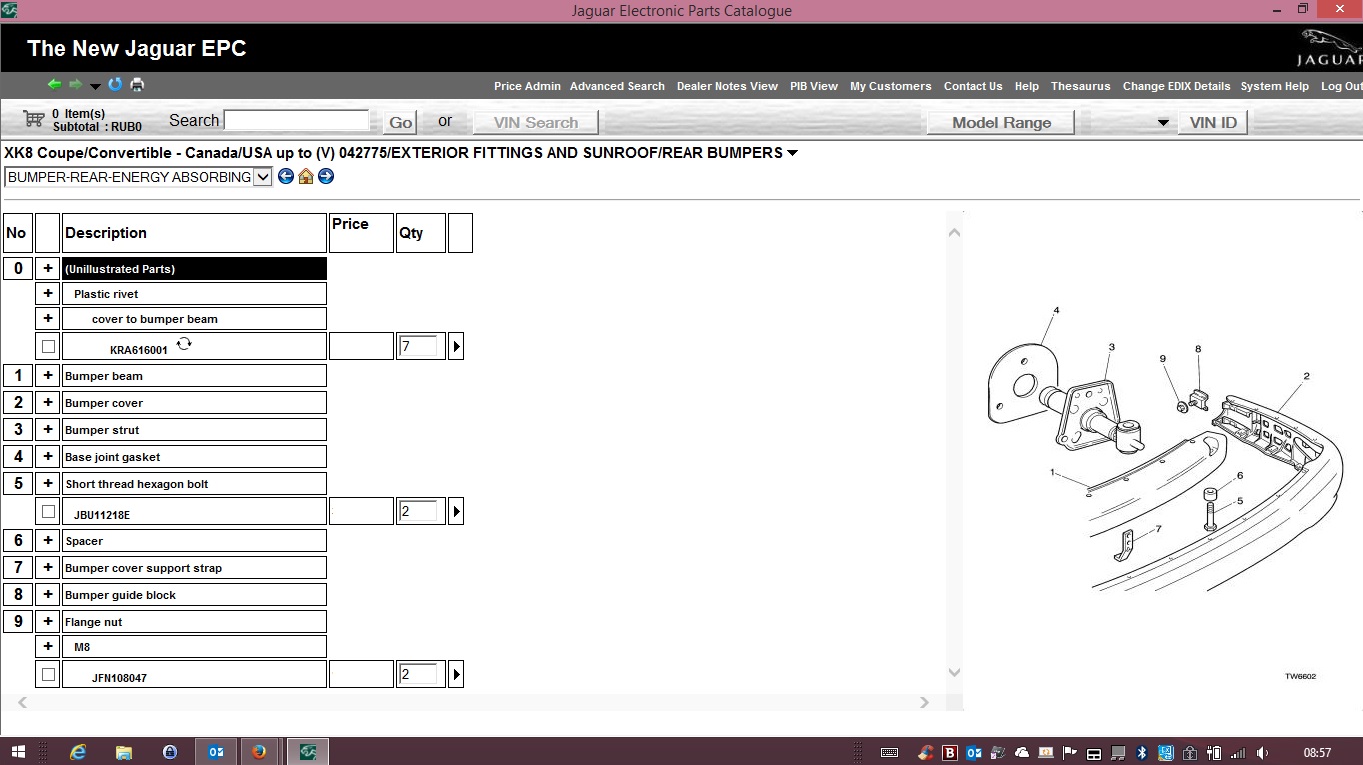
The Rear Bumper is adjustable for height so that it sits flush with the rear body panels with the Bolt /Spacer (items 5 and 6) but very little can be done to correct front to rear alignment.
Here's the listing from the Parts Catalogue. The main adjustment is on the Guide Block (item 8):
(click on the image to enlarge it)
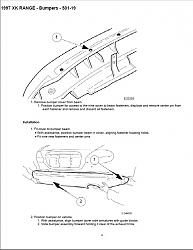
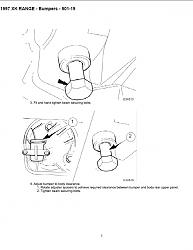
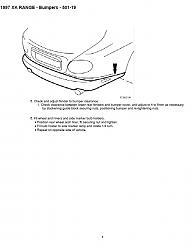
The procedure for refitting the Rear Bumper details adjustment:
(click on each image to enlarge it)
If it's much out of alignment, the Beam or Strut could have been damaged by impact.
Graham
Here's the listing from the Parts Catalogue. The main adjustment is on the Guide Block (item 8):

(click on the image to enlarge it)
The procedure for refitting the Rear Bumper details adjustment:


(click on each image to enlarge it)
If it's much out of alignment, the Beam or Strut could have been damaged by impact.
Graham
Last edited by GGG; Sep 4, 2013 at 02:11 PM.


Joined: Apr 2012
Posts: 25,864
Likes: 4,708
From: Summerville, South Carolina
Here are the removal/installation procedures from JTIS hope this helps
removal
THE REAR BUMPER IS CLOSE TO THE EXHAUST PIPES WHICH MAY BE HOT. CARE MUST THEREFORE BE EXERCISED WHEN WORKING IN THIS VICINITY.
Position vehicle on a 4-post ramp with parking brake on and raise ramp to working height.
Remove rear wheel arch liners and side marker bulb holders.
Slacken and remove rear wheel arch liner plastic nut and remove liner from wheel arch.On N. American vehicles, rotate side marker bulb holder 1/4 turn, withdraw from lamp and ensure that leads are free from bumper.
Repeat operations on opposite side of vehicle.
Reposition the telephone antenna.
Remove and discard the retaining rivet.
Remove and discard the wiring harness tie wraps. Disconnect the reversing aid electrical connectors.
One connector shown, remaining connectors similar.
Separate bumper from supports.
Slacken and remove bolts securing beam to support brackets (menasco struts on N. American market vehicles). Remove rear bumper from vehicle.With assistance, slide bumper assembly rearwards off guide blocks, holding it clear of the exhaust trims.
Remove bumper cover from beam.Position bumper for access to the nine cover to beam fasteners, remove center pin from each fastener and remove and discard all fasteners.
Installation:
Fit cover to bumper beam.With assistance, position bumper beam in cover, aligning fastener locating holes.Fit nine new fasteners and center pins.
Position bumper on vehicle.
-With assistance, align bumper cover side armatures with guide blocks.
-Slide bumper assembly forward holding it clear of the exhaust trims. Fit and hand tighten beam securing bolts.
Adjust bumper to body clearance.
-Rotate adjuster spacers to achieve required clearance between bumper and body rear upper panel.
-Tighten beam securing bolts.
Check and adjust fender to bumper clearance.
-Check clearance between lower rear fenders and bumper cover, and adjust to 4 to 6mm as necessary by slackening guide block securing nuts, positioning bumper and re-tightening nuts.
Fit wheel arch liners and side marker bulb holders.
-Position rear wheel arch liner, fit securing nut and tighten.
-Fit bulb holder to side marker lamp and rotate 1/4 turn.
-Repeat on opposite side of vehicle.
Fit the telephone antenna.
-Fit new the retaining rivet.
-Fit new wiring harness tie wraps.
Connect the reversing aid electrical connectors.
-One connector shown, remaining connectors similar.
Lower the 4-post ramp.
Senior Member
Joined: Dec 2013
Posts: 328
Likes: 86
From: Sarnia, Ontario, Canada
The Rear Bumper is adjustable for height so that it sits flush with the rear body panels with the Bolt /Spacer (items 5 and 6) but very little can be done to correct front to rear alignment.
Here's the listing from the Parts Catalogue. The main adjustment is on the Guide Block (item 8):
Attachment 53356
(click on the image to enlarge it)
The procedure for refitting the Rear Bumper details adjustment:
Attachment 53357
Attachment 53358
Attachment 53359
(click on each image to enlarge it)
If it's much out of alignment, the Beam or Strut could have been damaged by impact.
Graham
Some help please. I have to change out my bumper beam on the rear. In doing so I am purchasing all the bit and pieces. I have a used cover, used bumper struts (North America) but need to acquire the bolts and nuts that fasten the struts to the beam. what part number are these. They do not appear to be items you have mentioned.
Joined: Dec 2011
Posts: 120,439
Likes: 17,014
From: Durham, UK
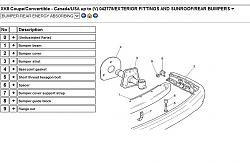
Here's the Parts Catalogue extract for the USA energy absorbing rear bumper assembly:
(click on the image to enlarge it)
Is it item 5 you need?
Our European bumpers don't have energy absorbing struts. The support bracket is a fibreglass/alumninium composite construction and the Bumper Beam is plastic with embedded brass securing nuts for the equivalent of item 5.
I haven't seen a USA Bumper Beam but it must have the securing nuts for item 5 fixed in the Beam?
Graham
Senior Member
Joined: Dec 2013
Posts: 328
Likes: 86
From: Sarnia, Ontario, Canada
Here's the Parts Catalogue extract for the USA energy absorbing rear bumper assembly:
Attachment 98024
(click on the image to enlarge it)
Is it item 5 you need?
Our European bumpers don't have energy absorbing struts. The support bracket is a fibreglass/alumninium composite construction and the Bumper Beam is plastic with embedded brass securing nuts for the equivalent of item 5.
I haven't seen a USA Bumper Beam but it must have the securing nuts for item 5 fixed in the Beam?
Graham
Trending Topics
Senior Member
Joined: Dec 2013
Posts: 328
Likes: 86
From: Sarnia, Ontario, Canada
Here's the Parts Catalogue extract for the USA energy absorbing rear bumper assembly:
Attachment 98024
(click on the image to enlarge it)
Is it item 5 you need?
Our European bumpers don't have energy absorbing struts. The support bracket is a fibreglass/alumninium composite construction and the Bumper Beam is plastic with embedded brass securing nuts for the equivalent of item 5.
I haven't seen a USA Bumper Beam but it must have the securing nuts for item 5 fixed in the Beam?
Graham
Attachment 98024
(click on the image to enlarge it)
Is it item 5 you need?
Our European bumpers don't have energy absorbing struts. The support bracket is a fibreglass/alumninium composite construction and the Bumper Beam is plastic with embedded brass securing nuts for the equivalent of item 5.
I haven't seen a USA Bumper Beam but it must have the securing nuts for item 5 fixed in the Beam?
Graham
Thanks again Graham that was the right bolt !

Thread
Thread Starter
Forum
Replies
Last Post
99xk8guy
XK8 / XKR ( X100 )
12
Sep 29, 2025 10:51 PM
Currently Active Users Viewing This Thread: 1 (0 members and 1 guests)