Jaguar Forums - Jaguar Enthusiasts Forum
  • LOG IN
  • REGISTER
  • Forums
    • General Jaguar Forums
      • New Member Area - Intro a MUST
      • Jaguar Forums Feedback & Suggestion Center
      • General Tech Help
    • Jaguar Models ( Current )
      • XF (X260)
      • F-Type ( X152 )
      • XE ( X760 )
      • E-Pace
      • F-Pace (X761) / C-X17
      • I-Pace EV
    • Jaguar Models ( Modern )
      • XF and XFR ( X250 )
      • XJ ( X351 )
      • X-Type ( X400 )
      • S-Type / S type R Supercharged V8 ( X200 )
      • XJ XJ6 / XJ8 / XJR ( X350 & X358 )
      • XJ XJ8 / XJR ( X308 )
      • XJ XJ12 ( X305 )
      • XJ XJ6 / XJR6 ( X300 )
      • XK8 / XKR ( X100 )
      • XK / XKR ( X150 )
    • Jaguar Models ( Classics )
      • Mark V - X 420G
      • MKI / MKII S type 240 340 & Daimler
      • XK120 XK140 XK150
      • E type ( XK-E )
      • XJ6 & XJ12 Series I, II & III
      • XJS ( X27 )
      • XJ40 ( XJ81 )
      • XKSS
      • XJ220
    • Other Jaguars
      • Other Jaguar Models / Concepts / Replicas
    • Diesel variants
      • Diesel variants - All models
    • Non Jaguar vehicles
      • Non-Jaguar Vehicles
    • Brand Review
      • Jaguar Press release
      • Jaguar Customer Relationship Centre
      • Jaguar Engines & transmissions
      • Wheels / Tires, Suspension & handling
      • Interior
      • Exterior
      • Audio/Visual Electronics
      • Detailing / Car care
      • Motorsports
    • Jaguar Classifieds
      • Marketplace
      • PRIVATE For Sale / Trade or Buy Classifieds
      • VENDOR 'For Sale' Classifieds
    • Regional
      • US Northeast
      • US Central
      • US Southwest
      • US Western
      • US Northwest
      • US Midwest
      • US Mid Atlantic
      • US Lower Atlantic
      • US Southern Midwest
      • Canada
      • Mexico, South America
      • UK & Eire
      • Europe
      • Australia - Queensland
      • Australia - New South Wales / ACT
      • Australia - Victoria / Tasmania
      • Australia - Western
      • Australia - South / NT
      • New Zealand
      • Other Areas
    • Official Site Sponsors
      • VENDOR Threads
    • General Interest / History
      • Sights N Sounds
      • Photography
      • Forum announcement archives / Forum History
      • Jaguarforums Merchandise
      • Memorial Section
  • News
  • Marketplace
    • Vendor Directory
    • Become a Vendor
    • Member Marketplace
    • Vendor Marketplace
    • Site Store
  • New Posts
  • Tools
    • Car Payment Calculator
    • Tire Rim Calculator
    • Vin Decoder
    • Recalls
    • Technical Service Bulletins (TSBs)
    • Members List
    • Live Feed
  • Gallery
  • View Dark Mode
    • Please register or login to enable Dark Mode.
  • Log In
  • Register
Jaguar Forums - Jaguar Enthusiasts Forum
    • Threads
      • Advanced
Dark Mode

Please register or login to enable Dark Mode.

Log In

Forgot your Password?

By logging into your account, you agree to our Terms of Use and Privacy Policy, and to the use of cookies as described therein.
or
 
  • Recent
  • Commented
  • Albums
  • My Pictures

Peter_of_Australia's Photos

View Profile
Sort:
Commented
  • Most Recent
  • Most Comments
  • Albums
  • Photos
And both cable end in this little connector.
0 2022/10/24 00:00:18 Peter_of_A
Here is the outgoing cable runing along the fat wiring loom, and in the middle of the bumber this cable gets company: A second cable that I fixed firmly to earth via the bolt to the horn assy.
0 2022/10/24 00:00:16 Peter_of_A
Those two cables will get connected to those 2 contacts of the coil of a 12V relay. Which cable goes to which side of the coil, does not matter. The ignition ON signal feeds into a fuse (I chose 10A), which goes to the "common" contact of the relay. And the outgoing cable from that relay leaves from the NC contact of the relay, i.e. the :normally closed" contact, so that the DTRL is on, when ignition is on. But if you then switch on low beam, the relay will move its contact over to the NO-contac
0 2022/10/24 00:00:14 Peter_of_A
Both cables need to be properly insulated again.
0 2022/10/24 00:00:11 Peter_of_A
...and this is the other.
0 2022/10/24 00:00:08 Peter_of_A
As described above, this is one signal spliced off from the headlight connector, which I need for the relay...
0 2022/10/24 00:00:06 Peter_of_A
This is where the ignition relay is at home.
0 2022/10/24 00:00:03 Peter_of_A
I need a strong "battery plus" (= 13.7V approx.) signal to power the DTRL LED lights. So contact 87 on the ignition relay was perfect. If you happen to only find a "weak" signal (I mean on any other car, e.g. a signal coming from the stalk switches), use that signal only to open a relay, which then switches thru a battery plus signal coming from the battery. But I am happy with contact 87, which makes things a bit easier.
0 2022/10/24 00:00:00 Peter_of_A
Only after I finished the job, I realized that I could have done one better: To get even the very last bit of oil and dirt out of the rear axle (despite Jaguar fairlure to provide a release plug), I could have done, what I have drawn above: attach my metal pipe (which you have seen in the pictures) to a hose, and that to a solid and airtight jar as in the sketch and connect the second pipe to an old vacuum cleaner... I;ll do that next time.
0 2022/10/23 21:44:02 Peter_of_A
The total amount of oil in the S-Type axle is 1.3L. Above I filled a water bottle for comparison purposes with 1.3L of water and next to it the bottle with the oil I removed from the axle - more than 1.2L. Not bad, I would say. Next I used the pump to fill in the new oil and fitted the filler plug again.
0 2022/10/23 21:20:32 Peter_of_A
And now I can direct the end of the pipe very precisely of there I want to have it.
0 2022/10/23 21:20:30 Peter_of_A
And I fed it into the opening. Very easy.
0 2022/10/23 21:20:28 Peter_of_A
I do not have access to a junkyard with old cars and surplus pipes, BUT I had an old surplus TV-antenna here: Perfect. I have cut out that bit, which you see above.
0 2022/10/23 21:20:27 Peter_of_A
But I should have known better: This was a pointless exercise, as it is simply not possible to direct that flexible hose inside the axle into the right position. I guess, I got only about 1/3 of the total oil in there out that way. Note: It is always a good idea to fixate the end of the hose with a ring-spanner - and then best place a weight onto that ring-spanner.
0 2022/10/23 21:20:24 Peter_of_A
Thus I tried that, and I even routed the suction pipe around that beam to be able to get the best access.
0 2022/10/23 21:20:22 Peter_of_A
I use my fluid pump to get the old fluid out of there. I checked youtube, etc. and some seem to suggest that you can simply poke the suction tube in there and remove the oil...
0 2022/10/23 21:20:19 Peter_of_A
Step one: Remove filler bolt with a 3/8" ratchet (without any socket attached). Better than a ratchet would be a "solid" ratchet, i.e. one without that fragile mechanism. I myself use a ratchet, which got damaged a long time ago and I welded the mechanism solid. To that ratchet I attach a long pipe to increase the lever-arm. The picture above is actually from when I tightened the filler bolt again, but to open it, you obviously have to turn it anti-clockwise.
0 2022/10/23 21:20:16 Peter_of_A
TO ensure the filler hose does not fall out I squeezed it in position with a tube-cut-off. Even though I had removed 5L of fluid (by letting it drip for 3 days), I initially was only able to refill 2.3L (until it came back out by the filler hole). To continue nnow with the full flush, I left the filler hose connected, and...
0 2022/10/23 05:37:05 Peter_of_A
Now you can refill the transmission fluid with a handy fluid pump (AU$10, ebay or this week at Aldi)
0 2022/10/23 05:37:02 Peter_of_A
...secured the hose with a weight (hammer) in a bowl to collect all the old transmission fluid. Letting the engine run, pumps the transmission fluid out by that pipe and hose. Obviously, let the engine run for brief moments only, then youn have to refill the reservoir again (which I had left pump and filler hose connected). The engine on briefly again, and so on until clean transmission fluid is being pumped out. I filled in a total of 14.4L, including the last liter , which I filled after reins
0 2022/10/23 05:37:00 Peter_of_A
...and I removed the upper transmission fluid metal-pipe from the radiator. This can be done without fear that anything would drip out after removing that pipe. I connected a clear tube to that pipe and...
0 2022/10/23 05:36:58 Peter_of_A
Here again my special tool with the filler plug removed.
0 2022/10/23 05:36:55 Peter_of_A
To be able to refill the transmission fluid, you need to remove the filler plug, which Jag designed such that it is not accessible. And it sits really really tight. Special self-made tool required: A 26mm long cut-off bit from an 8mm Allen key, a solid 8mm spanner and a 30cm long pipe-bit as lever arm.
0 2022/10/23 05:36:53 Peter_of_A
But finally!
But finally!
0 2022/10/23 05:36:51 Peter_of_A
SO this is the new seal on the connector. Half an hour later (applying the "Insanity-method") I successfully put the connector back on (again with my left hand). According to Albert Einstein, trying the same thing over and over again and expecting a different result is the definition of insanity... Well, the connector just did not want to go back on - and the rteason was not the new gasket, because just to test it, I tried also without gasket: I do not know why, but it did not want to go back on
0 2022/10/23 05:36:48 Peter_of_A
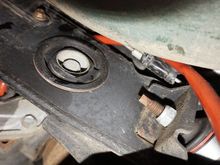
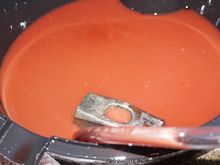
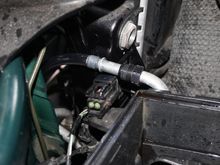
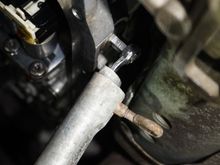
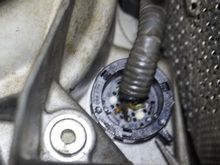
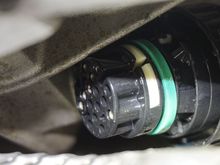
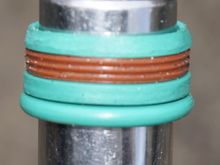
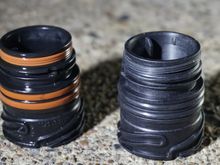
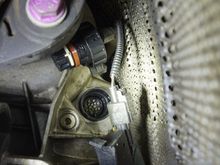
And that connector (which goes into the sleeve) also wants a new gasket. First, I overlooked that and there were still a some occasional drops dripping out. No idea, where to get the right gasket (2nd from top), but I did have FKM seals OD 29mm CS 3.5mm (=diameter). I tried that, but it was too thick, thus I thinned it down with an angle-grinder (1st from top thinned down too much, 3rd from top was OK. While I hope, that this seals suff, I also ordered already cheap FKM seals ID 22.4mm CS 2.65mm
0 2022/10/23 05:36:46 Peter_of_A
And you simply fixate the new sleeve pushing it back in. NOTE that there is this "thingy" at the bottom of the male part of the connector (picture above!), i.e.  there is only one correct rotary position, in which you need to insert the sleeve. Push it in sufficiently (by hand), and then push the white "grip" back up again - carefully - I gave it a few soft hits with that part of my hand, which is between wrist and palm.
And you simply fixate the new sleeve pushing it back in. NOTE that there is this "thingy" at the bottom of the male part of the connector (picture above!), i.e. there is only one correct rotary position, in which you need to insert the sleeve. Push it in sufficiently (by hand), and then push the white "grip" back up again - carefully - I gave it a few soft hits with that part of my hand, which is between wrist and palm.
0 2022/10/23 05:36:44 Peter_of_A
Either you have new gaskets for the old sleeve (left) or you have a new sleeve with new gaskets (right), which came with my BMW filter kit.
0 2022/10/23 05:36:42 Peter_of_A
...first you have to pull down carefully that white "grip", shown here at the front right. Now you can - without any effort, pull that sleeve out.
0 2022/10/23 05:36:39 Peter_of_A
With that connector removed you have access to that "sleeve", but as it is, you will not be able to remove it, because...
0 2022/10/23 05:36:36 Peter_of_A
WIth the FIlter removed and the fluid having dripped out overnight, it's time to remove the connector above the filter: I had my S-Type safely elevated on 4 stands and when sliding under the car from the left side I can easily turn off that connector anti-clockwise with my left arm/hand. Removing the X-member there is not required. Your arm fits thru above that X-member.
0 2022/10/23 05:36:34 Peter_of_A
Next I was faced with lots and lots of those unsuitable bolts holding the filter in position: That torx T27 is way too small: the little torx-slots will most of the time get damaged and become unusable before opening up: Hence, those nice wide slots: I made them with a 1mm cutting blade on an angle-grinder. I could even remove the botched one (right) quite easily.
0 2022/10/23 05:36:31 Peter_of_A
The picture shows already the next (BMW) filter fitted. Removing the old one was quite a fight: That plastic fluid release bolt at the bottom was impossible to remove: I drilled a hole into it to release the old fluid.
0 2022/10/23 05:36:27 Peter_of_A
And rather than trying to make my life hard by somehow attempting to get the vents down to where they were once sitting, I have cut thin wooden frames for those vents and tinted the wood a bit darker than it was. Note that anything bright would reflect in the wind-screen. Looks fab!
0 2022/10/20 23:46:16 Peter_of_A
I removed the remaining bits and pieces of the vents and glued them together from the back with  either hot glue or silicone (can't remember). I spray-painted the top of those vents in the original green colour of the Jag.
I removed the remaining bits and pieces of the vents and glued them together from the back with either hot glue or silicone (can't remember). I spray-painted the top of those vents in the original green colour of the Jag.
0 2022/10/20 23:46:14 Peter_of_A
To start with, independently of the vent issue - I covered the top of that extremely cheap looking dash (in an ugly colour, too) with real dark green sheep-skin leather (matching with my green Jag X).
0 2022/10/20 23:46:12 Peter_of_A
Here a picture of the special "medical procedure" (pushing the 2 little screwdrivers towards each other at the same time and allowing space on the opposing side for the switch to fall out...
0 2022/10/20 05:51:37 Peter_of_A
And I figured that this is the proper home for those 8 metal bars. Then switches back on, and clipping the upper part back onto the lower part.
0 2022/10/20 04:43:37 Peter_of_A
And the switch back into the trim, everything back into the door and everything worked again.
0 2022/10/20 04:43:35 Peter_of_A
After that you have 8 little metal bars and this above.
0 2022/10/20 04:43:33 Peter_of_A
First
Page
22 of 24
Last
Go To
Page
  • 1
  • ...
  • 18
  • 19
  • 20
  • 21
  • 22
  • 23
  • 24
22 of 24
Go To GO
Go to page of 24 pages
  • 1
  • ...
  • 18
  • 19
  • 20
  • 21
  • 22
  • 23
  • 24

Top
Jaguar Forums - Jaguar Enthusiasts Forum
  • Contact Us
  • FAQ
  • Archive
  • Advertising
  • Cookie Policy
  • Privacy Statement
  • Terms of Service
  • Your Privacy Choices
  • Manage Preferences

© 2026 MH Sub I, LLC dba Internet Brands

Follow Us        


When you click on links to various merchants on this site and make a purchase, this can result in this site earning a commission. Affiliate programs and affiliations include, but are not limited to, the eBay Partner Network.