Jaguar Forums - Jaguar Enthusiasts Forum
  • LOG IN
  • REGISTER
  • Forums
    • General Jaguar Forums
      • New Member Area - Intro a MUST
      • Jaguar Forums Feedback & Suggestion Center
      • General Tech Help
    • Jaguar Models ( Current )
      • XF (X260)
      • F-Type ( X152 )
      • XE ( X760 )
      • E-Pace
      • F-Pace (X761) / C-X17
      • I-Pace EV
    • Jaguar Models ( Modern )
      • XF and XFR ( X250 )
      • XJ ( X351 )
      • X-Type ( X400 )
      • S-Type / S type R Supercharged V8 ( X200 )
      • XJ XJ6 / XJ8 / XJR ( X350 & X358 )
      • XJ XJ8 / XJR ( X308 )
      • XJ XJ12 ( X305 )
      • XJ XJ6 / XJR6 ( X300 )
      • XK8 / XKR ( X100 )
      • XK / XKR ( X150 )
    • Jaguar Models ( Classics )
      • Mark V - X 420G
      • MKI / MKII S type 240 340 & Daimler
      • XK120 XK140 XK150
      • E type ( XK-E )
      • XJ6 & XJ12 Series I, II & III
      • XJS ( X27 )
      • XJ40 ( XJ81 )
      • XKSS
      • XJ220
    • Other Jaguars
      • Other Jaguar Models / Concepts / Replicas
    • Diesel variants
      • Diesel variants - All models
    • Non Jaguar vehicles
      • Non-Jaguar Vehicles
    • Brand Review
      • Jaguar Press release
      • Jaguar Customer Relationship Centre
      • Jaguar Engines & transmissions
      • Wheels / Tires, Suspension & handling
      • Interior
      • Exterior
      • Audio/Visual Electronics
      • Detailing / Car care
      • Motorsports
    • Jaguar Classifieds
      • Marketplace
      • PRIVATE For Sale / Trade or Buy Classifieds
      • VENDOR 'For Sale' Classifieds
    • Regional
      • US Northeast
      • US Central
      • US Southwest
      • US Western
      • US Northwest
      • US Midwest
      • US Mid Atlantic
      • US Lower Atlantic
      • US Southern Midwest
      • Canada
      • Mexico, South America
      • UK & Eire
      • Europe
      • Australia - Queensland
      • Australia - New South Wales / ACT
      • Australia - Victoria / Tasmania
      • Australia - Western
      • Australia - South / NT
      • New Zealand
      • Other Areas
    • Official Site Sponsors
      • VENDOR Threads
    • General Interest / History
      • Sights N Sounds
      • Photography
      • Forum announcement archives / Forum History
      • Jaguarforums Merchandise
      • Memorial Section
  • News
  • Marketplace
    • Vendor Directory
    • Become a Vendor
    • Member Marketplace
    • Vendor Marketplace
    • Site Store
  • New Posts
  • Tools
    • Car Payment Calculator
    • Tire Rim Calculator
    • Vin Decoder
    • Recalls
    • Technical Service Bulletins (TSBs)
    • Members List
    • Live Feed
  • Gallery
  • View Dark Mode
    • Please register or login to enable Dark Mode.
  • Log In
  • Register
Jaguar Forums - Jaguar Enthusiasts Forum
    • Threads
      • Advanced
Dark Mode

Please register or login to enable Dark Mode.

Log In

Forgot your Password?

By logging into your account, you agree to our Terms of Use and Privacy Policy, and to the use of cookies as described therein.
or
 
  • Recent
  • Commented
  • Albums
  • My Pictures

Peter_of_Australia's Photos

View Profile
Sort:
Commented
  • Most Recent
  • Most Comments
  • Albums
  • Photos
So to remove the air intake I have to first remove the upper part of the throttle body. Do do that, you have to remove all kinds of hoses and connectors. I you forgot to take pictures, maybe my picture here helps you when trying to figure out later, what goes where...
0 2023/01/04 02:53:07 Peter_of_A
Let the journey begin: When doing something like that, take pictures all the time. Note that there are different throttle-bodies on different X308. I do not have that black plastic vacuum cylinder, and don't be confused by that white cylinder: It's just an old food container, which fits perfectly - making sure that no dirt falls into the throttle while I am working there.
0 2023/01/04 02:53:04 Peter_of_A
Lots of craks in the plastic cover. Obviously, plasic and head do not mix...
0 2023/01/03 16:04:27 Peter_of_A
A rat!
A rat!
0 2023/01/03 02:19:06 Peter_of_A
0 2023/01/01 04:02:25 Peter_of_A
0 2023/01/01 04:02:23 Peter_of_A
0 2023/01/01 04:02:21 Peter_of_A
0 2023/01/01 04:02:19 Peter_of_A
0 2023/01/01 04:02:16 Peter_of_A
0 2023/01/01 04:02:14 Peter_of_A
Now, since I did this ATF change (full flush) while I had to remove the radiator anyway, but not the A/C radiator (to swap the timing chains, etc.) I had had both pipes (from and to the transmission) removed from the radiator anyway. I removed the ATF from the transmission (release plug in the pan), which was about 5L, then I put the plug back on. Then - and that is new: I used my "air pressure gun" and I blew CAREFULLY (I did not pull the trigger completely and I intentionally let a bit of airp
0 2023/01/01 04:02:12 Peter_of_A
My way to do so was finding a relatively small hex-key and putting the longer end into the filler plug, while attaching a pipe as lever onto the short end of the hex key. I thibk it was an 8mm hex key.
0 2023/01/01 04:02:10 Peter_of_A
Step 1 - as you should do it - but I always forget (and do it later): Loosen the filler plug (do not open, ATF would splash out, but loosen - just so that you know that you are able to remove it later for refilling).
0 2023/01/01 04:02:08 Peter_of_A
Mounted back onto the car-body.
0 2022/12/27 04:26:01 Peter_of_A
Then you get yourself somewhere a rubber block and cut out of the full the right size rubber cylinder. I used an angle grinder with sanding disc. I am not responsible for any damage or injury. You clean up the two leftover metal parts (also with the angle grinder and "glue" all 3 parts together with black silicone. Let it dry over night. And you have an "all new" part...  ;)
Then you get yourself somewhere a rubber block and cut out of the full the right size rubber cylinder. I used an angle grinder with sanding disc. I am not responsible for any damage or injury. You clean up the two leftover metal parts (also with the angle grinder and "glue" all 3 parts together with black silicone. Let it dry over night. And you have an "all new" part... ;)
0 2022/12/27 04:25:59 Peter_of_A
After it is broken into two, it can be screwed off with a socket - same applies to the other part stuck in the car-body.
0 2022/12/27 04:25:55 Peter_of_A
I am starting with a picture, so you know, what
this is about. The official name of this part is Instrumount, the P/N is EAC8130, and it is the X308 rubber stud under the box, which contains the engine-air-filter. And it is broken...
I am starting with a picture, so you know, what this is about. The official name of this part is Instrumount, the P/N is EAC8130, and it is the X308 rubber stud under the box, which contains the engine-air-filter. And it is broken...
0 2022/12/27 04:25:53 Peter_of_A
0 2022/12/27 03:06:54 Peter_of_A
The old fluid in there was unbelievably dirty (black, right). After the first hectic 5-10 seconds, I asked the helper to start the car without steering wheel action until I say STOP: That resulted in the clean fluid output of the left bottle, i.e. that was already the new fliid, which came back out.
0 2022/12/27 02:24:21 Peter_of_A
That hose extends to the waste bottle. You need a helper now, who starts the car (in P position and handbrake on) and turn the steering wheel to both sides on your command, while you stand prepared with an open 1 or 1.5 Liter bottle of Dex. I used a milk-bottle filled from the 20L bucket before.
III. Things will happen extremely fast. Make sure that the hose is secured and cannot fly around spraying the ATF all over the place. The reservoir will empty in a heartbeat, you have to poor the TF very
That hose extends to the waste bottle. You need a helper now, who starts the car (in P position and handbrake on) and turn the steering wheel to both sides on your command, while you stand prepared with an open 1 or 1.5 Liter bottle of Dex. I used a milk-bottle filled from the 20L bucket before. III. Things will happen extremely fast. Make sure that the hose is secured and cannot fly around spraying the ATF all over the place. The reservoir will empty in a heartbeat, you have to poor the TF very
0 2022/12/27 02:24:19 Peter_of_A
I stuffed a suitable hose into the return hose (and fixed it with that clip). The reservoir rests here on a brick. You fill up the reservoir with DEX III.
0 2022/12/27 02:24:17 Peter_of_A
I stuffed on end of a bit of tube with heat-glue and put that tube over the reservoir's return-hose connection.
0 2022/12/27 02:24:15 Peter_of_A
It prooved to be extremely difficult to get the return hose (the lower hose) off. Afterwards, getting the hose back on was equally difficult, so I resorted to using a heat gun, to warm up the rubber hose a bit, which was very helpful - I should have done that already at this point here, during the removal.
0 2022/12/27 02:24:14 Peter_of_A
Then I removed the bracket, pushed the clips of the hosed back and used pliers to twist-turn the hoses, so that they both can turn around the point where they are attached. The lid of the reservoir is back on!
0 2022/12/27 02:24:12 Peter_of_A
Next I lowered the reservoir so that I can empty it even more.
0 2022/12/27 02:24:10 Peter_of_A
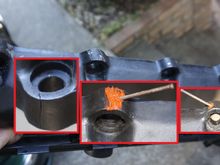
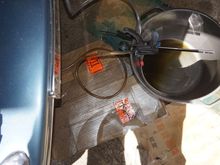
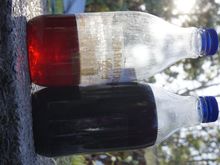
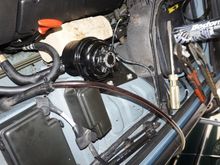
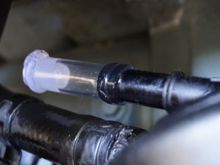
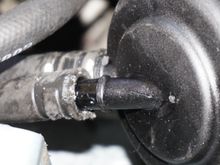
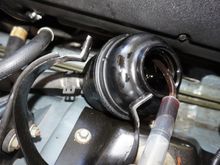
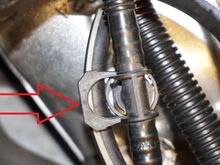
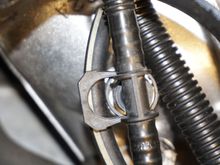
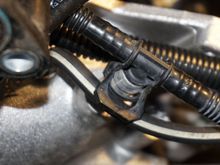
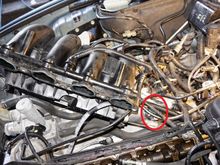
Then I detached the reservoir from its bracket. Also, I have to determine, which of the two hoses the return hose is. You can see it, when you look into the reservoir. ON the Ford Fairlane NL and the S-Type the return hose is the upper hose, but this here is the other design as used on the X-Type: The lower hose connects to the pipe, which rises up INSIDE of the reservoir so that the lower hose effectively becomes the "upper" hose, if you know what I mean.
0 2022/12/27 02:24:07 Peter_of_A
Let's start with an "art-picture"...  ;) You can see what is important: I use heat-glue to glue a bit of tube onto a syringe to empty the pwr. steering reservoir bit by bit and fill the waste bottle with the old fluid.
Let's start with an "art-picture"... ;) You can see what is important: I use heat-glue to glue a bit of tube onto a syringe to empty the pwr. steering reservoir bit by bit and fill the waste bottle with the old fluid.
0 2022/12/27 02:24:02 Peter_of_A
0 2022/12/27 01:57:51 Peter_of_A
That little white "clip" on the wiring loom is just one example of a X-mas tree. I heated it up a bit to get it out, and then again I headed it up to get it back in again later.
0 2022/12/26 15:48:50 Peter_of_A
And once, that red pin of the primary tensioner is pulled: Am I supposed to move that black thing, which look like a bit of a chain (where the red arrow points at) into any direction?
0 2022/12/18 04:05:05 Peter_of_A
In those blue circles you can just spot the red pins from the new secondary tensioners. I am sure they need to be pulled, once everything else is fitted properly.  In those green circles are the primary tensioners. They also have red pins. Are they also supposed to be pulled? I did, but I am not sure, if that was correct - at least I just found a YT-video, where those were also pulled. But is that correct?
In those blue circles you can just spot the red pins from the new secondary tensioners. I am sure they need to be pulled, once everything else is fitted properly. In those green circles are the primary tensioners. They also have red pins. Are they also supposed to be pulled? I did, but I am not sure, if that was correct - at least I just found a YT-video, where those were also pulled. But is that correct?
0 2022/12/18 03:57:14 Peter_of_A
0 2022/12/18 03:53:02 Peter_of_A
So push that clip INTO the clip and then pull?
0 2022/12/13 03:25:04 Peter_of_A
And this is the top view of that mysterious clip design.
0 2022/12/13 03:08:15 Peter_of_A
I already pulled that plastic-clip, which is an integral part of the clip, which I can't get off.
0 2022/12/13 03:08:13 Peter_of_A
Circled in red: That clip fixes a T-piece (of a passing tube) to the lower throttle body.
0 2022/12/13 03:08:11 Peter_of_A
All good again. I found a new metal idler pulley with bearing, replacin the crappy original plastic pulley (where bearings cannot be swapped). And funny: Hard to see, but the new black pulley is made in Canada (hard to see, printed on the right)...: Which is a perfect match with the rest of the tesioner (see picture above...).
0 2022/12/10 03:05:21 Peter_of_A
But not to worry: 5mm shorter sounds a lot, but it is not that bad, because even the new bolt used nearly all the thread available (further out there was no more thread). Plus, I used the red loctite). Nevertheless, I went over the top, and I drilled a little hole into the new bolt and added another little screw from the other side. And used loctite again.
0 2022/12/10 03:05:19 Peter_of_A
I was soooo lucky to find a left handed bolt! They did not have and left handed bolds in our local shop, where they sell bolts, screws and nuts only. But: the lawn-mower shop did have one. About 5mm shorter, though, and I also had to place a properly sized washer there as well to fixate the inner part of the bearing.
0 2022/12/10 03:05:16 Peter_of_A
And this is the other broken off bolt I had to deal with: The belt tensioner is marketed as non fixable replacement part. Obviously the bearing of the idler puller on it needs to be replaced. The cost for that tensioner are horrendous. I was "hammering" that bolt of the pulley with an air-ratchet... - until it broke off - and only then I saw the trap Jaguar planted there: That was a left-handed bolt!!! What the ...!? The things they do to sell the complete tensioner! Anyway, as you can see above
0 2022/12/10 03:05:14 Peter_of_A
First
Page
19 of 24
Last
Go To
Page
  • 1
  • ...
  • 17
  • 18
  • 19
  • 20
  • 21
  • ...
  • 24
19 of 24
Go To GO
Go to page of 24 pages
  • 1
  • ...
  • 17
  • 18
  • 19
  • 20
  • 21
  • ...
  • 24

Top
Jaguar Forums - Jaguar Enthusiasts Forum
  • Contact Us
  • FAQ
  • Archive
  • Advertising
  • Cookie Policy
  • Privacy Statement
  • Terms of Service
  • Your Privacy Choices
  • Manage Preferences

© 2026 MH Sub I, LLC dba Internet Brands

Follow Us        


When you click on links to various merchants on this site and make a purchase, this can result in this site earning a commission. Affiliate programs and affiliations include, but are not limited to, the eBay Partner Network.