MKI / MKII S type 240 340 & Daimler 1955 - 1967

Jag MK2 Sill Wiring Harness

Thread Tools
 
Search this Thread
 
  #1  
Old 03-17-2015, 08:28 AM
MK2's Avatar
MK2
MK2 is offline
Senior Member
Thread Starter
Join Date: Jan 2013
Location: Florida
Posts: 595
Received 68 Likes on 55 Posts
Default Jag MK2 Sill Wiring Harness

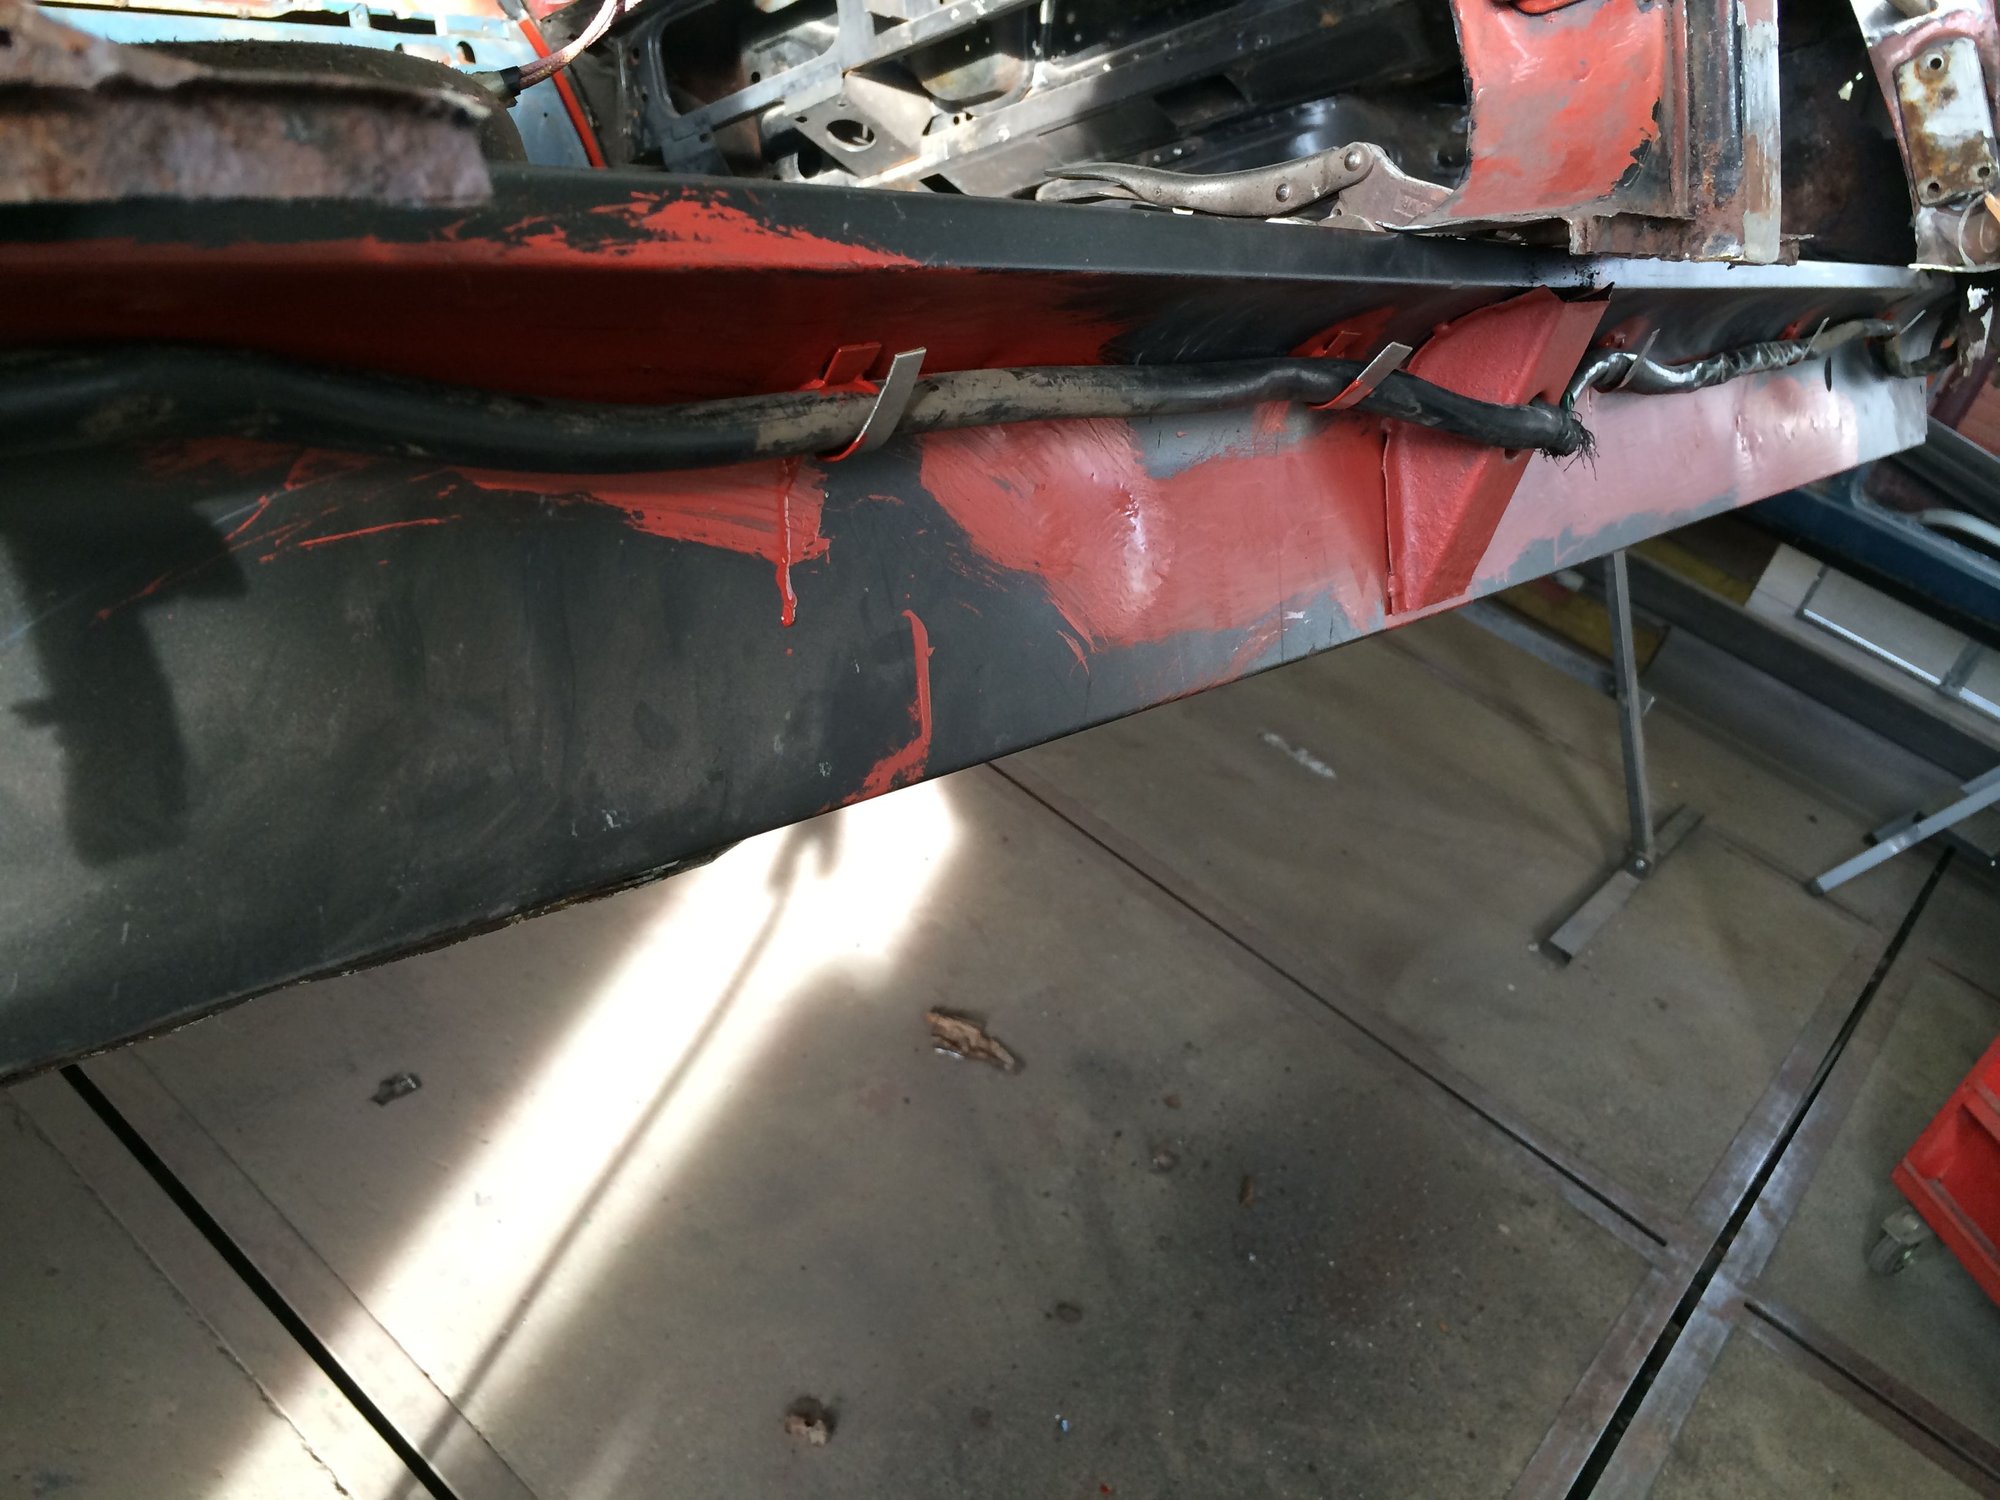
I have the installation of the LH and RH sill wiring harness ahead of me. Does anyone have any tips to make this an easier job than it appears to be?

Thank you!

Lin
 
  #2  
Old 03-17-2015, 08:37 AM
Jagfixer's Avatar
Senior Member
Join Date: Aug 2012
Location: Millstadt, IL
Posts: 656
Received 178 Likes on 153 Posts
Default

Doesn't the harness go over the doors like the MKI? I used a coat hanger and run it thru the hard places then pulled harness thru.
 

Last edited by Jagfixer; 03-17-2015 at 08:37 AM. Reason: spelling
  #3  
Old 03-17-2015, 02:53 PM
bazanaius's Avatar
Member
Join Date: Jul 2014
Posts: 48
Received 4 Likes on 4 Posts
Default

If the old one is still in - bits of string on the end of it before you pull it are ideal.
 
  #4  
Old 03-17-2015, 07:43 PM
MK2's Avatar
MK2
MK2 is offline
Senior Member
Thread Starter
Join Date: Jan 2013
Location: Florida
Posts: 595
Received 68 Likes on 55 Posts
Default Jag MK2 Sill Wiring Harness

The old harness is already out and no the wiring goes through the sills, not over the door. Thanks.
Lin
 
  #5  
Old 03-18-2015, 04:29 AM
ollibee's Avatar
Senior Member
Join Date: Dec 2012
Location: Basel-Switzerland
Posts: 107
Received 27 Likes on 24 Posts
Default

Hi Lin

Does this photo helps?


Regards,
Oliver
 
The following 2 users liked this post by ollibee:
littlelic69 (03-18-2015), MK2 (03-18-2015)
  #6  
Old 03-18-2015, 06:10 AM
Nookieman's Avatar
Senior Member
Join Date: Mar 2015
Location: Enumclaw, Washington U.S.A.
Posts: 678
Likes: 0
Received 103 Likes on 79 Posts
Default

I have used a vacuum cleaner to suck a piece of string through, then used the string to pull the wires. On an Alfa Spider though but it might work on your jag.
 
  #7  
Old 03-18-2015, 06:13 AM
MK2's Avatar
MK2
MK2 is offline
Senior Member
Thread Starter
Join Date: Jan 2013
Location: Florida
Posts: 595
Received 68 Likes on 55 Posts
Default Jag MK2 Sill Wiring Harness

Oliver,
yes. Those are helpful. At least now I can see what the probable path looks like. Of course, my outer sill is not removed so it will still be a challenge.
Thank you!
Lin
 
  #8  
Old 03-18-2015, 08:36 AM
MK2's Avatar
MK2
MK2 is offline
Senior Member
Thread Starter
Join Date: Jan 2013
Location: Florida
Posts: 595
Received 68 Likes on 55 Posts
Default Jag MK2 Sill Wiring Harness

Oliver,
It looks like you installed new inner sills. Were the wire clips the same on the original inner sills that you removed?

Lin
 
  #9  
Old 03-19-2015, 07:20 AM
ollibee's Avatar
Senior Member
Join Date: Dec 2012
Location: Basel-Switzerland
Posts: 107
Received 27 Likes on 24 Posts
Default

Hi Lin,
The position of the clips are not exactly the same as original (but +/- they have been nearly those positions).
Regards,
Oliver
 
  #10  
Old 03-20-2015, 05:15 AM
redtriangle's Avatar
Senior Member
Join Date: Jun 2014
Location: Australian Capital Territory
Posts: 353
Received 111 Likes on 79 Posts
Default

Try using a plastic "snake", the ones domestic electricians use when installing extra power points. Rigid enough to push thru but also flexible to work around obstacles.
 
  #11  
Old 03-22-2015, 07:54 AM
Fraser Mitchell's Avatar
Veteran Member
Join Date: Dec 2009
Location: Crewe, England
Posts: 9,391
Received 2,430 Likes on 1,940 Posts
Default

There should be an access hole at the front of the rear wheel arch. It's normally covered by a grommet. When I did mine in the mid-80s, I removed the looms, but pulled a piece of string behind the loom. If you haven't got this, then a fairly stiff piece of wire will be needed. I'd use this to get a piece of string through first. Remember halfway along the loom some wires come out of another hole to go up the central door pillar. Of course the factory workers had to get the loom through with nothing to help them, so it is possible. They probably had what 'redtriangle' mentioned. When I had some electrical extensions done in my house the electricians had these, and some were as long as fishing rods !
 
  #12  
Old 03-23-2015, 06:46 AM
redtriangle's Avatar
Senior Member
Join Date: Jun 2014
Location: Australian Capital Territory
Posts: 353
Received 111 Likes on 79 Posts
Default

I'd love to go back in time & see how they did this job on the production line!

Also, how they managed to fit the rear bumper in reasonable time. It took me 5 hours last Saturday nite.

There were spanners thrown severely and a liberal amount of swearing!
 

Last edited by redtriangle; 03-23-2015 at 06:47 AM. Reason: spelling
  #13  
Old 03-31-2015, 11:30 AM
littlelic69's Avatar
Senior Member
Join Date: Jan 2013
Location: Chester UK
Posts: 878
Received 134 Likes on 100 Posts
Default Replacing Rear Bumper.

I too have replaced the rear bumper after a complete re-spray. It took forever! And I managed to damage the new paint job! The problem is that the two main bolts at the rear are "head heavy" In that you can locate them but cannot turn them to get a bite in the thread. As you fiddle about, the heavy head pulls the bolt down and out of the hole. In the end, I fashioned a piece of wood to jam between the bolt head and the bumper. Then I could carefully rotate the bolt head "flat by flat until I had a bite. The exhaust tail pipes also have VERY sharp edges!
 
Related Topics
Thread
Thread Starter
Forum
Replies
Last Post
Forcedair1
XJ XJ8 / XJR ( X308 )
37
05-14-2023 03:28 PM
allenman85
F-Type ( X152 )
14
05-10-2021 03:11 PM
mbergen
XJS ( X27 )
7
10-23-2019 10:26 PM
ajacks86
XK / XKR ( X150 )
8
10-12-2017 08:51 PM
philwarner
XJ6 & XJ12 Series I, II & III
16
09-05-2015 10:05 AM

Currently Active Users Viewing This Thread: 1 (0 members and 1 guests)


Quick Reply: Jag MK2 Sill Wiring Harness


All times are GMT -5. The time now is 06:47 PM.