

Darn Turret


O'Reilly has them in stock at many stores.
Thread Starter
|
Veteran Member


Joined: Feb 2009
Posts: 8,020
Likes: 1,731
From: Sunny South Carolina
Hey Jon, sorry I am late to the party, it looks like the usual suspects have this pounded out for you.
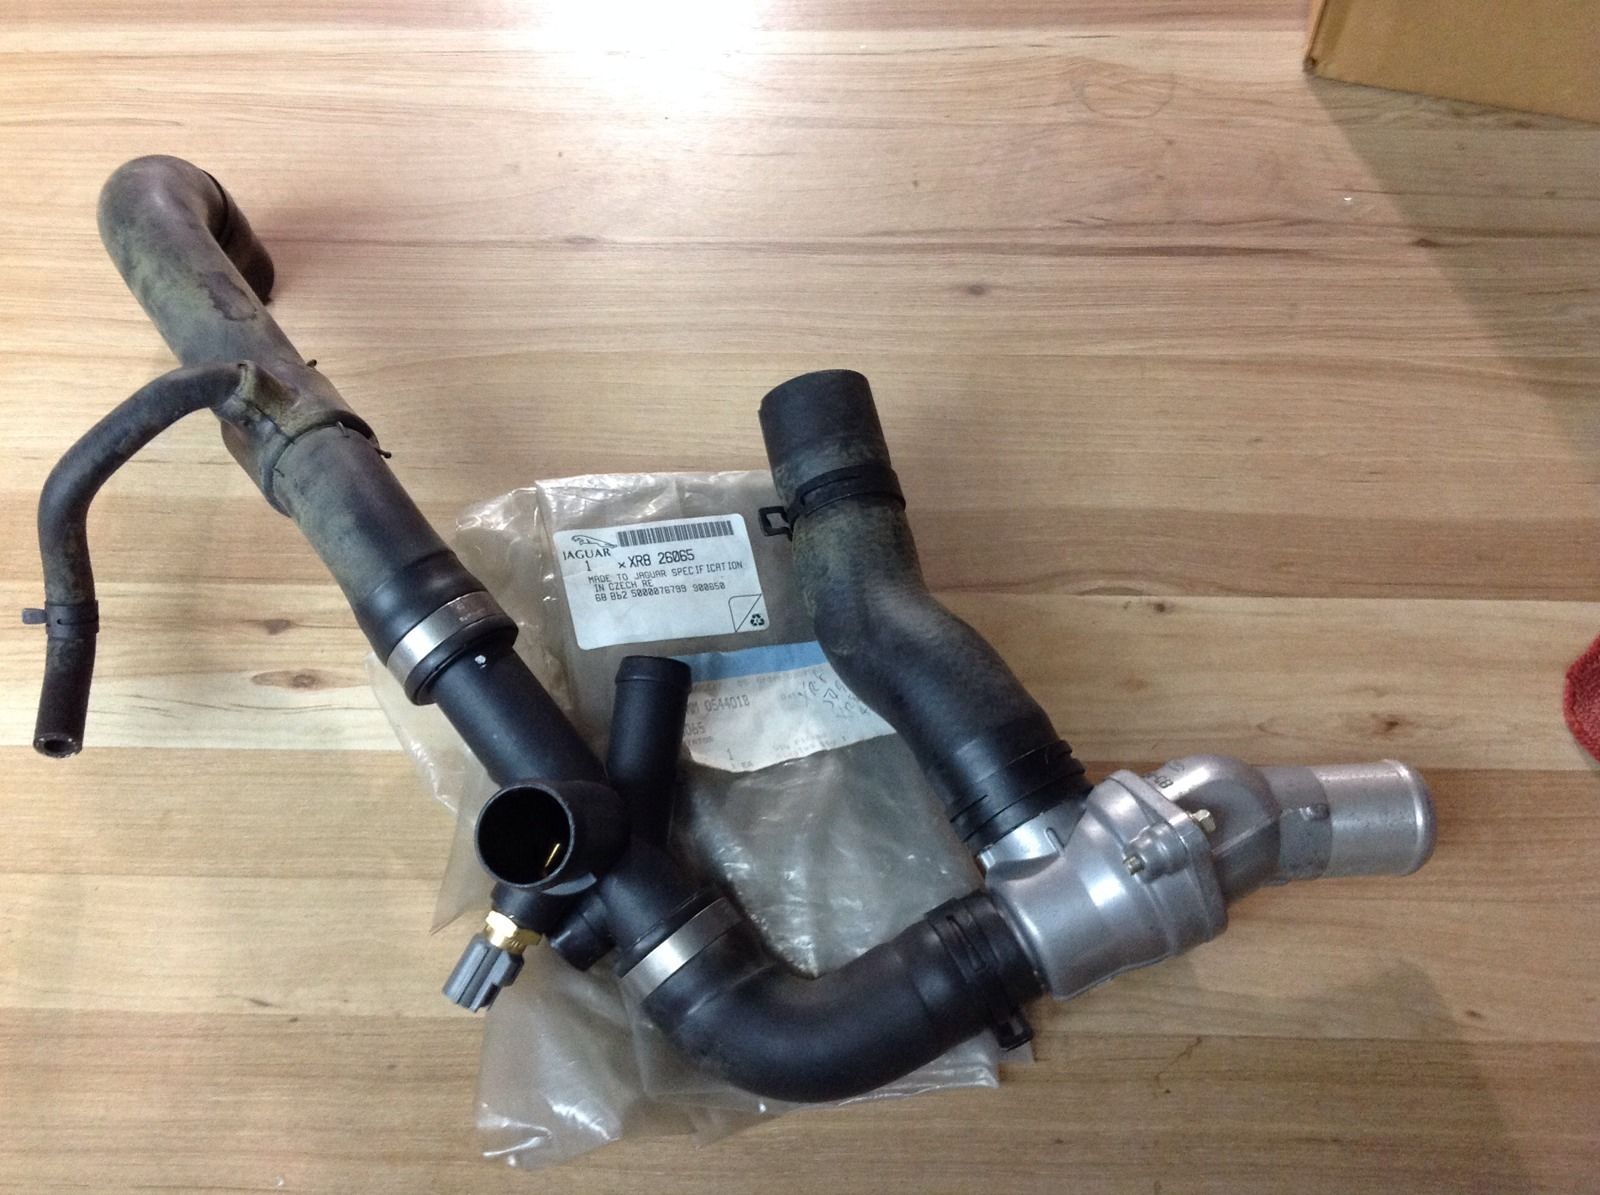
The picture with the butcher block as a background is the entire part I purchased off ebay. Some of the hoses had a white film kind of like a dusting of baby powder on them I don't know why. It was all new and came with the thermostat housing and new thermostat.
I agree with Zane, I did a complete antifreeze flush when changing Joyce's out. As mentioned in the OP, I recall thinking of your large hands in that tight space, that is why I mentioned it. I do recall having a use for a band aid when I was finished. Take your time and you will be fine. As I mentioned the whole replacement took way less than an hour. Oh and I did not even have a cold one doing this job . I did not have the special hose clamp removal tool, I used regular needle nose and pliers.
Everything in this picture is what came through ebay to me:
The picture with the butcher block as a background is the entire part I purchased off ebay. Some of the hoses had a white film kind of like a dusting of baby powder on them I don't know why. It was all new and came with the thermostat housing and new thermostat.
I agree with Zane, I did a complete antifreeze flush when changing Joyce's out. As mentioned in the OP, I recall thinking of your large hands in that tight space, that is why I mentioned it. I do recall having a use for a band aid when I was finished. Take your time and you will be fine. As I mentioned the whole replacement took way less than an hour. Oh and I did not even have a cold one doing this job
. I did not have the special hose clamp removal tool, I used regular needle nose and pliers.Everything in this picture is what came through ebay to me:
Last edited by joycesjag; Sep 8, 2015 at 10:55 AM. Reason: add pic

Veteran Member

Joined: Jan 2009
Posts: 13,081
Likes: 4,736
From: Raleigh, NC
Thanks Rick. I'm going with just the top hose assembly, leaving my original thermostat housing in place. If the new assembly arrives in tomorrow afternoon's mail as projected, I hope to start the job first thing Thursday morning when it is a bit cooler (assuming no rain)....
I went back to Harbor Freight this morning and purchased the smallest set of needle-nose vicegrips I've ever seen. They were part of a two-piece set that sold for $4.99 (before my 20% off coupon), item no. 91683. These things are tiny, less than 5 inches long. I hope they will do the trick for me in those tight spaces. We'll see....
Thanks to everyone who contributed here. While I'm not looking forward to this job because I know it will rip up my hands, I appreciate all of you offering your experience and expertise. I'll post back with the results (assuming I can still type)....

Veteran Member
Joined: Jun 2009
Posts: 3,899
Likes: 803
From: Home

Compound Hose Pliers
Since we are talking pliers I wanted to add another one that works great!
These are used to remove and install vacuum/fuel and other hoses. They are compound jointed so have a narrow reach which is just what's needed in our cramped engine compartments!
You can rotate and push or pull at the same time to break the rubber bond to metal that happens over time and heat with vacuum hoses.
.
.
.

First time I used mine, it bent where it should. I thought they were some kind of cheapo tool. Then I looked at it and needless to say, I was a dumbass at that moment.
Veteran Member
Joined: Jan 2009
Posts: 13,081
Likes: 4,736
From: Raleigh, NC
I saw a 3-piece set of those skinny hose removal pliers yesterday while I was at Harbor Freight. Almost bought it, but then decided that they probably wouldn't help me on the coolant hoses I'm going after because the coolant hoses are far larger in diameter than these tools are designed for....
Veteran Member
Joined: Jan 2009
Posts: 13,081
Likes: 4,736
From: Raleigh, NC
My new hose assembly did not show up in today's mail delivery as eBay said it would. Bummer....
This afternoon I removed the engine cover, airbox, and air intake duct to get ready for the job. That definitely opened up some tool-manipulation room....
This afternoon I removed the engine cover, airbox, and air intake duct to get ready for the job. That definitely opened up some tool-manipulation room....
Veteran Member
Joined: Jan 2009
Posts: 13,081
Likes: 4,736
From: Raleigh, NC
Update:
I'm glad to say that the new hose assembly is now installed. It is indeed an aftermarket knock-off. It has "Uro Parts" printed on its side....
A few tips for those of you with the 2005-to-2008 3.0:
1. I believe this aftermarket hose assembly was originally designed for the earlier S-Types. The new turret has that same cross-hatch pattern on its top as shown in Zane's photos, and the new turret is taller than my factory turret....
2. The new hose that runs into the engine block behind the throttle body (part no. XR810208) is just over 8 inches long. My original hose in that spot is just under 5.25 inches long, so I had to cut the new hose to fit....
3. The new coolant temperature sensor comes with a metal washer, not a rubber gasket like my factory Denso coolant temperature sensor has. I don't trust the new metal washer so I swapped my factory sensor (with its original rubber gasket) into the new hose assembly. That rubber gasket is more than 10 years old so I'm going to have to watch that area for pinhole leaks. Easy enough to do by leaving the engine dust cover off and shining a flashlight on that spot from the drivers side of the engine bay. If it turns out that I do indeed need to replace that gasket, I can probably find something suitable at the hardware store. The airbox and air intake duct will have to come off again in order to remove the sensor and replace the gasket....
The areas that gave me the most trouble were the squeeze clamps on the original hose running into the engine block. One of those recessed squeeze clamps was installed upside-down. I could not even see where to put my hose removal tool grips and access was blocked on both sides because the clamp was recessed into a tight spot. Since that original hose is part of the new replacement hose assembly, I decided to cut it all the way off as far up against its nipple as I could. That gave me more tool-manipulation room, but the clamp was still upside-down and invisible. I must admit that I simply got lucky. I spread my hose-removal tool just enough to push the grips into that tight spot, guessed where the prongs to squeeze and open the clamp would be, and the tool locked into place on the clamp on the first try. I pulled the clamp off and then cut the remaining part of the hose and got it off. Biggest relief of the day....
The key is to take your time, study each clamp position before you try to remove it, and place your various tools on the clamps in the position that gives you the greatest amount of tool manipulation room. I replaced all the squeeze clamps on the hoses running into the engine block with worm-drive screw clamps, and I made sure those screw heads were in the best position for me to be able to get my quarter-inch 7mm socket drive on them. If I ever have to do this job again, it will be much easier and quicker....
I spent about two hours start to finish. Quite a bit of that time was selecting the right tool and trying to get it into the right position along with my monster hands. Fighting those clamps and hoses running into the engine block was the worst part. Switching that area to worm-drive screw clamps made installation of the new hose assembly go much smoother....
Hope this helps the next guy in line for replacing this hose assembly....
Gr8 job, Jon!
I should probably clarify my earlier posts in this thread: The pics I put up in post #4 are of the Uro replacement part from Rock Auto as fitted to the 2005 S-Type 3.0L.
The pics I put up in post #19 are the OEM hose as removed from the 2003 S-Type 3.0L (with broken turret) and the OEM hose as removed from the 2005 S-Type 3.0L (intact turret with smooth top)
I didn't experience the catastrophic failure Rick described in post#1; rather a very small leak like we are accustomed to seeing at the overflow bottle nipple. Picking at it ever so slightly trying to determine if repositioning the clamp might solve the problem moved it IMMEDIATELY into its pictured state!
I replaced it with the $200+ OEM replacement from the dealer back in the days before I joined the forum or discovered Motorcarman. If I think of it, I'll try to snap a pic of it next time the car is in-state and post to this thread.
I replaced this hose on the 2005 "pre-emptively" during the mandatory 110,000 mile radiator change.
https://www.jaguarforums.com/forum/s...nt-leak-81519/
(the 2005 sprung the exact same radiator leak 2yrs later in 2014 - both were nearing 110k miles)
Jon, I honestly do not remember the metal washer vs. rubber under the temp sensor, but definitely recall having to swap the old sensor onto the new hose. Pretty sure I used whatever sealing device I found under the new sensor when I removed it from the new hose.
Forgive me for not thinking of it sooner, but as lucky as you were today, you should've done this one, too! Its spring-clamp was a far more BITter ex-wife than any of the clamps on the upper rad hose assy: https://www.jaguarforums.com/forum/s...p-3-0l-126574/
Last edited by aholbro1; Sep 10, 2015 at 06:55 PM.
Veteran Member
Joined: Jan 2009
Posts: 13,081
Likes: 4,736
From: Raleigh, NC
Thanks Zane. All the other original coolant hoses in that general area looked and felt pretty solid. I examined them as best I could once I got the leaking original upper hose assembly completely out of there and freed up some room for my eyes and hands. Of course, the other original hoses could fail tomorrow. If they do, I'll just have to deal with it....
By the way, my very small and slow leak was caused by the long skinny black plastic hose nipple just under the turret starting to disintegrate. When I removed that clamp and pulled that hose, the nipple basically fell apart inside the hose and I had to dig the remnants out with my needle-nose pliers. If I had not spotted the leak last Saturday morning as part of my weekly check-up, I feel certain that a catastrophic failure would have been in my very near future....
By the way, my very small and slow leak was caused by the long skinny black plastic hose nipple just under the turret starting to disintegrate. When I removed that clamp and pulled that hose, the nipple basically fell apart inside the hose and I had to dig the remnants out with my needle-nose pliers. If I had not spotted the leak last Saturday morning as part of my weekly check-up, I feel certain that a catastrophic failure would have been in my very near future....

Veteran Member
Joined: Jun 2010
Posts: 3,135
Likes: 227
From: No. NJ
MOdern cars can be amazingly sadistic at times. My close in neighbors got to hear a lot of curse words this spring as I did all of my work in some of the same areas Jon.
When it gets nasty apply the screws! Clamps that is ...
So maybe this new manufacturer's part is the factory's upgrade?
If that sealing washer was copper I think I'd feel better with that plus the appropriate sealer as a solution over vintage rubber.
When it gets nasty apply the screws! Clamps that is ...
So maybe this new manufacturer's part is the factory's upgrade?
If that sealing washer was copper I think I'd feel better with that plus the appropriate sealer as a solution over vintage rubber.
Update:
I'm glad to say that the new hose assembly is now installed. It is indeed an aftermarket knock-off. It has "Uro Parts" printed on its side....
A few tips for those of you with the 2005-to-2008 3.0:
1. I believe this aftermarket hose assembly was originally designed for the earlier S-Types. The new turret has that same cross-hatch pattern on its top as shown in Zane's photos, and the new turret is taller than my factory turret....
2. The new hose that runs into the engine block behind the throttle body (part no. XR810208) is just over 8 inches long. My original hose in that spot is just under 5.25 inches long, so I had to cut the new hose to fit....
3. The new coolant temperature sensor comes with a metal washer, not a rubber gasket like my factory Denso coolant temperature sensor has. I don't trust the new metal washer so I swapped my factory sensor (with its original rubber gasket) into the new hose assembly. That rubber gasket is more than 10 years old so I'm going to have to watch that area for pinhole leaks. Easy enough to do by leaving the engine dust cover off and shining a flashlight on that spot from the drivers side of the engine bay. If it turns out that I do indeed need to replace that gasket, I can probably find something suitable at the hardware store. The airbox and air intake duct will have to come off again in order to remove the sensor and replace the gasket....
The areas that gave me the most trouble were the squeeze clamps on the original hose running into the engine block. One of those recessed squeeze clamps was installed upside-down. I could not even see where to put my hose removal tool grips and access was blocked on both sides because the clamp was recessed into a tight spot. Since that original hose is part of the new replacement hose assembly, I decided to cut it all the way off as far up against its nipple as I could. That gave me more tool-manipulation room, but the clamp was still upside-down and invisible. I must admit that I simply got lucky. I spread my hose-removal tool just enough to push the grips into that tight spot, guessed where the prongs to squeeze and open the clamp would be, and the tool locked into place on the clamp on the first try. I pulled the clamp off and then cut the remaining part of the hose and got it off. Biggest relief of the day....
The key is to take your time, study each clamp position before you try to remove it, and place your various tools on the clamps in the position that gives you the greatest amount of tool manipulation room. I replaced all the squeeze clamps on the hoses running into the engine block with worm-drive screw clamps, and I made sure those screw heads were in the best position for me to be able to get my quarter-inch 7mm socket drive on them. If I ever have to do this job again, it will be much easier and quicker....
I spent about two hours start to finish. Quite a bit of that time was selecting the right tool and trying to get it into the right position along with my monster hands. Fighting those clamps and hoses running into the engine block was the worst part. Switching that area to worm-drive screw clamps made installation of the new hose assembly go much smoother....
Hope this helps the next guy in line for replacing this hose assembly....
I'm glad to say that the new hose assembly is now installed. It is indeed an aftermarket knock-off. It has "Uro Parts" printed on its side....
A few tips for those of you with the 2005-to-2008 3.0:
1. I believe this aftermarket hose assembly was originally designed for the earlier S-Types. The new turret has that same cross-hatch pattern on its top as shown in Zane's photos, and the new turret is taller than my factory turret....
2. The new hose that runs into the engine block behind the throttle body (part no. XR810208) is just over 8 inches long. My original hose in that spot is just under 5.25 inches long, so I had to cut the new hose to fit....
3. The new coolant temperature sensor comes with a metal washer, not a rubber gasket like my factory Denso coolant temperature sensor has. I don't trust the new metal washer so I swapped my factory sensor (with its original rubber gasket) into the new hose assembly. That rubber gasket is more than 10 years old so I'm going to have to watch that area for pinhole leaks. Easy enough to do by leaving the engine dust cover off and shining a flashlight on that spot from the drivers side of the engine bay. If it turns out that I do indeed need to replace that gasket, I can probably find something suitable at the hardware store. The airbox and air intake duct will have to come off again in order to remove the sensor and replace the gasket....
The areas that gave me the most trouble were the squeeze clamps on the original hose running into the engine block. One of those recessed squeeze clamps was installed upside-down. I could not even see where to put my hose removal tool grips and access was blocked on both sides because the clamp was recessed into a tight spot. Since that original hose is part of the new replacement hose assembly, I decided to cut it all the way off as far up against its nipple as I could. That gave me more tool-manipulation room, but the clamp was still upside-down and invisible. I must admit that I simply got lucky. I spread my hose-removal tool just enough to push the grips into that tight spot, guessed where the prongs to squeeze and open the clamp would be, and the tool locked into place on the clamp on the first try. I pulled the clamp off and then cut the remaining part of the hose and got it off. Biggest relief of the day....
The key is to take your time, study each clamp position before you try to remove it, and place your various tools on the clamps in the position that gives you the greatest amount of tool manipulation room. I replaced all the squeeze clamps on the hoses running into the engine block with worm-drive screw clamps, and I made sure those screw heads were in the best position for me to be able to get my quarter-inch 7mm socket drive on them. If I ever have to do this job again, it will be much easier and quicker....
I spent about two hours start to finish. Quite a bit of that time was selecting the right tool and trying to get it into the right position along with my monster hands. Fighting those clamps and hoses running into the engine block was the worst part. Switching that area to worm-drive screw clamps made installation of the new hose assembly go much smoother....
Hope this helps the next guy in line for replacing this hose assembly....
Veteran Member
Joined: Jan 2009
Posts: 13,081
Likes: 4,736
From: Raleigh, NC
Come to think of it, I cannot remember screaming a single curseword doing the hose assembly job replacement yesterday. That is an absolute rarity unlikely to ever be repeated. I'm sure the neighborhood appreciated it....
Veteran Member
Joined: Jan 2009
Posts: 13,081
Likes: 4,736
From: Raleigh, NC
Update:
I'm now at five days after the upper hose assembly replacement and thus far have seen no leaks or weepage. I have had to add a very small amount of coolant first thing each morning as the system continues to burp all the air out, though....
So far so good....
I'm now at five days after the upper hose assembly replacement and thus far have seen no leaks or weepage. I have had to add a very small amount of coolant first thing each morning as the system continues to burp all the air out, though....
So far so good....
Veteran Member
Joined: Jun 2010
Posts: 3,135
Likes: 227
From: No. NJ
My cooling system adventure from earlier this year has yeilded a remaining very slow seepage on the neck of the coolant ank which means that over a month I've had to add about 1/8th of an inch of coolant to the tank. It's done this ever since I've owned the car even after the dealer replaced the tank. It's not a huge issue but in replacing all of the hoses I did in my major service event I ended up with a low coolant warning light on permanently now.
While I had the tank out I DID pressure test it with hot, though not 200F, water and I could not find a fault. It's a quirk of my car I'll just have to live with. So either the connector or harness have failed or the sensor itself is bad now.
To get at that to check things out means I have to take a bunch of hoses off and drain some coolant which I just did!
I remember your asking if there was a way to just siphon out the tank and not have to do a complete system fill/bleed again.
What did you end up doing?
Last edited by Staatsof; Sep 16, 2015 at 09:42 AM.
Veteran Member
Joined: Jan 2009
Posts: 13,081
Likes: 4,736
From: Raleigh, NC
I siphoned out the coolant reservoir, then detached a couple of the highest-mounted hoses and siphoned them out. I gradually worked my way down, detaching the hoses and siphoning them out until I finally got the level of remaining coolant lower than any of the hoses I had to detach. I probably spilled less than 12 ounces of coolant onto the driveway during the process. Not too bad....
Veteran Member
Joined: Jan 2009
Posts: 13,081
Likes: 4,736
From: Raleigh, NC
Update:
I just discovered a pinhole coolant leak in my new upper hose assembly. It is at the base of the small hose that leads from the main body of the assembly up to the throttle body. When the engine is up to temperature, a drop of coolant pops out of that hose seam every 30 seconds or so....
The good news is that the seller (Imparts Inc. in Atlanta) will Priority Mail a new upper hose assembly to me today....
The bad news is that I have to do this job all over again once the new upper hose assembly gets here....
Veteran Member
Joined: Jun 2009
Posts: 3,899
Likes: 803
From: Home
It's always a bunch faster the 2nd time!!
I am pulling the SC again to fix my P/B vacuum hose leak that I caused when I changed the under SC hose several weeks ago. Old plastic just falls apart.
.
.
.
I am pulling the SC again to fix my P/B vacuum hose leak that I caused when I changed the under SC hose several weeks ago. Old plastic just falls apart.
.
.
.