When you click on links to various merchants on this site and make a purchase, this can result in this site earning a commission. Affiliate programs and affiliations include, but are not limited to, the eBay Partner Network.
So my 2004 XJR wipers would fail when cold. They would sporadically not return to the down position, instead stopping on the return swipe right in my field of vision until the next swipe was triggered. Manageable but annoying. So I decided to try and get them working better.
Step 1: Remove wiper assembly from car. You'll have to remove the wiper blades and plastic tray covering the assembly and remove the brake booster and possibly the master cylinder. (I already had my master cylinder out cause I am replacing it) to have enough room. If you remove the master then you'll have to bleed the brakes.
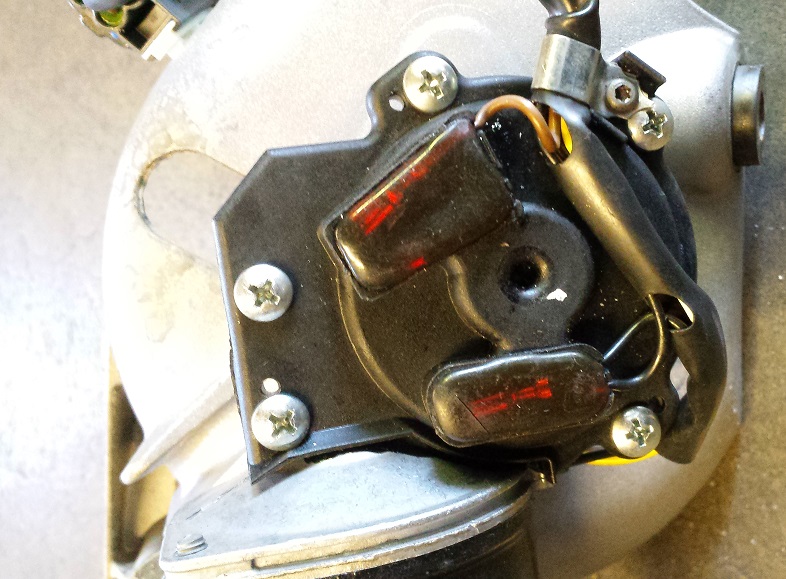
Step 2: With the wiper motor out of the car, carefully drill the rivets holding position sensor cover to the wiper motor.
Step 3: Clean and sand off the tarnish on the sensor contacts and make sure they are bent out to keep good pressure on the spinning disc. (see photos)
Step 4: Apply new clean lube that is electrical friendly and reassemble unit with small screws or rivets. I chose screws so I could easily take the cover off again if needed.
Step 5: Install wiper motor Assembly back into vehicle, reinstall brake booster, reinstall plastic cover and wiper blade assemblies.
So after I completed this I tested the system by spraying the car with the garden hose. So far the wipers have worked 100% perfect without fail. We will have to wait and see the next time it rains and how long they will be good for. Time will tell how long this repair will last.
A very simple repair, in fact more maintenance than repair, but unless one does it oneself, there are several hours of costly labour just to get the wiper mechanism on the bench. I can see why most shops just put a new one in, as it doesn't take long to make a big bill out of the labour hours needed to fix it
So we have had a good couple of weeks of on and off rain here in the bay area and I've had lots of opportunities to test the wipers now. I'm happy to report that the wiper have worked perfect since the repair. (Knock on wood) They have not faulted once. The auto function works great. Just turn it on and it does its job all by itself controlling the speed of the wipers. If anyone has a problem with their wipers not returning to the down position I would recommend to try this before buying any parts.
So we have had a good couple of weeks of on and off rain here in the bay area and I've had lots of opportunities to test the wipers now. I'm happy to report that the wiper have worked perfect since the repair. (Knock on wood) They have not faulted once. The auto function works great. Just turn it on and it does its job all by itself controlling the speed of the wipers. If anyone has a problem with their wipers not returning to the down position I would recommend to try this before buying any parts.
Over a decade later your post is still an incredibly helpful guide. I had no idea what the cause of my wipers sticking in the up position on a occasion could be.
Did this fix continue to work long term? I'm currently debating undergoing this repair but another post on a sister forum stated to expect 16+ hours in figuring out how to get everything apart... I may just buy a new servo when I dare attempt this myself.
It's not a simple repair. I did it all myself according to author manual. It's difficult to remove the mechanism, the motor housing is riveted, but the worst part is that damn starlock clip on the motor shaft. Apparently, there's a way to remove the motor itself without removing the mechanism. You probably have to remove the black panel under the windshield, but I didn't know how. Buying a used motor is a gamble, as new ones are out of stock and it is only a matter of time.... About a year after the repair, the problem returned, but this time it was related to a detached rain sensor patch. I can't explain the relation, but I replaced the patch myself, and the problem disappeared.
Last edited by PeterX358; Aug 24, 2025 at 10:02 AM.
It's not a simple repair. I did it all myself according to author manual. It's difficult to remove the mechanism, the motor housing is riveted, but the worst part is that damn starlock clip on the motor shaft. Apparently, there's a way to remove the motor itself without removing the mechanism. You probably have to remove the black panel under the windshield, but I didn't know how. Buying a used motor is a gamble, as new ones are out of stock and it is only a matter of time.... About a year after the repair, the problem returned, but this time it was related to a detached rain sensor patch. I can't explain the relation, but I replaced the patch myself, and the problem disappeared.
Do you happen to remember how you got that blue disc off? I'm afraid to break it by just yanking it and can't see to find a mechanism for it.
Separately I ws trying to get the motor out for a through cleaning but I'd imagine that's further than most people went.
That's right, there's that starlock clip, you reminded me of it and now my evening is ruined .... I tried to damage that clip with various very thin screwdrivers and did probably with some kind of metal skewer. The first day I gave up, the second day it took about an hour but I succeeded.
Thanks for the heads up there, I was missing that star ring under the grease. Definitely a pain in the rear to get out as there's not enough room to properly get a pick in there.
I took a small precision flathead and pried at it focusing on one side slowly until I finally bent it upward.. I was being careful to not overdo it so the blue disc didn't get damaged.
The locking ring definitely got beat but I figure since it's a retaining ring it won't impact functionality:
Somehow I think I'll be the last guy here crazy enough to undertake this but in case another soul follows through, here are additional pictures for reference.
Note these are prior to any sanding or contact cleaner, just wiped the grease off. Surprised at how clean it all looks, maybe didn't even need service but since I sourced this second hand, I'd rather go through it all once.
Wasn't able to get the combinator out unfortunately but I'll wipe the area that makes contact with the brushes as best as I can.
What kind of lube to use on the contact ring, white lithium ?
Just tried again, got the retaining ring out, & things cleaned up.
Curious just what type of lube to use to replace old white lube.
Last edited by Wingrider; Nov 7, 2025 at 03:10 PM.
White lithium grease is what I read to be standard as it allows for electricity to flow while still resisting moisture and not drying up. I went somewhat lighter in amount as there was a ton of old grease on the contact plate.
White lithium grease is what I read to be standard as it allows for electricity to flow while still resisting moisture and not drying up.
Hi JagNYC,
White lithium grease is often used in these types of applications because it will not degrade plastic parts as petroleum-based lubricants will, and it is heavier-bodied than silicone-based lubricants.
But like dielectric grease, white lithium grease is an insulator - it does not conduct electricity. So it should only be applied to non-electrically-conducting parts such as gears, shafts and bearings, and not to bushes, commutators, electrical terminals, etc.
Thanks:
That could be the main issue here.
When mine was taken apart, the contact points, or brushes.
Were coated with lube on their edges, the tracking area they used.
Was coated with carbon contaminated lube, from the brushes.
I have some lithium lube but will need to find a snap ring the correct size, maybe 1/4".
Buggered up the factory fastener, getting it out, but the washer underneath survived.
Between the two should be able to find one, auto parts first try
White lithium grease is often used in these types of applications because it will not degrade plastic parts as petroleum-based lubricants will, and it is heavier-bodied than silicone-based lubricants.
But like dielectric grease, white lithium grease is an insulator - it does not conduct electricity. So it should only be applied to non-electrically-conducting parts such as gears, shafts and bearings, and not to bushes, commutators, electrical terminals, etc.
Cheers,
Don
You're absolutely right on that, I incorrectly stated that its conductive when neither are. I'm having a ton of trouble finding consensus on what is the right grease to use here and where to apply it. I've found sources stating that white lithium is what's applied by wiper motor manufacturers and that's certainly what it looks like when you open the thing. It seems some sources say none is supposed to be on the contact plate and arms yet mine is coated in that.
However others will say you need dielectric synthetic grease as it also won't allow current to flow while still allowing the materials to shift their charge when exposed to an electrical field.
Feels like you'd need an electrical engineer to definitively state it one way or the other but what I've found inside my motor is a white grease coating mostly the contact pad and arms so I'll have to follow suit as much as I hate to not be certain.
Over time the grease migrates onto electrical conducting surfaces and is one of the causes of component failure. Best to leave the electrical conductors clean and dry.
Thanks club, unfortunately I bought myself extra work in breaking one of the wiper studs while trying to use pliers to get it off the splines.
Do yyou happen to know if you have to mark the starting position on the new motor?
Separately I'm having a hell of a time getting the brake booster off. I've detached the 4 nuts in the cabin and the master cylinder but no amount of prying gets it off.


 .... I tried to damage that clip with various very thin screwdrivers and did probably with some kind of metal skewer. The first day I gave up, the second day it took about an hour but I succeeded.


