
Reach Motor Cable Replacement

Thread Starter
|
Member
Joined: Apr 2013
Posts: 34
Likes: 18
From: Atlanta, GA
After searching and reading three different threads on this subject and still have some questions, I decided to go ahead and attempt this repair. Reach motor cable is available at Jaguar Parts, Land Rover Parts, Mini Cooper Parts
My reach motor cable was broken with the column all the way in, so I determined the only way to access the motor was to drop the whole column. Some have said that you can access it by removing the instrument cluster (which may be possible), but I really didn�t want to go this route.
After removing all of the trim panels you are left with just the column (Picture 1).
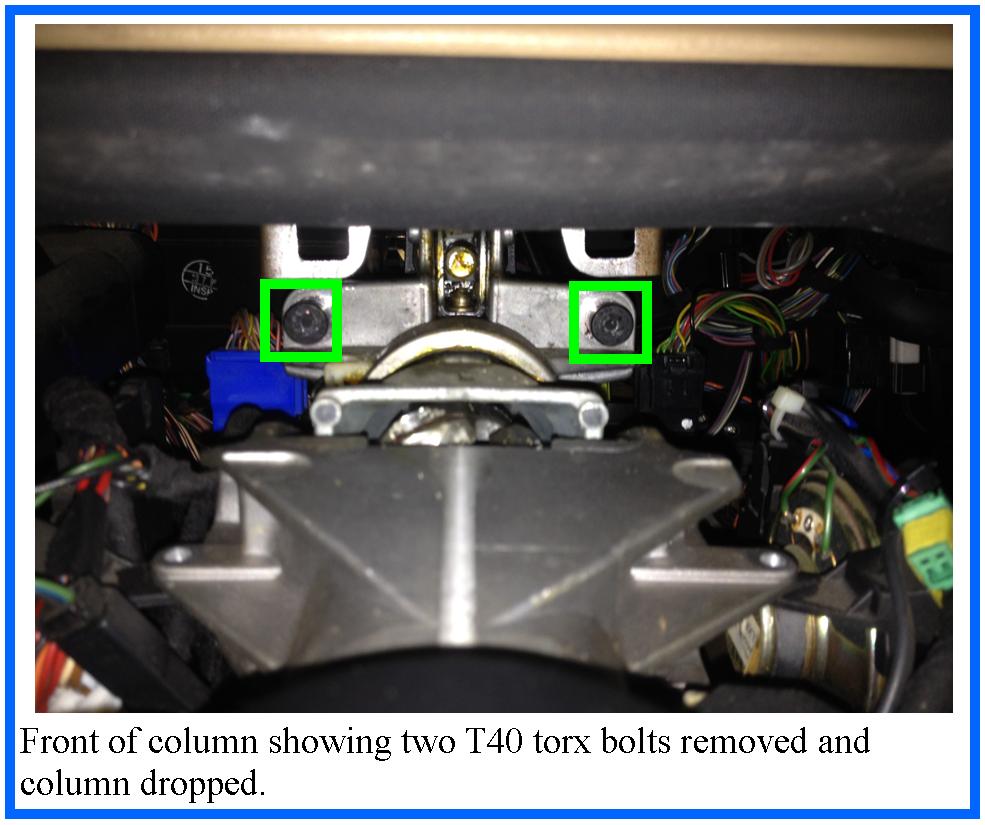
Remove the two T40 Torx bolts (Picture 2), you will need a long extension for you socket wrench.
Remove 1 bolt and 1 nut at base of column at floor board (Picture 3).
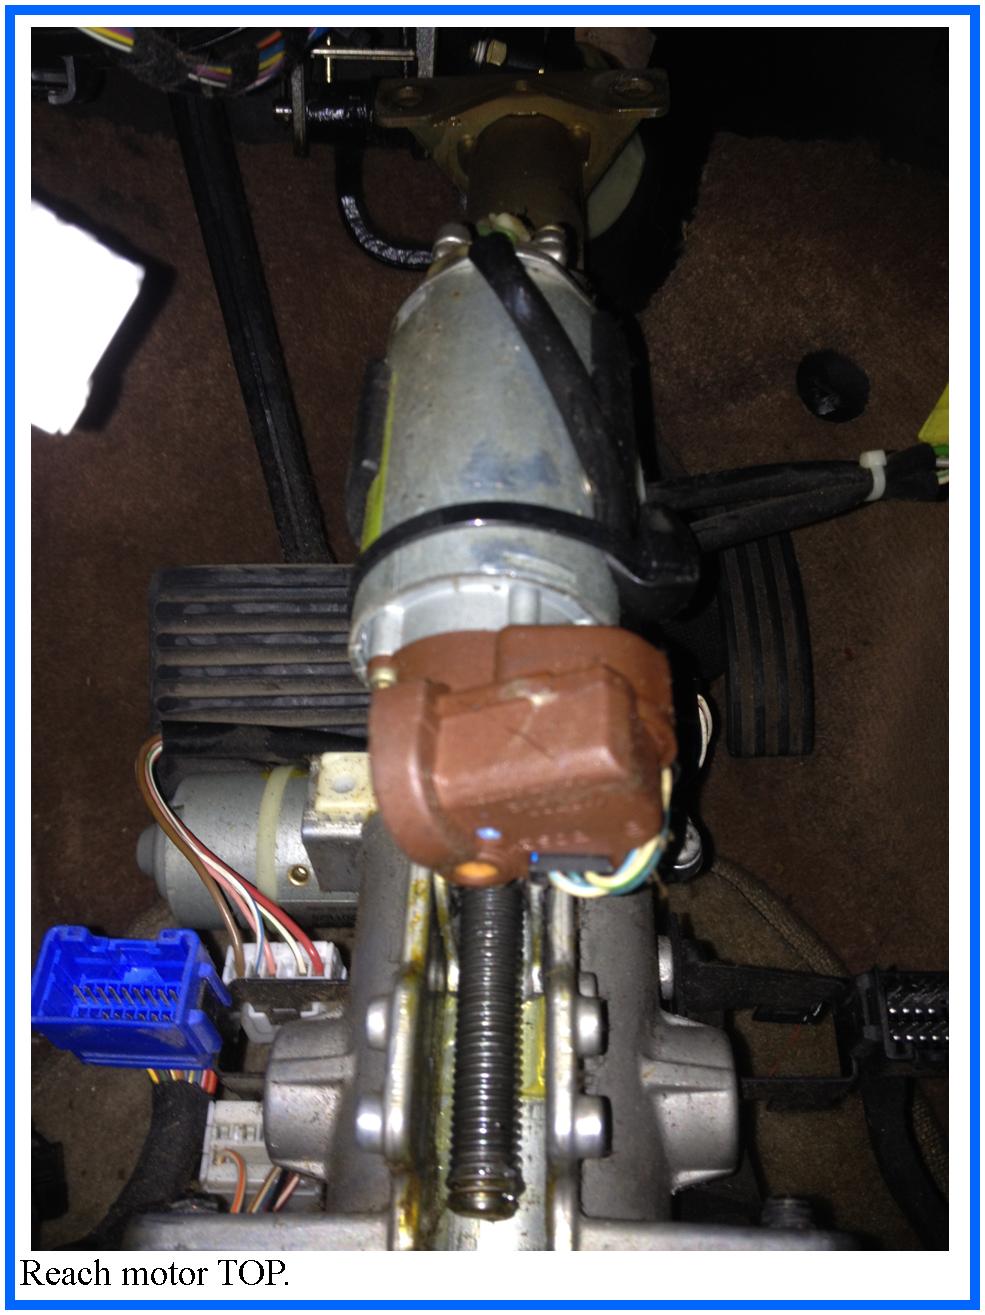
Disconnect all of the cables and drop the column (Picture 4), and you can then access the reach motor (Pictures 4, 5, & 6).
The motor is held in place with two cable ties that will need to be cut and replaced once new cable is installed (Pictures 7 & 8).
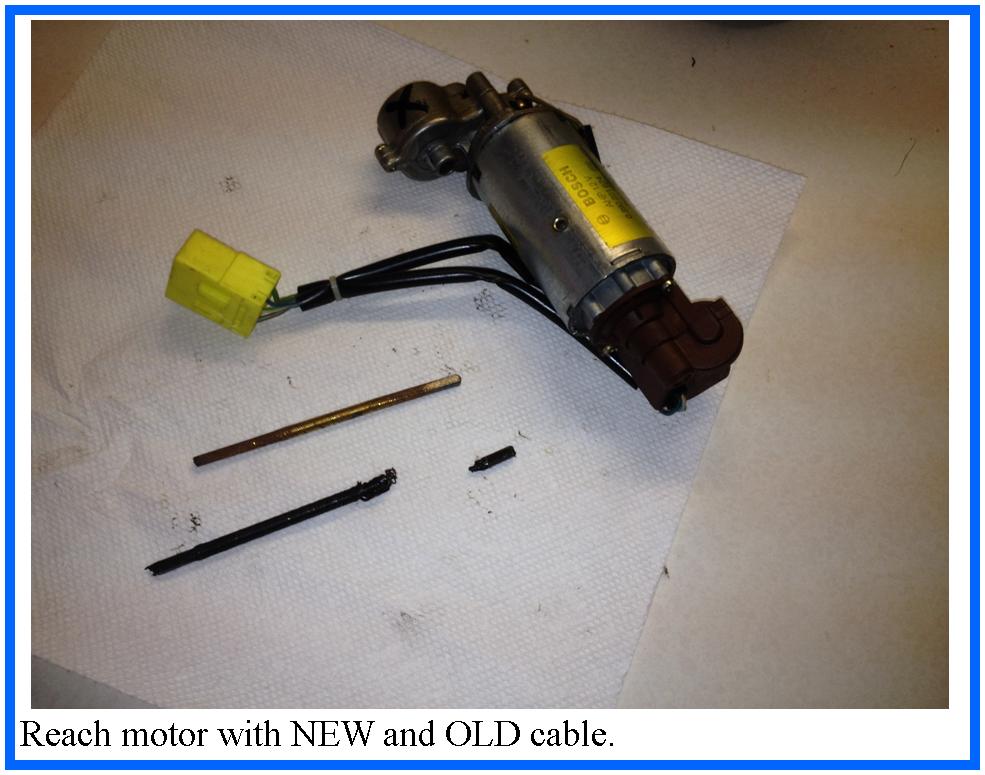
Remove the motor by pulling straight up from the plastic �C� clamp that holds it to the column (Pictures 9 & 10).
Pull the old cable out of the motor, don�t forget to make sure you get all of the pieces, mine was broke in two and replace with the new one (Picture 11).
Reassemble in reverse order.
I turned off the auto memory adjustment to prevent the cable from breaking in the future, as I believe the reason so many of these break is because the travel sensor goes bad.
Hope this helps someone out there as pictures always made things easier for me!
Cheers,
Ken


My reach motor cable was broken with the column all the way in, so I determined the only way to access the motor was to drop the whole column. Some have said that you can access it by removing the instrument cluster (which may be possible), but I really didn�t want to go this route.
After removing all of the trim panels you are left with just the column (Picture 1).
Remove the two T40 Torx bolts (Picture 2), you will need a long extension for you socket wrench.
Remove 1 bolt and 1 nut at base of column at floor board (Picture 3).
Disconnect all of the cables and drop the column (Picture 4), and you can then access the reach motor (Pictures 4, 5, & 6).
The motor is held in place with two cable ties that will need to be cut and replaced once new cable is installed (Pictures 7 & 8).
Remove the motor by pulling straight up from the plastic �C� clamp that holds it to the column (Pictures 9 & 10).
Pull the old cable out of the motor, don�t forget to make sure you get all of the pieces, mine was broke in two and replace with the new one (Picture 11).
Reassemble in reverse order.
I turned off the auto memory adjustment to prevent the cable from breaking in the future, as I believe the reason so many of these break is because the travel sensor goes bad.
Hope this helps someone out there as pictures always made things easier for me!
Cheers,
Ken

Senior Member
Joined: Jul 2012
Posts: 587
Likes: 133
From: Midwest
I do not have a XJ6 but I have been wondering about these steering column cables that go bad. I was surprised to see that it is actually a threaded rod. Would you know what the diameter and pitch of the rod would be? Did you happen to notice in photo#9 that the thrust bearing up against the white bushing does not look too healthy, it looks like one or two of the ball bearings are missing. I work with bearings quite a bit and when you see a grey metallic paste where a clean grease should be, that is usually not a good sign. Thanks for the great write up, photos do make a difference.
Senior Member
Joined: May 2010
Posts: 948
Likes: 317
From: Ireland
No, but when you drop the steering column, it can get in the way. I would however, recommend removing the airbag set up. Disconnect the battery, leave it alone for long enough to have a coffee and then you're good to go. Apparently it takes time to discharge the electrical system fully, so, better safe than sorry.
Senior Member
Joined: Apr 2012
Posts: 722
Likes: 92
From: Pittsburgh, PA
I'm going to try to do it without the wheel. Ordered the shaft today.
Going to recover the visors and add a homelink module to the driver's side over the weekend, hopefully.
When I'm done with that I'll drop the column, and let it sit without the battery connected until the shaft shows up.
Going to recover the visors and add a homelink module to the driver's side over the weekend, hopefully.
When I'm done with that I'll drop the column, and let it sit without the battery connected until the shaft shows up.
Last edited by mgb4tim; Mar 27, 2014 at 04:54 PM.
Thread Starter
|
Member
Joined: Apr 2013
Posts: 34
Likes: 18
From: Atlanta, GA
You don't have to remove the steering wheel (had it off to refinish).
Last edited by knealy2; Mar 27, 2014 at 05:15 PM.
Thread Starter
|
Member
Joined: Apr 2013
Posts: 34
Likes: 18
From: Atlanta, GA
I do not have a XJ6 but I have been wondering about these steering column cables that go bad. I was surprised to see that it is actually a threaded rod. Would you know what the diameter and pitch of the rod would be? Did you happen to notice in photo#9 that the thrust bearing up against the white bushing does not look too healthy, it looks like one or two of the ball bearings are missing. I work with bearings quite a bit and when you see a grey metallic paste where a clean grease should be, that is usually not a good sign. Thanks for the great write up, photos do make a difference.
It did appear to be missing 1 bearing, but could find nothing in the little chamber the sleeve fits in, and really nowhere for it to go if it fell out? Just cleaned and re-lubed it.
Trending Topics
Senior Member
Joined: Apr 2012
Posts: 722
Likes: 92
From: Pittsburgh, PA
OK, dumb question... How does the top of the steering column cover come off. The bottom came off with 2 screws. Doe the top just snap on?
I also saw another thread where they pulled off the gauge cluster. They pulled from the top center to release a clip... but then what?
I also saw another thread where they pulled off the gauge cluster. They pulled from the top center to release a clip... but then what?
Last edited by mgb4tim; Mar 30, 2014 at 06:14 PM.
Thread Starter
|
Member
Joined: Apr 2013
Posts: 34
Likes: 18
From: Atlanta, GA
OK, dumb question... How does the top of the steering column cover come off. The bottom came off with 2 screws. Doe the top just snap on?
I also saw another thread where they pulled off the gauge cluster. They pulled from the top center to release a clip... but then what?
I also saw another thread where they pulled off the gauge cluster. They pulled from the top center to release a clip... but then what?
Not sure about the cluster, as I did not remove it.
Cheers
Senior Member
Joined: Apr 2012
Posts: 722
Likes: 92
From: Pittsburgh, PA
Well, I never found the third screw for the top cover, but I did find the four tiny screws that hold the dash cluster in place.
So, with that said, the column is dropped, the shaft is replaced, and has been tested.
I'll button it all up tomorrow.
So, with that said, the column is dropped, the shaft is replaced, and has been tested.
I'll button it all up tomorrow.
Last edited by mgb4tim; Mar 31, 2014 at 11:58 AM.

Thread
Thread Starter
Forum
Replies
Last Post
KarimPA
New Member Area - Intro a MUST
8
Sep 3, 2015 07:32 PM
FS[Western US]: XJS Wiper Motor Upgrade- 76-88 - Electrolux Style
XJsc-guy
PRIVATE For Sale / Trade or Buy Classifieds
0
Sep 2, 2015 11:43 AM
Currently Active Users Viewing This Thread: 1 (0 members and 1 guests)