
Thread for replacing How to change Knock Sensors Post 1 & 2


Thread Starter
|
Veteran Member


Joined: Aug 2010
Posts: 2,636
Likes: 1,636
From: Southington CT
Hi
Translator asked to create this new thread that showed the missing photos in DavidN posts 1 and 2 in the How to change a Knock Sensor.
Starting with post 1:
How to change a Knock Sensor on a Jaguar AJ27 Engine
One of the common problems of the Jaguar V8 engines is knock sensor failure.
A faulty knock sensor will set the ignition timing in full retard and you'll get only a weak performance.
The failure is accompanied by the amber warning light and a DTC Message "Restricted Performance".
A knock sensor failure has not to be a permanent problem. Intermittent failure is common, but still the sensor has to be changed to get rid of the problem.
To verify if the problem is indeed a knock sensor failure and to check whether it is Bank 1 (right side of the car) or Bank 2 (left side of the car) you'll have to get the OBD codes read out.
The codes are as follows:
P0325 Knock Sensor 1 Circuit Malfunction (Bank 1 or Single Sensor)
P0326 Knock Sensor 1 Circuit Range/Performance (Bank 1 or Single Sensor)
P0327 Knock Sensor 1 Circuit Low Input (Bank 1 or Single Sensor)
P0328 Knock Sensor 1 Circuit High Input (Bank 1 or Single Sensor)
P0329 Knock Sensor 1 Circuit Intermittent (Bank 1 or Single Sensor)
P0330 Knock Sensor 2 Circuit Malfunction (Bank 2)
P0331 Knock Sensor 2 Circuit Range/Performance (Bank 2)
P0332 Knock Sensor 2 Circuit Low Input (Bank 2)
P0333 Knock Sensor 2 Circuit High Input (Bank 2)
P0334 Knock Sensor 2 Circuit Intermittent (Bank 2)
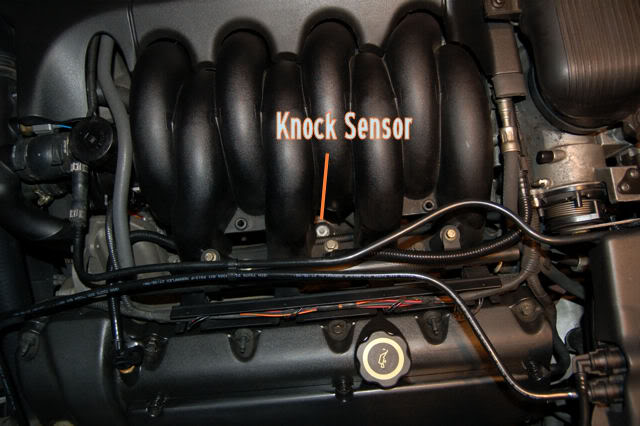
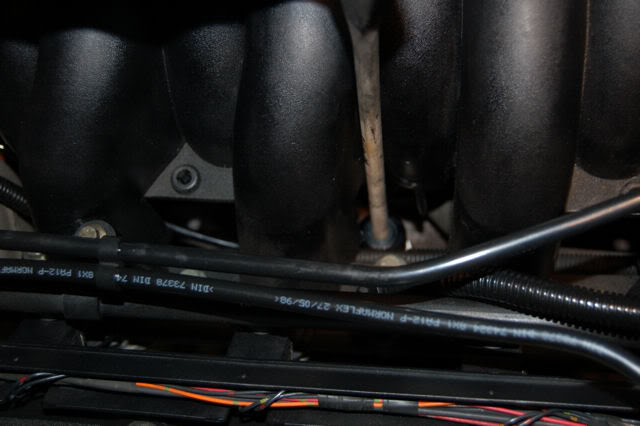
There are two knock sensors located on top of the Engine, approximately in the middle of the 4 cylinders at each bank.
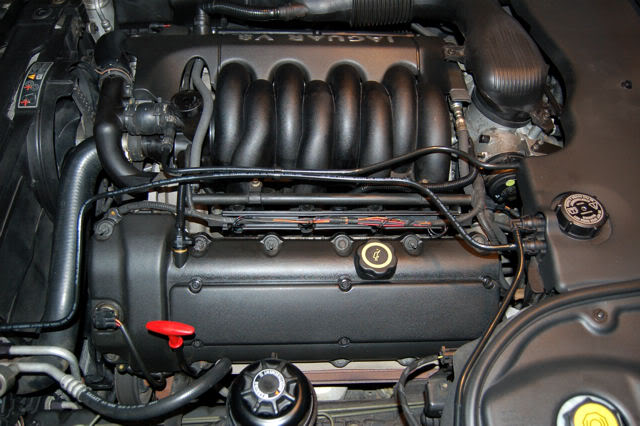
To get access to the sensors the black plastic engine cover with the "Jaguar V8" imprinted on has to be removed.
There are two types of knock sensors.
The "old" ones that are of a "screw-in barrel type" and the newer ones that are just bolted on.
I describe the replacement of the bolt-on type knock sensor on Bank 2 in the following documentation on a 1999 XJ8 AJ27 engine.
Be careful!
Knock sensors are piezo electric devices that are very sensitive! If dropped, over-torqued or struck they will probably be destroyed.
As knock sensors are sensitive to a sudden temperature change they are also easily fractured by steam blasting a hot engine.
So handle the knock sensors with great care and let the engine always cool before fitting a new sensor!
Here's my How-To-Write-up...
That's where we start...
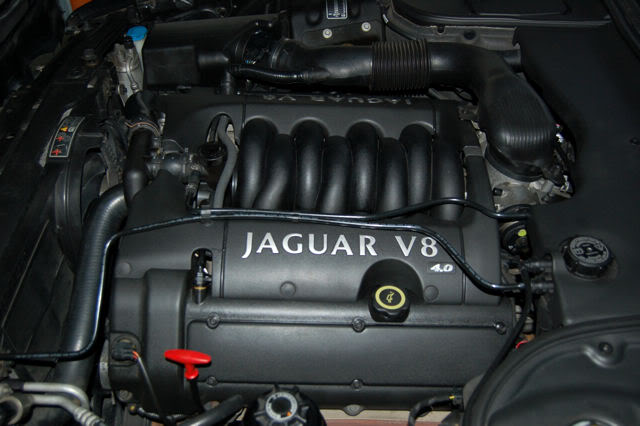
Remove the black plastic engine cover.
(It is just clipped on so just unclip the two black plastic hoses on top of the cover, bent them slightly away, and pull the cover off.)
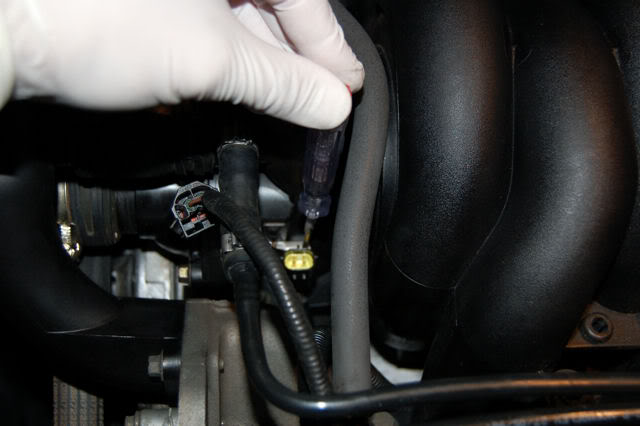
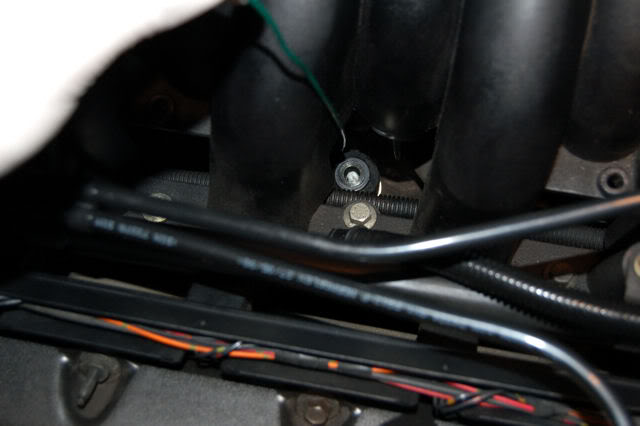
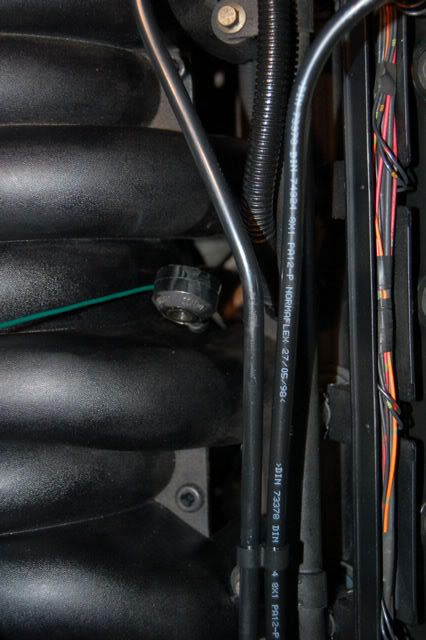
In here's the left-hand-side knock sensor hidden...
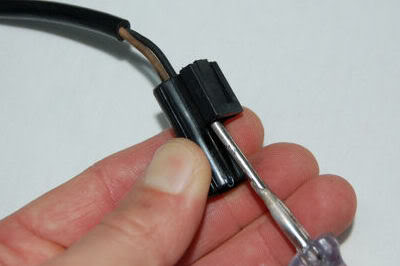
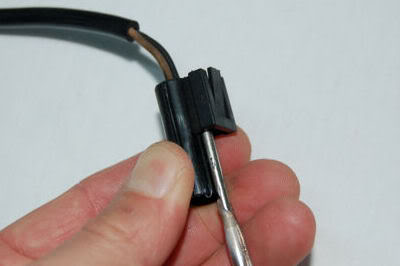
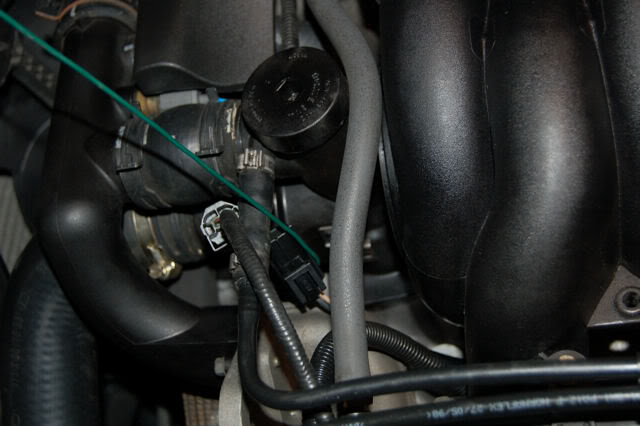
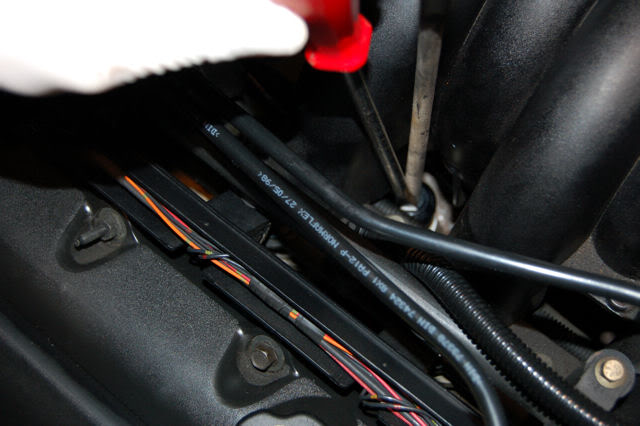
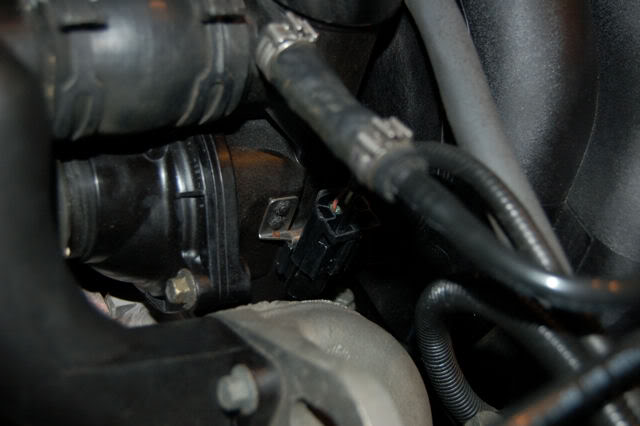
Unplug the electrical connector of the knock sensor located at the side of the black plastic thermostat housing.

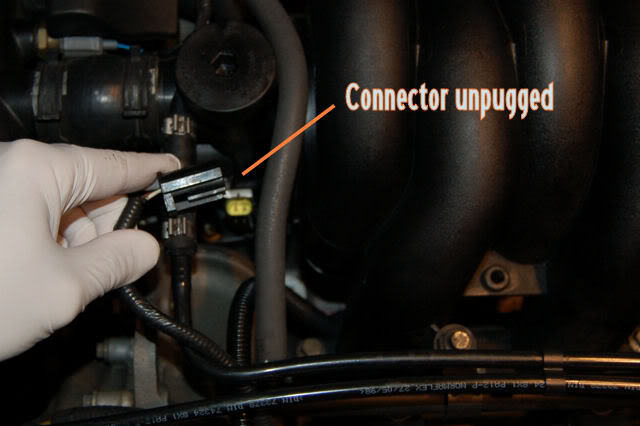
Remove the connector from the retainer clip.
(To not break the connector use a small bent tool to push the latch of the connector back and slide the connector downwards and off it's retainer clip.)
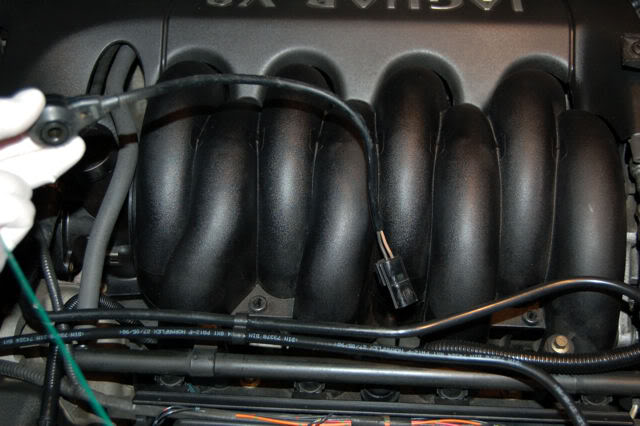
Here's my "tool" and a close-up of the connector:
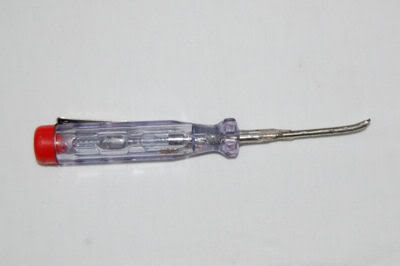
"Special tool" in use...

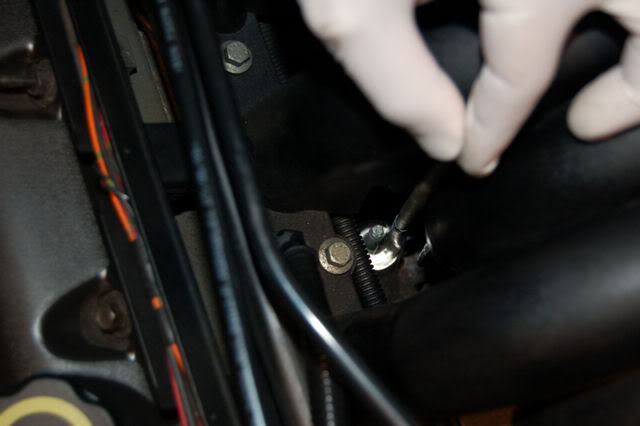
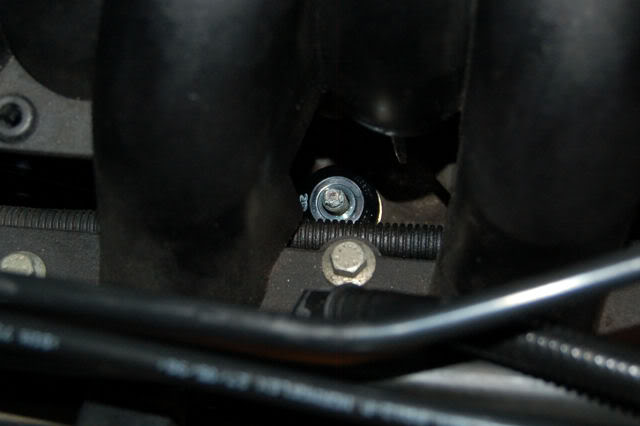
Loosen the 13mm screw nut that holds the knock sensor.
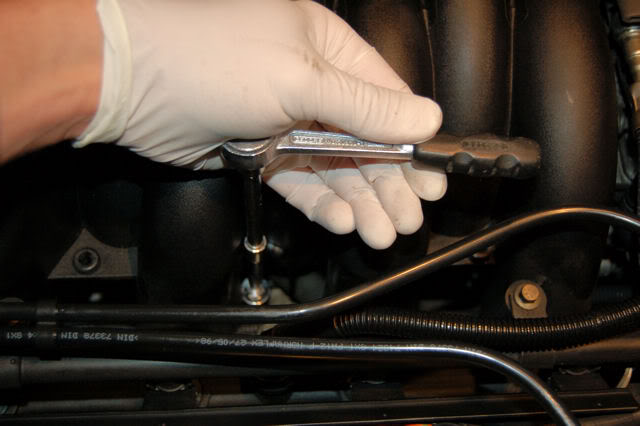
Fill a 13mm wrench socket with grease to hold the nut in the wrench socket.
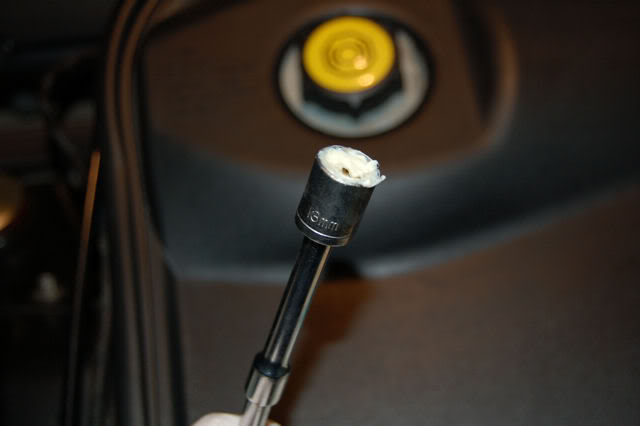
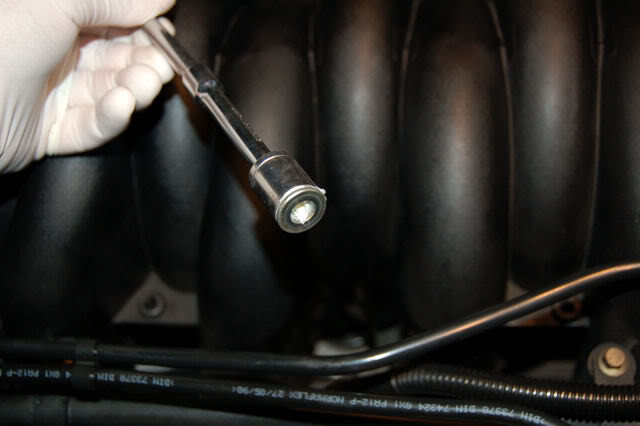
Remove the screw nut and carefully lift the wrench with the nut "glued" into it up.
Here is Post 2:
...
Get yourself two pieces of wire and bent one side into a small U-hook.
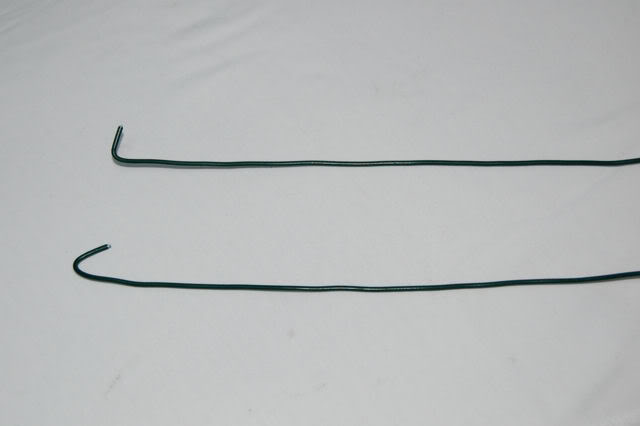
Use one U-Hook to pull up the knock sensor and with the second wire carefully guide the attached cable and it's connector out.
Here's the defective knock sensor vs a new one.
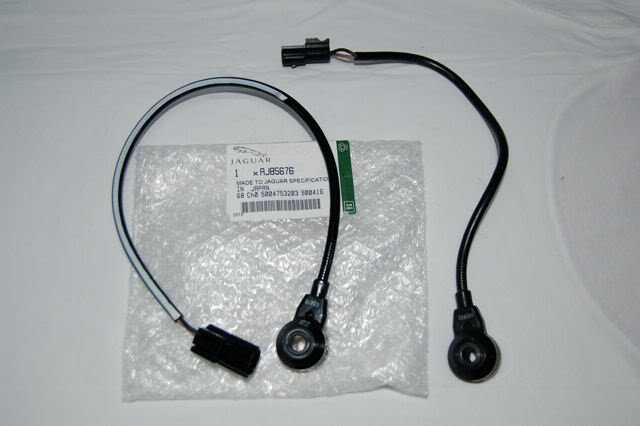
(I ordered the new ones with www.autopartswarehouse.com, Item No W0133-1655837, $27.95 free shipping to the US.
They are for a XKR but fit theXJ8 as well. Only difference is that the cable is a few inches longer than the one of the original sensor, but there is enough room to tuck it away nicely.)
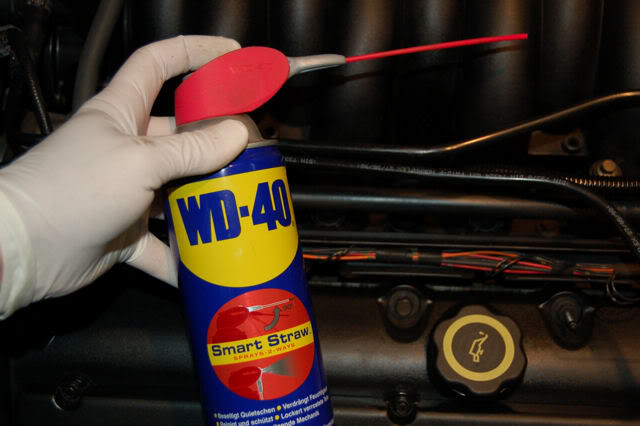
Use some WD40 and a paint brush to clean the surface on which the knock sensor was/will be mounted.

Insert the connector and the wire, guide it with the U-Hook-wire towards the front and lower the knock sensor onto the bolt.
To insert the new knock sensor use the shaft of a wooden spoon (or something similar) to hold and guide the knock sensor into position.
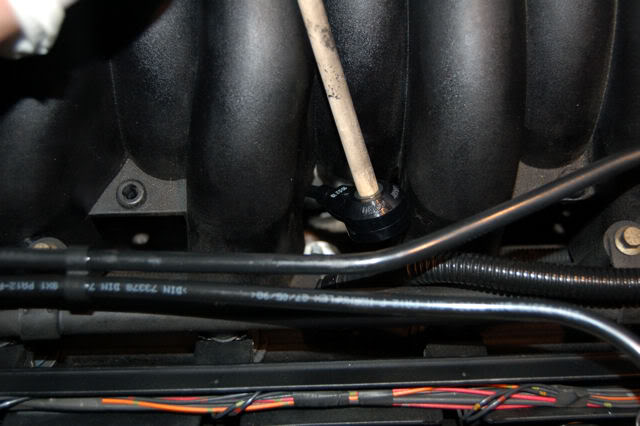
Hold the knock sensor in place with a large screwdriver and carefully remove the wooden shaft.
Slide the connector onto the retainer clip and connect it to the harness.
Grab the wrench socket with the 13mm nut still "glued" in and carefully guide the nut onto the bolt.
Tighten the nut to hand-tight. (Torque = 20Nm or 14 lb/ft, thanks to "xjrguy" for the torque data!).
Replace the engine cover and you are done!
It took me about 15 Minutes per side but I have been there before.
(As my first DTC appeared I interchanged the knock sensors just to be sure that the knock sensor was the culprit and not some bad wiring/contact.)
Good Luck!
David
P.S.
To follow that write up is completely on your own risk!
If some damage occurs following that write-up I'm in no way responsible!
Note to translator:
I do not know what is wrong with my mediafire - the folder that has the photos that DavidN provided. Apparently there is some kind serious download issue on these photos using the links from mediafire.
I delete the folder. I uploaded all the photos a folder (DaidN photo of How to changeknock sensor) to my account on www.photobucket.com.
Jim Lombardi
Translator asked to create this new thread that showed the missing photos in DavidN posts 1 and 2 in the How to change a Knock Sensor.
Starting with post 1:
How to change a Knock Sensor on a Jaguar AJ27 Engine
One of the common problems of the Jaguar V8 engines is knock sensor failure.
A faulty knock sensor will set the ignition timing in full retard and you'll get only a weak performance.
The failure is accompanied by the amber warning light and a DTC Message "Restricted Performance".
A knock sensor failure has not to be a permanent problem. Intermittent failure is common, but still the sensor has to be changed to get rid of the problem.
To verify if the problem is indeed a knock sensor failure and to check whether it is Bank 1 (right side of the car) or Bank 2 (left side of the car) you'll have to get the OBD codes read out.
The codes are as follows:
P0325 Knock Sensor 1 Circuit Malfunction (Bank 1 or Single Sensor)
P0326 Knock Sensor 1 Circuit Range/Performance (Bank 1 or Single Sensor)
P0327 Knock Sensor 1 Circuit Low Input (Bank 1 or Single Sensor)
P0328 Knock Sensor 1 Circuit High Input (Bank 1 or Single Sensor)
P0329 Knock Sensor 1 Circuit Intermittent (Bank 1 or Single Sensor)
P0330 Knock Sensor 2 Circuit Malfunction (Bank 2)
P0331 Knock Sensor 2 Circuit Range/Performance (Bank 2)
P0332 Knock Sensor 2 Circuit Low Input (Bank 2)
P0333 Knock Sensor 2 Circuit High Input (Bank 2)
P0334 Knock Sensor 2 Circuit Intermittent (Bank 2)
There are two knock sensors located on top of the Engine, approximately in the middle of the 4 cylinders at each bank.
To get access to the sensors the black plastic engine cover with the "Jaguar V8" imprinted on has to be removed.
There are two types of knock sensors.
The "old" ones that are of a "screw-in barrel type" and the newer ones that are just bolted on.
I describe the replacement of the bolt-on type knock sensor on Bank 2 in the following documentation on a 1999 XJ8 AJ27 engine.
Be careful!
Knock sensors are piezo electric devices that are very sensitive! If dropped, over-torqued or struck they will probably be destroyed.
As knock sensors are sensitive to a sudden temperature change they are also easily fractured by steam blasting a hot engine.
So handle the knock sensors with great care and let the engine always cool before fitting a new sensor!
Here's my How-To-Write-up...
That's where we start...
Remove the black plastic engine cover.
(It is just clipped on so just unclip the two black plastic hoses on top of the cover, bent them slightly away, and pull the cover off.)
In here's the left-hand-side knock sensor hidden...
Unplug the electrical connector of the knock sensor located at the side of the black plastic thermostat housing.
Remove the connector from the retainer clip.
(To not break the connector use a small bent tool to push the latch of the connector back and slide the connector downwards and off it's retainer clip.)
Here's my "tool"
"Special tool" in use...
Loosen the 13mm screw nut that holds the knock sensor.
Fill a 13mm wrench socket with grease to hold the nut in the wrench socket.
Remove the screw nut and carefully lift the wrench with the nut "glued" into it up.
Here is Post 2:
...
Get yourself two pieces of wire and bent one side into a small U-hook.
Use one U-Hook to pull up the knock sensor and with the second wire carefully guide the attached cable and it's connector out.
Here's the defective knock sensor vs a new one.
(I ordered the new ones with www.autopartswarehouse.com, Item No W0133-1655837, $27.95 free shipping to the US.
They are for a XKR but fit theXJ8 as well. Only difference is that the cable is a few inches longer than the one of the original sensor, but there is enough room to tuck it away nicely.)
Use some WD40 and a paint brush to clean the surface on which the knock sensor was/will be mounted.
Insert the connector and the wire, guide it with the U-Hook-wire towards the front and lower the knock sensor onto the bolt.
To insert the new knock sensor use the shaft of a wooden spoon (or something similar) to hold and guide the knock sensor into position.
Hold the knock sensor in place with a large screwdriver and carefully remove the wooden shaft.
Slide the connector onto the retainer clip and connect it to the harness.
Grab the wrench socket with the 13mm nut still "glued" in and carefully guide the nut onto the bolt.
Tighten the nut to hand-tight. (Torque = 20Nm or 14 lb/ft, thanks to "xjrguy" for the torque data!).
Replace the engine cover and you are done!
It took me about 15 Minutes per side but I have been there before.
(As my first DTC appeared I interchanged the knock sensors just to be sure that the knock sensor was the culprit and not some bad wiring/contact.)
Good Luck!
David
P.S.
To follow that write up is completely on your own risk!
If some damage occurs following that write-up I'm in no way responsible!
Note to translator:
I do not know what is wrong with my mediafire - the folder that has the photos that DavidN provided. Apparently there is some kind serious download issue on these photos using the links from mediafire.
I delete the folder. I uploaded all the photos a folder (DaidN photo of How to changeknock sensor) to my account on www.photobucket.com.
Jim Lombardi
Last edited by jimlombardi; Jul 15, 2012 at 07:59 AM.
Veteran Member

Joined: Oct 2008
Posts: 1,838
Likes: 459
From: Virginia Beach, VA
That is really nice, Jim. Beautiful engine too. I just wish I had seen it before I broke one of my knock sensor retainer clips. No big deal, but it's those little things that can drive you buggy !
Veteran Member
Joined: Mar 2011
Posts: 1,175
Likes: 258
From: Tasmania, Australia
Hello Jim....as always a brilliant and well described operation...full marks! ;o))
Can you tell me if the earlier type can be exchanged with the later type?
I am referring to the type fitted to AJ26 engines and the later type fitted to AJ27 engines.
Can you tell me if the earlier type can be exchanged with the later type?
I am referring to the type fitted to AJ26 engines and the later type fitted to AJ27 engines.
Senior Member
Joined: May 2012
Posts: 321
Likes: 33
From: Austin, TX
WOW !!!! This is fabulous. I have the intermittent P0332 code and "restricted performance" and was reading all kind of threads about having to remove the fuel injector rail, etc... and was putting this off. Now, I am going to order new sensor and get the job done! One of the best thread I came across recently. Very nice job indeed.


Junior Member
Joined: Nov 2012
Posts: 15
Likes: 2
From: Boston
Great post and pictures. My 1998 XJ8 VDP has an earlier style knock sensor which is not L shaped at the engine but straight. The wire comes straight out of the sensor, so it doesn't appear that it can be removed for testing purposes with a socket without damaging the wire. Do I need to remove the intake manifold to get a this with a spanner wrench? Thanks.
Thread Starter
|
Veteran Member
Joined: Aug 2010
Posts: 2,636
Likes: 1,636
From: Southington CT
Hi Gunner123
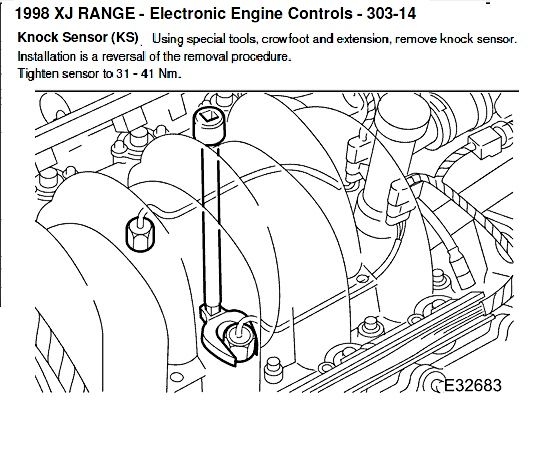
Here is a JPEG showing the combination of tools to remove the knock sensor type that has the straight wire (extracted from JTIS shop manual):
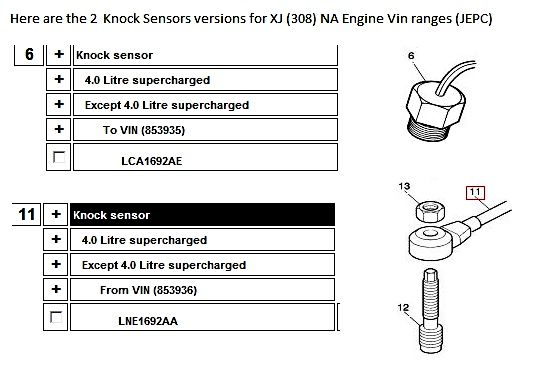
Here is another JPEG showing the 2 types of knock sensors for XJ (X308) NA engine(based on vin number range - extracted from the JEPC Jaguar Electronic Parts Catalog):
Hope this helps.
Jim Lombardi
Here is a JPEG showing the combination of tools to remove the knock sensor type that has the straight wire (extracted from JTIS shop manual):
Here is another JPEG showing the 2 types of knock sensors for XJ (X308) NA engine(based on vin number range - extracted from the JEPC Jaguar Electronic Parts Catalog):
Hope this helps.
Jim Lombardi
Trending Topics
Veteran Member
Joined: Dec 2011
Posts: 6,278
Likes: 690
From: Limousin, France
Thanks, Jim.
As you know the supercharged engine KS removal starts with those famous words 'Remove the Supercharger'.
Has anyone tried putting in a KS somewhere else?
Heresy! Horror! But it is only 'listening' to the cylinder head so why not put it somewhere accessible in contact with the head ?
As you know the supercharged engine KS removal starts with those famous words 'Remove the Supercharger'.
Has anyone tried putting in a KS somewhere else?
Heresy! Horror! But it is only 'listening' to the cylinder head so why not put it somewhere accessible in contact with the head ?
Junior Member
Joined: Nov 2012
Posts: 15
Likes: 2
From: Boston
Thanks Jim. I spoke with a Jaguar mechanic yesterday who agreed that you can replace the knock sensor without removing the intake manifold and ignition rail. He said to cut the wire and use a deep socket to remove the sensor and then install the new one with a wrench like those used for oxygen sensors. I can either purchase this or possibly borrow one from AutoZone or Advanced Auto I took it for a 15 minute drive and along the way the warning lights cleared with the exception of the Check Engine light. I stopped by AutoZone to use their scanner which could not establish a signal connection, so I don't know yet which one is defective. The check engine light went out.
So I'm going to wait until it happens again.
So I'm going to wait until it happens again.
Thread Starter
|
Veteran Member
Joined: Aug 2010
Posts: 2,636
Likes: 1,636
From: Southington CT
Hi Gunner123
You do not have to remove the intake manifold, just use a rachet, an extension bar, and the crowfoot type attachment as shown in the illustration that is included in post# 7.
Jim Lombardi
You do not have to remove the intake manifold, just use a rachet, an extension bar, and the crowfoot type attachment as shown in the illustration that is included in post# 7.
Jim Lombardi
Junior Member
Joined: Nov 2012
Posts: 15
Likes: 2
From: Boston
Hi Jim,
In your first photo in this thread, there is a small vent tube directly above the dip stick. I need to disconnect this clip to see if the tube is blocked. The clip has a hoseshoe shaped clip that slides out, but I'm not sure how this clip works. Can you please explain?
Thanks.
In your first photo in this thread, there is a small vent tube directly above the dip stick. I need to disconnect this clip to see if the tube is blocked. The clip has a hoseshoe shaped clip that slides out, but I'm not sure how this clip works. Can you please explain?
Thanks.
Thread Starter
|
Veteran Member
Joined: Aug 2010
Posts: 2,636
Likes: 1,636
From: Southington CT
Hi Gunner123
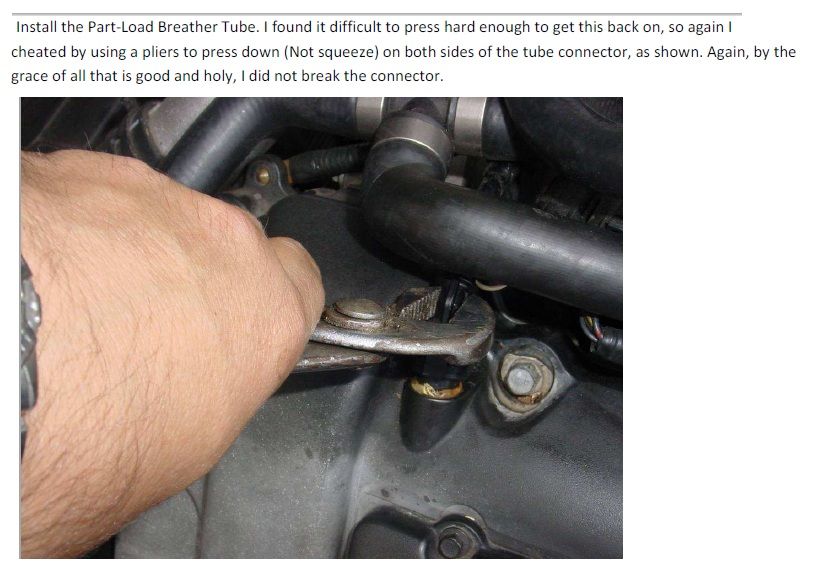
It appears to be the Part Load Breather Tube that you are asking about. I am not sure about any clip that can be removed, this tube is removed by releasing the tangs that secure the tube (squeezing them and then pulling the tube out).
Here are 3 JPEG files extracted from a DIY writeup on a few Maintenance items including the Breather Hoses:
The 1st one is the removal

2nd one the cleaning:

3rd one is the install:
There is also TSB 600-03 that gives instructions on cleaning the Part Loader Breather.
Here is the weblink to the TSB 600-03:
https://www.jaguarforums.com/forum/a...e-breather-pdf
Jim Lombardi
It appears to be the Part Load Breather Tube that you are asking about. I am not sure about any clip that can be removed, this tube is removed by releasing the tangs that secure the tube (squeezing them and then pulling the tube out).
Here are 3 JPEG files extracted from a DIY writeup on a few Maintenance items including the Breather Hoses:
The 1st one is the removal
2nd one the cleaning:
3rd one is the install:
There is also TSB 600-03 that gives instructions on cleaning the Part Loader Breather.
Here is the weblink to the TSB 600-03:
https://www.jaguarforums.com/forum/a...e-breather-pdf
Jim Lombardi
Last edited by jimlombardi; Dec 12, 2012 at 03:32 PM.
Junior Member
Joined: Nov 2012
Posts: 15
Likes: 2
From: Boston
Jim, Thanks! Your description helped alot. My 98 VDP has a horseshoe shaped plastic clip on the part breather tube. The sides of this clip get progressively wider towards the center than at the ends, so when you push it towards the tube it spreads the tangs. Worked great once I figured it out. The part load breather tube was plugged so hopefully this was the cause of some oil consumption and oil leaking back into the air filter on the other side of the vehicle, which shows up as a one inch band across the filter. I flipped the air filter end-to-end so I'll be able to tell if additonal oil is leaking into it.
Thanks again,
Gunner123
Thanks again,
Gunner123
Thread Starter
|
Veteran Member
Joined: Aug 2010
Posts: 2,636
Likes: 1,636
From: Southington CT
Hi
P0327 DTC code is the Bank A - Cylinder 1 or can be stated as A1
View from front of Vehicle
Bank B --------- Bank A
B1- ----------------A1
B2----------------- A2
B3----------------- A3
B4----------------- A4
Here is what JTIS
shop manual says (gives same information viewing from inside the vehicle in the driver position):
as viewed from the driving position, the left-hand cylinder bank is designated Bank B and the right-hand cylinder bank is designated A-bank , the cylinder bores of each bank are numbered 1 to 4, from the front of the vehicle.
in other words - Left hand drive vehicles (US and others) Bank A is passenger side, Right hand drive vehicles (UK mostly) Bank A is the drivers side.
Jim Lombardi
Last edited by jimlombardi; Jan 17, 2013 at 11:19 AM.

Junior Member
Joined: Oct 2010
Posts: 19
Likes: 0
From: Camino, CA
JIm, I just want to confirm that I can use the knock sensor listed below on my 2001 XJ8 (Base model) and are they interchangeable between bank A and bank B?
Thanks,
John
www.autopartswarehouse.com, Item No W0133-1655837, $27.95 free shipping to the US. They are for a XKR but fit theXJ8 as well. Only difference is that the cable is a few inches longer than the one of the original sensor, but there is enough room to tuck it away nicely.)
Thanks,
John
www.autopartswarehouse.com, Item No W0133-1655837, $27.95 free shipping to the US. They are for a XKR but fit theXJ8 as well. Only difference is that the cable is a few inches longer than the one of the original sensor, but there is enough room to tuck it away nicely.)
Thread Starter
|
Veteran Member
Joined: Aug 2010
Posts: 2,636
Likes: 1,636
From: Southington CT
Hi EngineerReeves
Look at posts 45 and 44 in the original forum thread that forum member DavidN created:
https://www.jaguarforums.com/forum/x...ine-faq-45963/
I think David used the cheaper knock sensor for 2005 XK8 (W0133-1655837) the equilvent to Jaguar part# AJ85676 (Parts Geek website shows W0133-1655837 listed several times as XJ8, XK8, X-Type, S-Type, XJR, XKR, Vandem Plus, Super V8).
According to the JEPC (Jaguar Electronic Parts Catalog) for the 2001 XJ8 the same knock sensor part# is used for the 2 knock sensors.
Did you notice that statement in this thread by DavidN?
"P.S.
To follow that write up is completely on your own risk!
If some damage occurs following that write-up I'm in no way responsible! "
There have not been any posting to the forum that reports any issues using the cheaper knock sensor that DavidN used.
Jim Lombardi

Junior Member
Joined: Jun 2013
Posts: 6
Likes: 0
From: Columbia, TN
I have a 2000 XJ8 4.0L with CEL code P027 indicated. I have replaced knock sensors in other vehicles (usually easy to do), but am confused by various information found on the forum.
Does my XJ8 have one or two knock engine sensors? The thread with pictures showing everything on the top of the engine seems very straight forward, but is that where mine is?
Any help and advice would be appreciated.
Thanks,
Gary
Does my XJ8 have one or two knock engine sensors? The thread with pictures showing everything on the top of the engine seems very straight forward, but is that where mine is?
Any help and advice would be appreciated.
Thanks,
Gary
Veteran Member
Joined: Mar 2012
Posts: 1,531
Likes: 204
From: Florida
You have two, one on each side.
I replaced the one on the right hand side -- took my time and didn't have any real serious problems, just a little tricky getting to it and threading the wire. The hardest part for me was getting the plug pushed on the side of the thermostat tower, but I just took my time and eventually it snapped on. Also, this was the first and only one I've ever done, so it was more difficult for me, you might not have any issues whatsoever!
I replaced the one on the right hand side -- took my time and didn't have any real serious problems, just a little tricky getting to it and threading the wire. The hardest part for me was getting the plug pushed on the side of the thermostat tower, but I just took my time and eventually it snapped on. Also, this was the first and only one I've ever done, so it was more difficult for me, you might not have any issues whatsoever!