
XJ6 Series 3 Alternator Voltage Regulator Replacement Done Easier

Thread Starter
|
Senior Member
Joined: May 2012
Posts: 737
Likes: 255
From: Wisconsin
XJ6 Series 3 Alternator Voltage Regulator Replacement Done Easier
The alternator should be holding a steady voltage all the way from idle to max revs at 14 volts for an XJ6 Series 3.
Low voltage could be a number of faults but if going from 15 volts to 18+ volts with headlights getting brighter, this would most likely be a defective voltage regulator inside the back of the Alternator.
The original voltage regulator was a Lucas 15TR 37666A with three wires found in the back of the alternator Lucas A133-75 24101D. The newer replacement voltage regulator part 15TR 37666D only has two wires. Article by Lucas confirmed the change to a two-wire voltage regulator where the red wire is now built into the unit and it is therefore no longer needed.
I just replaced the regulator inside the alternator in my 1983 XJ6 4.2L Series 3. I was having intermittent 17.5V bursts that would last for a few minutes which would cause my headlights to become very bright and then return to normal when the voltage went back down to 14 volts. Even after cleaning all the old ground connections and still having 17.5V spikes, I purchased a brand new, name brand voltage regulator.
If you don�t want to remove the alternator completely by removing one end of the sway bar and loosening the further end to move it aside a few inches to allow for removal of the alternator, you can install a new voltage regulator into the alternator while on the car after just removing the adjustable trunnion, using a cable tie to secure the alternator out of the way, removing the two alternator mounting bolts, flipping the alternator around and removing the back plastic cover and then removing and installing the new voltage regulator while the alternator rests on the sway bar and then reinstalling. I have been driving the car now for a month and no problems thus so far, voltage holds steady at 14 volts.
Tools needed:
To remove alternator from brackets:
Two 2 �� wrenches
Two 9/16� wrenches
Two 7/16� wrenches
To remove the back plastic back from alternator and remove a few other small bolts holding wire connectors, etc.:
8mm socket
10mm socket
3/16� socket
5/16� socket
1/2� socket
7/32� socket
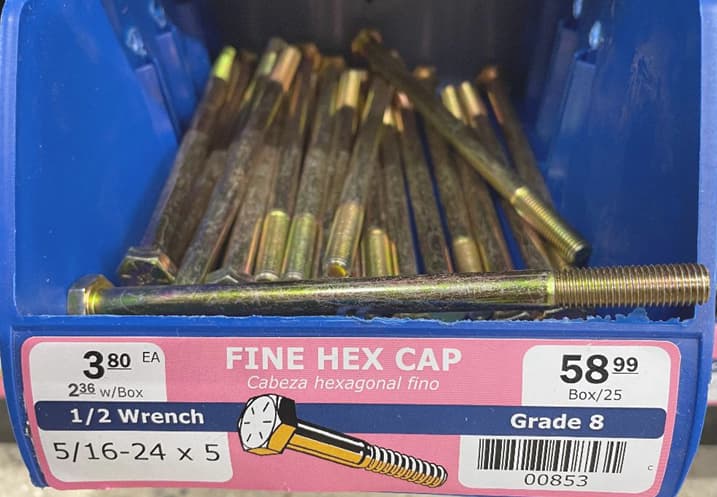
The Alternator pivots on two 5/16� bolts with bolt heads and nuts that are ��. These are a little tricky to remove so to simplify my suggestion is to purchase of a 5 inch long bolt (5� long bolt with �� head and �� nut both 24 count fine threads). The bolt shaft can be smooth but threads need to be 4 1/4� from inside of bolt head to the start of the threads. I bought the bolt at an ACE Hardware store. Put the bolt in so the nut is on the front of the car side. This will simplify the removal and install of the alternator for the future.
Alternator before starting repair work from undercar view:

image843�1124 276 KB
Picture of alternator off of the belt tightener tensioner and pushed to the side and held by a cable tie, so now you can see to remove the two bolts on top that hold up the alternator.

image1056�792 91 KB
Picture of one bolt removed on the left, the right bolt nut off and ready to remove the bolt to drop the alternator and carefully flip it to show the back plastic cover for access to remove the back cover.
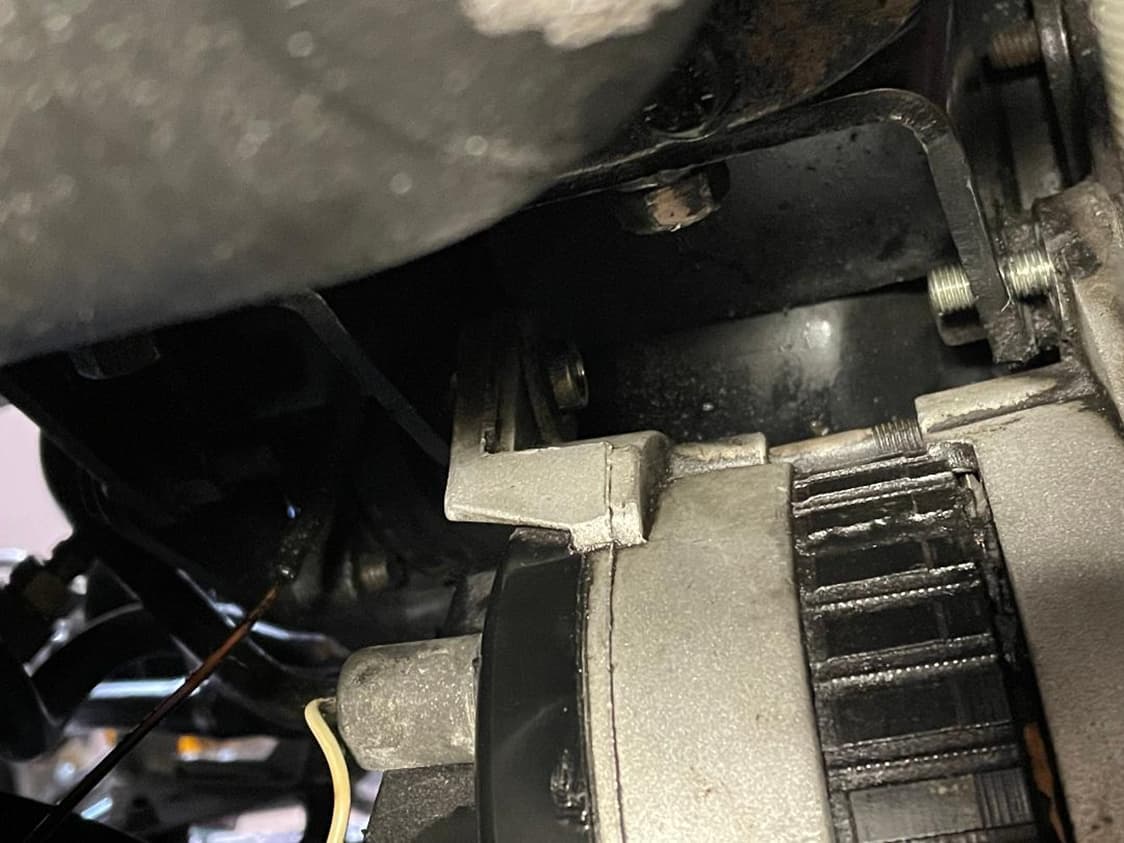
image1124�843 85.3 KB
Picture of back plastic cover on alternator with alternator resting on the sway bar. This is an original Lucas alternator.

image1069�802 107 KB
The wire ends that are held onto the alternator via small bolts now removed.
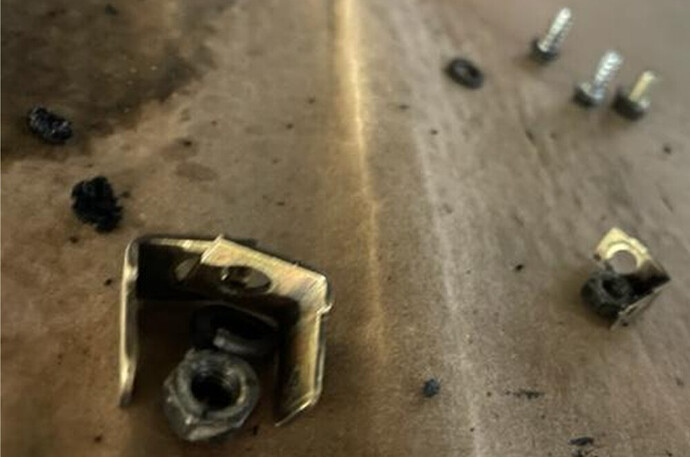
image999�663 87.6 KB
Picture with black plastic cover removed and you can see the original voltage regulator with yellow, black and red wires. Remove the one small bolt on the right next to the red wire and it will pull out once you also remove the yellow, black and red wires.

image1069�802 104 KB
When you remove the yellow wire small bolt it also holds down the motor brush plate so good time to check your motor brushes by pulling it out, mine were still plenty long, you can check the other side while you are at it.
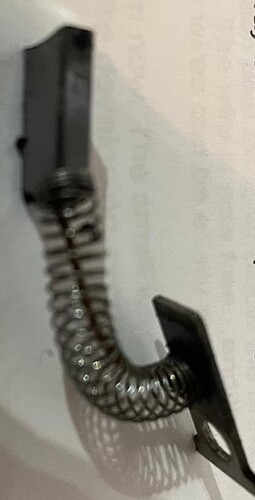
image571�1116 29.9 KB
Original Voltage Regulator now removed (75AMP Air Conditioning XJ6 Series 3).
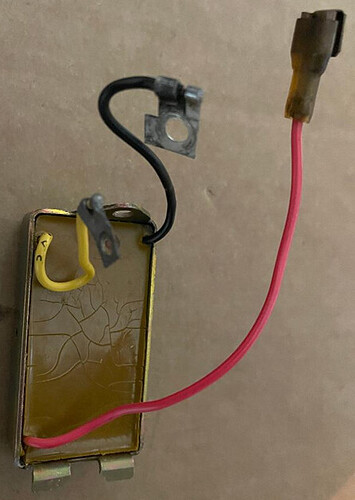
image444�624 54.6 KB
New standard voltage regulator by Transpo IL219 (Transpo is the maker and brand name),
(it is listed as 65 amps but I understand it can range up to 80 amps by design):

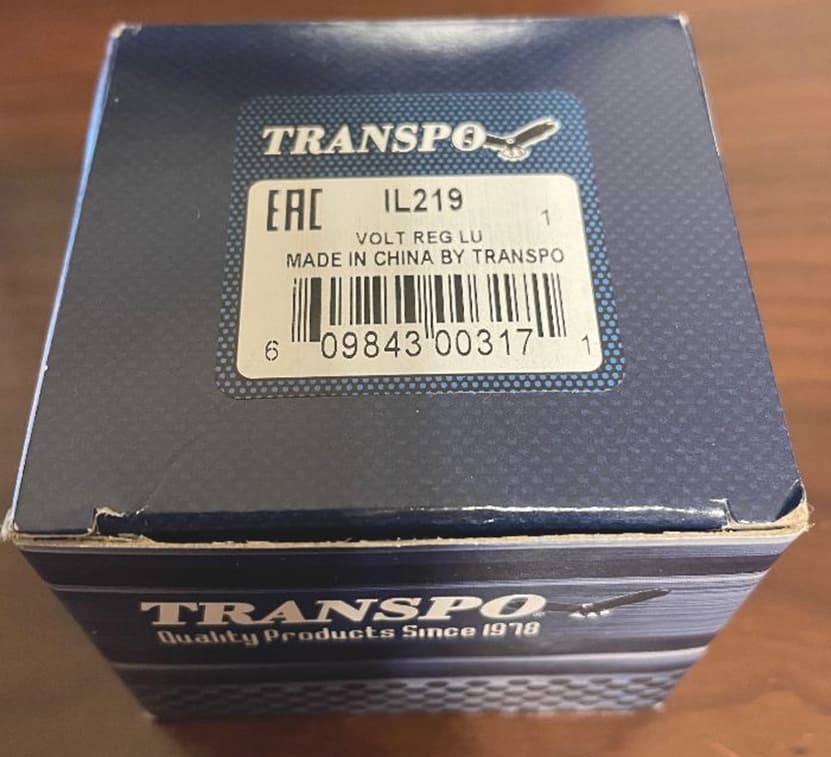
image831�757 57.4 KB
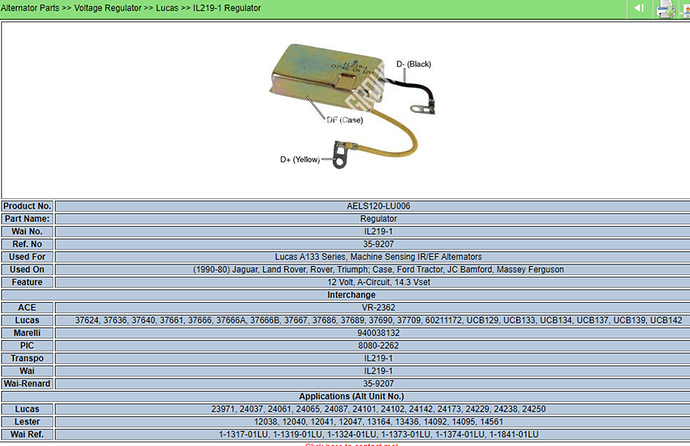
image840�543 163 KB
Article by Lucas confirming the change to a two-wire voltage regulator where the red wire is now built into the unit and no longer needed.
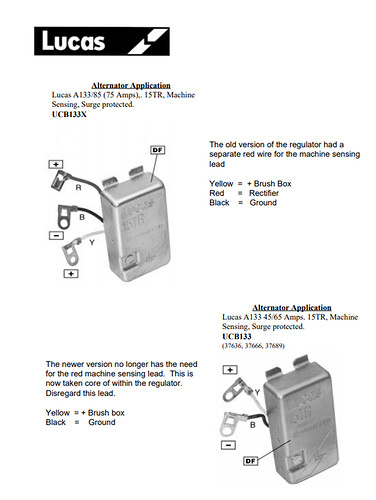
image1031�1368 145 KB
New voltage regulator installed via bolt and yellow and black wires hooked up.
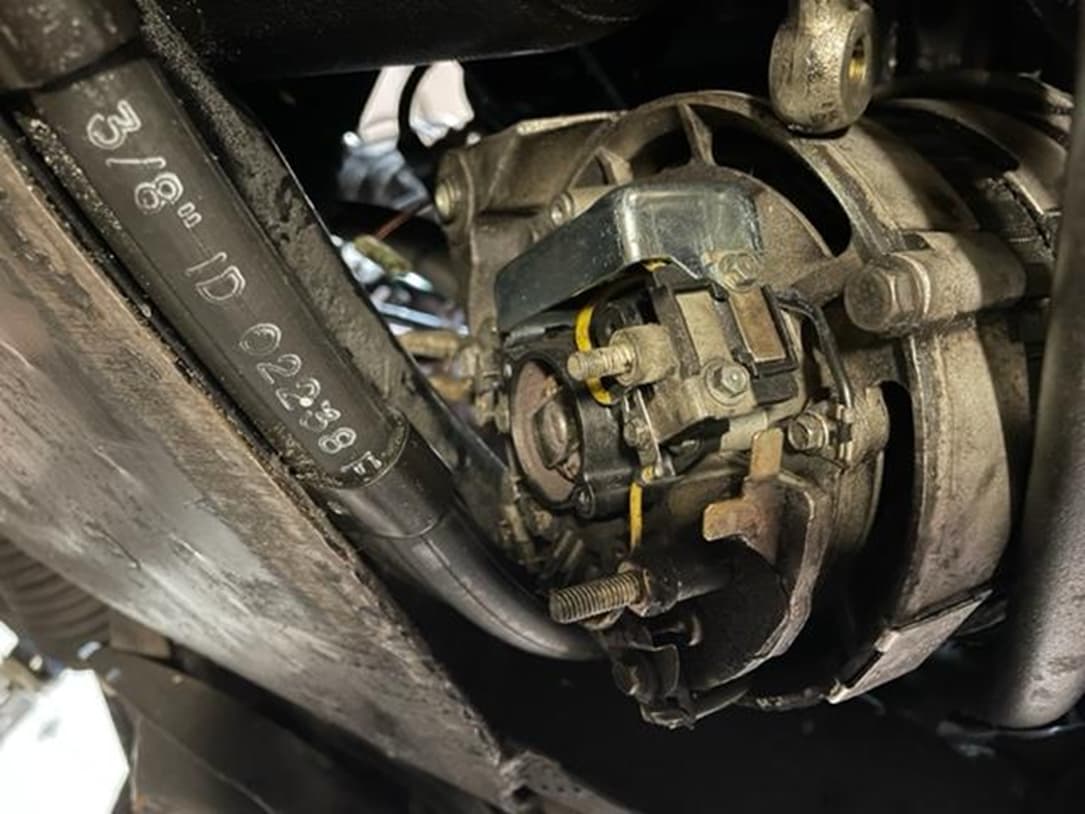
image1085�814 82 KB
Replacement 5 inch bolt vs the two original bolts. Since 5 inch bolt is same size threads, used two washers and one nut off the original bolts to install the replacement 5 inch bolt. I purchased the 5 inch bolt at a larger sized ACE Hardware store.
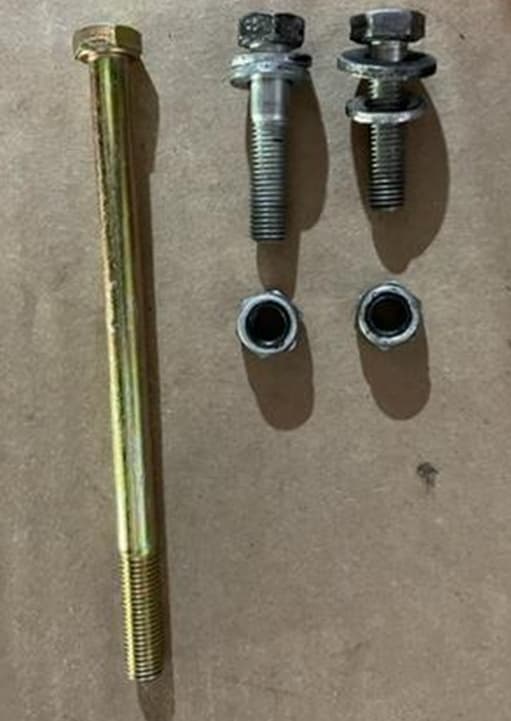
image511�721 30.2 KB
The Alternator is now re-installed, and belt tensioner set. Job Done!
Drove the car around and the voltage stayed at 13.9V to 14.1V steady all the time no matter what accessories were used including headlights turned on.

image829�1106 248 KB
The alternator should be holding a steady voltage all the way from idle to max revs at 14 volts for an XJ6 Series 3.
Low voltage could be a number of faults but if going from 15 volts to 18+ volts with headlights getting brighter, this would most likely be a defective voltage regulator inside the back of the Alternator.
The original voltage regulator was a Lucas 15TR 37666A with three wires found in the back of the alternator Lucas A133-75 24101D. The newer replacement voltage regulator part 15TR 37666D only has two wires. Article by Lucas confirmed the change to a two-wire voltage regulator where the red wire is now built into the unit and it is therefore no longer needed.
I just replaced the regulator inside the alternator in my 1983 XJ6 4.2L Series 3. I was having intermittent 17.5V bursts that would last for a few minutes which would cause my headlights to become very bright and then return to normal when the voltage went back down to 14 volts. Even after cleaning all the old ground connections and still having 17.5V spikes, I purchased a brand new, name brand voltage regulator.
If you don�t want to remove the alternator completely by removing one end of the sway bar and loosening the further end to move it aside a few inches to allow for removal of the alternator, you can install a new voltage regulator into the alternator while on the car after just removing the adjustable trunnion, using a cable tie to secure the alternator out of the way, removing the two alternator mounting bolts, flipping the alternator around and removing the back plastic cover and then removing and installing the new voltage regulator while the alternator rests on the sway bar and then reinstalling. I have been driving the car now for a month and no problems thus so far, voltage holds steady at 14 volts.
Tools needed:
To remove alternator from brackets:
Two 2 �� wrenches
Two 9/16� wrenches
Two 7/16� wrenches
To remove the back plastic back from alternator and remove a few other small bolts holding wire connectors, etc.:
8mm socket
10mm socket
3/16� socket
5/16� socket
1/2� socket
7/32� socket
The Alternator pivots on two 5/16� bolts with bolt heads and nuts that are ��. These are a little tricky to remove so to simplify my suggestion is to purchase of a 5 inch long bolt (5� long bolt with �� head and �� nut both 24 count fine threads). The bolt shaft can be smooth but threads need to be 4 1/4� from inside of bolt head to the start of the threads. I bought the bolt at an ACE Hardware store. Put the bolt in so the nut is on the front of the car side. This will simplify the removal and install of the alternator for the future.
Alternator before starting repair work from undercar view:
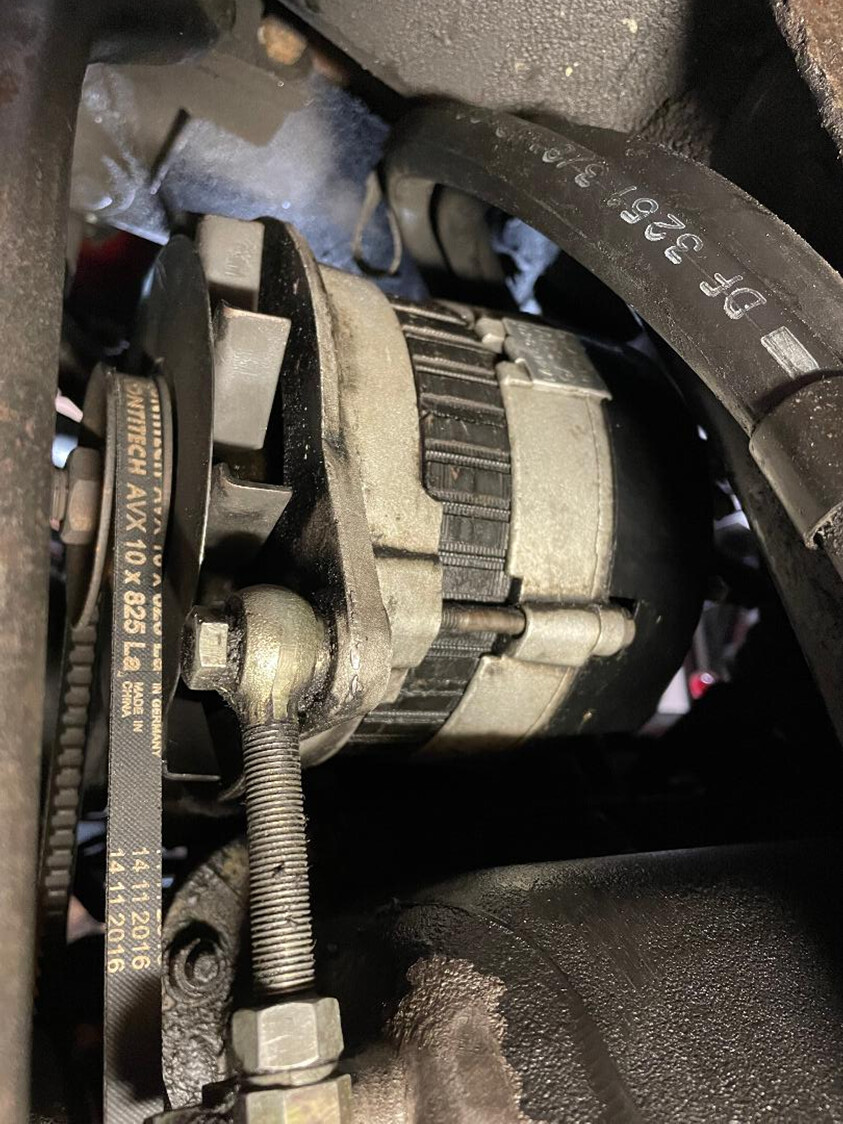
image843�1124 276 KB
Picture of alternator off of the belt tightener tensioner and pushed to the side and held by a cable tie, so now you can see to remove the two bolts on top that hold up the alternator.
image1056�792 91 KB
Picture of one bolt removed on the left, the right bolt nut off and ready to remove the bolt to drop the alternator and carefully flip it to show the back plastic cover for access to remove the back cover.
image1124�843 85.3 KB
Picture of back plastic cover on alternator with alternator resting on the sway bar. This is an original Lucas alternator.
image1069�802 107 KB
The wire ends that are held onto the alternator via small bolts now removed.

image999�663 87.6 KB
Picture with black plastic cover removed and you can see the original voltage regulator with yellow, black and red wires. Remove the one small bolt on the right next to the red wire and it will pull out once you also remove the yellow, black and red wires.
image1069�802 104 KB
When you remove the yellow wire small bolt it also holds down the motor brush plate so good time to check your motor brushes by pulling it out, mine were still plenty long, you can check the other side while you are at it.
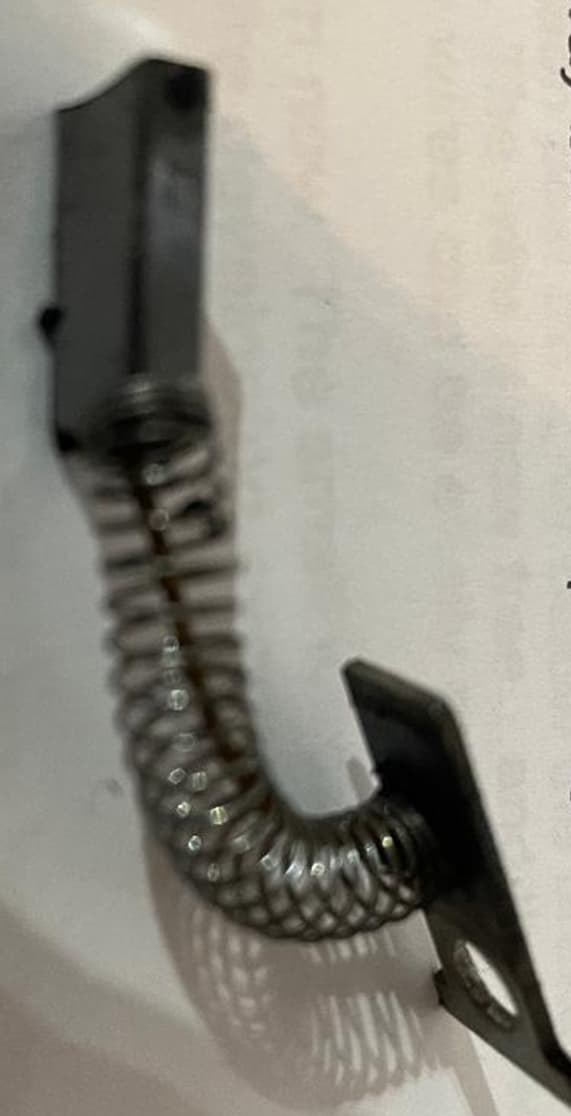
image571�1116 29.9 KB
Original Voltage Regulator now removed (75AMP Air Conditioning XJ6 Series 3).

image444�624 54.6 KB
New standard voltage regulator by Transpo IL219 (Transpo is the maker and brand name),
(it is listed as 65 amps but I understand it can range up to 80 amps by design):
image831�757 57.4 KB

image840�543 163 KB
Article by Lucas confirming the change to a two-wire voltage regulator where the red wire is now built into the unit and no longer needed.

image1031�1368 145 KB
New voltage regulator installed via bolt and yellow and black wires hooked up.
image1085�814 82 KB
Replacement 5 inch bolt vs the two original bolts. Since 5 inch bolt is same size threads, used two washers and one nut off the original bolts to install the replacement 5 inch bolt. I purchased the 5 inch bolt at a larger sized ACE Hardware store.
image511�721 30.2 KB
The Alternator is now re-installed, and belt tensioner set. Job Done!
Drove the car around and the voltage stayed at 13.9V to 14.1V steady all the time no matter what accessories were used including headlights turned on.
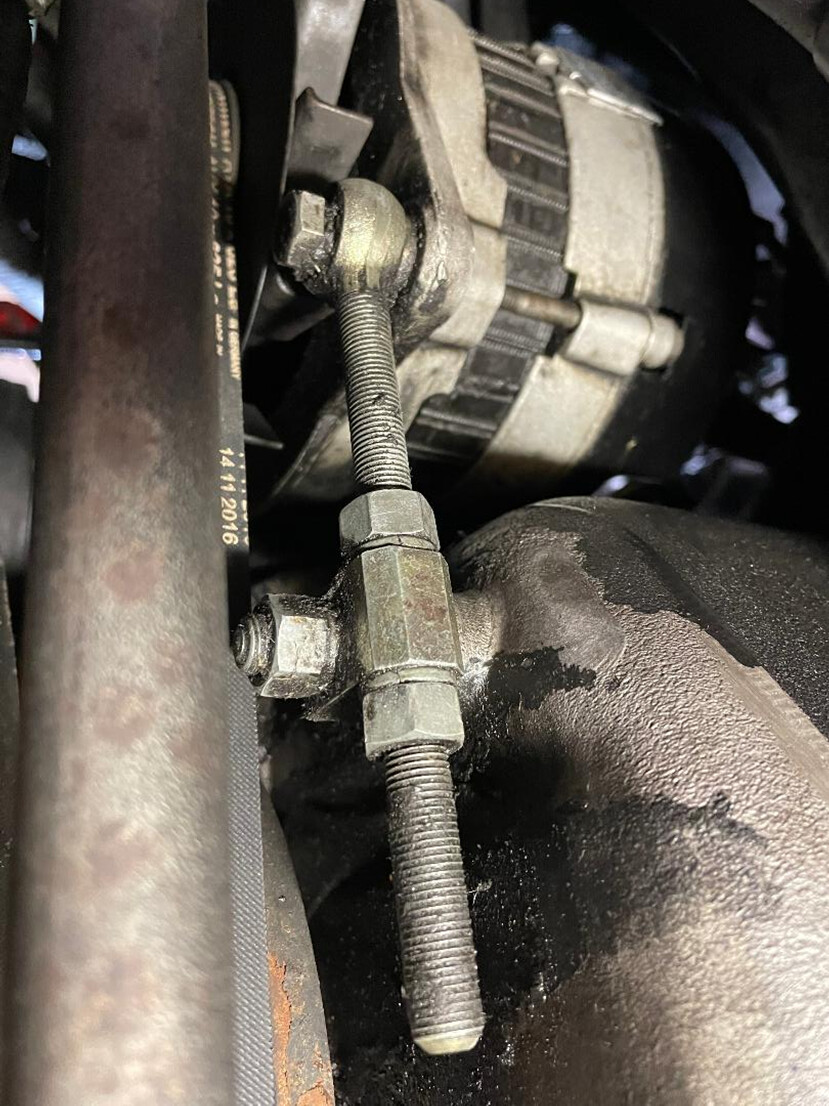
image829�1106 248 KB


Veteran Member


Joined: Mar 2008
Posts: 25,544
Likes: 11,744
From: Pacific Northwest USA
Yeah, personally, I would much rather repair the alternator on the workbench rather than under the car. But there's more than one way to skin a cat and LCM's posting has a lot of good info !
Cheers
DD
Cheers
DD
Thread Starter
|
Senior Member
Joined: May 2012
Posts: 737
Likes: 255
From: Wisconsin
Jose,
For me it is now cold in Wisconsin so it cut out the sway bar step and was easy enough to do on the car as I knew it was just the voltage regulator as the issue. If one wants to rebuild the alternator, then moving the sway bar out of the way it the best and easiest way, that is great advise.
The writeup also confirms from the LUCAS article that the voltage regulator was indeed changed to be just a two wire regulator vs the original 3 wire; I have seen many people get very confused by this and search for the very hard to find new old stock three wire ones and then only to pay a very high price for it, so this answers that question and the new two wire units are available for only about $14.00 USD.
I bought the car for my teenage son as his first car as he wanted a vintage Series 3 so I figured why not while he is in highs school is should be a neat experience, as one never forgets their first car! Lets hope its a enjoyable and a rather reliable experience; the car is mechanically up to date.
Cheers.
Last edited by lcmjaguar; Nov 26, 2022 at 11:22 AM.
Veteran Member

Joined: Mar 2007
Posts: 9,145
Likes: 2,665
From: Florida
Yes I have replaced the alternator once through the bottom and it was a greasy pain. But with the a./c compressor above it it's even worse.
Who sells this updated regulator? I kept my old Lucas replacing it with a GM and it has been a dissapointment.
Who sells this updated regulator? I kept my old Lucas replacing it with a GM and it has been a dissapointment.
Trending Topics
Thread Starter
|
Senior Member
Joined: May 2012
Posts: 737
Likes: 255
From: Wisconsin
It is used in a lot of older commercial equipment also, but easiest way to get is from two sellers on Ebay (I am not affiliated with them at all). Just search iL219 voltage regulator and one will see the two sellers.
OEGParts out of Florida
Batesperformance out of Texas
It is listed to be used for the following Jaguar cars:
Make Model Years Engine Remarks
Jaguar Vanden Plas 88-89 L6 3.6L 3590cc Lucas Unit, 80 Amp
Jaguar Vanden Plas 90-92 L6 4.0L 3980cc Lucas Unit, 80 Amp
Jaguar Vanden Plas 82-87 L6 4.2L 4235cc Lucas Unit
Jaguar XJ12 82-89 V12 5.3L 5343cc Lucas Unit
Jaguar XJ12 1981 V12 5.3L 5343cc Lucas Unit, 2nd Prod
Jaguar XJ6 87-89 L6 3.6L 3590cc Lucas Unit, 80 Amp
Jaguar XJ6 90-92 L6 4.0L 3980cc Lucas Unit, 80 Amp
Jaguar XJ6 81-87 L6 4.2L 4235cc Lucas Unit
Jaguar XJS 82-89 V12 5.3L 5343cc Lucas Unit
Jaguar XJS 1981 V12 5.3L 5343cc Lucas Unit, 2nd Prod
There is also an Ebay seller mantacelecticmotors that sells the rebuild kit of three bearings, motor brushes and the same voltage regulator for $45.00 USD if one is inclined to rebuild their original Lucas alternator themselves.
the listing is titled... Lucas Alternator Repair Kit for JC Bamford Mahindra Massey New Holland Case more.
Cheers

Thread
Thread Starter
Forum
Replies
Last Post
denraden1
XJ6 & XJ12 Series I, II & III
18
Jul 31, 2013 11:21 AM
Currently Active Users Viewing This Thread: 1 (0 members and 1 guests)