
Cherry Blossom - Restoration 1990 XJS V12


Veteran Member


Joined: Apr 2014
Posts: 4,564
Likes: 3,507
From: Kent, UK
OB,
Good work so far, but now the serious part begins. That front suspension looks like it needs a good examination. As you probably know, the key element is the front subframe and, in particular, the bottom of the spring pan. It's an area you can't even see properly with the spring in situ. And don't even think about removing the spring without the very substantial and specialist spring compressor! It's literally a matter of life and death. �350 to buy but can be hired thru' JEC etc.
If you take the spring out, absolutely essential to replace the lower bushes and pin (which will be seized) whilst it's apart. Plus the top and lower balljoints and top bushes. Because it's only the price of new parts once it's apart anyway.
Of course, if it's not coming apart and you're happy with the subframe, that completely changes the approach!
Good luck
Paul
Veteran Member
Joined: May 2014
Posts: 5,906
Likes: 2,182
From: Bremen, Germany
 Everything but finished at the moment. Loads more to do like rear axle removal and overhaul, seal some parts of the engine, redo the windscreen etc.
 I like projects! Keeps me busy!

Last edited by Daim; Jul 28, 2014 at 03:46 PM.
Thread Starter
|
Veteran Member
Joined: Feb 2013
Posts: 17,809
Likes: 3,945
OB,
Good work so far, but now the serious part begins. That front suspension looks like it needs a good examination. As you probably know, the key element is the front subframe and, in particular, the bottom of the spring pan. It's an area you can't even see properly with the spring in situ. And don't even think about removing the spring without the very substantial and specialist spring compressor! It's literally a matter of life and death. �350 to buy but can be hired thru' JEC etc.
If you take the spring out, absolutely essential to replace the lower bushes and pin (which will be seized) whilst it's apart. Plus the top and lower balljoints and top bushes. Because it's only the price of new parts once it's apart anyway.
Of course, if it's not coming apart and you're happy with the subframe, that completely changes the approach!
Good luck
Paul
Good work so far, but now the serious part begins. That front suspension looks like it needs a good examination. As you probably know, the key element is the front subframe and, in particular, the bottom of the spring pan. It's an area you can't even see properly with the spring in situ. And don't even think about removing the spring without the very substantial and specialist spring compressor! It's literally a matter of life and death. �350 to buy but can be hired thru' JEC etc.
If you take the spring out, absolutely essential to replace the lower bushes and pin (which will be seized) whilst it's apart. Plus the top and lower balljoints and top bushes. Because it's only the price of new parts once it's apart anyway.
Of course, if it's not coming apart and you're happy with the subframe, that completely changes the approach!
Good luck
Paul
That has really Cheered me up! (Not!) but I know you know what you're talking about, so I'll start by giving the whole thing a good Clean up, so that I can see the 'Wood or Should that be the rust from the Trees'
If it all has to come apart, then so be it!
Thread Starter
|
Veteran Member
Joined: Feb 2013
Posts: 17,809
Likes: 3,945
I don't have time for projects, I don't even have time to sleep but I hate to pay Cowboys for anything I can do better myself and if I screw it up then its my fault.
My other XJS is a Classic Example, another one owner very low mileage 'Cream Puff' of a Car, that must have come out of 'Pampering Central Casting!' Always Garaged & Covered and really well looked after.
But just look at what happened, when he had a repair to the Exhaust!
This puts the word 'Bodge Up' on a whole new Plateau!
I just 'freaked' when I saw it as this is a repair that's so wrong on so many different levels!
If I need a job done, that I can't do myself, then all the Certificates on their Walls mean 'Sweet Naf All' to me!
First they get a grilling like they do with Politicians and if they Screw it up, then I won't pay!
So I always try and do the job myself!
I've got to replace the inboard Rotors on my other XJS so I hope you will be taking lots of Photos, to show myself and others how its done.
Because you simply cannot get that kind of guidance looking through a Manual and I must say that your Photographs are Ace!

What a bodge up! where do they find these people!


Veteran Member
Joined: Jul 2010
Posts: 7,362
Likes: 1,241
From: Austin tx and Daytona FL.
of course you could be totally unrealistic, and have a new sub-frame made out of STAINLESS STEEL, never rust again!
then again most Jag enthusiets are not very realistic, me included, when i started my project, some people said i was $&%#(unusual).
then again most Jag enthusiets are not very realistic, me included, when i started my project, some people said i was $&%#(unusual).
Last edited by ronbros; Jul 29, 2014 at 05:04 PM.
Thread Starter
|
Veteran Member
Joined: Feb 2013
Posts: 17,809
Likes: 3,945
Front Suspension: Looking Better after Power Wash/Shot Blast/Primer/Repaint/Black Wax.
Next Job will be to remove the Front Spoiler, not the easiest job in the World, as all the Screws are rusty and won't come undone and not enough room to grind them off with an Angle Grinder.
The best way I've found to do this, is to loosen them by tapping them on their sides with a Hammer and Chisel and then unscrewing them using a Screwdriver.
Then replace the lower panel and the lower grill, after cleaning and respray


Last edited by orangeblossom; Aug 1, 2014 at 08:33 AM.
Thread Starter
|
Veteran Member
Joined: Feb 2013
Posts: 17,809
Likes: 3,945
I've got a couple of pieces left over and don't know what they are or where they go!
I'll give the red one a shot blast but I think it will need replacing though the black plastic one looks OK.
The main thing is that I don't want to start throwing money at her, at least until I have managed to get her running but am quite prepared to spend whatever it takes after that.
Can anyone help to identify these and show me where they fix to.


Veteran Member
Joined: Jan 2012
Posts: 14,526
Likes: 10,699
From: France
The red piece goes under the black lower grille, between the inside edges of the lower 3/4 panels under the bumper/wing. The rounded long side goes forwards and on the lower grille there are pegs which go into it. The short sides bolt up to the aforesaid inner edges of the lower 3/4 panels, and the back straight edge bolts up to the bottom of the rad cross member. It forces air through the rad stack instead of letting it shoot underneath the car.
It will clean up OK, spot of Hammerite, it cannot be seen really.
The plastic piece looks a bit like the valence that goes back from the top edge of the bumper towards the panel along the middle front of the rad stack. Mine is different, but that is my guess. Otherwise, for all I know about convertible XJSs it could go anywhere!
Greg
Thread Starter
|
Veteran Member
Joined: Feb 2013
Posts: 17,809
Likes: 3,945
The red piece goes under the black lower grille, between the inside edges of the lower 3/4 panels under the bumper/wing. The rounded long side goes forwards and on the lower grille there are pegs which go into it. The short sides bolt up to the aforesaid inner edges of the lower 3/4 panels, and the back straight edge bolts up to the bottom of the rad cross member. It forces air through the rad stack instead of letting it shoot underneath the car.
It will clean up OK, spot of Hammerite, it cannot be seen really.
The plastic piece looks a bit like the valence that goes back from the top edge of the bumper towards the panel along the middle front of the rad stack. Mine is different, but that is my guess. Otherwise, for all I know about convertible XJSs it could go anywhere!
Greg
It will clean up OK, spot of Hammerite, it cannot be seen really.
The plastic piece looks a bit like the valence that goes back from the top edge of the bumper towards the panel along the middle front of the rad stack. Mine is different, but that is my guess. Otherwise, for all I know about convertible XJSs it could go anywhere!
Greg
Thanks!
Its all coming back to me now!
I cannot even remember what I was doing Yesterday, so trying to remember what happened 14 years ago, was a bit of a bridge too far.
I thought it was the Closing panel over the top of the Rad but as I already had one of those, this was a bit of a mystery.
Also you were bang on, where the Plastic Panel goes.
But need to get the Spoiler off, as there are a couple of rust spots, on the front lower quarter panels, which need some attention.
Thread Starter
|
Veteran Member
Joined: Feb 2013
Posts: 17,809
Likes: 3,945
If and When I get Her running, I might just treat myself to one of these.
Has anyone got one?
oneConcept MD-410 Car Radio USB SD MP3 at the Best Price!
Has anyone got one?
oneConcept MD-410 Car Radio USB SD MP3 at the Best Price!
Veteran Member
Joined: May 2014
Posts: 5,906
Likes: 2,182
From: Bremen, Germany
Hmm, I bought a "cheaper" radio which blends in a tad better, as it has multicolour display lighting. Nothing looks worse - in my opinion - than a blue display in an older car...
I think I paid �23 for this:
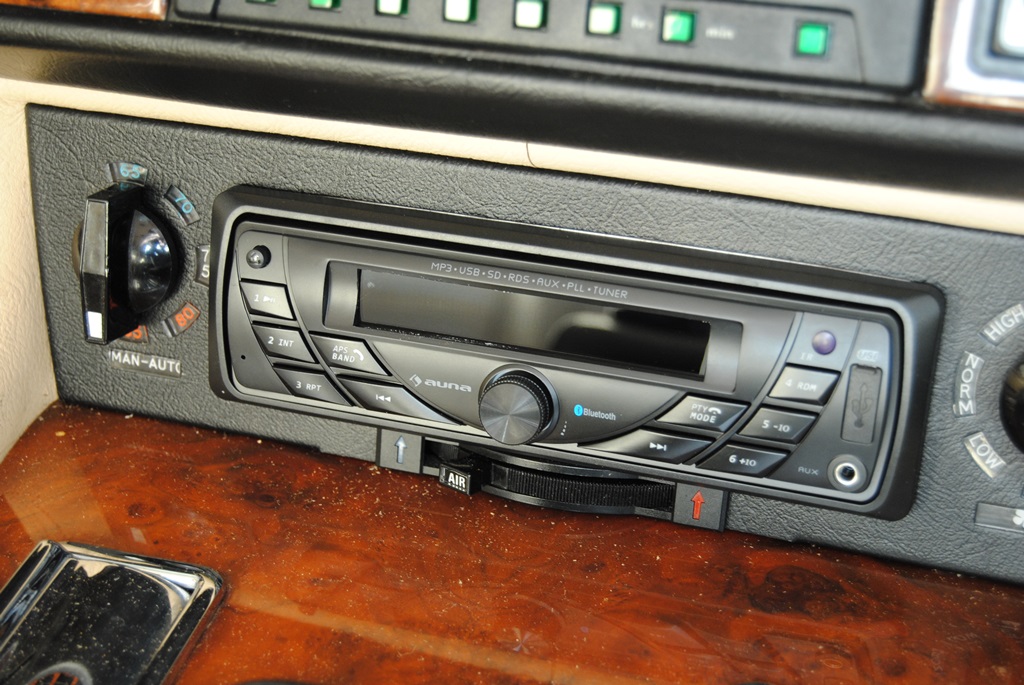
BlueTooth (Handsfree - works really well!), USB, MP3, SD, AUX, Radio (haha), comes with remove and other bits and bobs. Sound is fine! The factory speakers seem to cope well
I think I paid �23 for this:
BlueTooth (Handsfree - works really well!), USB, MP3, SD, AUX, Radio (haha), comes with remove and other bits and bobs. Sound is fine! The factory speakers seem to cope well

Veteran Member
Joined: Mar 2014
Posts: 26,695
Likes: 10,259
From: Tehama County, California, USA
Hmm, I bought a "cheaper" radio which blends in a tad better, as it has multicolour display lighting. Nothing looks worse - in my opinion - than a blue display in an older car...
I think I paid �23 for this:
BlueTooth (Handsfree - works really well!), USB, MP3, SD, AUX, Radio (haha), comes with remove and other bits and bobs. Sound is fine! The factory speakers seem to cope well
I think I paid �23 for this:
BlueTooth (Handsfree - works really well!), USB, MP3, SD, AUX, Radio (haha), comes with remove and other bits and bobs. Sound is fine! The factory speakers seem to cope well
(';')