When you click on links to various merchants on this site and make a purchase, this can result in this site earning a commission. Affiliate programs and affiliations include, but are not limited to, the eBay Partner Network.
Those two big front crossmember pivot bolts... '88 XJS
Are those threaded into the frame at the outsides of the cross member pivots, as well as the having the big capture nuts?
Standard RH thread?
The two bolts on my car seem to be immovable, at least with a 165 ft-lb impact wrench, or a 3' breaker bar, but I haven't leaned on the breaker bar enough to break the bar, or socket,, yet...
I suppose I can always change all control arm bushings, (except for maybe the swing bolt bushings), with the cross member in place, while hanging off those pivot bolts? Is that correct?
It looks like the swing bolt bushings can also be changed by loosening the capture straps??
Calipers and discs and shocks are all off already.
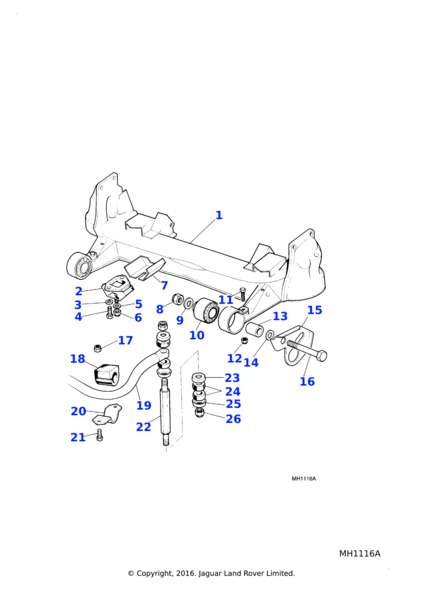
The bolt is likely rusted onto the metal sleeve/bushing (#13 in the pic) which itself is rusted onto the big bushing (#10)
I don't have an easy answer for you. Maybe you can somehow get some penetrating oil in there?
Lots of heat? But you'll melt the rubber. Or were you replacing the big bushings anyway?
When I've done lower control arm bushings I've fussed with the subframe. I make room for removing the long lower control arm bolts by dropping the steering rack out of the way.
some spacer about ~1/2" long is welded to the frame rail, I thought maybe the inside of that bushing/boss thats welded to the frame was internally threaded, and the bolt was also fully threaded to just under the head of the bolt.
The bushing #13, inside the large rubber part (and its steel inner sleeve) pivots freely a round the bolt, but there is definitely a 1/2" boss welded to teh frame. That boss, is it threaded inside?
I would have figured that little 1/2" long boss would have surrendered the bolt to the breaker bar if it was rust, or tight on a straight thru sleeve. I will apply some more penetrating fluid.
If those bolts are seized into the sleeves and spacer, good luck on the lower control arm fulcrum- you might want to get them in advance, some times you have to get out the Sawzall….
You can pivot the subframe down without removing the big front bushing bolts by loosening the band around the “six shooter” bushings (only useful if the bushings are good). My concern is that once you drop the rear of the subframe, it becomes difficult to beat the fulcrums out if they are seized.
I assume that you are renewing the lower control arm bushings, which often are seized on the fulcrum pivot bolt. Sometimes you can beat the crap out of them, they become damaged, and they still refuse to come out- then you have to cut the fulcrum pivot to remove the control arm. After front springs are removed of course.
That is why you may need a fulcrum pivot bolt.
Doug
Are you aiming to replace the lower wishbone bushes? If so, supporting the engine with a beam across the wing gutters and undoing the steering column from the rack, the shocks and the flexibles to the brakes, then allows the rear subframe V mounts to be undone and (assuming the car is in the air on a ramp or something secure) the subrame will pivot down on the front mounts, using a jack to control it lowering slowly. If you are doing a complete R&R of everything, then removing the springs and calipers before lowering the subrame greatly helps as loads of weight comes out of the assembly. Use an impact driver to undo the steering arm and caliper bolts, otherwise they very likely will not come free, however long the lever used on a spanner or socket.
I am not quite clear about what you have so far managed to undo, but the huge front subframe nuts undo from the bolts, and the bolts then can be just removed. It they are rusted/stuck then replace the nut so that it remains a bit proud of the bolts threads and start bashing the nut with a FBH. The bolt will eventually come out, also turning the bolt once the nut is off will loosen it in the tubes it goes through, an impact driver is a great tool for this. There are no other threaded parts other than the nut and bolt. The key thing to save is the spacer inside the rubber bush as it is needed to be reused with your new bushes, as the bolt is smaller than the hole in the bush. If the spacer tube is toast, they can be found easily enough from UK breakers.
If you are doing the lower wishbone pins, getting them out of the subframe tube they go through can be a real pain. I had to use a sawzall to cut through the pin in the tiny space between the wishbone and the subframe, on each leg of the wishbone, and then bash the cut off pin out of the subframe tubes with an FBH and a steel drift! use loads of antiseize on reassembly!
Last edited by Greg in France; Dec 22, 2024 at 09:29 AM.
The cross member pivots freely around the large bolts, the front cross member bushings are NOT seized to the bolts.
I am rebuilding the front cross member to replace the disintegrated polyurethane bushings on the control arms, some previous owner installed.
I figured as long as i was replacing the urethane control arm bushings with OEM bushings, i would also replace the front and rear cross member mount bushings, the rears are no problem.
I also "think" I can loosen the band clamps around the large front bushings and perhaps get the old "six shooter" bushings out as they are NOT seized to the large pivot bolts out, and slide new ones in, but if not, no big deal as they don't seem to be damaged.
The bolts wouldn't come out with moderate hammering. I did not know if they were threaded into the bushings welded to the frame rails, or not, one obviously can't hammer out a threaded bolt, which is why i asked originally, I didn't want to break or damage anything unnecessarily
The bolts would not turn with an impact wrench, either, or a large breaker bar, I was looking for input on how to get the bolts out, either unscrew or just hammer out.
They are not seized into the metal bushings under the rubber "six shooter" bushings, but they do appear to be seized into the metal bushings welded to the frame rails, so it would seem more, heavier hammering with a 4 lb hand sledge hammer vs a 16 oz ball peen hammer is what will be required.
I have so far removed the rack, the calipers, the rotors and hubs,and soon the disc backing plates and shocks.
I will also loosen the four bolts holding the bottom spring mount plate to the lower control arm,and then remove two diagonal bolts and install long all thread thread rods into those holes.
I think i can put floor jack under the spring retaining plate (while the cross member is still on the car), and remove the other two bolts, and then lower the floor jack, decompressing the spring, using the allthread as guides for the retaining plate as it comes down. That seems quicker than backing the plate off via turning nuts on the threaded rods.
If I can get the cross member off, that would be great, if i can't, I can remove everything else for paint and clean and Metalastic bushing installation, and just clean and paint the cross member, while attached to the front pivot bolts. New upper and lower ball joints and shocks will also be installed. I don't think those items are bad, but as long as it is that far apart, i may as well replace all the wearing components as I found out a long time ago, if you don't something you didn't replace will shortly fail and you have to take it all apart again.
If you’re having trouble with the front bushing bolts, just wait until you get to those lower fulcrum bolts as RGK has mentioned!
Pulling out the big donut bushing with the bolt still in the side of the car is perfectly fine way to do it. I’ve done more than my fair share of these here in the rust belt of NH! Before I had an impact wrench to break these bolt free, I would put a very long wrench on it, prop up one end of the wrench, lower the jack and let the weight of the car break it free. Now I have an Astro Pneumatic Thor air impact gun and it’s the *****. But more than once I just left it all in place and took the donut out.
But if you’re doing lower control arm bushings too… well thats not an option. The whole subframe should come out. The lower fulcrum bolts heads are actually threaded on! They are not a single piece! It’s like a very thin nut made to look like a bolt head.
I’ve fantasized about using hydraulic pressure on the front bolts, and the lower fulcrums. When something like this is rusted solid, you need steady heavy pressure and time. For the short front bolts, maybe a bottle jack and a length of pipe set between the opposite nuts on either end of the car. Loosen the nuts so there is a little room for them to move. Jack that jack so it’s pretty tight… and wait. If you have an attached garage you’ll hear it all fall to the floor overnight as the bolt finally budges. Set it all again, and the side that didn’t move should have the nut loose and the side that did move, have the nut up on the threads so it can’t move further. In this case, make sure the bushing pinch bolt is TIGHT so the subframe takes the pressure, not the relatively weak chassis mount.
When you have the whole subframe off the car, maybe maybe maybe with enough pieces of angle cut pipe you could get the entire frame into a hydraulic press and press out those lower fulcrum bolts. I once took a whole subframe to a fat old man with a general shop that had a huge press. I’d already cut the bolt so the lower control arm was off, but there were still some stubs of the lower fulcrum sticking out. I figured he could press it out. Instead he took a large ballpein hammer and hit the stub so hard fast and repeatedly it was over in moments… that fat old bald man with a beer belly made me look like an entire bed of pansies.
Last edited by Jagsandmgs; Dec 22, 2024 at 04:35 PM.
Jags and MGs; same as me! I have a similar story, was rebuilding a Muncie 4 speed a long time ago. Tried to remove the countershaft for days (manual said tap it out), finally took it to a shop. Guy looked at me like I had 3 eyes, grabbed a socket and a 4 pounder and with one swing sent it across the shop floor.
The left front spring came out almost as I planned, i did need to install some drop nuts on the threaded rods to lower the bottom retainer plate, even with the floor jack under it.
Not a huge deal, but when this is all said and done, i think i will file "Rebuilding the XJS front suspension", under Things I would rather not do again.
I am hoping the lower fulcrum shaft (#2 in pic) comes out fairly easily, someone had it out to put poly bushing in is, and those are 80% gone to pieces.
I am kind of at a standstill until I get some ball joints, i will see if NAPA can get them, otherwise I will order online, I don't want cheap Chinese crap joints, but i don't need OEM, either. I will work on getting the left control arms off, tomorrow.
Question: I assume the new Metaliastic bushes press into the control arms and then they just slip over the fulcrum shafts (or the lower shaft pushes thru the bushes)? waiting to be fully tightened once the car is lowered and driven around the block?
I need to get new anti-roll bar rubber bushings, also.
Best compromise between Chinese and OEM is Lemforder, for about $36 each from rockauto.com. Lemforder is who made them originally for Jaguar, and if you buy the $80 Jaguar parts, they’re just Lemforder in the box. I can’t promise Lemforder is still made in Germany though! Been a while.
Upper control arm bushings do just slip in the upper control arms with a little force. Lowers are very hard to install and require a press… they’re tight.
As you mentioned, the lower arm bushes just push into the eyes (when I did mine that was not hard to do, red brake grease may help) but you MUST buy genuine Metalastik for this application or you will be doing it again in 6 months.
The pins, as mentioned above, have a thin nut-like endpiece and sadly on some new ones this is not that well fixed. I had one come loose on assembly and decided to weld it on, so do consider this when you are rebuilding. Aftermarket bush after 3 months failed end piece Ready to weld Welded
The lower control arm fulcrum pin tapped out really easy, with subframe still attached to car.
Question.
In the attached pic,, upper control arms, I am not sure what item 5 is supposed to be.
I have the elastic stop nut, a thick flat steel washer, then there are two, thin, semi conical stainless steel washers the same OD as the new Metalastic bushing, one was on the inside (that would butt up to item #3, the cross shaft), one on the outside on the non-existent urethane bushing. Were these possibly part of the urethane bushings that disintegrated? I can post a pic if necessary.