
Brake Caliper Rebuild

Thread Starter
|
Veteran Member
Joined: Sep 2012
Posts: 1,473
Likes: 655
From: Devon. U.K.
Usual disclaimer – brakes are a fairly important part of your car. If you are not confident about taking them to pieces, ignore the rest of this post.
I have now had my XK8 for 18 months or so, and partly because it needs new brake pads all round, and partly because I wanted to change the brake fluid, I decided to do a full refurbishment of my calipers.What follows only applies to the single piston “standard” set-up. I believe the uprated Brembo brakes are different, although some of this may still be relevant.
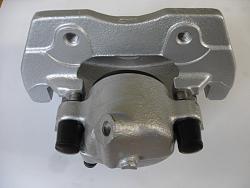
Although I was tempted to go for the full shot-blast /powder coat treatment, I decided that a reasonable clean-up / paint job was a better option for me in terms of the time and cost involved.
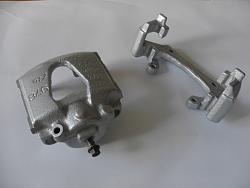
Remove the calipers and the caliper carriers and discard the brake pads.– nothing particularly complicated or difficult here and if you fall at this first hurdle, I respectfully suggest that what follows may be beyond your skill and experience. Wrap tape around , or otherwise cap-off the open end of the flexible pipes to keep fluid loss to a minimum. Note that the rear has a “banjo” type fitting and you will need 4 x copper washers when reassembling. You can then totally dismantle them – the only difficult part is removing the pistons. The rears are easy – the inlet pipe is on the rear, and you can push the piston out with a wooden dowel or even a drill bit. Fronts are a bit harder but I found that I could grip the top edge with mole-clamps and lever the piston out without too much difficulty. I cleaned up the caliper carriers and caliper body with a wire brush before painting but if you have access to a blast cabinet, or want to send them away for a full refurbishment,that’s obviously a better, although rather more expensive, option.
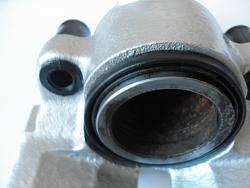
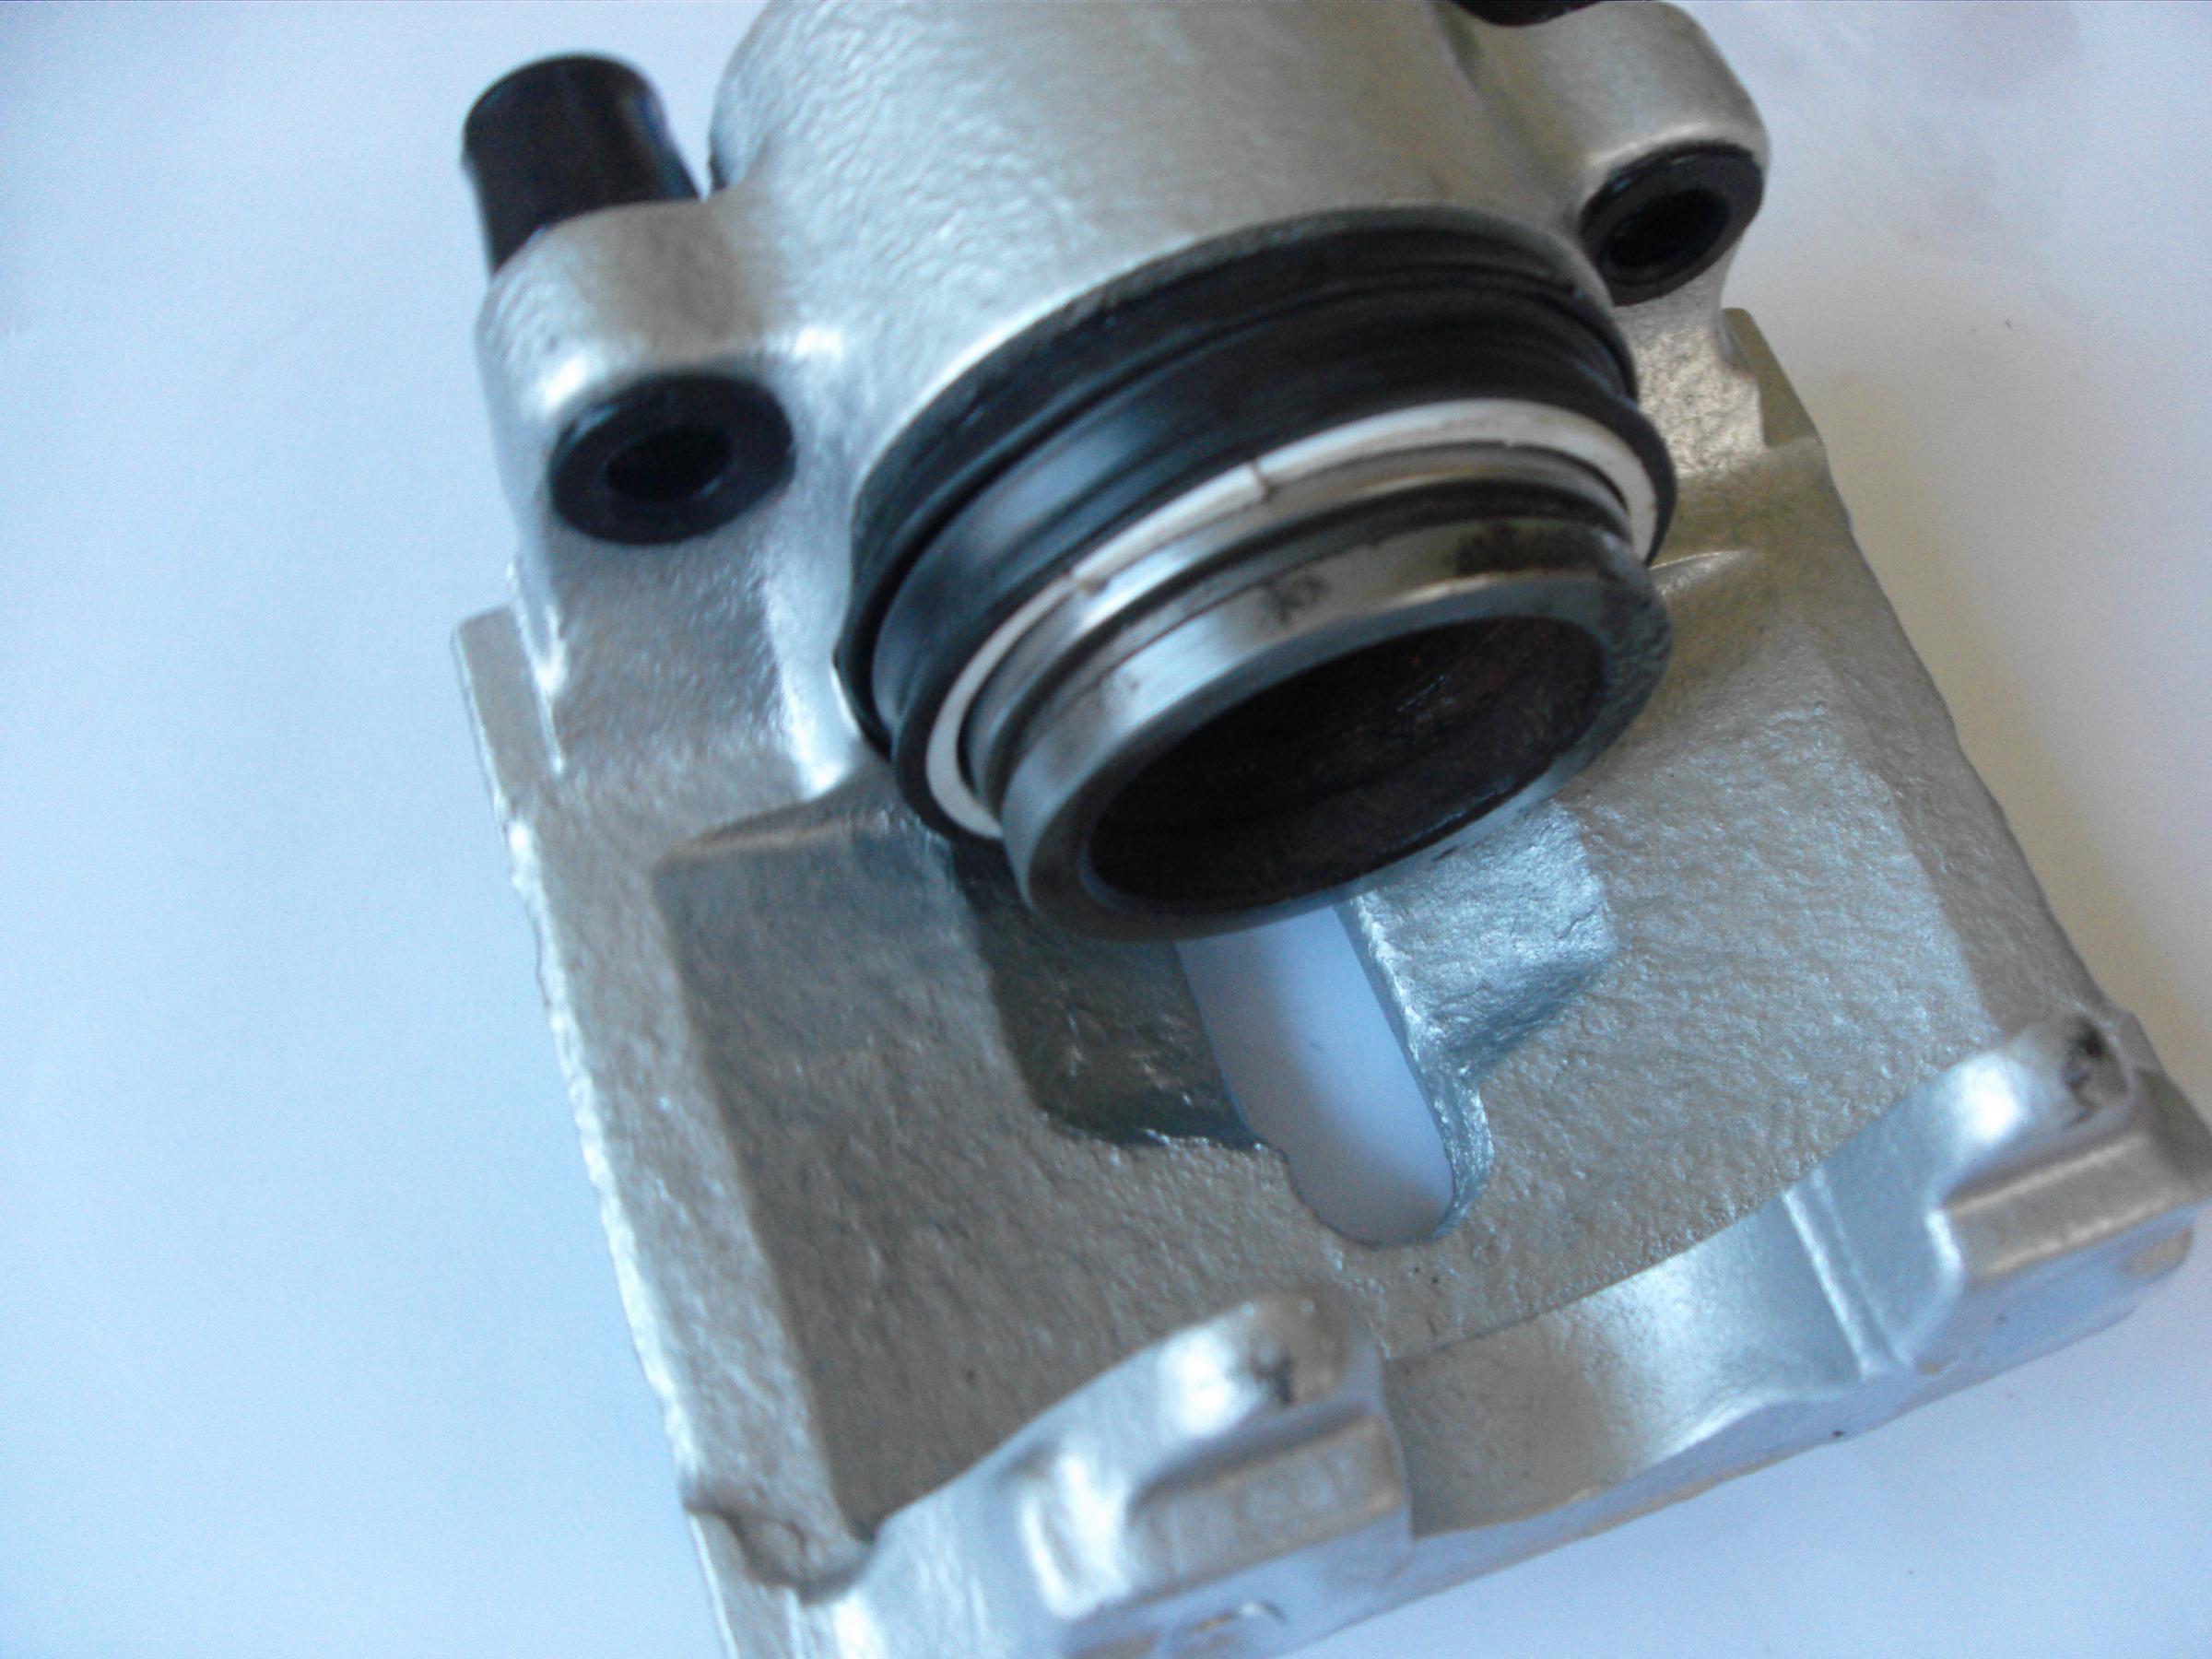
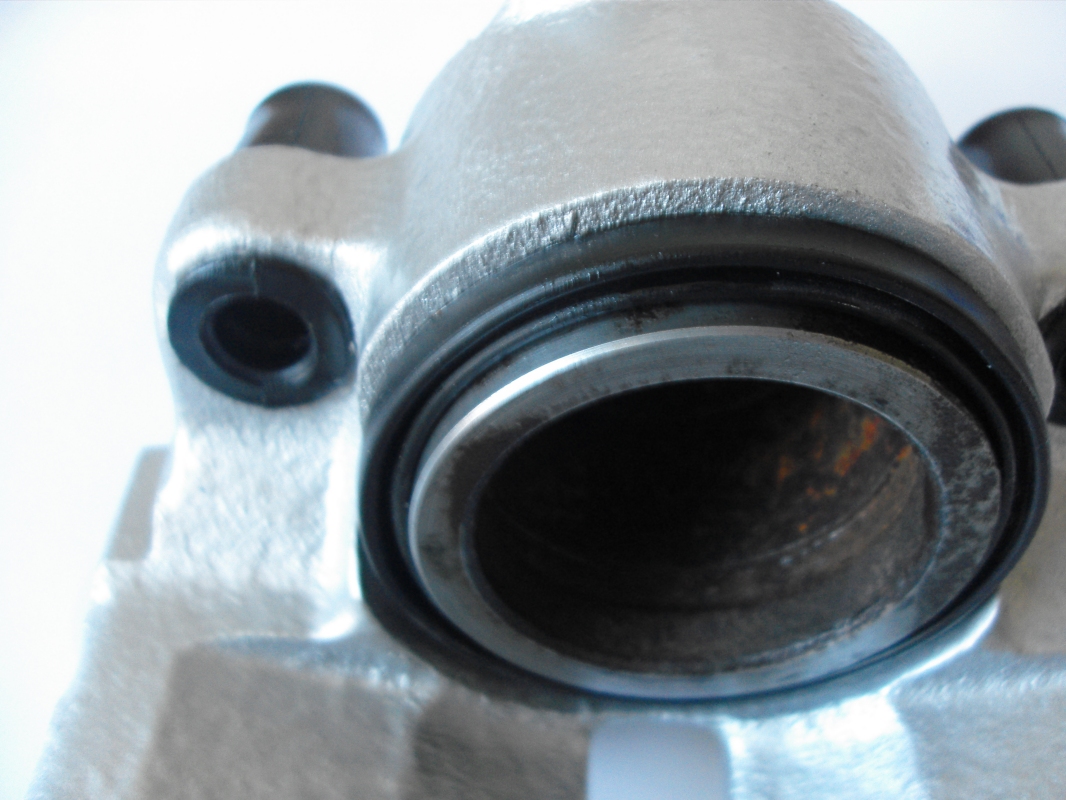
Thoroughly clean then examine the pistons – if they are smooth and shiny, they are OK to re-use. If there’s any sign of pitting or corrosion, either get new pistons or new calipers – your life is worth more than a fairly small amount of money. The bore inside the caliper is not quite so critical, as there’s no contact between this and the piston and there’s no movement, but make sure it is clean and in reasonable condition.
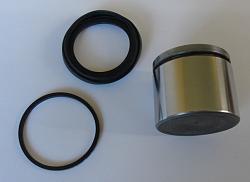
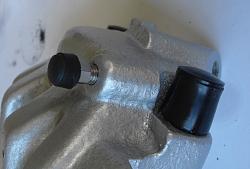
You will now need four caliper repair kits – 2 x front and 2x rear. I got mine from forum sponsor SNG Barratt, but there are other suppliers. Make sure you get the right parts – rears are JLM21054. Fronts are either JLM12123 or MJD7868AA depending on your vin. The kit has the square internal rubber seal (the most important bit), the outer gaiter/seal, four rubber bushings for the sliders with end caps, and a rubber cap for the bleedscrew. I also decided to replace the four bleed screws, which were a bit past their best, with new stainless steel items at very small additional cost.
Clean and paint, or blast and powder-coat the caliper parts– your decision.
Now – put everything back together again. Use ONLY brake fluid or red brake grease during this process. Mineral oils will damage rubber seals and bushes and must NOT be used. I find the red grease a bit too thick and sticky and prefer the thinner fluid.
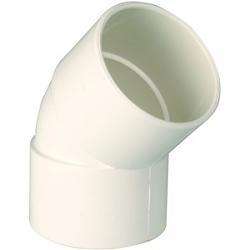
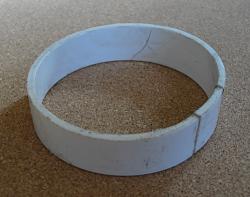
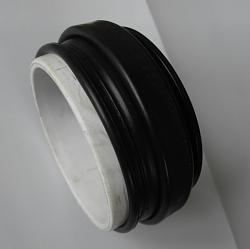
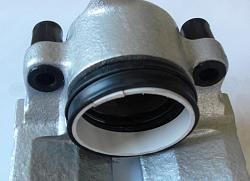
The square seal goes into the inner groove easily – no problem. The harder part is getting the gaiter / seal into BOTH the outer groove in the piston AND the groove in the caliper body. For this I made two “special parts” at a total cost of about �2.00 ($3.00 ?) I got two ABS plastic plumbing connectors and cut a strip about � inch off the end. The smaller rear piston is a sliding fit inside a standard 1�”connector but I had to make a 2” connector slightly bigger with a small “insert” for the front piston. The photos make it obvious how to do it – the key point being that you can make sure the seal is fully and correctly seated in the caliper, before sliding the piston into the caliper body through the plastic collar. It will take you about 15 minutes to make the two “tools” – it could take you about an hour to fiddle around with the seal and piston before getting it all back together, and you would not be absolutely certain that the seal was properly fitted into the grooves in the piston and caliper.

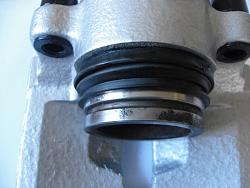
Once you have got the piston past both seals in the caliper body, you can remove the plastic tool and put the other end of the outer seal into the groove in the piston. Keep everything well lubricated with brake fluid, and it should all go back together quickly and easily.
The rest is just reassembly with new pads, bleedling the system properly etc. Use red brake grease on the four sliders and a bit of threadlock fluid on the caliper carrier bolts. Brake fluid absorbs moisture –use ONLY new fluid for the bleeding process and DON’T shake the container before use.
If you use your car for track days, or very aggressive driving, a paint finish may not withstand the high temperatures involved and powder coating will be the best and only option. For me, the result was a decent compromise in terms of cost and appearance, and I’m satisfied that the brakes should now be OK for another three / four years, when I will need new pads and maybe discs (rotors) and it will be prudent to bleed them through again to replace the fluid.
I have now had my XK8 for 18 months or so, and partly because it needs new brake pads all round, and partly because I wanted to change the brake fluid, I decided to do a full refurbishment of my calipers.What follows only applies to the single piston “standard” set-up. I believe the uprated Brembo brakes are different, although some of this may still be relevant.
Although I was tempted to go for the full shot-blast /powder coat treatment, I decided that a reasonable clean-up / paint job was a better option for me in terms of the time and cost involved.
Remove the calipers and the caliper carriers and discard the brake pads.– nothing particularly complicated or difficult here and if you fall at this first hurdle, I respectfully suggest that what follows may be beyond your skill and experience. Wrap tape around , or otherwise cap-off the open end of the flexible pipes to keep fluid loss to a minimum. Note that the rear has a “banjo” type fitting and you will need 4 x copper washers when reassembling. You can then totally dismantle them – the only difficult part is removing the pistons. The rears are easy – the inlet pipe is on the rear, and you can push the piston out with a wooden dowel or even a drill bit. Fronts are a bit harder but I found that I could grip the top edge with mole-clamps and lever the piston out without too much difficulty. I cleaned up the caliper carriers and caliper body with a wire brush before painting but if you have access to a blast cabinet, or want to send them away for a full refurbishment,that’s obviously a better, although rather more expensive, option.

Thoroughly clean then examine the pistons – if they are smooth and shiny, they are OK to re-use. If there’s any sign of pitting or corrosion, either get new pistons or new calipers – your life is worth more than a fairly small amount of money. The bore inside the caliper is not quite so critical, as there’s no contact between this and the piston and there’s no movement, but make sure it is clean and in reasonable condition.

You will now need four caliper repair kits – 2 x front and 2x rear. I got mine from forum sponsor SNG Barratt, but there are other suppliers. Make sure you get the right parts – rears are JLM21054. Fronts are either JLM12123 or MJD7868AA depending on your vin. The kit has the square internal rubber seal (the most important bit), the outer gaiter/seal, four rubber bushings for the sliders with end caps, and a rubber cap for the bleedscrew. I also decided to replace the four bleed screws, which were a bit past their best, with new stainless steel items at very small additional cost.
Clean and paint, or blast and powder-coat the caliper parts– your decision.
Now – put everything back together again. Use ONLY brake fluid or red brake grease during this process. Mineral oils will damage rubber seals and bushes and must NOT be used. I find the red grease a bit too thick and sticky and prefer the thinner fluid.
The square seal goes into the inner groove easily – no problem. The harder part is getting the gaiter / seal into BOTH the outer groove in the piston AND the groove in the caliper body. For this I made two “special parts” at a total cost of about �2.00 ($3.00 ?) I got two ABS plastic plumbing connectors and cut a strip about � inch off the end. The smaller rear piston is a sliding fit inside a standard 1�”connector but I had to make a 2” connector slightly bigger with a small “insert” for the front piston. The photos make it obvious how to do it – the key point being that you can make sure the seal is fully and correctly seated in the caliper, before sliding the piston into the caliper body through the plastic collar. It will take you about 15 minutes to make the two “tools” – it could take you about an hour to fiddle around with the seal and piston before getting it all back together, and you would not be absolutely certain that the seal was properly fitted into the grooves in the piston and caliper.


Once you have got the piston past both seals in the caliper body, you can remove the plastic tool and put the other end of the outer seal into the groove in the piston. Keep everything well lubricated with brake fluid, and it should all go back together quickly and easily.

The rest is just reassembly with new pads, bleedling the system properly etc. Use red brake grease on the four sliders and a bit of threadlock fluid on the caliper carrier bolts. Brake fluid absorbs moisture –use ONLY new fluid for the bleeding process and DON’T shake the container before use.


If you use your car for track days, or very aggressive driving, a paint finish may not withstand the high temperatures involved and powder coating will be the best and only option. For me, the result was a decent compromise in terms of cost and appearance, and I’m satisfied that the brakes should now be OK for another three / four years, when I will need new pads and maybe discs (rotors) and it will be prudent to bleed them through again to replace the fluid.
Last edited by DevonDavid; Feb 28, 2015 at 07:41 AM.


Member
Joined: Sep 2019
Posts: 59
Likes: 21
From: Tavares FL
DevonDavid. I just spent a couple of hours wrestling with rebuilding my calipers and the dust seal was kicking my posterior orifice. I was just about to give up and order rebuilt calipers when I checked Jaguar Forums to see if anyone had posted a fix for this dust seal install. You, my friend, saved me much frustration and expense. Once I cut the 2" PVC as you instructed, I followed your instructions, and "both" calipers were rebuilt within 15 minutes. Thank you


Joined: Dec 2011
Posts: 120,439
Likes: 17,016
From: Durham, UK
Great write-up.
Added to FAQ's under Brakes - Caliper Rebuild:
https://www.jaguarforums.com/forum/x...ts-data-29800/
Graham
Added to FAQ's under Brakes - Caliper Rebuild:
https://www.jaguarforums.com/forum/x...ts-data-29800/
Graham

Senior Member

Joined: Jul 2020
Posts: 100
Likes: 53
From: Wight
I just used this technique on the front calipers - a standard size aerosol lid (from your can of brake cleaner!) cut down to 2cm or so worked perfectly. Also I would say that I only loaded the piston end of the seal onto the tool the caliper end of the seal was left free and it slid strain into it's groove.

Thread
Thread Starter
Forum
Replies
Last Post
Currently Active Users Viewing This Thread: 1 (0 members and 1 guests)