
Fuel line disconnect


Thread Starter
|
Junior Member
Joined: Sep 2018
Posts: 2
Likes: 0
From: Indianapolis
What am I doing wrong? I am trying to change the fuel pump on my 99 xk8 and cannot get the fuel lines disconnected. I have fabricated a tool and can hear the tab release but cannot pull the fuel line loose. Is there more than one tab? Any suggestions would be appreciated. Thanks

Senior Member
Joined: Sep 2008
Posts: 913
Likes: 72
From: Florida
What am I doing wrong? I am trying to change the fuel pump on my 99 xk8 and cannot get the fuel lines disconnected. I have fabricated a tool and can hear the tab release but cannot pull the fuel line loose. Is there more than one tab? Any suggestions would be appreciated. Thanks
PS. I don't know exactly how Jag fuel lines are connected, but most cars need special tool. Post a picture.
Veteran Member
Joined: Sep 2012
Posts: 1,473
Likes: 655
From: Devon. U.K.
I'm not 100% sure about the ones on the tank - I assume that is what you are referring to - but I would guess it is one of these :

In which case there are four internal tabs and you need a special tool to disconnect it.
Have you seen this :
JagRepair.com - Jaguar Repair Information Resource
In which case there are four internal tabs and you need a special tool to disconnect it.
Have you seen this :
JagRepair.com - Jaguar Repair Information Resource

Veteran Member
Joined: Jan 2011
Posts: 1,865
Likes: 918
From: MI
What am I doing wrong? I am trying to change the fuel pump on my 99 xk8 and cannot get the fuel lines disconnected. I have fabricated a tool and can hear the tab release but cannot pull the fuel line loose. Is there more than one tab? Any suggestions would be appreciated. Thanks


Joined: Dec 2009
Posts: 13,581
Likes: 9,526
From: Wise County,TX
If you damage the 'lock-tabs' they are replaceable as FUEL TANK STUFFER PINS EBC9606.
I don't know if they are still available new. Call a dealer with the part number and inquire if you need one or 2.
bob
I don't know if they are still available new. Call a dealer with the part number and inquire if you need one or 2.
bob
Senior Member


Joined: Jan 2011
Posts: 239
Likes: 117
From: Lutz, FL
I used a plastic disconnect set to replace my fuel pumps, but after beating my head against the wall I broke down and got a metal fuel line disconnect tool that does 5/16'' and 3/8''. I bought a combo one for AC lines as well, but sadly, ended up buying the fuel line specific one as listed due to clearance issues. (The other had 4 slots and the "ears" stuck out and got in the way.)
the plastic sets are cheap and seem to give you options, but it would not disconnect my lines for the life of me for the engine bay ones..... Metal tools are good.
-Scott
the plastic sets are cheap and seem to give you options, but it would not disconnect my lines for the life of me for the engine bay ones..... Metal tools are good.
-Scott
Trending Topics

Veteran Member
Joined: Apr 2014
Posts: 5,457
Likes: 1,816
From: New Jersey USA
Jasmine, if the photo above is accurate post #3, i want to share a story.
I just went through this changing a friends Ford explorer fuel filter.
The 3 or 4 tabs you xan see on the inside clamp on a raised surface on the neck of the filter. In your case I suppose it is the pump. Once these are released with the tool, and slid back past the raised surface, the line should slide off.
on my job it just stopped in its tracks. Since the surface was smooth I realized(eventually) that the tabs were not part of the problem. The special tool is impotent at this point.
it turned out that there is an o ring shaped item out of sight behind the clips the tool works on. I probably had way more space to work with than you do, even the. I couldn't unfasten the connector by hand.
I went to good old physics and created a lever.
let me explain. First confirm that the clips are no longer faced with anything to latch onto.
then I used a small vice grip to clamp on the filters neck (I will leave it to you to translate filter to pump or whatever) . I left about 1/8 inch space between the top of the vice grip and the frozen co Hector.
imagine for a moment the profile of a long nose pliers. It tapers towards the tip.
this was enough space to fit the end of a long nose pliers between the vice grip and the connector. Of course the pliers was opened to equalize the leverage left right.
Once pliers was snug i levered them using the vice grip as the fulcrum. This resulted in movement leaving a bigger space. I pushed the pliers in again until snug and repeated. This released it.
I never really could tell if it was dirt or corrosion. I did measure that taking 0.1mm off the diameter of the filters neck (used a dremmel) allowed it to move through this o ring area.
long story but awfully similar in several ways. I hope the idea of setting up a lever can apply and help you too.
John
Veteran Member
Joined: Apr 2014
Posts: 5,457
Likes: 1,816
From: New Jersey USA
Jagmike, if the photo above is accurate post #3, i want to share a story.
I just went through this changing a friends Ford explorer fuel filter.
The 3 or 4 tabs you xan see on the inside clamp on a raised surface on the neck of the filter. In your case I suppose it is the pump. Once these are released with the tool, and slid back past the raised surface, the line should slide off.
on my job it just stopped in its tracks. Since the surface was smooth I realized(eventually) that the tabs were not part of the problem. The special tool is impotent at this point.
it turned out that there is an o ring shaped item out of sight behind the clips the tool works on. I probably had way more space to work with than you do, even the. I couldn't unfasten the connector by hand.
I went to good old physics and created a lever.
let me explain. First confirm that the clips are no longer faced with anything to latch onto.
then I used a small vice grip to clamp on the filters neck (I will leave it to you to translate filter to pump or whatever) . I left about 1/8 inch space between the top of the vice grip and the frozen co Hector.
imagine for a moment the profile of a long nose pliers. It tapers towards the tip.
this was enough space to fit the end of a long nose pliers between the vice grip and the connector. Of course the pliers was opened to equalize the leverage left right.
Once pliers was snug i levered them using the vice grip as the fulcrum. This resulted in movement leaving a bigger space. I pushed the pliers in again until snug and repeated. This released it.
I never really could tell if it was dirt or corrosion. I did measure that taking 0.1mm off the diameter of the filters neck (used a dremmel) allowed it to move through this o ring area.
long story but awfully similar in several ways. I hope the idea of setting up a lever can apply and help you too.
John
Last edited by Johnken; Oct 1, 2018 at 04:13 PM.
Veteran Member
Joined: Sep 2012
Posts: 1,473
Likes: 655
From: Devon. U.K.
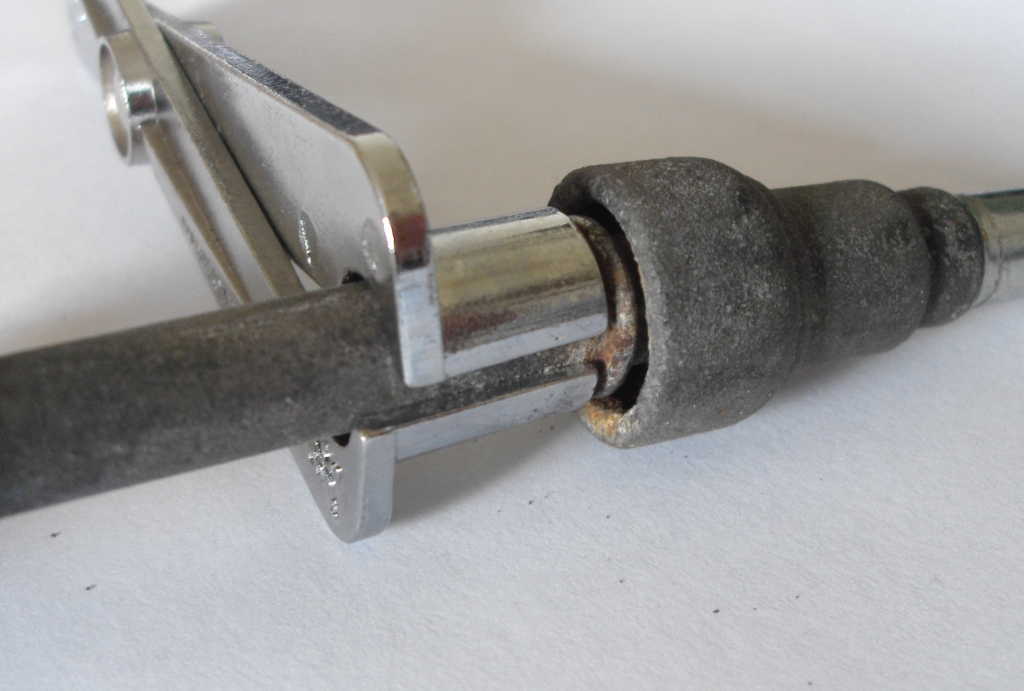
In these connectors, the pipe has a metal "ridge" which is what keeps it located within the clip - there's also an 'o' ring which makes the fuel-tight seal. If it is easy to get at, then a metal tool like this will do the job quite easily - essentially, it is pushed in beyond those four "lugs" and then provides a smooth surface against which to pull back on the pipe. However, as I understand it (haven't done this job myself), the two connectors for the tank are extremely difficult to access, so a different tool and a bit of ingenuity are required to get them free.


Thread
Thread Starter
Forum
Replies
Last Post
EsRay
XJ XJ6 / XJ8 / XJR ( X350 & X358 )
2
Nov 30, 2017 04:11 PM
Vicky Baker
S-Type / S type R Supercharged V8 ( X200 )
7
Nov 17, 2017 08:47 AM
LedZepplin
XK8 / XKR ( X100 )
5
Jul 24, 2011 09:19 PM
Currently Active Users Viewing This Thread: 1 (0 members and 1 guests)