
Thanks - New Tensioners Installed


Thread Starter
|
Senior Member
Joined: May 2011
Posts: 359
Likes: 101
From: CA
Happy Holidays to one and All
I wanted to say what a happy owner I am, and how pleased I am to find all the good information on this website. I've never seen such a knowledgeable, well-mannered, good-humored bunch as we have here, so this is my thanks for all the good data, and all the good advice.
I am what may be a typical Jaguar second-hand buyer. After growing up knowing of the marque and lusting after the E-Type in the 60s as a boy, I've always considered the autos to be beyond my reach. Beyond reach, until that fateful day when I saw my 01 XK8 while idly browsing the web. After going to see it and drive it I knew it had to be mine, and two days later it was. I congratulated myself for a deal well-made, and didn't make much of the salesman's question of whether I had owned a Jag before, or knew much about the XK8. Of course my answer was "no"and "no", and he just went "hmm" and changed the subject.
Of course, after buying it, and finding this fine forum, I was quickly educated on why, perhaps, I found such a wonderful car at what seemed a bargain price. Oh my word, the number of things that could be wrong, beginning the possible self-destruction of the engine caused by failed tensioners. Fortunately, my car isn't displaying any electrical gremlins, the transmission shifts smoothly with no funny noises, and apart from somewhat reluctant seat controls it has performed flawlessly for the past 8 months, but still those tensioners never left my mind.
So over the course of the last 4 days, I've come home from work and spent an hour each night performing the Secondary Tensioner replacement and now I'm happy to report the car running just fine with the 3rd generation tensioners installed. Thanks to the superb FAQ created by SimonAllen and the two-part description by EZDriver I felt confident in going ahead and planning the task, and sure enough it went forward without a hitch. Thanks too to WhiteXKR for posting the Ford part numbers for the parts, which saved me a couple of bucks more. I read over every thread I could find on the subject, and appreciate all the other reports, so I thought I would add my own to the library.
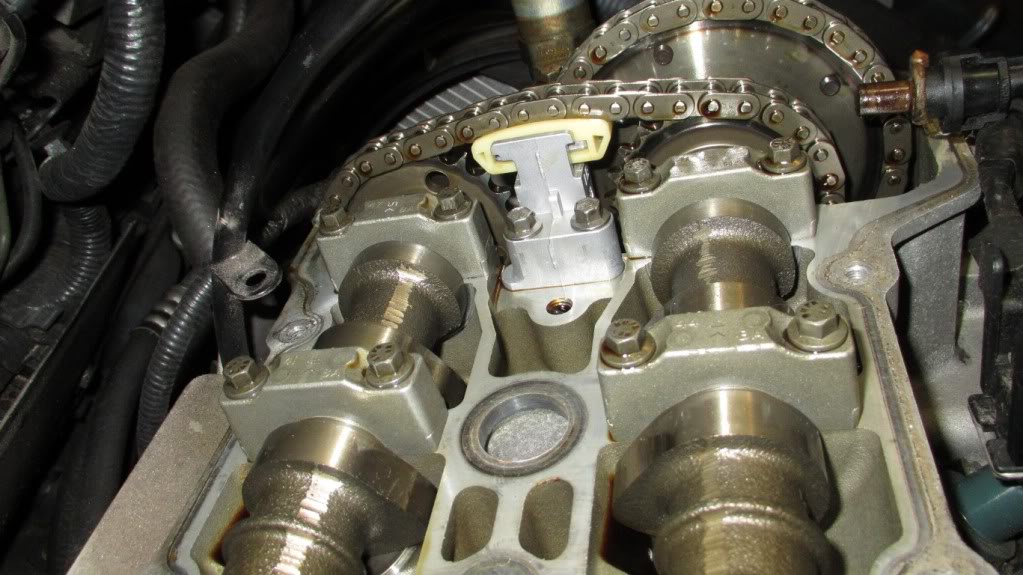
The removed tensioners are shown below, showing the typical cracks. Just like others have reported, these can't be seen when they are installed in the car. If you remove your cam covers and think you don't have any problems because you can't see anything, you're just fooling yourself. My car only has about 49k miles on it now, 3k more than when I bought it. The engine looks clean, as if it enjoyed regular oil changes and no overheating, yet the plastic tensioners still are cracked. As for other common notes about the task:
To anyone else contemplating this task, it's not that difficult. Just a matter of reading the copious information available on this forum, being patient, turning the right screws at the right times, and keeping your hands clean. Oh, and did I mention you have to be patient, and think through any issues and problems before charging ahead?
Once again, a big thanks to all - for your contributions that gave me the confidence to go ahead with this project.
Steve

I wanted to say what a happy owner I am, and how pleased I am to find all the good information on this website. I've never seen such a knowledgeable, well-mannered, good-humored bunch as we have here, so this is my thanks for all the good data, and all the good advice.
I am what may be a typical Jaguar second-hand buyer. After growing up knowing of the marque and lusting after the E-Type in the 60s as a boy, I've always considered the autos to be beyond my reach. Beyond reach, until that fateful day when I saw my 01 XK8 while idly browsing the web. After going to see it and drive it I knew it had to be mine, and two days later it was. I congratulated myself for a deal well-made, and didn't make much of the salesman's question of whether I had owned a Jag before, or knew much about the XK8. Of course my answer was "no"and "no", and he just went "hmm" and changed the subject.
Of course, after buying it, and finding this fine forum, I was quickly educated on why, perhaps, I found such a wonderful car at what seemed a bargain price. Oh my word, the number of things that could be wrong, beginning the possible self-destruction of the engine caused by failed tensioners. Fortunately, my car isn't displaying any electrical gremlins, the transmission shifts smoothly with no funny noises, and apart from somewhat reluctant seat controls it has performed flawlessly for the past 8 months, but still those tensioners never left my mind.
So over the course of the last 4 days, I've come home from work and spent an hour each night performing the Secondary Tensioner replacement and now I'm happy to report the car running just fine with the 3rd generation tensioners installed. Thanks to the superb FAQ created by SimonAllen and the two-part description by EZDriver I felt confident in going ahead and planning the task, and sure enough it went forward without a hitch. Thanks too to WhiteXKR for posting the Ford part numbers for the parts, which saved me a couple of bucks more. I read over every thread I could find on the subject, and appreciate all the other reports, so I thought I would add my own to the library.
The removed tensioners are shown below, showing the typical cracks. Just like others have reported, these can't be seen when they are installed in the car. If you remove your cam covers and think you don't have any problems because you can't see anything, you're just fooling yourself. My car only has about 49k miles on it now, 3k more than when I bought it. The engine looks clean, as if it enjoyed regular oil changes and no overheating, yet the plastic tensioners still are cracked. As for other common notes about the task:
- I used the ty-wrap method. Found it was very easy to get everything unbolted and lift the cam up out of the bearing surfaces and then hold it with one hand while removing and replacing the tensioner.
- I cut short the stud holding the dipstick tube in place, but then found the tube moved quite freely anyway. Such is life. I cleaned up the cut end of the stud, and re-installed everything.
- I didn't fool about with turning over the engine with no fuel pump to prime the tensioners before starting. However, the engine was reluctant to start and took a couple of cranks before it fired up. So by accident, I guess I did follow that advice... No codes were thrown, and if anything I swear the sound is now smoother than before, although I admit it might all be psychological.
- I drove the car slowly for a couple of miles before revving it above 1500 or so, and then gently for a couple more miles with frequent stops while I tried to locate a rattle in the rear window or top mechanism – but that's another story.
- As mentioned above I used the Ford parts identified by WhiteXKR, and the Felpro gasket set. No issues whatsoever with either, and to say I'm impressed in general in the design of the gasket and how it fits in the cover. Not at all like the old days with the 1963 Corvair (another story).
- Found a standard Sears small universal socket driver and long extension suitable for all cover bolts, even those in the rear bottom corner. The long extension was nice, letting me stand a little straighter when just “spinning” the bolts into place before exchanging the ratchet and applying the final torque.
To anyone else contemplating this task, it's not that difficult. Just a matter of reading the copious information available on this forum, being patient, turning the right screws at the right times, and keeping your hands clean. Oh, and did I mention you have to be patient, and think through any issues and problems before charging ahead?
Once again, a big thanks to all - for your contributions that gave me the confidence to go ahead with this project.
Steve
Last edited by Steve8; Dec 25, 2011 at 07:46 PM. Reason: Removed copied formatting marks.

Senior Member
Joined: Dec 2011
Posts: 312
Likes: 10
From: Chicago suburbs
Hey can you post the links of all the threads you used to complete the job?
What parts did you use, and total cost?
Did you use any of the special tools that some people rent here?
So there is no way to tell if your tensioners have been changed out until they are actully taken off?
Thanks!
What parts did you use, and total cost?
Did you use any of the special tools that some people rent here?
So there is no way to tell if your tensioners have been changed out until they are actully taken off?
Thanks!


Member
Joined: Dec 2011
Posts: 77
Likes: 2
From: bethlehem,pa
Can someone either post pictures, step by step of this repair? Any of the posts would be great but to have it done by one person, on YOU TUBE or here would be great.
Being a member of the Porsche forum, the forum originator has actually produced book(s) on step by step up-grades to 911s and others. Invaluable for XK owners fi done.
Being a member of the Porsche forum, the forum originator has actually produced book(s) on step by step up-grades to 911s and others. Invaluable for XK owners fi done.

Veteran Member
Joined: Mar 2008
Posts: 5,390
Likes: 1,116
From: Ellijay
There are many, many pictorials on the tensioner issue. Here is my reading list:
Cam Chain Tensioners - Removing Valve Covers Only
https://www.jaguarforums.com/forum/j...17/#post316489
Cam Chain Tensioners
Help - sudden fail - Jaguar Forums - Jaguar Enthusiasts Forum
I just changed my own timing chain tensioners........ - Jaguar Forums - Jaguar Enthusiasts Forum
Ford tensioners for Jaguar??? - Jaguar Forums - Jaguar Enthusiasts Forum
Tensioners, when are they a "must replace" item? - Jaguar Forums - Jaguar Enthusiasts Forum
Free File Sharing Made Simple - MediaFire
DIY ~ Jaguar 4.0 (R&R) Timing belt, Tensioners, Water Pump, etc. - Calguns.net
Cam Chain Tensioners Lincoln LS Part Numbers
https://www.jaguarforums.com/forum/j...34/#post330655
JTIS .pdf files on Chains/Tensioners replacement
https://www.jaguarforums.com/forum/j...prokets-54603/
Cam locking tool dimensions
Welcome to Jag-lovers - Members Photo Viewing Page
Cam Chain Tensioners Cam Removal Method 2nd tensions DIY instruction FAQ - Jaguar Forums - Jaguar Enthusiasts Forum
Broken Cam Due to Removing Cam
Cam shaft woes - Jaguar Forums - Jaguar Enthusiasts Forum
If anyone knows of a missing link and would post it we would have EVERYTHING in one thread and then just point here.
Cam Chain Tensioners - Removing Valve Covers Only
https://www.jaguarforums.com/forum/j...17/#post316489
Cam Chain Tensioners
Help - sudden fail - Jaguar Forums - Jaguar Enthusiasts Forum
I just changed my own timing chain tensioners........ - Jaguar Forums - Jaguar Enthusiasts Forum
Ford tensioners for Jaguar??? - Jaguar Forums - Jaguar Enthusiasts Forum
Tensioners, when are they a "must replace" item? - Jaguar Forums - Jaguar Enthusiasts Forum
Free File Sharing Made Simple - MediaFire
DIY ~ Jaguar 4.0 (R&R) Timing belt, Tensioners, Water Pump, etc. - Calguns.net
Cam Chain Tensioners Lincoln LS Part Numbers
https://www.jaguarforums.com/forum/j...34/#post330655
JTIS .pdf files on Chains/Tensioners replacement
https://www.jaguarforums.com/forum/j...prokets-54603/
Cam locking tool dimensions
Welcome to Jag-lovers - Members Photo Viewing Page
Cam Chain Tensioners Cam Removal Method 2nd tensions DIY instruction FAQ - Jaguar Forums - Jaguar Enthusiasts Forum
Broken Cam Due to Removing Cam
Cam shaft woes
- Jaguar Forums - Jaguar Enthusiasts ForumIf anyone knows of a missing link and would post it we would have EVERYTHING in one thread and then just point here.
Last edited by test point; Dec 26, 2011 at 07:44 AM.
Trending Topics

Veteran Member
Joined: Dec 2010
Posts: 2,125
Likes: 279
From: Holly Lake Ranch, Texas
Thanks Steve8 for the feed back. Glad you like the forum and that it was helpful. Surprised you would have been able to remove the dip stick without cutting the stud down. On mine there was no way in h..l I could do that and cutting the stud down was the only way. Your info is a great input to the job.
Here us the link to my post when I did my tensioners. This includes eleven pictures.
https://www.jaguarforums.com/forum/x...ics-faq-52653/
EZDriver
Here us the link to my post when I did my tensioners. This includes eleven pictures.
https://www.jaguarforums.com/forum/x...ics-faq-52653/
EZDriver
Last edited by EZDriver; Dec 26, 2011 at 11:57 AM. Reason: add post link

After reading this, I simply had to add to the post by saying a huge "thank you" to........
steve8 - for the great post and kudos n kind words you give this forum.
Test Point - for the great reply and the all in one post with all necessary links added!
My thought is that we could / should have this post by Test Point redone as an initiated thread, with any other links added and it then made FAQ for future members use!
EXDriver - for post c/w with helpful link added
You guys rock
Thread Starter
|
Senior Member
Joined: May 2011
Posts: 359
Likes: 101
From: CA
Thanks Test Point and EZDriver for helping me answer those questions on links to threads. I'm not half as organized as you guys are!
I didn't use any special tools, opting to follow the zip-tie (I call them ty-wraps) method instead. There doesn't seem to be any drawbacks, unless perhaps your cam doesn't want to lift out of the bearing surfaces. But mine popped right out, it's just the suction from the oil and close tolerances that holds it in after the caps are removed.
Once the cam covers are removed, one can clearly see which model of tensioner is installed. What can't be seen is the condition of the plastic tensioner (assuming it hasn't broken to pieces already). For mine, the cracks so visible in the photos were completely hidden before removal from the engine.
As a reward for my efforts, and recognizing the new-found confidence in my motor, I took the car for the longest trip yet today. After buying it and learning of the tensioner issue, I confess to only short trips back and forth to work, or minor errands about town, as I just couldn't bring myself to commit to a longer trip. So today I took off over the mountains east of San Diego down to Anza Borrego State Park. Through the twisties I also discovered the true handling capability of the car - which is simply awesome! Wow, I've never has such fun in a car (well, while driving it anyway). And that's what it's all about.
See the pictures at photobucket here Borrego Dec 2011 pictures by ffsteve100 - Photobucket
Steve
Senior Member
Joined: Nov 2011
Posts: 303
Likes: 11
From: BURBAGE leicestershire uk
Hi Steve nice post.Thats a really good angle to photograph the cams and the new tensioner helps me to understand what's going on in there. I have 9 months warranty left on mine so will tackle this job when the warranty expires.
I agree it would be good if all the threads were in one place and easier to track.
Cheers Al
I agree it would be good if all the threads were in one place and easier to track.
Cheers Al


Thread
Thread Starter
Forum
Replies
Last Post
FS[SouthWest]: Red 2001 XK8 Convertible in Colorado
picard
PRIVATE For Sale / Trade or Buy Classifieds
7
Oct 12, 2015 11:56 AM
Dickie_L_J_O
XJ XJ8 / XJR ( X308 )
8
Sep 13, 2015 07:44 AM
davidladewig
S-Type / S type R Supercharged V8 ( X200 )
3
Sep 11, 2015 06:48 PM
Currently Active Users Viewing This Thread: 1 (0 members and 1 guests)