
Upper Ball Joint Separator tips


Thread Starter
|
Senior Member


Joined: Dec 2016
Posts: 249
Likes: 115
From: Jacksonville FL
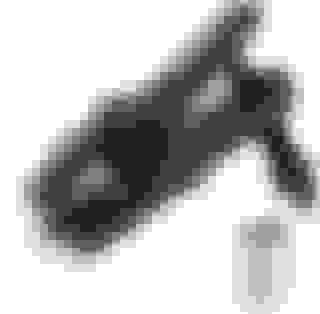
Has anyone used a tool like this to sperate the upper front Ball joints? I did try it and I was at the point of thinking about a breaker bar on it but didnt want to damage the ball joints or break the tool. I am waiting to have another go at in when the weather gets cooler and have replacement ball joints. May as well do it all. My reason is that I am replaceing the worn out rubber bushing with poly.
Last edited by GGG; Aug 2, 2022 at 03:08 AM.


Joined: Dec 2009
Posts: 13,581
Likes: 9,526
From: Wise County,TX
I use those and if I think the tension is getting to the DAMAGE limit, I use a BFH and smack it until it dislodges the taper.
You can back up the other side of the impact with another BFH.(or an old body dolly)
Air hammers also work well.
You can back up the other side of the impact with another BFH.(or an old body dolly)
Air hammers also work well.
Sponsor
Joined: Aug 2018
Posts: 770
Likes: 388
That is similar to the factory tool but then again most are. If you are a JCNA member you could just loan the tool. Just an observation--the fingers look too fat to fit or at least much fatter than the factory tool which slips in the joint area. Good luck.
Veteran Member

Joined: Apr 2014
Posts: 4,731
Likes: 2,950
From: Jersey, Channel Islands
Mine came loose OK following motorcarman' process. Take care not to damage the rubber boot:- my splitter has the fork shaped to fit around it.
Note you don't strictly need to separate the control arm just to replace the upper bushings.
edit: sorry - I see you're replacing the BJs
Note you don't strictly need to separate the control arm just to replace the upper bushings.
edit: sorry - I see you're replacing the BJs
Last edited by michaelh; Aug 1, 2022 at 11:18 AM.

Veteran Member
Joined: Jun 2013
Posts: 2,107
Likes: 1,366
From: Australia
As already mentioned, the fingers on the one pictured are much too fat to fit between control arm and upright on the Jag.
l use that style but slimmer, works very well but still amazing the scary tension that is sometimes required to break a simple taper.
l use that style but slimmer, works very well but still amazing the scary tension that is sometimes required to break a simple taper.
Thread Starter
|
Senior Member
Joined: Dec 2016
Posts: 249
Likes: 115
From: Jacksonville FL
When I did the upper shock mounts I dound that my bushing are really tight in the A arm. It seems they just fall out for some but mine are really in there. If yours were tight how were you able to remove them without taking the A arm out?
Trending Topics

Veteran Member
Joined: Apr 2014
Posts: 5,457
Likes: 1,816
From: New Jersey USA
This thread reminds me of a battle with that ball joint on 1 side. As pictured & discussed in this link: https://www.jaguarforums.com/forum/x...ghlight=Pickle
I learned that all pickle forks are not created equal. Photos in link. In a nutshell I tried the device you pictured first, no joy, it broke. I then spent what felt like hours hammering with an autozone rented pickle fork - nothing. In frustration I visited my mechanic and complained. He just smiled and handed me a Snap-On brand pickle fork. World of difference it worked fast!
I have an air hammer now, but the attached post may help you.
John

Member
Joined: Mar 2015
Posts: 92
Likes: 35
From: San Diego, CA
The ball joint separator sold at Harbor Freight (#99849) and other parts stores worked fine for me when replacing the upper arm bushings. It is a quality forged, "made in Taiwan" tool with the proper thin fingers that fit easily under the ball joint without damage, and it poses much less of a threat to the joint seal than a fork. I have used it twice to replace the arm bushings, both times without undue strain. I should qualify this by saying my car is California rust-free and easier to work on than many that live through winters. Be sure to wear eyewear and gloves, etc., if you go this route, as the joint "explodes" out of the socket when it comes loose, spreading a lot of debris.
Thread Starter
|
Senior Member
Joined: Dec 2016
Posts: 249
Likes: 115
From: Jacksonville FL
The ball joint separator sold at Harbor Freight (#99849) and other parts stores worked fine for me when replacing the upper arm bushings. It is a quality forged, "made in Taiwan" tool with the proper thin fingers that fit easily under the ball joint without damage, and it poses much less of a threat to the joint seal than a fork. I have used it twice to replace the arm bushings, both times without undue strain. I should qualify this by saying my car is California rust-free and easier to work on than many that live through winters. Be sure to wear eyewear and gloves, etc., if you go this route, as the joint "explodes" out of the socket when it comes loose, spreading a lot of debris.

Senior Member
Joined: Nov 2011
Posts: 827
Likes: 141
From: Stamford CT USA
Hey Pb,
I'm replacing my shocks and control arm bushings. I would rather not split the ball joint but i'm not sure how you would press the new bushings into the arm in the confined space. How did you press yours in?
Thanks!.
I'm replacing my shocks and control arm bushings. I would rather not split the ball joint but i'm not sure how you would press the new bushings into the arm in the confined space. How did you press yours in?
Thanks!.

Veteran Member
Joined: Mar 2021
Posts: 2,141
Likes: 893
From: Northampton, UK
When you have the long bolt out you can swing the top arm about and get it to a convenient place to work on it . Use a length of threaded rod and some washers / sockets to push out the bushes if they dont fall out.
Stick the washers onto the bushes with contact adhesive or you will have a battle on your hands to align it all up .
Easy job 24mm socket+spanner + impact gun + knuckle.
Stick the washers onto the bushes with contact adhesive or you will have a battle on your hands to align it all up .
Easy job 24mm socket+spanner + impact gun + knuckle.
Thread Starter
|
Senior Member
Joined: Dec 2016
Posts: 249
Likes: 115
From: Jacksonville FL
When you have the long bolt out you can swing the top arm about and get it to a convenient place to work on it . Use a length of threaded rod and some washers / sockets to push out the bushes if they dont fall out.
Stick the washers onto the bushes with contact adhesive or you will have a battle on your hands to align it all up .
Easy job 24mm socket+spanner + impact gun + knuckle.
Stick the washers onto the bushes with contact adhesive or you will have a battle on your hands to align it all up .
Easy job 24mm socket+spanner + impact gun + knuckle.
Veteran Member
Joined: Apr 2014
Posts: 4,731
Likes: 2,950
From: Jersey, Channel Islands
You can replace the upper arm BJ without too much drama using a normal press or large C-clamp & suitable adaptors.
The lower one is a bear due to the taper on the arm. See this thread from szhilian39, which also links to a couple of others:
https://www.jaguarforums.com/forum/x...7/#post2481415
The lower one is a bear due to the taper on the arm. See this thread from szhilian39, which also links to a couple of others:
https://www.jaguarforums.com/forum/x...7/#post2481415

Veteran Member
Joined: May 2012
Posts: 1,035
Likes: 693
From: New Jersey
I replaced the front shock mounts, shocks, ball joints, and bushings. I did most of the work myself but I took the control arms and strut assemblies to a shop to get the ball joints replaced, and shock and shock mounts replaced. Those seemed like a little more than I wanted to wrestle with. I wasn't sure that I had the proper tools and it looked like I could get hurt if something let loose so I farmed this out to someone with better tools and who was comfortable using them.
The owner of the shop told me that he did the ball joints himself because of the small amount of control arm material around the ball joints.
I'm very glad that I handled this the way I did and I would do it again.
The owner of the shop told me that he did the ball joints himself because of the small amount of control arm material around the ball joints.
I'm very glad that I handled this the way I did and I would do it again.

Veteran Member
Joined: Mar 2012
Posts: 2,308
Likes: 1,267
From: Fort Worth
I have one of those from Harbor Freight. Kind of discovered this accidentally out of frustration and just walking away after heating, hammering and cursing didn't budge one. What I've done a few times now is just crank up the tension on a ball joint till I feel its about to reach the tool's limit and then I'd just leave it for a few hours or even overnight. Then I'd come out the next morning and if it hadn't popped loose on its own, then all it took is another eighth of a turn. Same method seems to work for removing tapered pulleys (tho with a different tool obviously). Don't really understand why that's worked but it has. If you got the time, worth a try anyway and probably less likely to hurt anything, least of all yourself, than trying to heat, hammer or curse it loose. 

Veteran Member
Joined: May 2012
Posts: 1,035
Likes: 693
From: New Jersey
I think the length of time required is inversely proportional to the amount of time you actually have.

Member
Joined: Oct 2024
Posts: 94
Likes: 23
From: Argyll
Cut off the ball from the taper with a reciprocating saw, remove the hub altogether. Fasten the master ball joint splitter and suitable cups. I left the nut on the thread. Use wrecking bar to tighten to limit. Place lower end on an anvil or similar and drive a lump hammer directly onto the bolt head - For every action there is an equal and opposite reaction. bingo, good old Newton. Repeat with tighten and strike until fully released.

Thread
Thread Starter
Forum
Replies
Last Post
Chuck Schexnayder
XJ XJ6 / XJ8 / XJR ( X350 & X358 )
50
May 28, 2025 08:34 PM
Currently Active Users Viewing This Thread: 1 (0 members and 1 guests)