When you click on links to various merchants on this site and make a purchase, this can result in this site earning a commission. Affiliate programs and affiliations include, but are not limited to, the eBay Partner Network.
Hope someone can help with this one
I've bought the Diff pinion replacment flange kit for my 2003 XKR part no C2N2581
I don't know where the loose black washer in the kit goes.
The old flange doesn't have one
It came packed at the end of the flange as though it goes between the prop and the flange?
Pictures on line seem to show it at the prop end
Also does any one know the torque setting for flange nut?
Can anyone help please
Andy
Last edited by GGG; Aug 13, 2017 at 05:20 PM.
Reason: Emphasise Model & Year
I've moved your question from General Tech Help to XK8/XKR forum. This is the place to post technical questions about your model.
Please follow this link New Member Area - Intro a MUST - Jaguar Forums - Jaguar Enthusiasts Forum to the New Member Area - Intro a MUST forum and post some information about yourself and your vehicle for all members to see. In return you'll get a proper welcome and some useful advice about posting to the forum.
Wash if I remember correctly is behind the flange nut, also there should be a crush sleeve within the kit as well. See pictures below, hope this helps.
Remove the driveshaft. For additional information, refer toSection 205-01 Driveshaft.
WARNING:
Make sure no damage occurs to the input shaft.
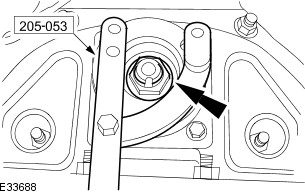
Release the peened collar of the drive pinion flange retaining nut.
WARNING:
Make sure no damage occurs to the input shaft threads.
Using the special tool, remove and discard the drive pinion flange retaining nut.
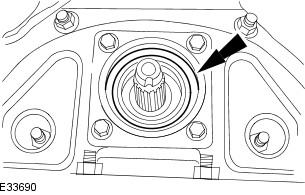
Using the special tool, remove and discard the drive pinion flange.
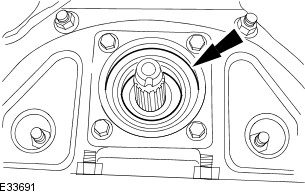
Remove and discard the ryton ring.
Remove and discard the drive pinion oil seal.
Installation
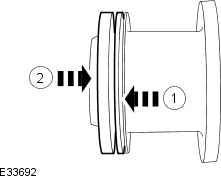
Slide the drive pinion oil seal and ryton ring against the shoulder of the drive pinion flange.
Position the ryton ring to the drive pinion oil seal.
Slide the drive pinion oil seal and ryton ring against the shoulder of the drive pinion flange.
NOTE:
Apply a suitable amount of clean differential oil to lubricate the outer diameter of the drive pinion oil seal.
Loosely install the drive pinion flange assembly to the differential case.
Slide the drive pinion flange assembly into position until the drive pinion oil seal is adjacent to the differential case.
NOTES:
Install a new drive pinion flange retaining nut.
Make sure the ryton ring has remained correctly positioned to the drive pinion oil seal.
Using the special tool, tighten the drive pinion flange retaining nut to 203 - 223 Nm.
Peen the collar of the drive pinion flange retaining nut to the drive pinion.
Install the driveshaft. For additional information, refer toSection 205-01 Driveshaft.
Check the differential oil level, and if necessary, fill the differential with oil to the lower edge of the fill hole.
Remove the driveshaft. For additional information, refer toSection 205-01 Driveshaft.
WARNING:Make sure no damage occurs to the input shaft.
Release the peened collar of the drive pinion flange retaining nut.
WARNING:Make sure no damage occurs to the input shaft threads.
Using the special tool, remove and discard the drive pinion flange retaining nut.
Using the special tool, remove and discard the drive pinion flange.
Remove and discard the ryton ring.
Remove and discard the drive pinion oil seal.
Installation
Slide the drive pinion oil seal and ryton ring against the shoulder of the drive pinion flange.
Position the ryton ring to the drive pinion oil seal.
Slide the drive pinion oil seal and ryton ring against the shoulder of the drive pinion flange.
NOTE:Apply a suitable amount of clean differential oil to lubricate the outer diameter of the drive pinion oil seal.
Loosely install the drive pinion flange assembly to the differential case.
Slide the drive pinion flange assembly into position until the drive pinion oil seal is adjacent to the differential case.
NOTES:Install a new drive pinion flange retaining nut.
Make sure the ryton ring has remained correctly positioned to the drive pinion oil seal.
Using the special tool, tighten the drive pinion flange retaining nut to 203 - 223 Nm.
Peen the collar of the drive pinion flange retaining nut to the drive pinion.
Install the driveshaft. For additional information, refer toSection 205-01 Driveshaft.
Check the differential oil level, and if necessary, fill the differential with oil to the lower edge of the fill hole.
Thanks for the info so far but i don't think the black washer is included in the intructions.
I' tried to put a link to a picture of the kit showing the washer loose.Hope it works!
It doesn't fit in the hole behind the nut it's too big, but does fit in the recess in the flange between the flange and prop which is were it was in the pack.
It could go between the flange and seal but there wasn't one there before.
Any further suggestion much appreciated
Andy
Hi, I appreciate this is an old thread, I have the same dilemma, where does the extra black metal washer go in the Jag Companion kit for the diff pinion shaft.
The only place it would fit is between the rear bearing and main body of the companion kit, however there was not one in place when I dismantled the existing set up.
Also in the JTI on how to reassemble the kit with new oil seal, it says to torque up to around 220nm, what I have experienced is the distortion of the metal inner part of the oil seal, is this to be expected? Any help greatly appreciated as im on my 3rd seal now and losing the will to live 😄
it�s the pinion shaft that makes it leak
please stop touching the thing for your own safety and the POS diff�s too
Please can you explain why this is for my own safety ? And why I should stop touching it?
you have not given any relevant information to the question I have asked, please provide facts
you�re losing the will to live messing around with this diff, that�s the premise of my failed joke
the shaft splines are worn and will need loctite 660 sealant or good rtv depending on how worn it is, otherwise it will continue to leak. this is a common failure
Thank you for reply and advice, Locktite 660 at the ready, new seal on its way, any advice as to where the black metal washer sits and should the metal sleeve deform into a cone shape ?
I have the same question.
My differential blew up and left me stranded in the middle of 65 mph traffic for 2 hrs. Not a good day.
It is back in the garage now, and I have purchased a used differential on eBay, cleaned it up and painted it...looks good. Hoping it works good.
I ordered the seal kit and have the same question. Where does the extra washer go?
Looking for tips from someone who has done this, so far its a bit sketchy.


 Remove and discard the drive pinion oil seal.
Release the peened collar of the drive pinion flange retaining nut.
Using the special tool, remove and discard the drive pinion flange retaining nut.
Using the special tool, remove and discard the drive pinion flange.
Remove and discard the ryton ring.
Slide the drive pinion oil seal and ryton ring against the shoulder of the drive pinion flange.
Slide the drive pinion flange assembly into position until the drive pinion oil seal is adjacent to the differential case.
Peen the collar of the drive pinion flange retaining nut to the drive pinion.