Jaguar Forums - Jaguar Enthusiasts Forum
  • LOG IN
  • REGISTER
  • Forums
    • General Jaguar Forums
      • New Member Area - Intro a MUST
      • Jaguar Forums Feedback & Suggestion Center
      • General Tech Help
    • Jaguar Models ( Current )
      • XF (X260)
      • F-Type ( X152 )
      • XE ( X760 )
      • E-Pace
      • F-Pace (X761) / C-X17
      • I-Pace EV
    • Jaguar Models ( Modern )
      • XF and XFR ( X250 )
      • XJ ( X351 )
      • X-Type ( X400 )
      • S-Type / S type R Supercharged V8 ( X200 )
      • XJ XJ6 / XJ8 / XJR ( X350 & X358 )
      • XJ XJ8 / XJR ( X308 )
      • XJ XJ12 ( X305 )
      • XJ XJ6 / XJR6 ( X300 )
      • XK8 / XKR ( X100 )
      • XK / XKR ( X150 )
    • Jaguar Models ( Classics )
      • Mark V - X 420G
      • MKI / MKII S type 240 340 & Daimler
      • XK120 XK140 XK150
      • E type ( XK-E )
      • XJ6 & XJ12 Series I, II & III
      • XJS ( X27 )
      • XJ40 ( XJ81 )
      • XKSS
      • XJ220
    • Other Jaguars
      • Other Jaguar Models / Concepts / Replicas
    • Diesel variants
      • Diesel variants - All models
    • Non Jaguar vehicles
      • Non-Jaguar Vehicles
    • Brand Review
      • Jaguar Press release
      • Jaguar Customer Relationship Centre
      • Jaguar Engines & transmissions
      • Wheels / Tires, Suspension & handling
      • Interior
      • Exterior
      • Audio/Visual Electronics
      • Detailing / Car care
      • Motorsports
    • Jaguar Classifieds
      • Marketplace
      • PRIVATE For Sale / Trade or Buy Classifieds
      • VENDOR 'For Sale' Classifieds
    • Regional
      • US Northeast
      • US Central
      • US Southwest
      • US Western
      • US Northwest
      • US Midwest
      • US Mid Atlantic
      • US Lower Atlantic
      • US Southern Midwest
      • Canada
      • Mexico, South America
      • UK & Eire
      • Europe
      • Australia - Queensland
      • Australia - New South Wales / ACT
      • Australia - Victoria / Tasmania
      • Australia - Western
      • Australia - South / NT
      • New Zealand
      • Other Areas
    • Official Site Sponsors
      • VENDOR Threads
    • General Interest / History
      • Sights N Sounds
      • Photography
      • Forum announcement archives / Forum History
      • Jaguarforums Merchandise
      • Memorial Section
  • News
  • Marketplace
    • Vendor Directory
    • Become a Vendor
    • Member Marketplace
    • Vendor Marketplace
    • Site Store
  • New Posts
  • Tools
    • Car Payment Calculator
    • Tire Rim Calculator
    • Vin Decoder
    • Recalls
    • Technical Service Bulletins (TSBs)
    • Members List
    • Live Feed
  • Gallery
  • View Dark Mode
    • Please register or login to enable Dark Mode.
  • Log In
  • Register
Jaguar Forums - Jaguar Enthusiasts Forum
    • Threads
      • Advanced
Dark Mode

Please register or login to enable Dark Mode.

Log In

Forgot your Password?

By logging into your account, you agree to our Terms of Use and Privacy Policy, and to the use of cookies as described therein.
or
 
  • Recent
  • Commented
  • Albums
  • My Pictures

My Post Pictures

Peter_of_Australia
August 13, 2022
 965
 0
Sort:
Most Recent
  • Default
  • Most Recent
The belt was on, but I dit not like the OFFSET of those 2 new pulleys, thus I took the belt off again, modified the offset and...
0 2023/01/27 02:47:33 Peter_of_A
Now it became clear, WHY that bolt of the belt-tensioner was a left-handed threaded bolt: So that you can grab it with a spanner in the situation above when wanting to install the belt!!! Well then - so for that short moment I just have to come up with another way to release the tension to avoid damage to that new bolt... Shown above is one way to get the belt back on...
0 2023/01/27 02:47:31 Peter_of_A
After you have read my thread (linked below) with the drama reg. that left handed bolt on the belt-tensioner-pulley: After I was lucky enough to find a left handed bolt in a mower shop, it turned out that that bolt would not sit tight. I probably did not only break the old bolt, but also killed the thread with over-tighening. Thus, I cut a new thread for a right handed bolt, and bought a longer right handed  bolt and nut and used locktite. Jaguar charges an arm and a leg for this "non-servicable
After you have read my thread (linked below) with the drama reg. that left handed bolt on the belt-tensioner-pulley: After I was lucky enough to find a left handed bolt in a mower shop, it turned out that that bolt would not sit tight. I probably did not only break the old bolt, but also killed the thread with over-tighening. Thus, I cut a new thread for a right handed bolt, and bought a longer right handed bolt and nut and used locktite. Jaguar charges an arm and a leg for this "non-servicable
0 2023/01/27 02:47:29 Peter_of_A
...and yet another pipe, which is happy to see new seals - they were in one of my kits.
0 2023/01/27 02:47:27 Peter_of_A
Happy campers! The chain-gang's smiling sprocket-teeth moment...
0 2023/01/27 02:47:25 Peter_of_A
OK, above I simply put a lever-extension onto an allan key to get to those 4 sprockets. But now the name of the game is to apply the exact torque to tighten those sprocket-bolts. The Allan key can't connect to the torque wrench. So either you buy an expensive special 10mm hex-socket, or you do it like me and harvest a bit of the Allan key and stuff it into a 10mm socket... And there also a lot of excitement and hipe regarding a very special sprocket-key or whatever - I could not grasp the idea
0 2023/01/27 02:47:23 Peter_of_A
Withtn he help of my markings...: No worries!
0 2023/01/27 02:47:21 Peter_of_A
Other guides put a lot of emphasis onto arresting the flywheel with a special pin, which however - as I see it  - can only be put into position, if you have the complete engine removed from the car. With the engine sitting in the car a pipe (probably a brake-line) and cables block access to that sensor, which needs to be removed to put the pin in. Thus: All bollocks! I marked all the chains and sprockets and even the crankshaft-position. That did the trick for me. Ote the first new guide mounted
Other guides put a lot of emphasis onto arresting the flywheel with a special pin, which however - as I see it - can only be put into position, if you have the complete engine removed from the car. With the engine sitting in the car a pipe (probably a brake-line) and cables block access to that sensor, which needs to be removed to put the pin in. Thus: All bollocks! I marked all the chains and sprockets and even the crankshaft-position. That did the trick for me. Ote the first new guide mounted
0 2023/01/27 02:47:20 Peter_of_A
Since the kit came without instructions: When I noticed that the OE bolts for the secondary tensioners were too long, I initially intended to sponsor 2 washers for each bolt, until the penny dropped as to why there were 4 bolts in the kit: Those are the shorter bolt required...
0 2023/01/27 02:47:18 Peter_of_A
And in case you wonder what sense it makes to mark up the old parts, since they are not going back in anymore...: I "transfer" the marks to the new parts! Bit by bit,
0 2023/01/27 02:47:16 Peter_of_A
Comparison: Old and new. Oh any by the way: The timing chain kit for my 3.2L X308 was ridiculously expensive, but I did some extensive research and I ended up buying the kit for a 4L X308 in the US. No problems. Btw.: Not only the pin of the secondary tensioner want to be pulled (after you tightened everything up), but also the red pin in picture above, the primary tensioner... And do not touch/move that "chain link".
0 2023/01/27 02:47:14 Peter_of_A
But the water pump does not cost the world, so I threw a new one in. The old seal was still perfect, I would have loved to reuse it, but the new pump was of a different design, thus I h
d to use the provided seal. Note that frequently the seal for a water pump is not much cheaper than the pump and seal together.
But the water pump does not cost the world, so I threw a new one in. The old seal was still perfect, I would have loved to reuse it, but the new pump was of a different design, thus I h d to use the provided seal. Note that frequently the seal for a water pump is not much cheaper than the pump and seal together.
0 2023/01/27 02:47:12 Peter_of_A
All the contact surfaces for the timing-cover seal nicely prepared (with isopropyl alcohol). Cheers! Seen here: Still the old water pump...
0 2023/01/27 02:47:10 Peter_of_A
And - yes" Shiny! Shiny! Shiny!  ;)   ...the engine oil pan. Btw: If you want or not: You need to do and engine oil change including removing the pan (as seen above), as there will definitely some kind of dirt be falling into the pan - maybe even metal filings - while you work on the timing chain. You would not want to have that in the engine oil.
And - yes" Shiny! Shiny! Shiny! ;) ...the engine oil pan. Btw: If you want or not: You need to do and engine oil change including removing the pan (as seen above), as there will definitely some kind of dirt be falling into the pan - maybe even metal filings - while you work on the timing chain. You would not want to have that in the engine oil.
0 2023/01/27 02:47:08 Peter_of_A
Again: ADOS!  ;)  and the rusty cross-bar below painted black with clear coat topping.
Again: ADOS! ;) and the rusty cross-bar below painted black with clear coat topping.
0 2023/01/27 02:47:06 Peter_of_A
Yes! ADOS! (Attention deficit... - Oh! Shiny!  ;) )
and new timing-cover-crankshaft-seal.
Yes! ADOS! (Attention deficit... - Oh! Shiny! ;) ) and new timing-cover-crankshaft-seal.
0 2023/01/27 02:47:04 Peter_of_A
I replaced the ideler pulley and the drive-belt-tensioner pulley both with the same generic pulley - big improvement anyway: Metal instead of Jaguar-plastic. The tensioner pulley is tricky! Left handed thread!!! Read my special thread about it (link below). In picture: I measured the exact offset of the OE pulleys and pushed the bearings (with the hydraulic press) into the desired position, and measured again.
ad
I replaced the ideler pulley and the drive-belt-tensioner pulley both with the same generic pulley - big improvement anyway: Metal instead of Jaguar-plastic. The tensioner pulley is tricky! Left handed thread!!! Read my special thread about it (link below). In picture: I measured the exact offset of the OE pulleys and pushed the bearings (with the hydraulic press) into the desired position, and measured again. ad
0 2023/01/27 02:47:03 Peter_of_A
I placed all the parts on the ground in the EXACT position they were on the car - because if you first mark everything nicely up, but then mess or mix up the parts, you gained nothing from the marks.
0 2023/01/27 02:47:01 Peter_of_A
Thus, all the chains, sprockets and guides are "on vacation now" - or better: "They are in retirement now", and the next generation will take over...  ;)
Thus, all the chains, sprockets and guides are "on vacation now" - or better: "They are in retirement now", and the next generation will take over... ;)
0 2023/01/27 02:46:59 Peter_of_A
With my 2 DIY bridges installed, all sprockets and chains marked up to identify the required exact position, it was time for an Alan-key and a massive lever-extension to get into action opening the bolts of the camshaft sprockets and secondary sprockets.
0 2023/01/27 02:46:57 Peter_of_A
I took this picture to show, where the little plate goes, which probably fell off, whe you removed the tensioner, so that you do not forget later. But as it turned out, the new tensioner is of a different design and does not need that plate. So I removed tensioners and guides. Big drama regarding one of those bolts of the guide on the bank 2 side. I did a special thread about this - link at the bottom. So be careful when removing those bolts - if you can...
0 2023/01/27 02:46:55 Peter_of_A
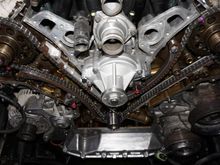
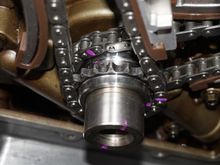
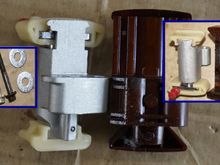
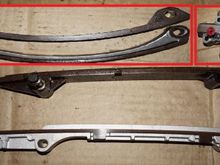
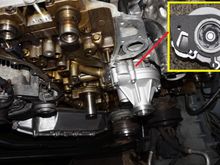
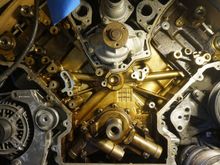
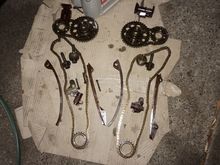
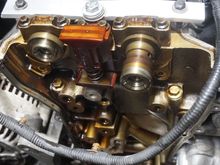
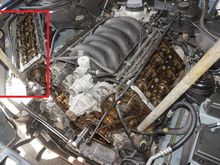
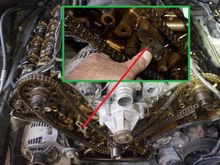
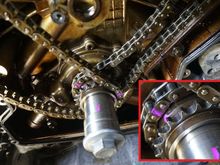
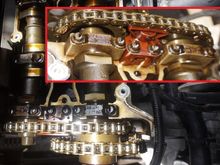
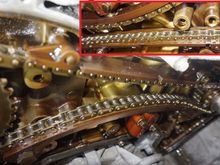
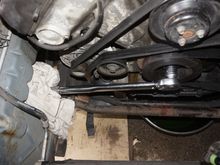
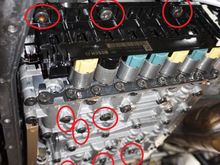
This is something I highly recommend: I have not seen this anywhere, but isn't it obvious??? The timing chain MUST be in the very same position afterwards as it was before. If you are just one tooth out, the engine does not run perfect anymore, if you are out 2-3 teeth, you are likely to kill your engine, as the X308 has an interference engine, i.e. pistons and valves occupy the SAME space, just not at the same time - unless of course you mess up the timing. The result would be bent valves. SO I
0 2023/01/27 02:46:53 Peter_of_A
you may notice that I have two different designs - both work.
0 2023/01/27 02:46:51 Peter_of_A
Before you can go on the camshafts have to arrested. There is a special bridge tool. It is about $100, but it is "cheaply" made: It features only 2 holes. 3 holes is way better. So I quickly cut aluminium strips to my liking with  3 holes. I used 2 strips on each side, each strip 2mm thick. If they can only offer CHEAP for $100, then I do CHEAP without paying money for it!  ;)  I bought the required bolts and washers.
Before you can go on the camshafts have to arrested. There is a special bridge tool. It is about $100, but it is "cheaply" made: It features only 2 holes. 3 holes is way better. So I quickly cut aluminium strips to my liking with 3 holes. I used 2 strips on each side, each strip 2mm thick. If they can only offer CHEAP for $100, then I do CHEAP without paying money for it! ;) I bought the required bolts and washers.
0 2023/01/27 02:46:49 Peter_of_A
To be seen here are the old plastic secondary tensioners: Again: not the best condition, but could be worse...
0 2023/01/27 02:46:47 Peter_of_A
After the balancer and its bolt have been removed to be able to remove the cover, there is something missing now to move the crankshaft clockwise to get the cam shafts into the desired position. Rather than spending ages to turn the long long thread of that bolt back in (without balancer), I used 2 old damaged bearings as spacers to make life easy.
0 2023/01/27 02:46:45 Peter_of_A
SO the Jag is 25 years old. The timing chains obviously have never been replaced, which was advised by Jaguar (or in the forums) a long time ago, as those plastic tensioners and guides break. And as you can see, there are broken, but they could have been in a worse condition.
0 2023/01/27 02:46:43 Peter_of_A
Well, there is a big coolant removal plug on the left rear of bank 2. Would have been nice to be able to open it, but I think that is possible only if the engine is removed from the cat. So I pumped at least a wee bit more out of there with a transfer pump.
0 2023/01/27 02:46:40 Peter_of_A
That is the only unsolved problem in my journey - but I found a solution: To get the timing cover off, you have to remove the cam-covers (btw.: to remove all those wiring X-mas trees from the cam covers without breaking the X-mas-tree-fasteners, I heat them up with a heat-gun first). Back to the problem: The oil-stick-tube is fitted onto one of those cam-cover bolds, and this bolt remains non-accessible with that tube still in place. I could not move the tube out of the way. I cut a little slot
0 2023/01/27 02:46:38 Peter_of_A
So this is the "alternate position"  ;) of the A/C radiator... Now there is access from the front to let the balancer-puller do its work. It's the correct puller for that purpose, but it was mad: I applied immense forces, the balancer moved a wee bit, but then refused to move on. I then learned that this is kind of normal. If that happens, remove the puller, maybe hit the balancer solfly with the rubber-mallet, and start again with the puller (you may not even have to remove the puller entir
So this is the "alternate position" ;) of the A/C radiator... Now there is access from the front to let the balancer-puller do its work. It's the correct puller for that purpose, but it was mad: I applied immense forces, the balancer moved a wee bit, but then refused to move on. I then learned that this is kind of normal. If that happens, remove the puller, maybe hit the balancer solfly with the rubber-mallet, and start again with the puller (you may not even have to remove the puller entir
0 2023/01/27 02:46:36 Peter_of_A
But after the bold is loose, it may still be stubborn enough (as in this case) so that I would have problems without that special tool (which I welded later), if I don't come up with a contraption like the one shown above to stop the balancer from turning.
0 2023/01/27 02:46:34 Peter_of_A
Don't try this at home! I did this now on the third car, no damage caused, but it is hairy and risky and therefore I would not recommend it - especially as I welded myself the required special tool anyway to be able to tighten the balancer-bolt back on again. So what I did here was that I wedged the big ratchet in position against a solid part of the car body and carefully and briefly activated the starter-motor to let it do the Hard Yakka (hard work). I think I had to do 3 attempts, and I was j
0 2023/01/27 02:46:32 Peter_of_A
That's my magic trick...  ;)  I removed the main radiator (by pulling it up after removing the bolts, which connect those 2), but left the A/C radiator in there (for obvious reasons!). It is possibly also an option to remove the radiator from underneath, but only if you have a big car-hoist. I was able to move the A/C radiator (without disconnecting the 2 pipes) up and down to wherever it was least in the way.
That's my magic trick... ;) I removed the main radiator (by pulling it up after removing the bolts, which connect those 2), but left the A/C radiator in there (for obvious reasons!). It is possibly also an option to remove the radiator from underneath, but only if you have a big car-hoist. I was able to move the A/C radiator (without disconnecting the 2 pipes) up and down to wherever it was least in the way.
0 2023/01/27 02:46:29 Peter_of_A
This job will take a while! Thus, place your bonnet (hood) somewhere, where nothing can "kill" it - no wind and nothing. It get the bonnet off, start with the 4 bolts thru the grille to remove the grille. After that you will have access to the big bolts of the hinges of the bonnet. I think it was 3 on each side and pay attention, what else "falls off" when removing those bolts - definitely the 2 horn, but I think there was also an electric ground-lug. Don't forget to reattach everything later ag
0 2023/01/27 02:46:25 Peter_of_A
0 2023/01/26 05:25:36 Peter_of_A
0 2023/01/26 05:25:33 Peter_of_A
0 2023/01/26 05:25:32 Peter_of_A
0 2023/01/26 05:25:29 Peter_of_A
0 2023/01/26 05:25:27 Peter_of_A
0 2023/01/26 05:25:24 Peter_of_A
First
Page
16 of 25
Last
Go To
Page
  • 1
  • ...
  • 14
  • 15
  • 16
  • 17
  • 18
  • ...
  • 25
16 of 25
Go To GO
Go to page of 25 pages
  • 1
  • ...
  • 14
  • 15
  • 16
  • 17
  • 18
  • ...
  • 25

Top
Jaguar Forums - Jaguar Enthusiasts Forum
  • Contact Us
  • FAQ
  • Archive
  • Advertising
  • Cookie Policy
  • Privacy Statement
  • Terms of Service
  • Your Privacy Choices
  • Manage Preferences

© 2026 MH Sub I, LLC dba Internet Brands

Follow Us        


When you click on links to various merchants on this site and make a purchase, this can result in this site earning a commission. Affiliate programs and affiliations include, but are not limited to, the eBay Partner Network.