
Airtex OE replacement waterpump


Thread Starter
|
Banned
Joined: Feb 2012
Posts: 517
Likes: 27
From: London
I was hoping to give the forums a rest from me ( i figure they need it ), but sods law has struck again, with my replacement waterpump.
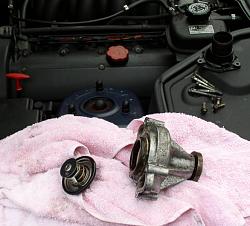
It's not quite the same design as the old one, which came off in the right to left sequence shown in pic 1. (The cardboard gasket shown is from the new pump, because once removed, there wasn't enough left of the old cardboard gasket to seperate and photograph).
The new one, an Airtex 4124, has a raised metal insert section replacing the thick sealing gasket of the old one (the bit with the chunk missing).
It came with just the cardboard gasket, pic 2.
So after some ponderance and sizing up, i'm of a mind that a watertight state for the new one would be to fit it as in pic 3, and dispense with the bits in pic 4, or should i put that big rubber O ring in pic 4 somewhere on the new pump?
It would be so nice not to have it leak when it's fitted.
Any assistance would naturally be much appreciated.
For those in need of a rest, i can only say that i can think of just one more thing i'd like to understand, which is locking the crank via the prybar in the torque converter method, but i'll put that in another thread, because there is a method in my nuisance.
So you are nearly free
After the above my next post should be at start up time . . . God willing.
Thread Starter
|
Banned
Joined: Feb 2012
Posts: 517
Likes: 27
From: London
I've got a feeling the O ring on the far right of pic 3 ( above post ) is supposed to go back in, because it says on the bumph with the new pump that the raised section is NOT a sealing surface.
If it IS supposed to go back in i'll get a new one. Would be silly to have it leak for the sake of that.
Although you could well be right about not needing it..
The fitting instructions are generic, so not specific to fitting this pump on an XK8.
It starts by saying you should always refer to vehicle manufacturers repair manual for exact fitting procedure.
Not much good if the pumps are different lol.
Those instructions do say, under "Fitting new pump" that:
" if water pump is equipped with O rings, care must be taken to avoid damage. Carefully clean O ring sealing surfaces. Apply suitable rubber lubricant to O rings and O ring sealing surfaces prior to attempting to install".
The old one was ( equipped with O rings ), but the new one isn't.
That's the dilemma, and the bumph with the new pump is no help.
The new one is supposed to have metal impellers, which i previously thought was a good thing, but more reading of the forums has revealed that the metal impellers can wear more quickly, and the problem with plastics was mainly with the earliest ( i think up to and including 98 cars), so my 2000 was ok.
From comparing the impellers of the old and new pumps, i can't tell any difference by feel between the new impellers and the old.
So i got the magnet out.
The magnet didn't stick to the pump housing's (both aluminium)
It didn't stick to either set of impellers ..???
It did stick to the centre shaft on both pumps (definitely metal).
I'm confused.
The impellers on the old pump looked fine.
First pic is the old pump, second pic is the new one.
Since i couldn't tell metal from plastic by feel, and the magnet didn't stick to either set of impellers, if you asked me i'd say that despite the claim in the bumph for the new pump, both pumps have plastic impellers.
Unless the new pumps impellers are de-magnetised??
Last edited by Roadhogg; Nov 16, 2012 at 04:55 PM. Reason: missed a bit, grammar


Joined: Dec 2011
Posts: 120,439
Likes: 17,015
From: Durham, UK
The old impeller looks OK and the impeller in the new pump can't be anything other than black plastic.
The old pump on my 2001 XK8 came off in one piece:
It had a metal gasket (same shape as the paper one you have for your replacement) and the OE replacement pump came with a new metal gasket.
I used Hylomar Sealant for the refit and it never subsequently leaked. The only reason for using Hylomar was I had the best part a tube left over from replacing an X300 sump. Any silicone sealant would have done.
For the paper gasket something like Hermetite on both sides should give you an effective seal.
Graham
The old pump on my 2001 XK8 came off in one piece:

It had a metal gasket (same shape as the paper one you have for your replacement) and the OE replacement pump came with a new metal gasket.
I used Hylomar Sealant for the refit and it never subsequently leaked. The only reason for using Hylomar was I had the best part a tube left over from replacing an X300 sump. Any silicone sealant would have done.
For the paper gasket something like Hermetite on both sides should give you an effective seal.
Graham
Last edited by GGG; Nov 16, 2012 at 07:31 AM.
Thread Starter
|
Banned
Joined: Feb 2012
Posts: 517
Likes: 27
From: London
I've got some clear coloured rtv gasket sealant that i used on the engine and camshaft cover gaskets when refitting them, which i think is silicone based.
If not i'll get some Hermetite.
Do you remember if your replacement pump had a raised section like my new one, or was it flush fitting like the old one with a thick sealing gasket?
And do you remember if you re-fitted the rubber O ring seals, or just used the metal gasket and sealant.
My old pump also has the metal gasket ( post 1, pic 1), which is probably re-usable, as are those little jaggedy seals inside it.
My main problem is whether or not none, either, or both of the rubber O ring seals are necessary, the small one seating against a ridge in the block housing.
The big one, shown in it's position round the thick gasket when it came off, i'm a lot less sure about, and it may not be needed.
If it does go back on, pic 2 shows where i think it would go (if anywhere).
The old metal gasket obviously has to be re-used (would have been nice of them to include a new one) because the cardboard gasket alone i doubt would be any good, since it's porous and won't seal anything for more than a minute when subjected to hot water and anti-freeze.
That seems to be there just to stop the metal gasket from welding itself to the pump housing.
It wouldn't hurt Airtex, who have after all designed it to fit in place of the original, to give specific instructions on what parts needed to be replaced when fitting the re-designed pump, rather than leaving people to guess what represents a water tight fit.

Senior Member
Joined: Feb 2010
Posts: 830
Likes: 141
From: Daytona, USA
I intalled a replacement pump that looks alot like yours. Don't need the O ring, just the gasket. Your old one looks prety much like mine did; I put the new one on just hoping the younger aged pump would last a while (and I bought it before I pulled off the old one). No leaks with just the gasket.
Thread Starter
|
Banned
Joined: Feb 2012
Posts: 517
Likes: 27
From: London
Oh well, 3 to 1 in favour of ditching the O ring is overwhelming.
I guess i can't convince you that you fitted the O ring ?
And make it 2-2
No?
Ok, the O ring is gone
Thanks mike, and plums, and GGG
I guess i can't convince you that you fitted the O ring ?
And make it 2-2
No?
Ok, the O ring is gone
Thanks mike, and plums, and GGG
Trending Topics
Veteran Member
Joined: Feb 2011
Posts: 9,733
Likes: 2,203
From: on-the-edge
Just to make you feel better, cardboard gaskets were quite common and yes they will seal. Take a look at your pump body joint, that's a cardboard gasket. Even if you had the metal shim in the mix, there would *still* be a cardboard layer in the stack.
The ring being marked "not a sealing surface" is probably to prevent people from installing with no gasket at all.
The purpose of the ring is probably to create a pressure ring against the cardboard much like metal o-rings sometimes found on cylinder head gaskets.
The ring being marked "not a sealing surface" is probably to prevent people from installing with no gasket at all.
The purpose of the ring is probably to create a pressure ring against the cardboard much like metal o-rings sometimes found on cylinder head gaskets.


Joined: Mar 2012
Posts: 4,759
Likes: 1,435
From: Hazlet Township, NJ
Use the paper gasket w/ Hylomar as Graham pointed out. No O-Ring should be necessary.
I purchased a new style water pump (looks a lot like your new one) it came with a metal gasket - looks just like the paper one - I installed with the metal gasket and hylomar - ZERO leaks! Good Luck!!
I purchased a new style water pump (looks a lot like your new one) it came with a metal gasket - looks just like the paper one - I installed with the metal gasket and hylomar - ZERO leaks! Good Luck!!
Thread Starter
|
Banned
Joined: Feb 2012
Posts: 517
Likes: 27
From: London
The water pump has only got five bolts and some gaskets.
I figured, how far wrong can you go for Christs sake.
Faked out again
Mind you, with that logic, a crankseal has only got one bolt and one gasket, and look what happened there.
Maybe i should take up domino's instead of spanners, i might be better
Couldn't be worse, surely?
I figured, how far wrong can you go for Christs sake.
Faked out again
Mind you, with that logic, a crankseal has only got one bolt and one gasket, and look what happened there.
Maybe i should take up domino's instead of spanners, i might be better
Couldn't be worse, surely?
Junior Member
Joined: Jul 2011
Posts: 8
Likes: 1
From: Southern Wisconsin
If it helps, i too installed my replacement water pump (like yours that only came with a paper gasket). New one went back on with paper gasket only. Used permatex water pump/thermostat gasket seal on both sides of paper gasket, bolted the pump on, and started driving the next day. No leaks siince. Good luck!


Senior Member
Joined: Aug 2012
Posts: 298
Likes: 124
From: Chandler, AZ
Seems like some of the manufacturers of these replacement pump kits are scrimping a bit too much. The original pumps had the o-ring and a nice gasket plate with embedded sealing rings. The last one I installed in a customer car yesterday came with only an embossed steel gasket. I was suspect of its sealing capabilities, so I put a bit of sealer on the gasket before installing. Wouldn't you know, the pump leaks at the jointed halves, where they have apparently used a paper gasket! I will have to change it again. Got this one from BAP. Not my usual supplier.
Joined: Mar 2012
Posts: 4,759
Likes: 1,435
From: Hazlet Township, NJ
Seems like some of the manufacturers of these replacement pump kits are scrimping a bit too much. The original pumps had the o-ring and a nice gasket plate with embedded sealing rings. The last one I installed in a customer car yesterday came with only an embossed steel gasket. I was suspect of its sealing capabilities, so I put a bit of sealer on the gasket before installing. Wouldn't you know, the pump leaks at the jointed halves, where they have apparently used a paper gasket! I will have to change it again. Got this one from BAP. Not my usual supplier.
Last edited by abonano; Nov 17, 2012 at 08:58 PM.
Thread Starter
|
Banned
Joined: Feb 2012
Posts: 517
Likes: 27
From: London
Seems like some of the manufacturers of these replacement pump kits are scrimping a bit too much. The original pumps had the o-ring and a nice gasket plate with embedded sealing rings. The last one I installed in a customer car yesterday came with only an embossed steel gasket. I was suspect of its sealing capabilities, so I put a bit of sealer on the gasket before installing. Wouldn't you know, the pump leaks at the jointed halves, where they have apparently used a paper gasket! I will have to change it again. Got this one from BAP. Not my usual supplier.
I think i found the metal gasket i should have got with this Airtex ( but which wasn't included ) on British parts, ( for those in other parts of the world it's a UK Jaguar parts shop )
Jaguar Parts | Land Rover parts | Range Rover Parts | British Parts UK
for about �10 + vat + delivery
I put it in pic 1
Pic 2 shows the OE replacement from Jaguar at �96.95 + vat + delivery, and,
Pic 3 shows what they describe as a cost effective direct replacement for the OE part at �30.42 again + vat + delivery.
Pics 2 and 3 look identical, i can't tell them apart.
The part number for the OE pump is JLM 21594, for the old shape XK8,
and the part number for the direct replacement is AJ88912, listed in the JEPC as for the newer shape 3.5 & 4.2 XK's ( and by XK's, i mean what looks like the newest shape post 2006). I didn't know they made a 3.5 XK.
It seems to me as if the 2 piece body design of the Airtex just gives an extra area to leak from that isn't necessary. Combine that with the likelihood that they were too tight to include the metal gasket, and i have my doubts about whether this pump will be up to the job compared to others.
You can also see from the pictures in post 3, with the 2 pumps i've got side by side, that the impellers on the Airtex are of much smaller diameter than those of the original pump, although they ARE deeper, so maybe they'll handle similar volumes of coolant.
I live in hope

If this Airtex is not up to the job for long, next time i'll probably go for something with a one piece body, more similar, or even identical, to the one i've just taken off.
After all, if it's the original pump, it lasted 12 years and at least 70,000 miles.
So they can't be that bad.
It looks like my best attempts at figuring out how bits of this car assemble/disassemble, have been destroyed yet again.
I submit . . i submit.
Just as well you guys are here to save the car from me
Or maybe it's the other way around.
Last edited by Roadhogg; Nov 18, 2012 at 09:20 AM. Reason: forgot the pictures
Joined: Mar 2012
Posts: 4,759
Likes: 1,435
From: Hazlet Township, NJ
Roadhogg - The steel embossed gasket (Pic #1 on post #15) is exactly the steel gasket that came with my replacement water pump (my replacement pump looks the same as Pic #2 in your original post) - Nothing else came in the box. I used the hylomar on that steel embossed gasket and no issues thus far.
I thought about using the steel gasket w/ embedded sealing rings instead - no dice! won't work!
I guess if you want - you can use the hylomar on that paper gasket between the two halves for extra insurance - that hylomar stuff is great!
I thought about using the steel gasket w/ embedded sealing rings instead - no dice! won't work!
I guess if you want - you can use the hylomar on that paper gasket between the two halves for extra insurance - that hylomar stuff is great!
Thread Starter
|
Banned
Joined: Feb 2012
Posts: 517
Likes: 27
From: London
Thanks abonano, i wasn't entirely happy with re-using the existing old metal gasket anyway, it's a looser fit round the raised part of the new pump than the cardboard gasket supplied.
The giveaway on the metal gasket is the tabs on the pictured gasket, which match the tab slots on the raised part of the new pump.
Holymar and the pictured gasket is the route i'll take.
I'll have to be a bit more careful with the housing joint gasket, tampering with it may invalidate the warranty.
I'll also try to get new gaskets for the old pump, in case it's called back in to service temporarily.

Thread Starter
|
Banned
Joined: Feb 2012
Posts: 517
Likes: 27
From: London
If you 're wondering if i'll ever get this timing chain job finished The_Ikon, i don't blame you
I've turned a mole hill of a job in to Mount Everest, because i've read of people doing the job in a weekend.
But you are talking to someone who, until now, took his car to a garage to have it fixed if it needed anything more than the brake pads changing.
Regarding the pump, i can't even buy the gasket until i get paid on December 5th.
I won't bore you by explaining the details, but lets just say that financially, things have gone very wrong lately, and have left me a bit "squeezed".
In the meantime, i can at least put other bits back on the car, so that with a bit of luck fitting the pump will be one of the last jobs before i can try starting her up.
The car isn't in danger until the beginning of February, so i'm not panicking just yet.
By then she has to be running, the front wishbone bushes and reconditioned steering rack has to be paid for and fitted, and the money has to be found to pack her off to XKRacer's place for the floor welding.
If she's MOT'd and taxed by early February, the council won't be able to take her away.
It's going to be close, but we'll see
Member
Joined: Nov 2013
Posts: 92
Likes: 91
From: Woodend, Victoria, Australia
Seems like some of the manufacturers of these replacement pump kits are scrimping a bit too much. The original pumps had the o-ring and a nice gasket plate with embedded sealing rings. The last one I installed in a customer car yesterday came with only an embossed steel gasket. I was suspect of its sealing capabilities, so I put a bit of sealer on the gasket before installing. Wouldn't you know, the pump leaks at the jointed halves, where they have apparently used a paper gasket! I will have to change it again. Got this one from BAP. Not my usual supplier.
Seems I am not the only one who has experienced leaks from the body joint of an Airtex pump. I replaced the original pump at ~200,000km in December 2014, and after only 14k (around about September 2015) the car started to use a small amount of coolant. It soon became obvious the source was in the vicinity of the pump. At first I thought the front seal had failed, but the pulley wasn't getting wet, so my next theory was that it must be leaking where it is mounted to the motor (self-doubt about my own workmanship). By end of 2015 I couldn't ignore it any more so bit the bullet and pulled the pump. To my surprise, the leak was from the joint in the body of the pump (see photo). I guess this could still have been my fault if I didn't torque the pump adequately when I mounted it (I was sure I had, but my torque wrench is two foot long and not really set up to measure 12 Nm). The five mounting bolts AND the two bolts which hold the pump together when it is delivered all contribute to keeping the two halves of the pump together. It was interesting, though that, when I removed the pump I found that the two extra bolts weren't much more than finger tight. Had the paper gasket compressed significantly or were these bolts loose from the start? I didn't think to check them when I bought the pump so I don't know.
Anyway, I have re-assembled the pump using RTV gasket maker and torqued to spec using a borrowed, very precise torque wrench. It will be interesting to see how I go this time.

Thread
Thread Starter
Forum
Replies
Last Post
KarimPA
S-Type / S type R Supercharged V8 ( X200 )
11
Sep 12, 2015 08:15 AM
KarimPA
New Member Area - Intro a MUST
8
Sep 3, 2015 07:32 PM
Currently Active Users Viewing This Thread: 1 (0 members and 1 guests)