
Coolant drain 2005 XK8


Thread Starter
|
Senior Member
Joined: Jun 2016
Posts: 209
Likes: 70
From: Georgia
I have just read elsewhere on the forum that the radiator drain is accessible, albeit by blind feel, and unscrewed 1/4 turn using a washer of 25 cents in size. In theory, this would permit a coolant drain / flush without jacking the car and lowering it numerous times. There was no mention of removing other top-side items. However, with smaller than presidential hands, and slender wrist and forearm, I hereby declare the proposition impossible. Now it could be that removing the air filter box entirely, more room could be created but, at least on a 2005 X-100 I still don't think it would be easy. There is also a dearth on photographs - no doubt due to the inaccessibility of said plug, even from below. I'll try to remedy that in due course.
Can anybody shed any first hand light on this topic?
Can anybody shed any first hand light on this topic?
Senior Member
Joined: Aug 2012
Posts: 552
Likes: 228
From: Tauranga, New Zealand
I took the very forward bumper under-tray off and it was accessible from the bottom. Try this thread for pictures: https://www.jaguarforums.com/forum/x...ng-how-148856/
Last edited by woox4; Apr 3, 2017 at 12:40 AM.

Member

Joined: Mar 2017
Posts: 32
Likes: 5
From: Whitby, New Zealand
Hi did mine a few weeks back. Was straight forward. Had to do multiple flushes though. Could only get 5 litres out at a time. Not sure if this is common but took a while to flush, refill startup-circulate , cooldown flush etc. Took half a day after the mutiple flushes and cooling down. Vehicle was on level ground. Keen to know if others only get 5 litres out at a time. I didn't change the thermostat though.
Thread Starter
|
Senior Member
Joined: Jun 2016
Posts: 209
Likes: 70
From: Georgia
Thanks for the input. I note that WooX4 removed the under tray. How does that help, if the drain plug is facing toward the engine, on the RHS (sitting in the car). On my 2005 at least, the tray ends at the cross-member that one can use to jack the car from, which is more or less where the radiator is. Ditto my comments about being able to reach it from the top. So, are we dealing with different locations / different accessibility / different model years? Other than that issue, the thermostat change article seems to have everything I need (other than for the seeming confusion about accessibility.
Member
Joined: Mar 2017
Posts: 32
Likes: 5
From: Whitby, New Zealand
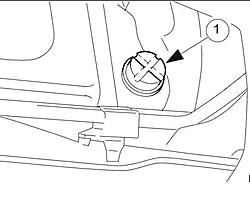
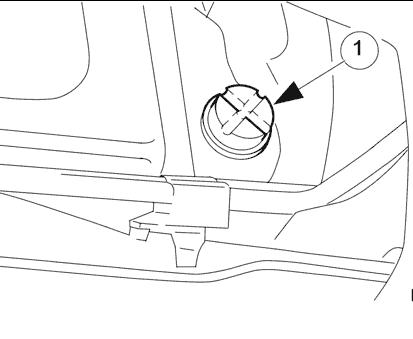
Impossible from top.Go in from bottom. Plug is horizontal on the right. Ie nearest right wheel. It's possible to do with tray on but you'll have to feel around for the plug. If you can get the vehicle off the ground you can see where the plug is. I used two layers of two inch wood under the various types
Member
Joined: Mar 2017
Posts: 32
Likes: 5
From: Whitby, New Zealand
Forgot to mention. The plug is round with a large slotted cross. Will need a big flat blade screwdriver to remove. I used a very long screwdriver which can be used at an angle. Unless you have a very short stubby screwdriver. Good luck
Thread Starter
|
Senior Member
Joined: Jun 2016
Posts: 209
Likes: 70
From: Georgia
Thanks to everyone for the assist. From what I can see from other posts and write-ups the coolant cannot be fully drained. One report stated approx 5 litres is all that drained out. Perhaps the block 'drain' that can double as a block heater can help, I don't know. Regardless:
As the specs say that the XK8 (N-Asp) holds 9.5 litres (10 US quarts) this indicates that my purchase of 2 gallons of 50/50 Dexcool was an irredeemable mistake (bought too long ago for return). After several water flushings and a final drain, the cooing system remains half full of water. Therefore, it is impossible to use a 50/50 premixture to achieve a 50% concentration.
No way out: 5 quarts of 100% Dexcool is added to the 5 quarts of residual water (the latter must be distilled water) and the garage will be cluttered by two gallon jugs of 50/50 and one gallon jug of 100% (containing only 3 quarts) for years to come :[
Trending Topics
be careful when you do it.. make sure you have a large pan of sorts.. when I did it I had coolant going all over the place. Since it's out of view, it follows paths and support beams (least on my XKR) so plenty of towels on stand by for sure.. :/
and you are right about the mixing and it not all coming out sadly.. I still have a few quarts of the Jaguar coolant laying around.
and you are right about the mixing and it not all coming out sadly..
I still have a few quarts of the Jaguar coolant laying around.
Member
Joined: Mar 2017
Posts: 32
Likes: 5
From: Whitby, New Zealand
I also took the undertray off. It doesn't take long. Yes coolant goes everywhere. The supercharger cars take 11.5 litres but concentrate comes in 5 litres so will probably drain off 2 more litres and add 2 of concentrate back in(maybe being a bit precious). Will do this shortly once I receive the real guages kit as the oil pressure sensor is located in the same general area.


Joined: Dec 2011
Posts: 120,439
Likes: 17,014
From: Durham, UK
I don't have a photo - it's difficult enough to reach the drain plug without attempting to get a camera anywhere near!
Always removed the plug from below on both my 4.0 litre and 4.2 litre XK8's and done the job with the front wheels on ramps. It's visible from above but I can't imagine getting enough rotation room to be able to remove it.
The system cannot be drained down completely because residual coolant remains in:
1. heater matrix
2. atmospheric recovery bottle
On a new (to me) vehicle, I like to do two intermediate fill/warm up/cool/drain cycles with plain water before a final 50/50 fill.
Graham


Joined: Dec 2009
Posts: 13,749
Likes: 9,698
From: Wise County,TX
There is a 'block-drain' plug on the left side of the engine behind the motor mount area.
A 17mm HEX bit will be needed to remove the large plug. I use a 1/2" drive Snap-On bit with a Universal Joint adapter attached to a long 1/2" drive extension.
I always drain the block when I remove cylinder heads to keep from making a 'swamp' in the shop.
You can get almost all the coolant from the engine this way.
bob
Thread Starter
|
Senior Member
Joined: Jun 2016
Posts: 209
Likes: 70
From: Georgia
Thanks for all the input. I opted to do the drain / fill / drive / drain repeat method, rather than going after the block drain. Congrats to the member who stated that half (5 quarts) of fluid remains trapped; that is exactly what it takes to fill the system up again. I can also confirm that owning an 8 mm crows-foot would make the removal of the back thermostat housing bolts a piece of cake. Of course, I don't have one!
Radiator drain: the screwdriver approach requires that a driver that is long enough and thin enough to fit over the suspension AND broad enough at the tip to adequately engage with the 'cross' in the plug - without risking ripping it apart - AND that also allows enough play for fingers to get around and turn the handle. Given the number of times the plug is about to be operated, I made an easy custom too: provided that its tip is ground back about 1/16" or so - a large-size phillips bit held in a 3/8 drive socket engaged the plug much better, when held square to the plug. I used a 3/8" universal joint next, on the end of a couple of 6" extensions, the ratchet-end one of which was a 'wobbler'. The extensions use the same path over the suspension as the depicted screwdriver. A palm-sized ratchet can be easily operated with one hand whilst the other can keep the universal and bit square to the plug.
Another tip: due to the delay caused by trying to confirm the pump issue (never resolved, but early model installed), the coolant reservoir was left empty for several days. The coolant residue (goo) dried out and promptly glued (or is it 'goo'd) the coolant level float in the down position. The Low Coolant message was duly noted before the installation of the new DexCool! That required the tank to be taken off and blasted with a hose. Also noted: there was plenty of floating junk in the hose that connects to the bottom of the tank, and which obviously hadn't been flushed by the drain / refill / drive / drain procedure.
Veteran Member

Joined: Nov 2013
Posts: 3,415
Likes: 1,647
From: Regional NSW, Australia
Is this trend of slime, sludge, jelly-like goo, floating solids (yuck) and even foaming . . . all a consequence of cross-mixing or topping-up with incompatible coolants? I realize that modern, light weight alloy engines require protective coolant chemistry, then compounded in some markets with anti-freeze, but why are we seeing more of this "goo" being reported?
Cheers,
Ken
Thread Starter
|
Senior Member
Joined: Jun 2016
Posts: 209
Likes: 70
From: Georgia
I can offer the following thoughts regarding the 'goo' I noted: First, there did not seem to be any significant goo 'glops' in the drained antifreeze. I captured it all for proper disposal, couldn't find anywhere that would take it, and decided to bury it on the property. Wake up America! But I digress.
Second, the goo that I did see was inside the reservoir, where it had congealed on the walls and (I couldn't see this at the time, as my Amazon-supplied remote camera had not arrived) on the float. The hose underneath presumably acts as a trap for any globs that float free. The semi-dried-on goo seemed to come off easily enough with a hose.
Third: There was no sign of the goo inside the thermostat housing or pump.
Assuming that the antifreeze was original from 2005 and 60k miles, the level in the reservoir having fallen and been topped up a number of times, this goo may occur as the level falls and then gets 'plated' onto surfaces. It may therefore be fairly local to the reservoir and underneath hose. Fingers crossed.
Member
Joined: Mar 2017
Posts: 32
Likes: 5
From: Whitby, New Zealand
I used the drain method as documented by the step-by-step procedure by TexasDan. I didn't do the thermostat replacement however I could only drain 5 litres out each time. TexasDan didn’t drain the block. Hence multiple flushes required to get the old coolant out. What a pain.
Next time I will drain the block as noted by Ken. I assume it's easy to get to with the car on jack stands? Any idea how much extra coolant can be drained out using the block drain plug?
Cheers Gerard
Next time I will drain the block as noted by Ken. I assume it's easy to get to with the car on jack stands? Any idea how much extra coolant can be drained out using the block drain plug?
Cheers Gerard
Veteran Member
Joined: Nov 2013
Posts: 3,415
Likes: 1,647
From: Regional NSW, Australia
Opening both rad drain and block drain and with car level (far easier on hoist, long ramps or over pit), you can expect to drain (and flush) almost all coolant - already noted at 9.5L. Suggest using 10L as the target mix and buy concentrate accordingly. I avoid using terms like pints, quarts and gallons on this forum because these measure differently for different markets.
Cheers,

Ken
Cheers,
Ken

Senior Member
Joined: Sep 2016
Posts: 159
Likes: 103
From: Santa Cruz, CA
Unless you enjoy the prospect of being drenched in coolant, open the radiator drain plug BEFORE unscrewing the cap on the coolant overflow tank. Take it from one who found out the hard way...