
How to clean MAF sensor

Thread Starter
|
Senior Member
Joined: May 2010
Posts: 311
Likes: 95
From: CA, USA
See attach photos this was on a Jag XKR 2001 54K miles
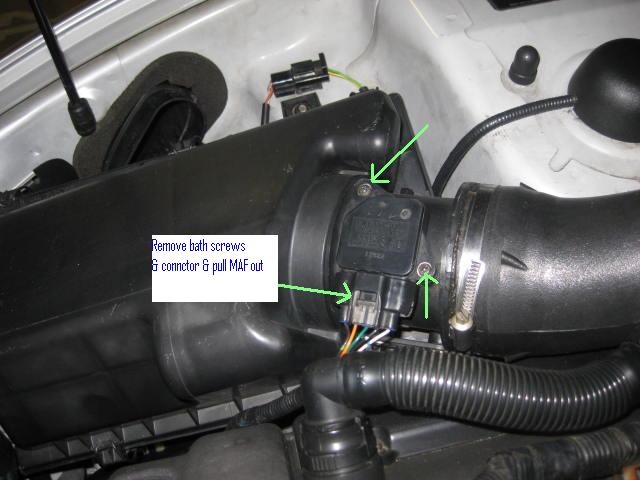
1/ Disconnect electrical connector and remove two phillips screws. Gently remove MAF sensor. (see pic 1)
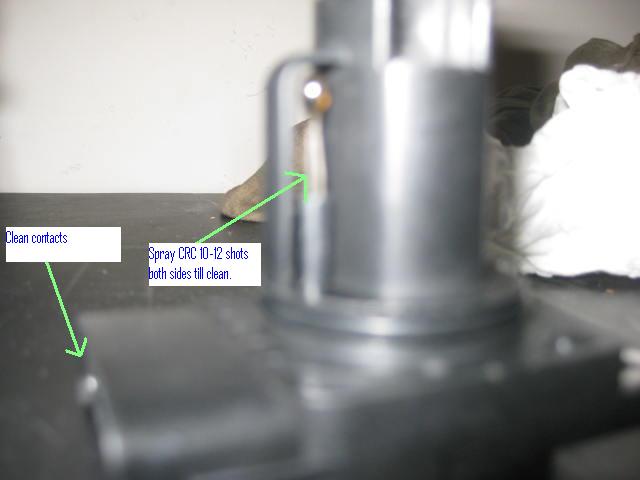
2/ Spray CRC cleaner on the metal connectors below the bulb top until shiny clean 10-14 sprays should do it. Clean from both sides BUT DO NOT TOUCH ANY PART OF THE SENSOR!!! (see pic 4)
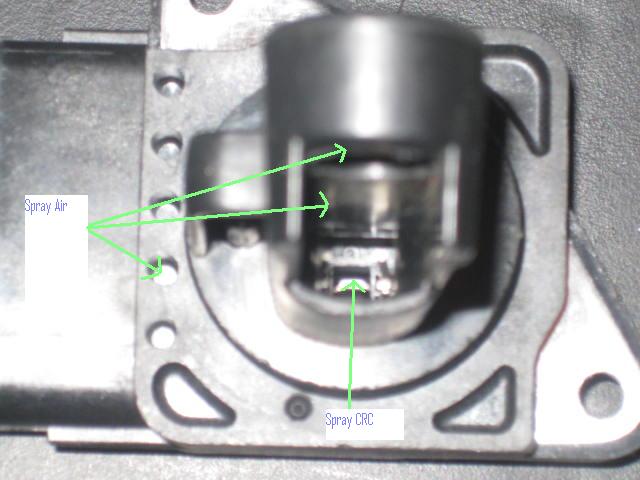
3/ From the top on one side you can see two other very small sensors inside the venture duct (see pic 5) spray 3-4 sprays on these to clean (DO NOT TOUCH THEM). Note most people do not know these exist I did'nt and did not clean and the MAFdid not work (performance restricted) once I clean these it worked fine.
4/ Clean the contacts (see pic 4)
5/ With compressed air blow out all the holes you can see as dust and crap builds up on the inside this should clean it. (se pic 5)
6/ Re-install MAF and reset then ECM i.e. disconnect the battery for 24 hrs. After connecting the battery reset windows (down hold 5secs up hold 5secs) and stereo settings.
I suspect step 3/ is not completed by most people so they end up buying a new one. I did but after taking a closer look and completing step 3/ my old one works also.
New ones can be bought for cheap from
Aliexpress.com : Buy Air Flow Sensor for (LNE1620BB=197408 0021) from Reliable Air Flow Sensor suppliers on HaoYang Auto Parts store
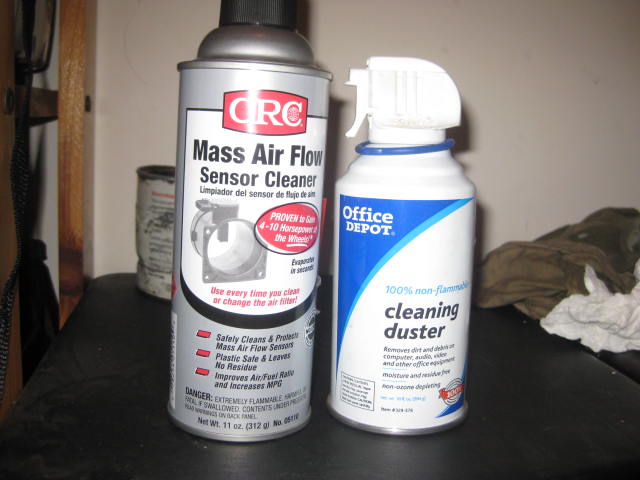
CRC spay I got on Amazon no Sales tax or S/H. (see pic 2)
Thanks
Simon
1/ Disconnect electrical connector and remove two phillips screws. Gently remove MAF sensor. (see pic 1)
2/ Spray CRC cleaner on the metal connectors below the bulb top until shiny clean 10-14 sprays should do it. Clean from both sides BUT DO NOT TOUCH ANY PART OF THE SENSOR!!! (see pic 4)
3/ From the top on one side you can see two other very small sensors inside the venture duct (see pic 5) spray 3-4 sprays on these to clean (DO NOT TOUCH THEM). Note most people do not know these exist I did'nt and did not clean and the MAFdid not work (performance restricted) once I clean these it worked fine.
4/ Clean the contacts (see pic 4)
5/ With compressed air blow out all the holes you can see as dust and crap builds up on the inside this should clean it. (se pic 5)
6/ Re-install MAF and reset then ECM i.e. disconnect the battery for 24 hrs. After connecting the battery reset windows (down hold 5secs up hold 5secs) and stereo settings.
I suspect step 3/ is not completed by most people so they end up buying a new one. I did but after taking a closer look and completing step 3/ my old one works also.
New ones can be bought for cheap from
Aliexpress.com : Buy Air Flow Sensor for (LNE1620BB=197408 0021) from Reliable Air Flow Sensor suppliers on HaoYang Auto Parts store
CRC spay I got on Amazon no Sales tax or S/H. (see pic 2)
Thanks
Simon
Last edited by joycesjag; Aug 4, 2012 at 09:18 PM.

Veteran Member
Joined: Dec 2011
Posts: 6,278
Likes: 690
From: Limousin, France
Simon,
To do a quick hard reset
Disconnect batt ground lead
Touch ground lead to batt +ve for a few secs
Reconnect ground lead in one clean move.
Saves waiting for the module capacitors to drain down.
To do a quick hard reset
Disconnect batt ground lead
Touch ground lead to batt +ve for a few secs
Reconnect ground lead in one clean move.
Saves waiting for the module capacitors to drain down.


Junior Member
Joined: Sep 2013
Posts: 1
Likes: 0
From: Eldorado Hills
Trending Topics
Veteran Member


Joined: Oct 2012
Posts: 3,787
Likes: 1,676
From: Puerto Rico
That seems like an overly expensive way to clean it. I cleaned mine using q-tips cotton swabs and cotton ***** with nothing on them and a very tiny (hair trimmer cleaning) brush to remove the black gunk.
I inserted my MAFS back in place and secured it. I haven't gotten the restricted performance message nor a CEL ever since. Is the MAFS cleaner spray really necessary?
I inserted my MAFS back in place and secured it. I haven't gotten the restricted performance message nor a CEL ever since. Is the MAFS cleaner spray really necessary?

Veteran Member

Joined: Jan 2009
Posts: 13,095
Likes: 4,753
From: Raleigh, NC
The MAF sensor spray cleaner may not be necessary, but it is certainly safer than risking damage to the sensor by touching/rubbing it. All three of our vehicles have MAF sensors that periodically need cleaning, a spray can of MAF sensor cleaner will last me for years, so it was a no-brainer to go ahead and purchase a can and just keep it on one of my garage shelves until needed....


Member
Joined: Feb 2013
Posts: 36
Likes: 3
From: Tamworth
That seems like an overly expensive way to clean it. I cleaned mine using q-tips cotton swabs and cotton ***** with nothing on them and a very tiny (hair trimmer cleaning) brush to remove the black gunk.
I inserted my MAFS back in place and secured it. I haven't gotten the restricted performance message nor a CEL ever since. Is the MAFS cleaner spray really necessary?
I inserted my MAFS back in place and secured it. I haven't gotten the restricted performance message nor a CEL ever since. Is the MAFS cleaner spray really necessary?
It's fine with a very steady hand & gentle touch but I wouldn't recommend it to anyone who's not totally sure they can do it.

Junior Member
Joined: Sep 2013
Posts: 2
Likes: 2
From: Netherlands
See attach photos this was on a Jag XKR 2001 54K miles
1/ Disconnect electrical connector and remove two phillips screws. Gently remove MAF sensor. (see pic 1)
2/ Spray CRC cleaner on the metal connectors below the bulb top until shiny clean 10-14 sprays should do it. Clean from both sides BUT DO NOT TOUCH ANY PART OF THE SENSOR!!! (see pic 4)
3/ From the top on one side you can see two other very small sensors inside the venture duct (see pic 5) spray 3-4 sprays on these to clean (DO NOT TOUCH THEM). Note most people do not know these exist I did'nt and did not clean and the MAFdid not work (performance restricted) once I clean these it worked fine.
4/ Clean the contacts (see pic 4)
5/ With compressed air blow out all the holes you can see as dust and crap builds up on the inside this should clean it. (se pic 5)
6/ Re-install MAF and reset then ECM i.e. disconnect the battery for 24 hrs. After connecting the battery reset windows (down hold 5secs up hold 5secs) and stereo settings.
I suspect step 3/ is not completed by most people so they end up buying a new one. I did but after taking a closer look and completing step 3/ my old one works also.
New ones can be bought for cheap from
Aliexpress.com : Buy Air Flow Sensor for (LNE1620BB=197408 0021) from Reliable Air Flow Sensor suppliers on HaoYang Auto Parts store
CRC spay I got on Amazon no Sales tax or S/H. (see pic 2)
Thanks
Simon
Regards Happy Jagged
Junior Member
Joined: Sep 2013
Posts: 2
Likes: 2
From: Netherlands
See attach photos this was on a Jag XKR 2001 54K miles
1/ Disconnect electrical connector and remove two phillips screws. Gently remove MAF sensor. (see pic 1)
2/ Spray CRC cleaner on the metal connectors below the bulb top until shiny clean 10-14 sprays should do it. Clean from both sides BUT DO NOT TOUCH ANY PART OF THE SENSOR!!! (see pic 4)
3/ From the top on one side you can see two other very small sensors inside the venture duct (see pic 5) spray 3-4 sprays on these to clean (DO NOT TOUCH THEM). Note most people do not know these exist I did'nt and did not clean and the MAFdid not work (performance restricted) once I clean these it worked fine.
4/ Clean the contacts (see pic 4)
5/ With compressed air blow out all the holes you can see as dust and crap builds up on the inside this should clean it. (se pic 5)
6/ Re-install MAF and reset then ECM i.e. disconnect the battery for 24 hrs. After connecting the battery reset windows (down hold 5secs up hold 5secs) and stereo settings.
I suspect step 3/ is not completed by most people so they end up buying a new one. I did but after taking a closer look and completing step 3/ my old one works also.
New ones can be bought for cheap from
Aliexpress.com : Buy Air Flow Sensor for (LNE1620BB=197408 0021) from Reliable Air Flow Sensor suppliers on HaoYang Auto Parts store
CRC spay I got on Amazon no Sales tax or S/H. (see pic 2)
Thanks
Simon
1/ Disconnect electrical connector and remove two phillips screws. Gently remove MAF sensor. (see pic 1)
2/ Spray CRC cleaner on the metal connectors below the bulb top until shiny clean 10-14 sprays should do it. Clean from both sides BUT DO NOT TOUCH ANY PART OF THE SENSOR!!! (see pic 4)
3/ From the top on one side you can see two other very small sensors inside the venture duct (see pic 5) spray 3-4 sprays on these to clean (DO NOT TOUCH THEM). Note most people do not know these exist I did'nt and did not clean and the MAFdid not work (performance restricted) once I clean these it worked fine.
4/ Clean the contacts (see pic 4)
5/ With compressed air blow out all the holes you can see as dust and crap builds up on the inside this should clean it. (se pic 5)
6/ Re-install MAF and reset then ECM i.e. disconnect the battery for 24 hrs. After connecting the battery reset windows (down hold 5secs up hold 5secs) and stereo settings.
I suspect step 3/ is not completed by most people so they end up buying a new one. I did but after taking a closer look and completing step 3/ my old one works also.
New ones can be bought for cheap from
Aliexpress.com : Buy Air Flow Sensor for (LNE1620BB=197408 0021) from Reliable Air Flow Sensor suppliers on HaoYang Auto Parts store
CRC spay I got on Amazon no Sales tax or S/H. (see pic 2)
Thanks
Simon
Junior Member

Joined: Apr 2020
Posts: 16
Likes: 5
From: Vancouver, BC
This is an old thread with not the greatest pictures but exactly what I needed to tackle the P0172 and P0175 restricting performance on my 2000 XKR. On inspection my new to me Jaguar had a dirty air filter and perhaps dirty MAF. I purchased a new air filter for $13 dollars and would've purchased a MAF from NAPA Auto Parts except they wanted $400 dollars for a refurbished unit! MAF sensor cleaner to the rescue and all codes are cleared and have not popped up again in a short interim drive. Hopefully won't pop up again in the near future.
Thank you to everyone that ever posted a "how to" thread. I expect to be very grateful!
Sincerely, Darcy
Thank you to everyone that ever posted a "how to" thread. I expect to be very grateful!
Sincerely, Darcy
Veteran Member
Joined: Jan 2018
Posts: 3,760
Likes: 2,351
From: on the road in NE Oklahoma
my experience as well. Even though I cleaned the sensor throughly each time, It took 3 times before proper
operation was achieved.
Z
Veteran Member
Joined: Jan 2019
Posts: 1,907
Likes: 1,428
From: Bahrain
Darcy - thanks for your positive feedback on an old thread. This is what makes the Forum an interesting place to visit.
I use exactly this procedure with the MAF Sensor spray - it's now part of my annual service - oil service, air filter change, MAF sensor clean, fuel filter change, plus I clean some of the easier to reach ground electrical body contacts, and clean and condition the leather interior. Every time I take the wheel liner off, I also lube the upper A arm fulcrum bolt. Don't want that long bolt binding again.
MAF spray is cheap, and as Jon89 said, I just keep it on the shelf (lasted 2 years so far) for both my Jag and L322 Range Rover).

Member
Joined: Dec 2012
Posts: 35
Likes: 5
From: OC, California
WOW I just learned about the hidden wires up inside the MAF after all this time, and a short spin already has avg mpg readout bumping up against 20 (US gallons). Who knew? I've been averaging like 13 mpg and wondering wtf? I think this might've done it. And yes, spray. It says in like 15 different places DO NOT TOUCH.

Thread
Thread Starter
Forum
Replies
Last Post
xjrjag
XJ XJ8 / XJR ( X308 )
23
Oct 24, 2024 03:09 PM
Currently Active Users Viewing This Thread: 1 (0 members and 1 guests)