
Thermostat Housing R & R questions

Thread Starter
|
Senior Member
Joined: Nov 2016
Posts: 109
Likes: 21
From: Colorado Springs, CO
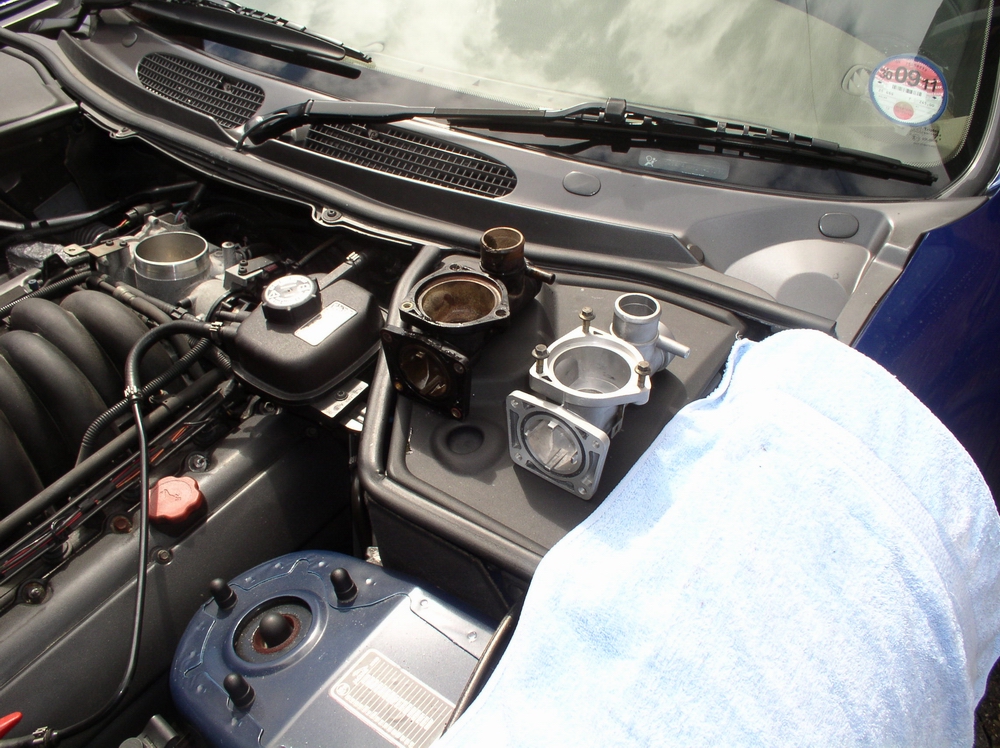
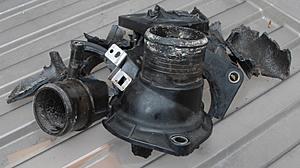
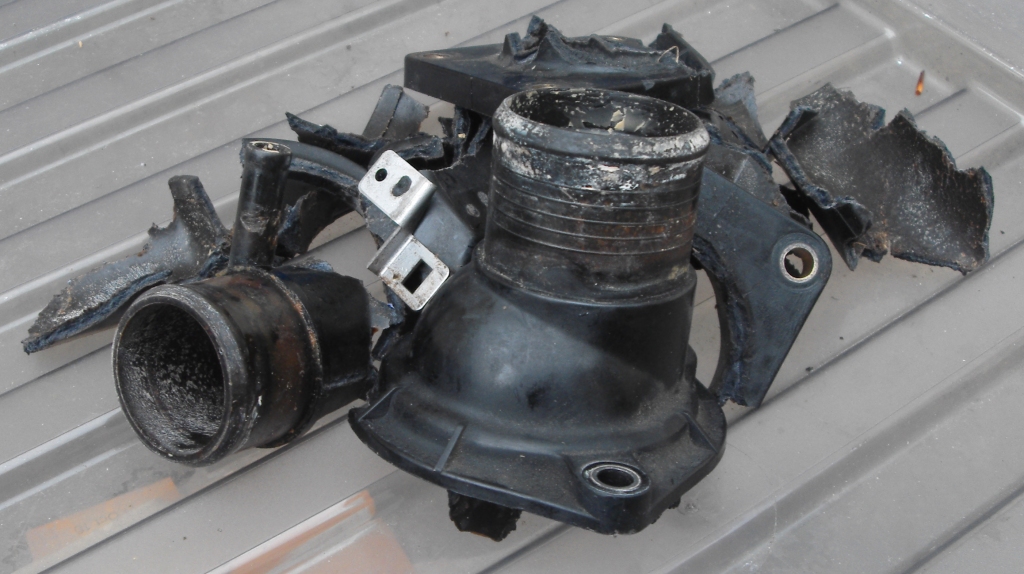
Finally tracked down ANOTHER coolant leak. This one is a cracked Thermostat Housing where the small hose nipple exits just under the screw-cap.
I found an aluminum replacement (one with a machined nipple rather than just cast) and am going to replace the housing and thermostat. Everything looks pretty straight-forward, but I've got a couple of days to research any nasty surprises that may be hiding. So...what has been your experiences in replacing the housing?...any thoughts on aluminum instead of plastic?
I've seen mention that some of the aluminum castings are kind of rough and I plan to polish any mating surfaces that look rough, like the place that the screw cap seal meets the housing, and I hope that the small hose nipple actually looks like the picture because it shows a machined lip instead of just a smooth tapered nipple. The kit also comes with all the rubber seals and the fiber gaskets.
It seems very inexpensive ($40) so when I get done, I'll post before and after pictures of any mods and a review in case I'm not the only X100 owner with a cracked cooling componant.


Joined: Dec 2011
Posts: 120,439
Likes: 17,009
From: Durham, UK
Jay,
No question that an aluminium aftermarket Thermostat Housing is the way to go.
I got one where the thread for the screw cap was badly machined and sent it back for a replacement. That was in 2011 and I don't recall reading any recent posts about poor quality components.

All the ones I've fitted have had a plain tapered bleed hose outlet as in the photo and I never had an issues with this connection.
The two bolts at the back of the housing are difficult to access without a crow's foot. Several members have just broken the old housing off but I'm way of pieces falling into the engine.
Graham
No question that an aluminium aftermarket Thermostat Housing is the way to go.
I got one where the thread for the screw cap was badly machined and sent it back for a replacement. That was in 2011 and I don't recall reading any recent posts about poor quality components.
All the ones I've fitted have had a plain tapered bleed hose outlet as in the photo and I never had an issues with this connection.
The two bolts at the back of the housing are difficult to access without a crow's foot. Several members have just broken the old housing off but I'm way of pieces falling into the engine.
Graham
Veteran Member
Joined: Apr 2014
Posts: 4,803
Likes: 3,013
From: Jersey, Channel Islands
The one I received from SNG also had the tapered bleed as per Graham's picture. I was a little concerned, so I spun some coarse-grade emery around it to aid grip. Otherwise plain sailing, and it's been fine.
Thanks, Graham:- good to hear no other complaints.
Thanks, Graham:- good to hear no other complaints.
Veteran Member
Joined: Sep 2012
Posts: 1,473
Likes: 655
From: Devon. U.K.
Yes - aluminium is the way forward !!
Up to you, and purely for aesthetic reasons, you might consider a coat of black paint before installation - just looks nicer.
If you are careful and keep a bit of rag in the orifice, a robust approach to disassembly is by far the quickest and most efficient method !!

Up to you, and purely for aesthetic reasons, you might consider a coat of black paint before installation - just looks nicer.
If you are careful and keep a bit of rag in the orifice, a robust approach to disassembly is by far the quickest and most efficient method !!

Last edited by DevonDavid; Feb 19, 2018 at 03:58 PM.
Veteran Member
Joined: May 2012
Posts: 3,290
Likes: 1,328
From: Winchester, CA
Having recently gone thru this evolution on my 1997 XK8 I would recommend while you are in there to change out the 2 hoses running under the manifold. The heater supply and return hoses. Due to age the system components are starting to fail.
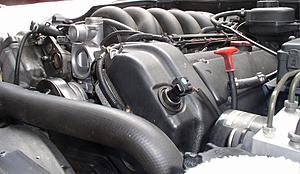
With mine I moved the intake manifold out of the way. Basically you unbolt the manifold. Disconnect the injector harness and loosen 2 cap screws on the throttle body and the manifold will tilt up from the front and pivot on the 2 loosened cap screws. They are on the left and right sides of the throttle body just below the throttle body elbow.
I wipe the manifold o-ring areas will a clean rag and put a little silicon lube on the o-rings and reused them.
With the manifold tilted it a little fiddly at the back for the hoses but it is doable. Plus you are all clear on the front for the hoses and the thermostat tower.
Thread Starter
|
Senior Member
Joined: Nov 2016
Posts: 109
Likes: 21
From: Colorado Springs, CO
Thanks for the answers. My parts came in a day early and looks pretty good.
Now the next question...
Any preferance in the order of assembly? Would it be easier to assemble the thermostat in the housing and then mount the entire assembly OR mount the housing and assemble it, piece by piece, on the motor?
Thx,
Jay (AC0FC)
Now the next question...
Any preferance in the order of assembly? Would it be easier to assemble the thermostat in the housing and then mount the entire assembly OR mount the housing and assemble it, piece by piece, on the motor?
Thx,
Jay (AC0FC)
Joined: Dec 2011
Posts: 120,439
Likes: 17,009
From: Durham, UK
Mount the housing and then assemble. There's plenty of room to work.
Make sure the 'giggle' pin in the thermostat (arrowed in red) is at the top.
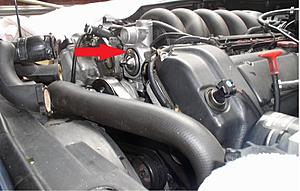
This helps air to bleed.
Graham

Make sure the 'giggle' pin in the thermostat (arrowed in red) is at the top.

This helps air to bleed.
Graham
Trending Topics
Veteran Member
Joined: Dec 2011
Posts: 2,940
Likes: 1,579
From: Spencer, NC
Jay, Here is the trail and error thread when I did mine. Should make a good rear if nothing else.
Go to #7 in the thread is when it gets interesting.
https://www.jaguarforums.com/forum/x...ousing-119815/
Wayne
Go to #7 in the thread is when it gets interesting.
https://www.jaguarforums.com/forum/x...ousing-119815/
Wayne
Thread Starter
|
Senior Member
Joined: Nov 2016
Posts: 109
Likes: 21
From: Colorado Springs, CO
Jay, Here is the trail and error thread when I did mine. Should make a good rear if nothing else.
Go to #7 in the thread is when it gets interesting.
https://www.jaguarforums.com/forum/x...ousing-119815/
Wayne
Go to #7 in the thread is when it gets interesting.
https://www.jaguarforums.com/forum/x...ousing-119815/
Wayne
Question...Why are they 2 different size bolts? Seems odd they'd stock 2 items where one would work. The mounting flange is the same thickness on all 4 corners. Is the hole too shallow to accept the long bolts? Are the short bolts not strong enough to go all the way around?
Jay
Veteran Member
Joined: Dec 2011
Posts: 2,940
Likes: 1,579
From: Spencer, NC
Jay, the only thing I can think of, the ability of the shorter one to go in the rear hole without taking the intake off.
Lots of times I don't question WHY. Gives me a headache.
Hope all is going well and you finish this week end.
Wayne
Lots of times I don't question WHY. Gives me a headache.
Hope all is going well and you finish this week end.
Wayne


Thread Starter
|
Senior Member
Joined: Nov 2016
Posts: 109
Likes: 21
From: Colorado Springs, CO
??? Do you mean someone replaced with shorter bolts than original? As far as I see, everyone has mentioned the short ones when they took off the OEM housing.
Thread Starter
|
Senior Member
Joined: Nov 2016
Posts: 109
Likes: 21
From: Colorado Springs, CO
That sounds like the way to go. One post gives the size etc and I think I'll go that way as well.
Veteran Member
Joined: Apr 2014
Posts: 4,803
Likes: 3,013
From: Jersey, Channel Islands
Some have advocated using the same bolts as the thermostat cover for the rearmost pair since they're a tad shorter and will give more clearance if you ever need to take the tower off again without lifting the intake manifold.
Given the new one is aluminium I'm expecting that it will be my descendants who get to do that, so the original equal-length bolts should be just fine.
+1 on DD's suggestion of a lick of black paint before assembly.
Given the new one is aluminium I'm expecting that it will be my descendants who get to do that, so the original equal-length bolts should be just fine.
+1 on DD's suggestion of a lick of black paint before assembly.
Last edited by michaelh; Feb 25, 2018 at 02:56 PM.

Thread
Thread Starter
Forum
Replies
Last Post
jagxk82005seneca
XK8 / XKR ( X100 )
5
Jan 12, 2015 08:37 PM
jimlombardi
XJ XJ8 / XJR ( X308 )
1
Feb 10, 2014 08:54 PM
Glenn Barickman
XK8 / XKR ( X100 )
1
Nov 7, 2010 10:08 PM
Currently Active Users Viewing This Thread: 1 (0 members and 1 guests)