

Headlight Renewal: I made the mistakes so you don't have to..


First, this post is not about dealing with the common issue of cloudy, yellowing lenses, though I touched on that at the end. It rather explains and illustrates the issues you face when your lights have broken beyond a point where the Brutal-fix https://www.jaguarforums.com/forum/s...ype-faq-10745/ is effective, yet you are not ready to plunk $600/per for a new version of the same problem.....Anyway, my daughter's 03 had reached that point on the left hand side. I wasn't sure the status of the right owing to the "fix" I'd effected prior to discovering the Brutal fix (more on that, later)
As I mentioned earlier, I'd ordered 2 sets of adjusters via eBay: https://www.jaguarforums.com/forum/s...repair-108183/ . They (Finally!) arrived on Christmas Eve. For your planning purposes, figure 10-15 calendar days between order and delivery despite whatever fantasy eBay whispers in your ear as to "estimated" delivery on these.
Right then, first order of business is to get it in the shop, up on ramps and execute Rick's excellent how-to: https://www.jaguarforums.com/forum/s...ics-faq-28534/ . Honestly, it's all downhill from here if you take a few precautions I became aware of during the process. First, armed with a 10 mm socket and a 12" extension at the ready, you have four bolts low across the front:

Then one behind the light (this is where you need the extension) It is no trouble to loosen, but can be a bit tricky to extract or start on re-assembly if you don't have one of those shop-magnets mounted on an old automotive antenna or a flexible clutch-claw for retrieving items dropped down the abiss between your S-type seat and center console:

With the fixings removed, you can jiggle it out of place to gain access to the wiring connector. Push the red cover aft, depress the locking mechanism and disconnect this plug:

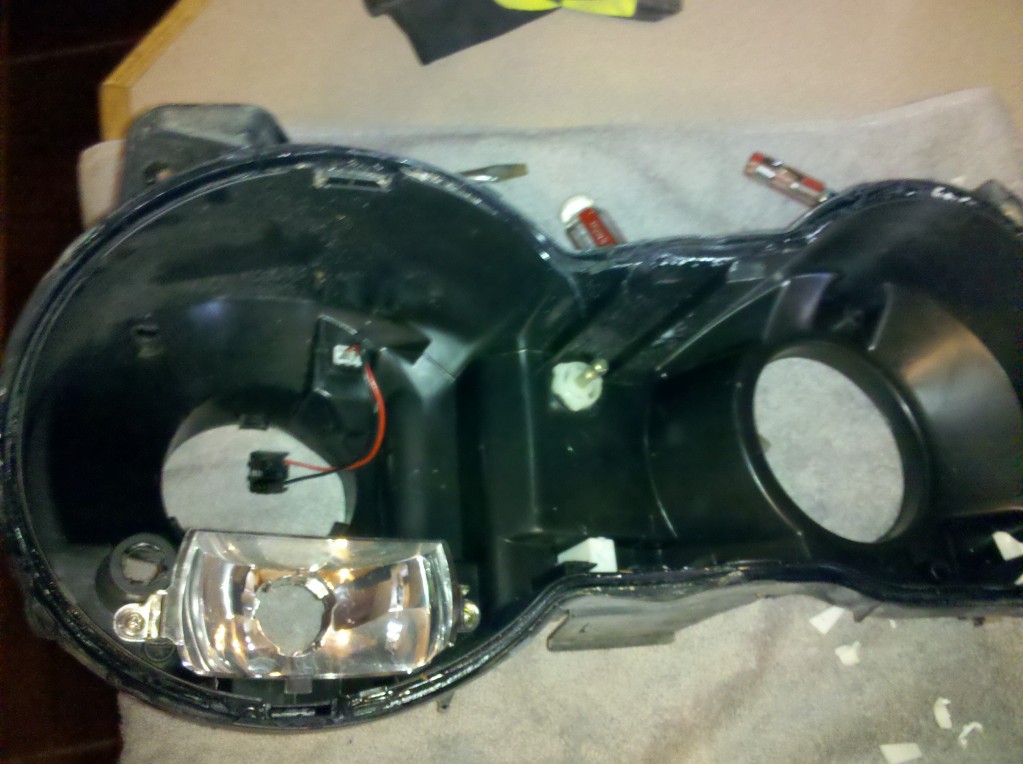
I stripped all the bulbs, wiring, and rubber bits off the assembly prior to baking. You'll need to prise this little clip off to liberate the wiring loom:
My oven is a bit smallish, and has digital controls. Lowest setting is 170 deg F. I removed one rack, set the other to the lowest position, set 170, started it, placed headlight assy on rack and made sure it wasn't touching any walls or elements, then headed off to the kid's BR closet to cycle the circuit breaker before returning to the control panel to reset all those values and restart it. (Don't ask, it's a GE Appliance, 'nuff said)
I let it heat to 170, then sit for 5-8 mins before pulling it out. Disengage the locking tabs and apply steady pressure to separate the halves. The adhesive will be soft and gummy at this point - stretching quite a bit until you get impatient and slash it with your handy putty knife or similar instrument. Once you get it apart, you are looking at these pieces:


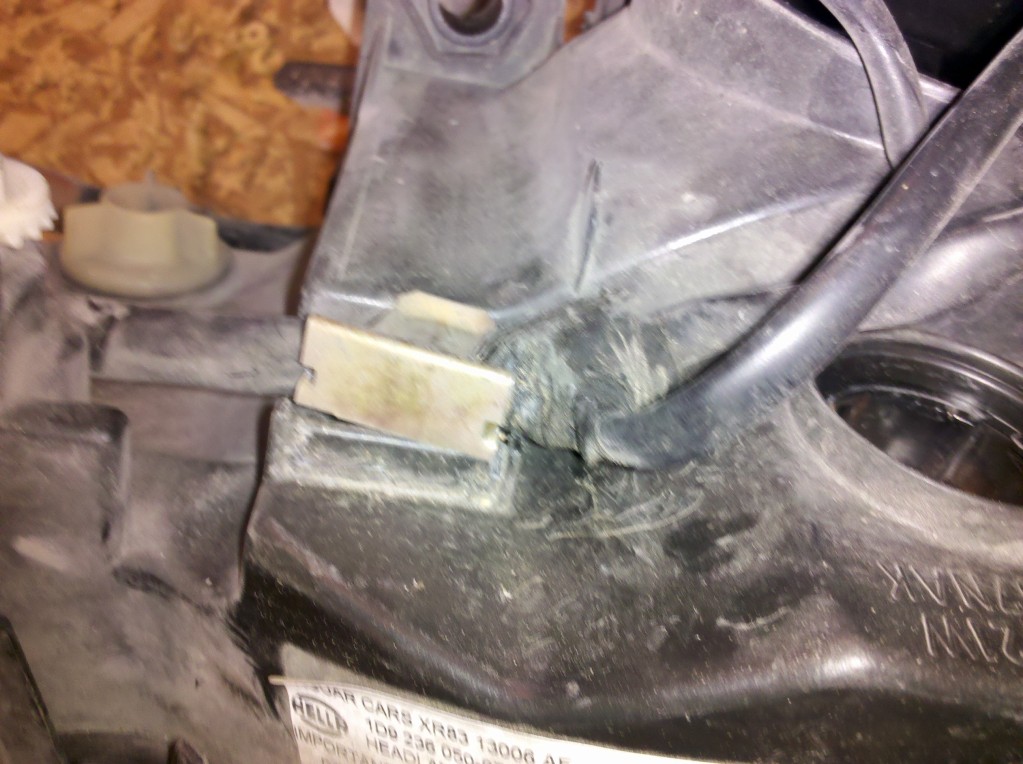
It's a bit hard to see, but the ball is broken off and stuck down in this receptacle:

Another of the broken pieces:

Nothing at all left of this one:

I sprayed these little gear-sets with some silicone lube in hopes of not breaking any teeth when actuating them to seat the new adjusters in place:

Here is one of the new pieces replacing the one that was totally disintegrated (You'll need a T10 to R&R):

The screw isn't fully seated in that photo, but the final-install pic was a bit blurry. You get the idea. I mentioned (I think - this is about the 4th attempt at this post; I reckon the margaritas don't mix too well with my keyboard actuator, leading to computer problems) that I had to use a collection of needle-nose pliers, O-ring picks, and even a drill to crush the broken plastic ***** into little bits to get them out of their respective sockets. Seemingly flushing that knowledge straight down the crapper, I replaced the two broken adjusters with my new bits with the steel ***** by holding each in place and turning the adjuster with a 10 mm wrench (I wouldn't advise using an allen and the little gear-teeth for this - save them for a proper headlight adjustment once you've refit the light to the car) until each was secure in a midpoint, slapped the chrome bit with (now clean)sockets on lightly, and carefully fit both halves back in the oven, to soften the adhesive for reassembly.
As the temp was climbing through 140F, doorbell chimed. UPS' own girl-in-brown had arrived bearing gifts solemnly promised for delivery by 23 Dec. Great anticipation and longing was heralded with a loud din - shrieks, screams, laughter....so I had to retrieve the laptop, check routing #'s and sort what was gift from other stuff, and insure the two anticipatory children got the right boxes. During this process, I discovered, "Sorry Halle, yours is on FedEx, so it's not here yet." My youngest was crushed and folded into a kitchen chair like a cheap suit. But wait, a doorbell chime! FedEx is here!
Wife: "Let me get the camera...."
Me (Sniff, sniff) "whazzat smell? Smell like....wait...I know this one....wait..yeah, burning plastic!"


These were the bits touching the rack, and as can be seen, I (barely) dodged a bullet on them. None of the damage is visible once installed, as it is on the back/bottom of the assembly. For the second and third batches, I placed little scraps of pine 1 X lumber strategically about the oven to insulate the plastic from the metal oven rack. What? Your S-type only has two headlight assy's? Yeah, mine too..but after I finally got the driver's side snapped back together, it was painfully obvious something had gone horribly wrong, quite apart from the over-baking. The shiny bit was rattling around in there just as loosely as before.
Not one to let failure deter me from greater destruction, I plowed into the passenger side headfirst. Same process to remove and strip it....Surprise!


I'd forgotten about this. Shortly after buying the car, and before I discovered this fine forum and the easy Brutal Fix, I was presented with a failed low-beam, pax side, and during the bulb renewal, either I busted the assembly, or at least noticed all was not well, so fitted this plexi-glass fork to hold things in place. Most remarkably, I fit it working entirely through the bulb access hole with headlight still mounted in car. It functioned, but adjustments were a bit more inconvenient.
But I digress.....a bit more watchful on the baking and now have the wood blocks in place. Being a bit oven-shy by now, I could've heated this one a bit more....didn't really get the adhesive all that soft. I'd get a bit of separation, with the adhesive stretching out spanning both parts, fighting back - so would get a finger or other suitable object between halves so as to free one hand, and cut the offending adhesive with a putty knife, leading to successively wider gaps around the part until I achieved full separation. All the while you are working with it, it is cooling down and hardening up, so under-baking is probably as likely to precipitate a catastrophic failure as over-baking. I believe you could snap the lens trying to remove it without the adhesive sufficiently softened.
The same broken *****-stuck-in-sockets greeted me in this one...but by now I had presence of mind to check-fit the sockets with the new steel ***** before fitting the pieces to the back half. Ball was the proper size..it just takes a fair bit of force to seat it in the socket; roughly equivalent to the amount one might imagine after working diligently to remove the broken plastic ones immediately before. I still think it is a good idea to fit the new pieces to the back half first, because you are cutting threads in the plastic, essentially, but then...remove them and press them into the sockets insuring they are fully seated before cranking the whole assembly down into the back half. The socket on the corner can be easily removed for fitment:


The one in the middle, not so much. Yeah, it appears to be removable with a 90 deg twist, but that path looked fraught with danger, so I put a 10 mm socket over the sleeve of the new adjuster, and held the whole mess in alignment and managed to tighten the vise to bear on it axially until it popped into place. If you look at the geometry of the new parts, as well as the parts they mount to, you will (should) conclude it can only end badly if you just try to force the two housings together with enough force to snap the ***** into their sockets.

The "Slotted socket" shown above with the screw only half-way in, WILL snap on the existing steel ball in the back of the case without breaking. It is not as tight a fit. Frankly, I didn't see any other way to do it, either. Here's a couple of shots of the new pieces in place:


But I recommend removing them and pressing them into the sockets before refitting. This time, I attempted to snap the halves back together BEFORE heading to the oven. I believe I had one locking tab that wouldn't seat due to too much hardened adhesive in the way. Otherwise, I suspect re-heating after reassembly is unnecessary, though it probably allows the adhesive to flow into nooks and crannies and helps with a better seal.
Pax side all back together and tight. Of course, at this point I'd already refit everything except bulbs to the driver's side, but clearly, it was work that needed to be redone. So I fixed that and fortunately, the deformed bits didn't preclude a dis-assembly, proper fixing, and re-assembly.
Since I recently changed the pax-side low beam again in the parking lot at ULM (I guess pointing at the ground improves bulb-life, that's two pax side bulbs yet the original driver's side soldiers on) I determined when I planned this task I'd renew all the bulbs and retain the old ones here on station for the 05. At the time, Wagner was running a $10 rebate on twin packs and I got these, hi and low less than $10/bulb!

Refitting those rear fixing screws is best done with a magnet:

After installing, I noted the lenses weren't all that clear anymore. A year or so ago I cleaned them up with the 3M renewal kit, but never applied any sort of UV coating. So I expected further degradation. On the plus side, the failing UV coating is the hard part to sand, and I have 3M refill kits on subscribe-n-save with Amazon, one having just arrived recently. Not really sure where the refill is, EXACTLY, but sure I could find it if I HAD to...I spied the leftovers from when I did the initial cleanup last year in a file drawer; There's a 500, 800, and the magic foam pad, all apparently with a bit of life left...I'll give it a go:
500 grit:


800 grit:


Magic Foam:

3M Polishing compound:
Meguiar's Plastic Polish: (Car is incredibly dirty)


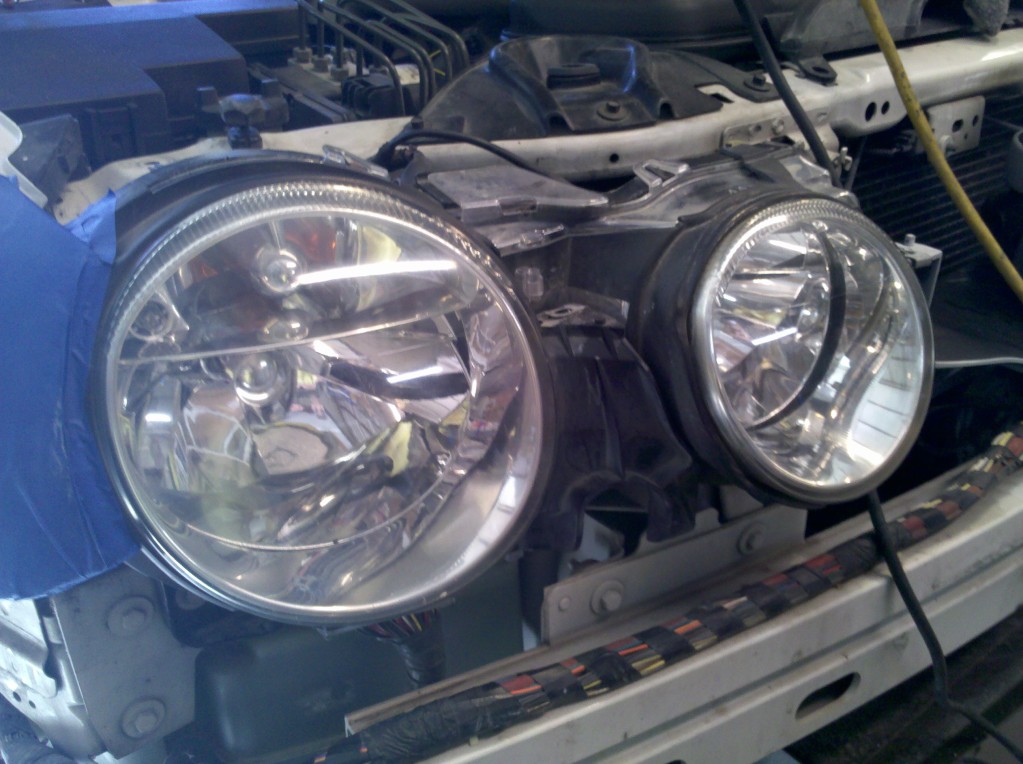
A bit of adjusting after dark, and as soon as it gets warm enough to wash the thing, it will be fit to be seen in, and as an added bonus, you can now see out! (at night)
As I mentioned earlier, I'd ordered 2 sets of adjusters via eBay: https://www.jaguarforums.com/forum/s...repair-108183/ . They (Finally!) arrived on Christmas Eve. For your planning purposes, figure 10-15 calendar days between order and delivery despite whatever fantasy eBay whispers in your ear as to "estimated" delivery on these.
Right then, first order of business is to get it in the shop, up on ramps and execute Rick's excellent how-to: https://www.jaguarforums.com/forum/s...ics-faq-28534/ . Honestly, it's all downhill from here if you take a few precautions I became aware of during the process. First, armed with a 10 mm socket and a 12" extension at the ready, you have four bolts low across the front:

Then one behind the light (this is where you need the extension) It is no trouble to loosen, but can be a bit tricky to extract or start on re-assembly if you don't have one of those shop-magnets mounted on an old automotive antenna or a flexible clutch-claw for retrieving items dropped down the abiss between your S-type seat and center console:

With the fixings removed, you can jiggle it out of place to gain access to the wiring connector. Push the red cover aft, depress the locking mechanism and disconnect this plug:

I stripped all the bulbs, wiring, and rubber bits off the assembly prior to baking. You'll need to prise this little clip off to liberate the wiring loom:

My oven is a bit smallish, and has digital controls. Lowest setting is 170 deg F. I removed one rack, set the other to the lowest position, set 170, started it, placed headlight assy on rack and made sure it wasn't touching any walls or elements, then headed off to the kid's BR closet to cycle the circuit breaker before returning to the control panel to reset all those values and restart it. (Don't ask, it's a GE Appliance, 'nuff said)
I let it heat to 170, then sit for 5-8 mins before pulling it out. Disengage the locking tabs and apply steady pressure to separate the halves. The adhesive will be soft and gummy at this point - stretching quite a bit until you get impatient and slash it with your handy putty knife or similar instrument. Once you get it apart, you are looking at these pieces:


It's a bit hard to see, but the ball is broken off and stuck down in this receptacle:

Another of the broken pieces:

Nothing at all left of this one:

I sprayed these little gear-sets with some silicone lube in hopes of not breaking any teeth when actuating them to seat the new adjusters in place:

Here is one of the new pieces replacing the one that was totally disintegrated (You'll need a T10 to R&R):

The screw isn't fully seated in that photo, but the final-install pic was a bit blurry. You get the idea. I mentioned (I think - this is about the 4th attempt at this post; I reckon the margaritas don't mix too well with my keyboard actuator, leading to computer problems) that I had to use a collection of needle-nose pliers, O-ring picks, and even a drill to crush the broken plastic ***** into little bits to get them out of their respective sockets. Seemingly flushing that knowledge straight down the crapper, I replaced the two broken adjusters with my new bits with the steel ***** by holding each in place and turning the adjuster with a 10 mm wrench (I wouldn't advise using an allen and the little gear-teeth for this - save them for a proper headlight adjustment once you've refit the light to the car) until each was secure in a midpoint, slapped the chrome bit with (now clean)sockets on lightly, and carefully fit both halves back in the oven, to soften the adhesive for reassembly.
As the temp was climbing through 140F, doorbell chimed. UPS' own girl-in-brown had arrived bearing gifts solemnly promised for delivery by 23 Dec. Great anticipation and longing was heralded with a loud din - shrieks, screams, laughter....so I had to retrieve the laptop, check routing #'s and sort what was gift from other stuff, and insure the two anticipatory children got the right boxes. During this process, I discovered, "Sorry Halle, yours is on FedEx, so it's not here yet." My youngest was crushed and folded into a kitchen chair like a cheap suit. But wait, a doorbell chime! FedEx is here!
Wife: "Let me get the camera...."
Me (Sniff, sniff) "whazzat smell? Smell like....wait...I know this one....wait..yeah, burning plastic!"


These were the bits touching the rack, and as can be seen, I (barely) dodged a bullet on them. None of the damage is visible once installed, as it is on the back/bottom of the assembly. For the second and third batches, I placed little scraps of pine 1 X lumber strategically about the oven to insulate the plastic from the metal oven rack. What? Your S-type only has two headlight assy's? Yeah, mine too..but after I finally got the driver's side snapped back together, it was painfully obvious something had gone horribly wrong, quite apart from the over-baking. The shiny bit was rattling around in there just as loosely as before.
Not one to let failure deter me from greater destruction, I plowed into the passenger side headfirst. Same process to remove and strip it....Surprise!


I'd forgotten about this. Shortly after buying the car, and before I discovered this fine forum and the easy Brutal Fix, I was presented with a failed low-beam, pax side, and during the bulb renewal, either I busted the assembly, or at least noticed all was not well, so fitted this plexi-glass fork to hold things in place. Most remarkably, I fit it working entirely through the bulb access hole with headlight still mounted in car. It functioned, but adjustments were a bit more inconvenient.
But I digress.....a bit more watchful on the baking and now have the wood blocks in place. Being a bit oven-shy by now, I could've heated this one a bit more....didn't really get the adhesive all that soft. I'd get a bit of separation, with the adhesive stretching out spanning both parts, fighting back - so would get a finger or other suitable object between halves so as to free one hand, and cut the offending adhesive with a putty knife, leading to successively wider gaps around the part until I achieved full separation. All the while you are working with it, it is cooling down and hardening up, so under-baking is probably as likely to precipitate a catastrophic failure as over-baking. I believe you could snap the lens trying to remove it without the adhesive sufficiently softened.
The same broken *****-stuck-in-sockets greeted me in this one...but by now I had presence of mind to check-fit the sockets with the new steel ***** before fitting the pieces to the back half. Ball was the proper size..it just takes a fair bit of force to seat it in the socket; roughly equivalent to the amount one might imagine after working diligently to remove the broken plastic ones immediately before. I still think it is a good idea to fit the new pieces to the back half first, because you are cutting threads in the plastic, essentially, but then...remove them and press them into the sockets insuring they are fully seated before cranking the whole assembly down into the back half. The socket on the corner can be easily removed for fitment:


The one in the middle, not so much. Yeah, it appears to be removable with a 90 deg twist, but that path looked fraught with danger, so I put a 10 mm socket over the sleeve of the new adjuster, and held the whole mess in alignment and managed to tighten the vise to bear on it axially until it popped into place. If you look at the geometry of the new parts, as well as the parts they mount to, you will (should) conclude it can only end badly if you just try to force the two housings together with enough force to snap the ***** into their sockets.

The "Slotted socket" shown above with the screw only half-way in, WILL snap on the existing steel ball in the back of the case without breaking. It is not as tight a fit. Frankly, I didn't see any other way to do it, either. Here's a couple of shots of the new pieces in place:


But I recommend removing them and pressing them into the sockets before refitting. This time, I attempted to snap the halves back together BEFORE heading to the oven. I believe I had one locking tab that wouldn't seat due to too much hardened adhesive in the way. Otherwise, I suspect re-heating after reassembly is unnecessary, though it probably allows the adhesive to flow into nooks and crannies and helps with a better seal.
Pax side all back together and tight. Of course, at this point I'd already refit everything except bulbs to the driver's side, but clearly, it was work that needed to be redone. So I fixed that and fortunately, the deformed bits didn't preclude a dis-assembly, proper fixing, and re-assembly.
Since I recently changed the pax-side low beam again in the parking lot at ULM (I guess pointing at the ground improves bulb-life, that's two pax side bulbs yet the original driver's side soldiers on) I determined when I planned this task I'd renew all the bulbs and retain the old ones here on station for the 05. At the time, Wagner was running a $10 rebate on twin packs and I got these, hi and low less than $10/bulb!

Refitting those rear fixing screws is best done with a magnet:

After installing, I noted the lenses weren't all that clear anymore. A year or so ago I cleaned them up with the 3M renewal kit, but never applied any sort of UV coating. So I expected further degradation. On the plus side, the failing UV coating is the hard part to sand, and I have 3M refill kits on subscribe-n-save with Amazon, one having just arrived recently. Not really sure where the refill is, EXACTLY, but sure I could find it if I HAD to...I spied the leftovers from when I did the initial cleanup last year in a file drawer; There's a 500, 800, and the magic foam pad, all apparently with a bit of life left...I'll give it a go:
500 grit:


800 grit:


Magic Foam:

3M Polishing compound:

Meguiar's Plastic Polish: (Car is incredibly dirty)


A bit of adjusting after dark, and as soon as it gets warm enough to wash the thing, it will be fit to be seen in, and as an added bonus, you can now see out! (at night)
Last edited by aholbro1; Jan 1, 2014 at 10:35 AM.
Thanks Jon,
But neither our 03 nor the 05 has self-levelers...the manual adjusters are constructed of plastic that is every bit the equal of that used in various places about the cooling system...if you know what I mean...and I'm sure you do! I believe when this one fails,

it defeats the Brutal-Fix. because it is the support at the bottom. When the two adjusters fail, either together or separately, the reflector just wants to fall away from the back of the housing at the top. The screw forces it back against the bits of adjuster that are left after the ***** break off in the sockets. But when you lose the bottom support, the screw can't help much.

Veteran Member


Joined: Jan 2009
Posts: 13,076
Likes: 4,724
From: Raleigh, NC
Thanks for the clarification, Zane Whenever I see these headlight adjustment failure posts, I automatically assume they refer to the self-leveling headlamp systems. Now I know better....
My 2005 S-Type's annual state inspection took place in mid-December. No issues and no adjustments required. Since both headlamp systems in that car were completely replaced as part of the numerous repairs required after I was front-ended back in August 2009, those particular plastic parts should be in much better shape than either of your original S-Types were/are. Still, I'll start paying some attention to them. I presume that as long as you do not turn the plastic adjustment wheels, the headlamps should stay put. Right or wrong?
My 2005 S-Type's annual state inspection took place in mid-December. No issues and no adjustments required. Since both headlamp systems in that car were completely replaced as part of the numerous repairs required after I was front-ended back in August 2009, those particular plastic parts should be in much better shape than either of your original S-Types were/are. Still, I'll start paying some attention to them. I presume that as long as you do not turn the plastic adjustment wheels, the headlamps should stay put. Right or wrong?
Once they achieve brittle-ness, I'm sure you couldn't change a bulb without breaking them, but probably they would still shatter from normal vibrations. Here's some of the stuff that fell out of one of mine just while I was taking the bulbs out in preparation for the oven:

Let me put it this way, I never messed with the driver's side on the 03, to change a bulb nor adjust it....and it was worse-broke than the pax side was.
Last edited by aholbro1; Jan 1, 2014 at 12:21 PM.

Veteran Member
Joined: Jun 2010
Posts: 3,135
Likes: 227
From: No. NJ
These pieces aren't just a Jaguar issue though right?
They're made by a major manufacturer who supplies all of the auto manufacturers. Is it Valeo?
I hate plastic quite often these days ...
My car is going to be 10 years old next year and has only 40K on it now but yes I too worry about plastic failure. That and the MF'ng hose under the supercharger!
They're made by a major manufacturer who supplies all of the auto manufacturers. Is it Valeo?
I hate plastic quite often these days ...
My car is going to be 10 years old next year and has only 40K on it now but yes I too worry about plastic failure. That and the MF'ng hose under the supercharger!
Trending Topics
These pieces aren't just a Jaguar issue though right?
They're made by a major manufacturer who supplies all of the auto manufacturers. Is it Valeo?
I hate plastic quite often these days ...
My car is going to be 10 years old next year and has only 40K on it now but yes I too worry about plastic failure. That and the MF'ng hose under the supercharger!
They're made by a major manufacturer who supplies all of the auto manufacturers. Is it Valeo?
I hate plastic quite often these days ...
My car is going to be 10 years old next year and has only 40K on it now but yes I too worry about plastic failure. That and the MF'ng hose under the supercharger!


Veteran Member


Joined: May 2009
Posts: 12,097
Likes: 3,371
From: home
One thing to consider after you get the headlights nice and polished up. They don't stay that way. After doing this 3 separate times I started looking around and I installed XPEL covers on all 4 head lights.
Check out this thread for more information as just about every S Type will suffer from this.
https://www.jaguarforums.com/forum/s...dlights-98888/
.
.
.
Check out this thread for more information as just about every S Type will suffer from this.
https://www.jaguarforums.com/forum/s...dlights-98888/
.
.
.

Member
Joined: Nov 2009
Posts: 36
Likes: 14
From: Fort Worth US
Another detailed, clear, and colorful post. Made the rebuild way easier than I expected, Thanks Zane
I found the oven route easy and much preferable to the heat gun method often recommended by others. Just make sure the kitchen manager is not around and don't answer the door if FedEx or someone shows up. I found that 200� for five minutes worked well for me.
I found the oven route easy and much preferable to the heat gun method often recommended by others. Just make sure the kitchen manager is not around and don't answer the door if FedEx or someone shows up. I found that 200� for five minutes worked well for me.

Veteran Member

Joined: May 2018
Posts: 2,150
Likes: 760
From: california
Very nice write up...first time i have come across this thread...glad i did because i have the inner rebuild parts, but was not comfortable with the you tube video...now i am confident reading this thread...if you want, instead of the magnet on the hard to reach bolts, i put a small square of electrical tape on the open end of the socket when i replaced the bulbs....holds the bolt in beautifully and is easy to manipulate

Thread
Thread Starter
Forum
Replies
Last Post
Currently Active Users Viewing This Thread: 1 (0 members and 1 guests)