
The Definitive X300 Magnesium Cam Cover Thread


Admittedly, the title is a bold proclamation. Hopefully, with the input of many of the sage and seasoned members here, the thread will eventually live up to it!
There is a cornucopia of great information on the cam cover right here on our own forum. I have tried to link everything I could find within these walls into this post. When you find a post that I missed, as you undoubtedly will, please post a link to it in this thread. If it is still within the edit-window of the original post when I see it, I will copy it into this OP. I have also attempted a rough-organization of the threads under a few categories that I thought summarize the content.
Condition:
https://www.jaguarforums.com/forum/x...-cover-135856/
https://www.jaguarforums.com/forum/x...dition-114221/
https://www.jaguarforums.com/forum/x...-cover-150047/
https://www.jaguarforums.com/forum/x...-cover-113578/
https://www.jaguarforums.com/forum/x...00-xjs-109104/
https://www.jaguarforums.com/forum/x...m-cover-72047/
https://www.jaguarforums.com/forum/x...m-cover-33457/
https://www.jaguarforums.com/forum/x...problem-95145/
https://www.jaguarforums.com/forum/x...-covers-89030/
https://www.jaguarforums.com/forum/x...we-rate-70045/
https://www.jaguarforums.com/forum/x...rrosion-58945/
Underside:
https://www.jaguarforums.com/forum/x...-cover-141628/
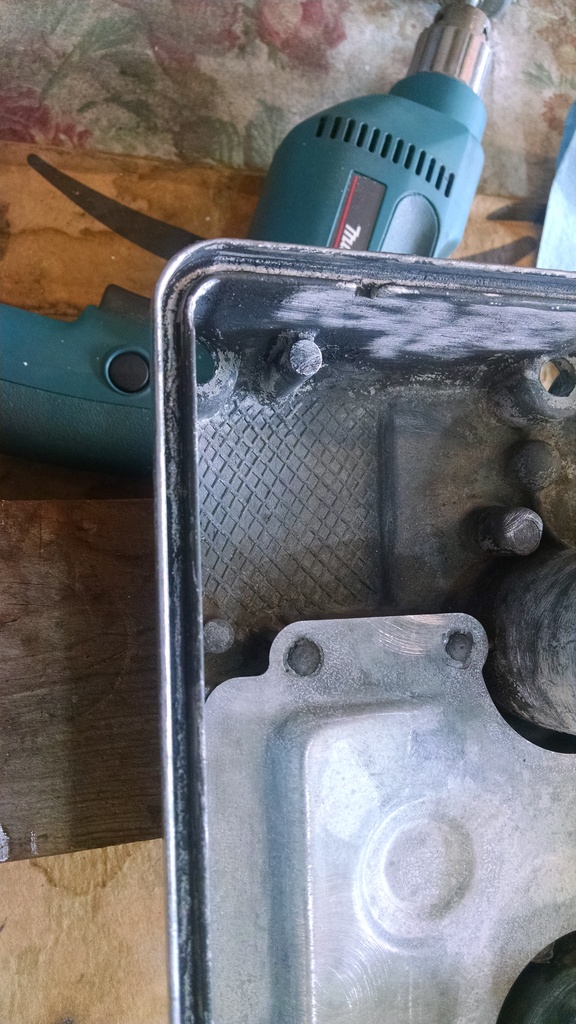
Here is the cover Tophatchef is referring to:
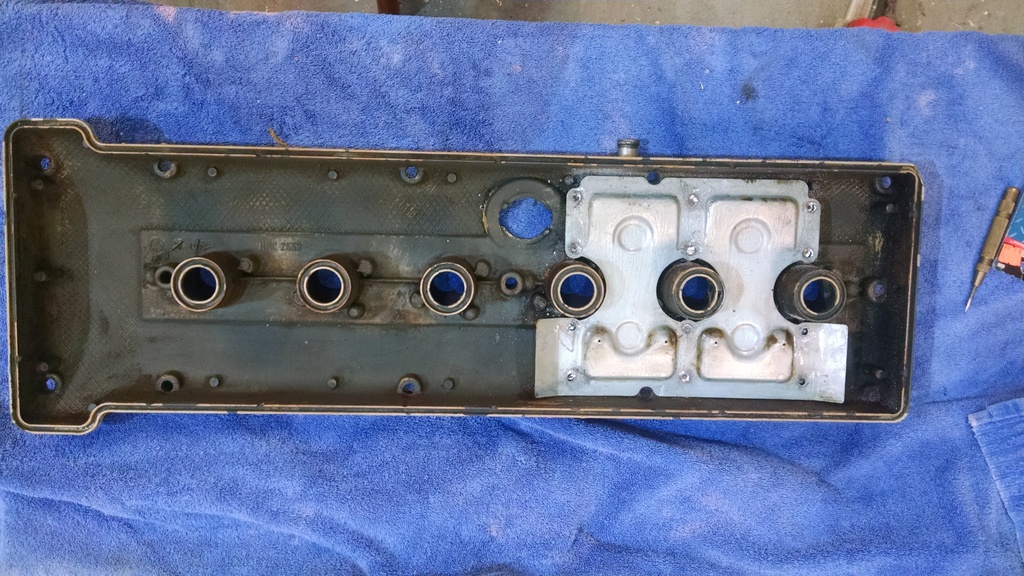
And here is what’s under it:
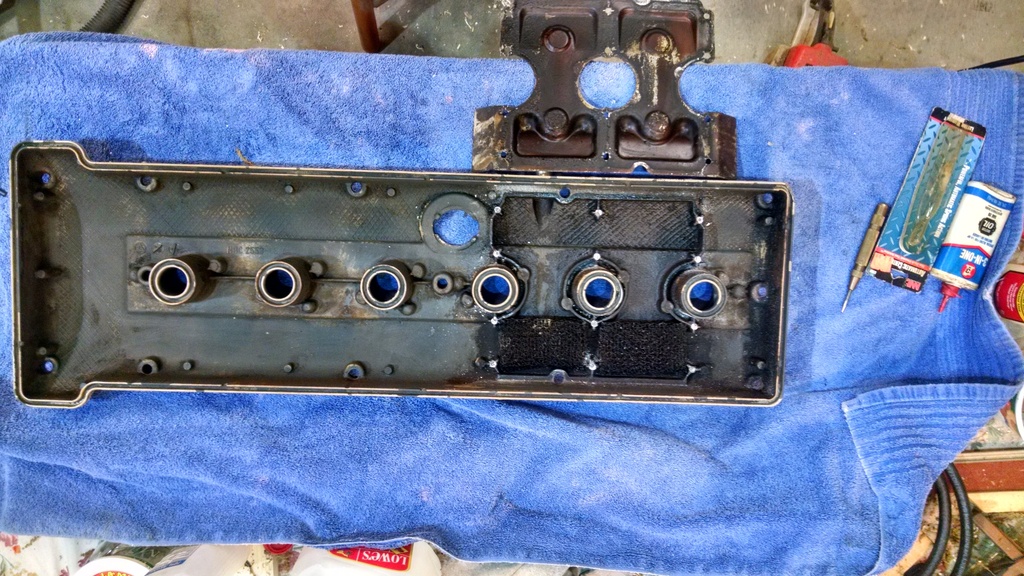
And if you flip the little mesh-pads over, they are likely caked in oil:
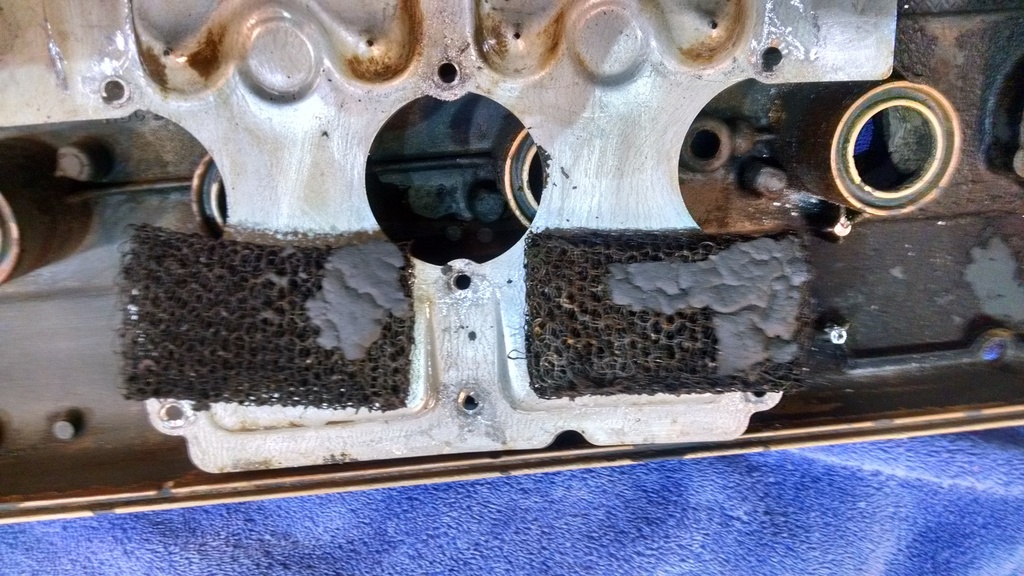
This thread just kinda played-out without resolution. I don’t recommend grinding off the rivets and removing the shield – I did it with a broken cam-cover with no intention of re-use to see what was under there, and to try soaking the pads in various cleaning solutions to see if they dissolved or anything. I believe most any fixings you may devise to re-attach it would expose you to the risk of them eventually falling out and into one or more of the cam-workings.
Leaks/refitting:
https://www.jaguarforums.com/forum/x...ain%2A-109247/
https://www.jaguarforums.com/forum/x...-cover-145200/
https://www.jaguarforums.com/forum/x...g-wells-90790/
https://www.jaguarforums.com/forum/x...er-kit-112783/
https://www.jaguarforums.com/forum/x...-engine-69241/
https://www.jaguarforums.com/forum/x...ue-spec-82366/
https://www.jaguarforums.com/forum/x...ing-oil-69198/
https://www.jaguarforums.com/forum/x...rk-plug-68358/
https://www.jaguarforums.com/forum/x...-change-58733/
https://www.jaguarforums.com/forum/x...ug-well-55154/
https://www.jaguarforums.com/forum/x...quickly-48934/
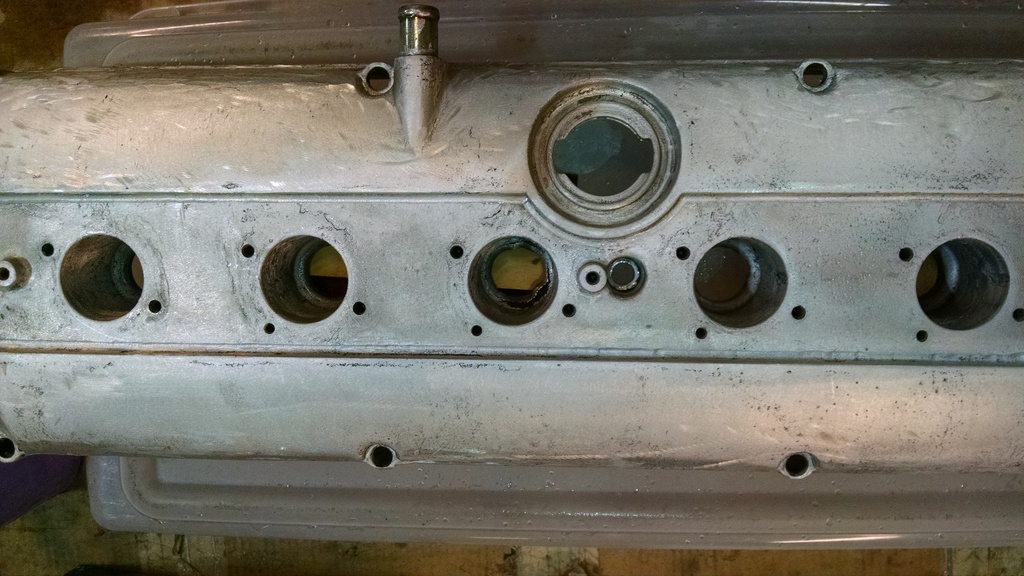
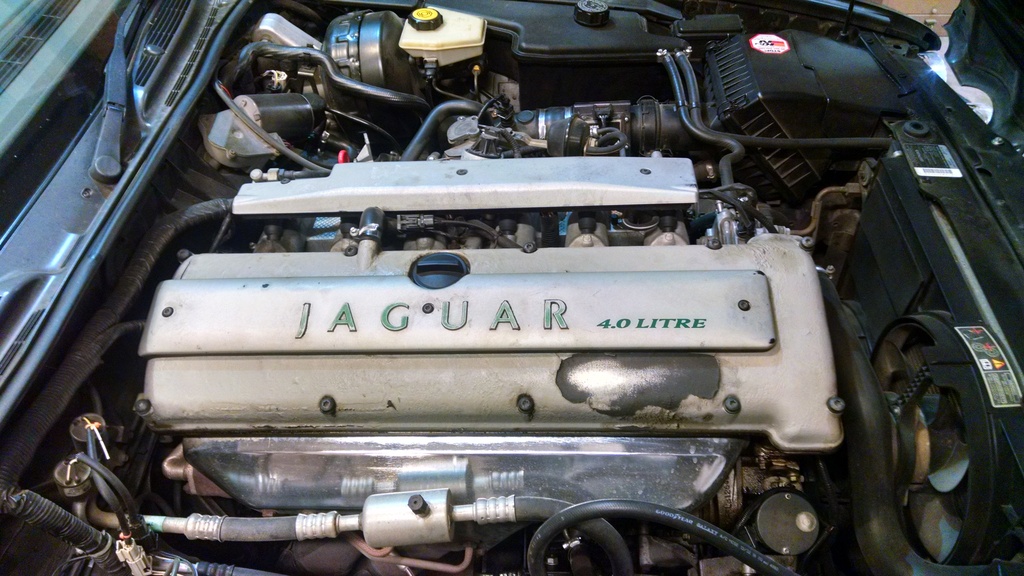
In my case, for the past year or two, I’ve been contemplating a cam-cover refurbishment for my ’95 daily driver, but unwilling to lay the car up for several weeks while getting the cover done-up. So I had been casually looking for a replacement without much success. Late last year, at his request, we obtained a sweet ’96 VDP for our 16 yr old lad. Some ribbing from his mates about driving an “old man’s car” but he couldn’t be happier and if I’d be honest, most of the “ribbing” originates from children whose primary means of transportation is manufactured in a sweatshop in China and bears the “Nike” logo. But I digress, as I’m wont to do. On the same day, right here on the forum classifieds, I found a running X300 for $200 from a member who was relocating from Houston to DFW. I quickly decided I’d found my replacement cam-cover and would be happy to have the rest of the car to boot! So ultimately, I need 3 cam-covers that are in good enough nick for the long haul. The best-laid plans of mice & men met the chap known as “Murphy” in short order. Removed the cam cover from the $200 find, dropped it, broke it, inspected it to find it was already “pre-broken” as it were, with a gaping hole in the #5 spark plug well seal land.
Found a replacement at the Fort Worth Pick-n-Pull for $17.99:
Had it powder coated for $160:
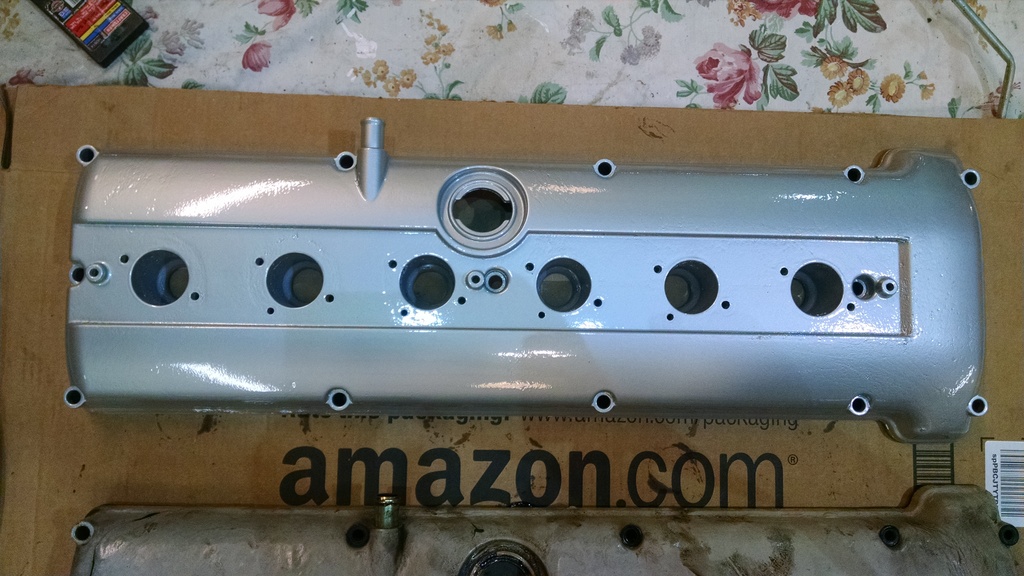
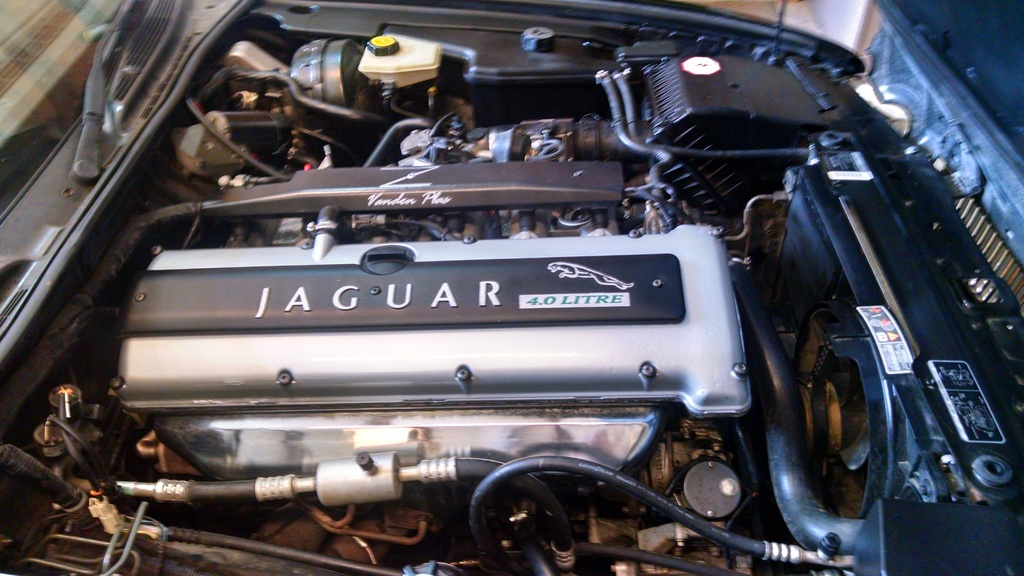
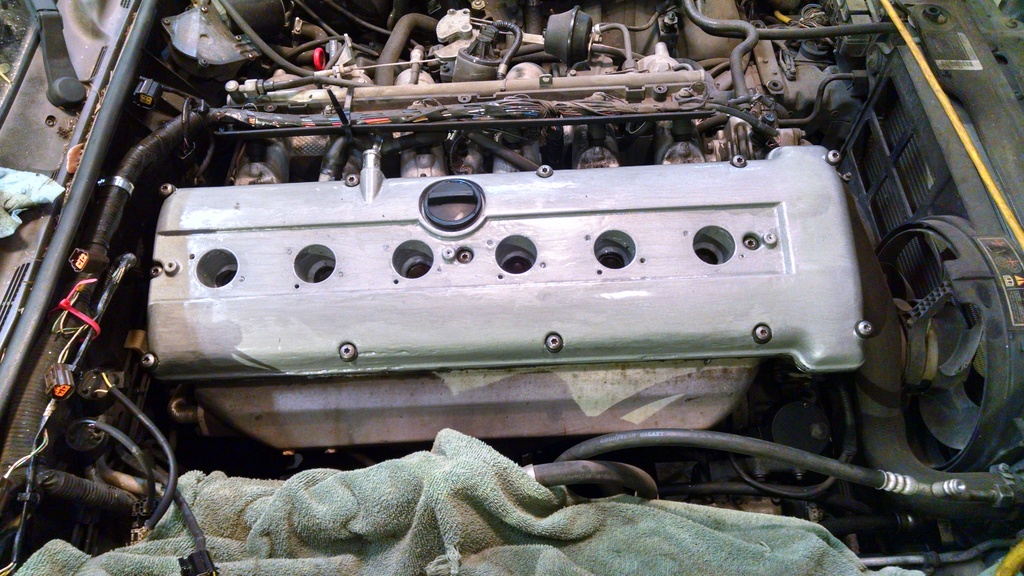
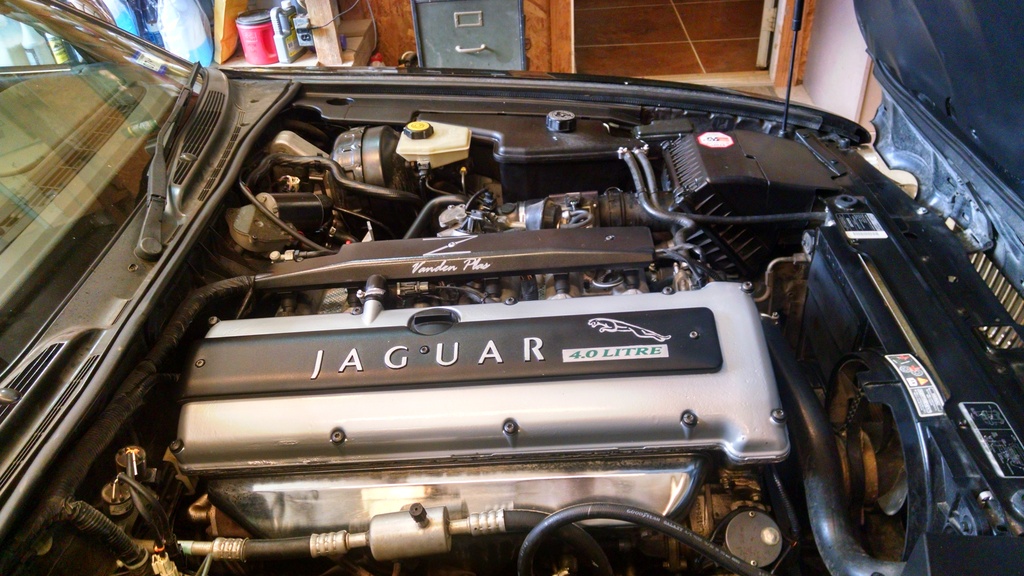
Painted the plastic coil and fuel rail covers and removed and replaced the cam cover:
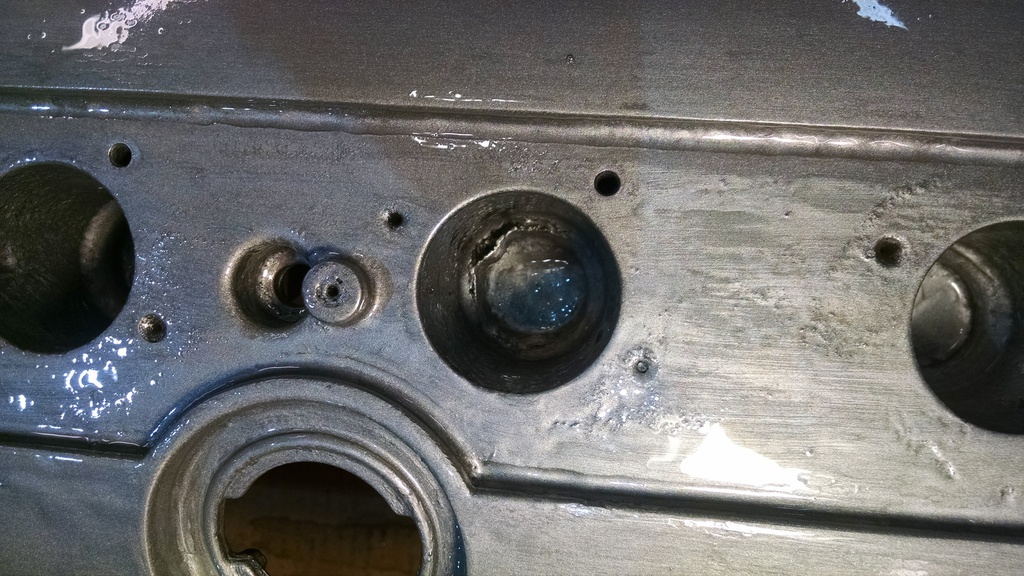
The one I pulled off had similar corrosion in the #4, though not quite as bad as the one I dropped. Received an email from the “Row52” app that the Dallas-West Pick-n-Pull had just received a ’96. I scooted out there and grabbed another replacement:
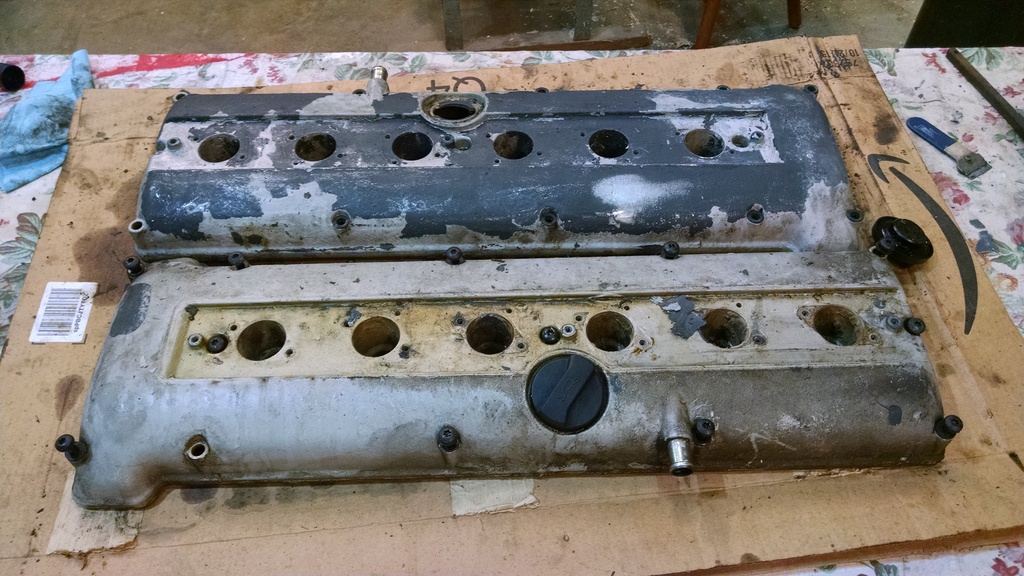
Afterward, I decided I’d try to salvage the one I pulled off the 95 daily driver, for fitment back to the $200 car. It didn’t look all that bad as-installed on the daily driver, but as I started scraping/sanding it….I soon graduated to a selection of grinding tools. The thing was riddled with black dust (which I believe to be a by-product of corrosion) throughout, so was pretty pock-marked by the time I finished “cleaning” it:
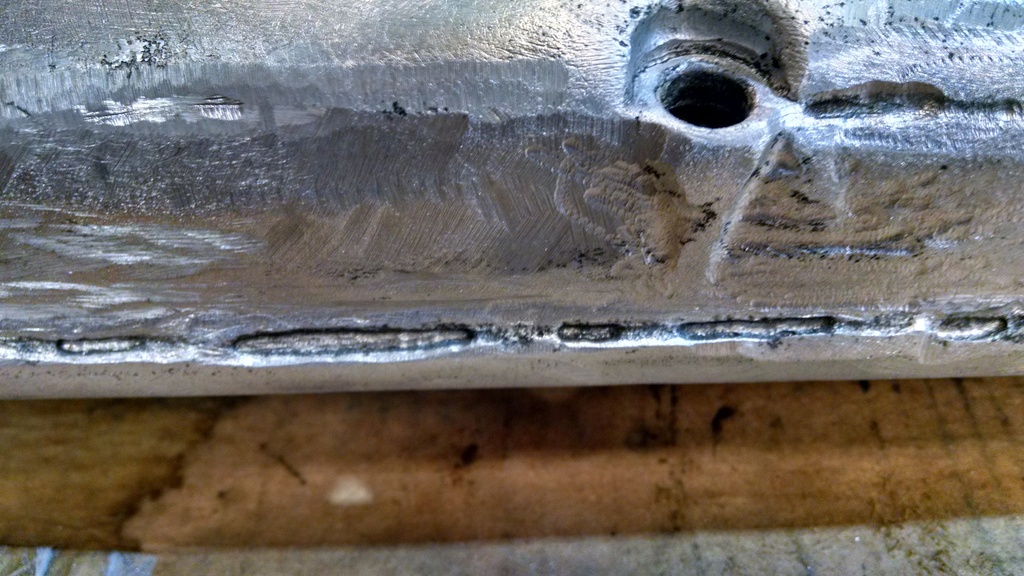
But my goal for this one was to see if one so badly damaged by corrosion could still return useful service, so appearance was not at the top of the list. Sprayed it down with POR15’s AP120 Metal Prep:
Brushed on a couple of coats of POR15 Silver:
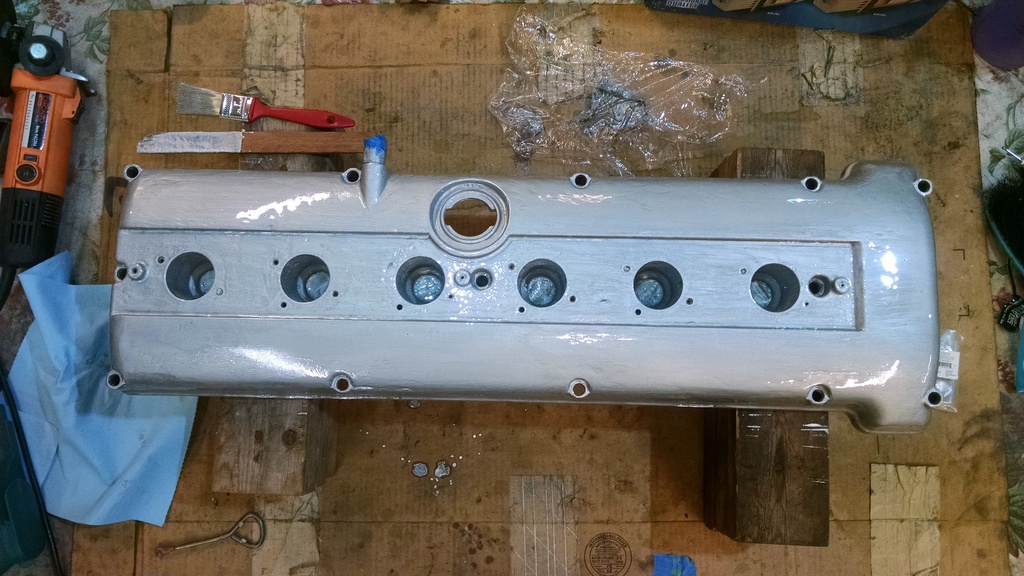
Including the seal grooves:
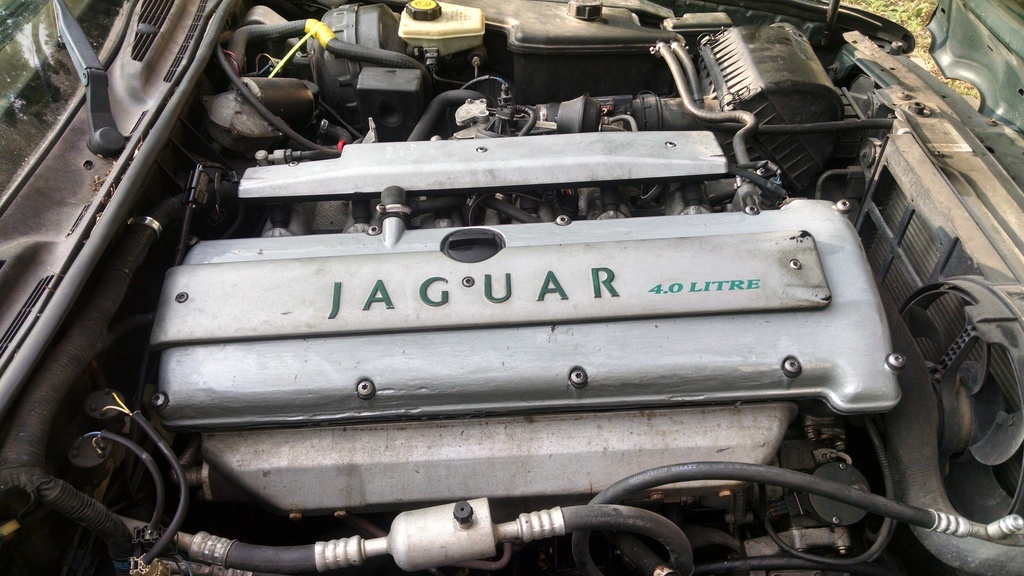
Then installed it:

To summarize, I’ve thus far completed two cars:
Before: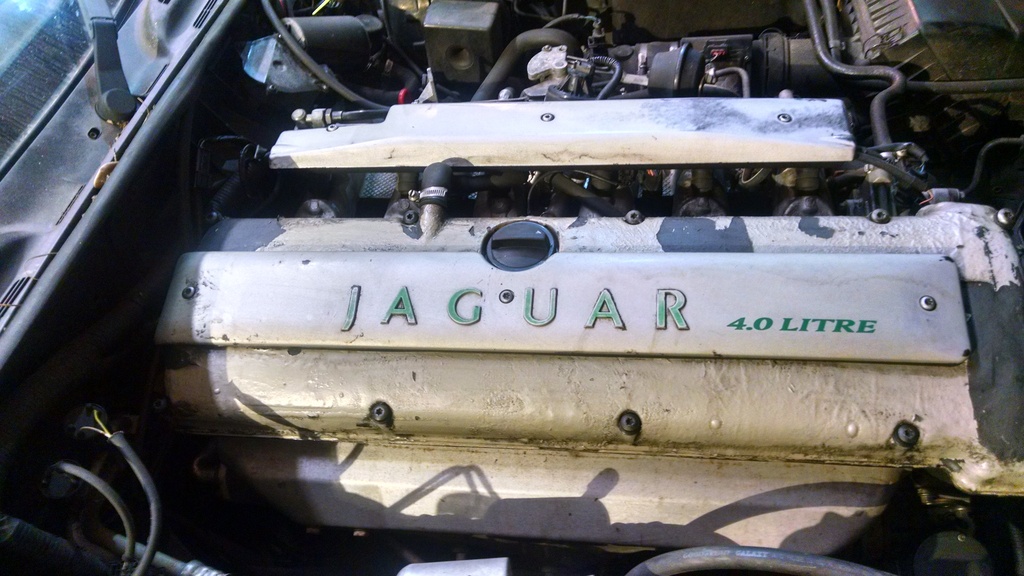
After:
Before:
After:
Costs:
Powder Coat: $17.99 to obtain the cover, $160 to have it powder coated; No labor hours involved in prep/finishing on my part.
POR15: Considerable labor hours, untracked – it is sanity-therapy to get out of the house to the shop and mess around. But cleaning off old paint and corrosion and then brushing on a couple of coats of paint will consume a bit of your time. The materials shown below are sufficient to do 10-20 cam-covers, if not more, but are the smallest package quantities I could find. I have been using the excess on some Jeep brackets I had previously sandblasted and had been leaving in my sandblast cabinet to keep the corrosion from returning. Also, as can be seen in one photo, I’m using it on the X300 battery fixing cleats, one at a time(Bruce doesn’t need one as it has no battery nor much motion to throw it around in the boot)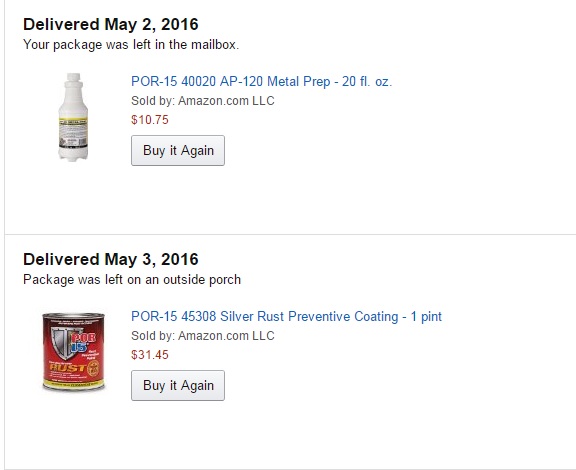
Other:
Bolt seals from Rock Auto:

Additional charges for shipping, but not allocated here because I ordered several other, larger parts from the same warehouse at the same time.
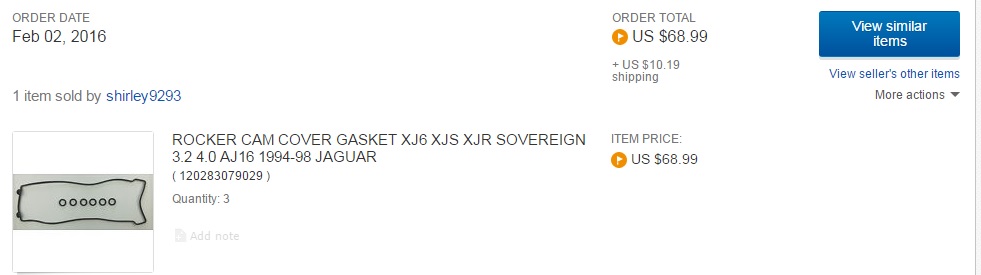
eBay: 3 Cam cover gaskets/18 spark plug bore seals
Planned follow-on actions are to polish the Dallas West Pick-n-Pull find to a high-gloss, as seen in several of the links above, coat the coil area with a liberal dose of the POR15 and the shiny exterior bits with POR15’s clearcoat for polished metal and fit that to my son’s 96. After a couple more years, we’ll see which method has demonstrated the greatest durability and do the one that will soon be removed from the lad’s 96 in that method and fit to his car before he departs for university in parts yet unknown.
I have attached pdf’s covering a Cam-cover renew How-to, as well as the JTIS instructions and a related TSB. In subsequent posts, I’ll present pdf’s, largely pictorial, detailing my trials and tribulations in accomplishing 2 refurbishments. Overall, according to the date-tags my phone attributed to the pictures, I pulled the cam cover off SpruceBruce on February 20 and re-installed the POR-15 version to Bruce on 22 May. Relax! It doesn’t really take that long. I have 5 kids, 3 in college and the remove-and-install dates encompass several holidays and spring-breaks, a college graduation, a couple of birthdays, an anniversary, and all 3 college kids moving their households in which activity their mother and I were deeply involved, not to mention a couple of business trips and full time work for my “real” job….So I reckon if you were dedicated, you could pull one off Sunday evening, hand it over to a powder coater Monday morning and be re-installing it the following weekend. Perhaps sooner if you catch the powder coater in the right cycle, with the stripper tank ready and your desired color already in the gun for some other product. Likewise, with all of your materials gathered in-hand, it would not be implausible to execute a POR15 finish over the weekend. You’d be busy, depending on how badly corroded it is to start with, but if you get an early Friday afternoon start, you may even be able to drive it to church for the Sunday morning service!
I found both the following individuals very pleasant, straight-shooters. Even though I didn't use Randy's services on the cam-cover, I took a small metal chair to him for sandblasting. He did a great job on it. I highly recommend either of them if you are in the North Texas/DFW area and have need of media blasting and/or powder-coating services:
Richard DFW Powder: 214-769-7867 http://www.dfwpowdercoating.com/
Randy A to Z Soda Blasting: 817-808-1061 http://atozsodablasting.com/
Keywords: Cam, Camshaft, Rocker, Valve, Cover, Magnesium
There is a cornucopia of great information on the cam cover right here on our own forum. I have tried to link everything I could find within these walls into this post. When you find a post that I missed, as you undoubtedly will, please post a link to it in this thread. If it is still within the edit-window of the original post when I see it, I will copy it into this OP. I have also attempted a rough-organization of the threads under a few categories that I thought summarize the content.
Condition:
https://www.jaguarforums.com/forum/x...-cover-135856/
https://www.jaguarforums.com/forum/x...dition-114221/
https://www.jaguarforums.com/forum/x...-cover-150047/
https://www.jaguarforums.com/forum/x...-cover-113578/
https://www.jaguarforums.com/forum/x...00-xjs-109104/
https://www.jaguarforums.com/forum/x...m-cover-72047/
https://www.jaguarforums.com/forum/x...m-cover-33457/
https://www.jaguarforums.com/forum/x...problem-95145/
https://www.jaguarforums.com/forum/x...-covers-89030/
https://www.jaguarforums.com/forum/x...we-rate-70045/
https://www.jaguarforums.com/forum/x...rrosion-58945/
Underside:
https://www.jaguarforums.com/forum/x...-cover-141628/
Here is the cover Tophatchef is referring to:

And here is what’s under it:

And if you flip the little mesh-pads over, they are likely caked in oil:

This thread just kinda played-out without resolution. I don’t recommend grinding off the rivets and removing the shield – I did it with a broken cam-cover with no intention of re-use to see what was under there, and to try soaking the pads in various cleaning solutions to see if they dissolved or anything. I believe most any fixings you may devise to re-attach it would expose you to the risk of them eventually falling out and into one or more of the cam-workings.
Leaks/refitting:
https://www.jaguarforums.com/forum/x...ain%2A-109247/
https://www.jaguarforums.com/forum/x...-cover-145200/
https://www.jaguarforums.com/forum/x...g-wells-90790/
https://www.jaguarforums.com/forum/x...er-kit-112783/
https://www.jaguarforums.com/forum/x...-engine-69241/
https://www.jaguarforums.com/forum/x...ue-spec-82366/
https://www.jaguarforums.com/forum/x...ing-oil-69198/
https://www.jaguarforums.com/forum/x...rk-plug-68358/
https://www.jaguarforums.com/forum/x...-change-58733/
https://www.jaguarforums.com/forum/x...ug-well-55154/
https://www.jaguarforums.com/forum/x...quickly-48934/
In my case, for the past year or two, I’ve been contemplating a cam-cover refurbishment for my ’95 daily driver, but unwilling to lay the car up for several weeks while getting the cover done-up. So I had been casually looking for a replacement without much success. Late last year, at his request, we obtained a sweet ’96 VDP for our 16 yr old lad. Some ribbing from his mates about driving an “old man’s car” but he couldn’t be happier and if I’d be honest, most of the “ribbing” originates from children whose primary means of transportation is manufactured in a sweatshop in China and bears the “Nike” logo. But I digress, as I’m wont to do. On the same day, right here on the forum classifieds, I found a running X300 for $200 from a member who was relocating from Houston to DFW. I quickly decided I’d found my replacement cam-cover and would be happy to have the rest of the car to boot! So ultimately, I need 3 cam-covers that are in good enough nick for the long haul. The best-laid plans of mice & men met the chap known as “Murphy” in short order. Removed the cam cover from the $200 find, dropped it, broke it, inspected it to find it was already “pre-broken” as it were, with a gaping hole in the #5 spark plug well seal land.
Found a replacement at the Fort Worth Pick-n-Pull for $17.99:

Had it powder coated for $160:

Painted the plastic coil and fuel rail covers and removed and replaced the cam cover:

The one I pulled off had similar corrosion in the #4, though not quite as bad as the one I dropped. Received an email from the “Row52” app that the Dallas-West Pick-n-Pull had just received a ’96. I scooted out there and grabbed another replacement:

Afterward, I decided I’d try to salvage the one I pulled off the 95 daily driver, for fitment back to the $200 car. It didn’t look all that bad as-installed on the daily driver, but as I started scraping/sanding it….I soon graduated to a selection of grinding tools. The thing was riddled with black dust (which I believe to be a by-product of corrosion) throughout, so was pretty pock-marked by the time I finished “cleaning” it:

But my goal for this one was to see if one so badly damaged by corrosion could still return useful service, so appearance was not at the top of the list. Sprayed it down with POR15’s AP120 Metal Prep:

Brushed on a couple of coats of POR15 Silver:


Including the seal grooves:


Then installed it:


To summarize, I’ve thus far completed two cars:
Before:

After:

Before:

After:

Costs:
Powder Coat: $17.99 to obtain the cover, $160 to have it powder coated; No labor hours involved in prep/finishing on my part.
POR15: Considerable labor hours, untracked – it is sanity-therapy to get out of the house to the shop and mess around. But cleaning off old paint and corrosion and then brushing on a couple of coats of paint will consume a bit of your time. The materials shown below are sufficient to do 10-20 cam-covers, if not more, but are the smallest package quantities I could find. I have been using the excess on some Jeep brackets I had previously sandblasted and had been leaving in my sandblast cabinet to keep the corrosion from returning. Also, as can be seen in one photo, I’m using it on the X300 battery fixing cleats, one at a time(Bruce doesn’t need one as it has no battery nor much motion to throw it around in the boot)

Other:
Bolt seals from Rock Auto:

Additional charges for shipping, but not allocated here because I ordered several other, larger parts from the same warehouse at the same time.
eBay: 3 Cam cover gaskets/18 spark plug bore seals

Planned follow-on actions are to polish the Dallas West Pick-n-Pull find to a high-gloss, as seen in several of the links above, coat the coil area with a liberal dose of the POR15 and the shiny exterior bits with POR15’s clearcoat for polished metal and fit that to my son’s 96. After a couple more years, we’ll see which method has demonstrated the greatest durability and do the one that will soon be removed from the lad’s 96 in that method and fit to his car before he departs for university in parts yet unknown.
I have attached pdf’s covering a Cam-cover renew How-to, as well as the JTIS instructions and a related TSB. In subsequent posts, I’ll present pdf’s, largely pictorial, detailing my trials and tribulations in accomplishing 2 refurbishments. Overall, according to the date-tags my phone attributed to the pictures, I pulled the cam cover off SpruceBruce on February 20 and re-installed the POR-15 version to Bruce on 22 May. Relax! It doesn’t really take that long. I have 5 kids, 3 in college and the remove-and-install dates encompass several holidays and spring-breaks, a college graduation, a couple of birthdays, an anniversary, and all 3 college kids moving their households in which activity their mother and I were deeply involved, not to mention a couple of business trips and full time work for my “real” job….So I reckon if you were dedicated, you could pull one off Sunday evening, hand it over to a powder coater Monday morning and be re-installing it the following weekend. Perhaps sooner if you catch the powder coater in the right cycle, with the stripper tank ready and your desired color already in the gun for some other product. Likewise, with all of your materials gathered in-hand, it would not be implausible to execute a POR15 finish over the weekend. You’d be busy, depending on how badly corroded it is to start with, but if you get an early Friday afternoon start, you may even be able to drive it to church for the Sunday morning service!
I found both the following individuals very pleasant, straight-shooters. Even though I didn't use Randy's services on the cam-cover, I took a small metal chair to him for sandblasting. He did a great job on it. I highly recommend either of them if you are in the North Texas/DFW area and have need of media blasting and/or powder-coating services:
Richard DFW Powder: 214-769-7867 http://www.dfwpowdercoating.com/
Randy A to Z Soda Blasting: 817-808-1061 http://atozsodablasting.com/
Keywords: Cam, Camshaft, Rocker, Valve, Cover, Magnesium
Last edited by aholbro1; Jun 4, 2016 at 10:00 PM.


Joined: Dec 2009
Posts: 13,743
Likes: 9,690
From: Wise County,TX
Every few years I seem to buy someone's X300 and the cam covers ALL start looking BAD!!
I am out of the X300 ownership at the moment but I'm sure one will come my way soon.
I'll get your 'expertise' on refurb when I do!!!!!!!!!!!!!!!!!!!!!!!
I remember the original Beechcraft Baron & Bonanza elevators were a Magnesium Corrosion nightmare. Yea it's light and strong???? but Corrosion????????????? WOW.
http://www.bonanza.org/news/549-Resk...oredirect=true
STCs for replacement is a good idea.
The EARLY VW Type 1 and 2 used Magnesium engine cases. At least the oil inside the engine kept corrosion from inside-out 'at bay'.
I have several magnesium ribbon spools that are fun to play with on occasion.
bob
Trending Topics
Veteran Member
Joined: Mar 2014
Posts: 3,750
Likes: 688
From: Sanford, NC
Thanks, this a great consolidated resource!
As you discovered, I think powder coating is the way to go in many cases because of the imperfections in the cover, especially if the cover is heavily corroded. The thick powder coating will fill and cover some of the surface imperfections better than paint, which would probably highlight them.
When you had your cover powder coated, how did you work with the shop to make sure they didn't over-fill the underside gasket perimeter slot/furrow with powder coating such that the gasket wouldn't seat? Or did you just have them coat it up to the outside edge of the gasket slot/furrow?
Another paint alternative though might be a crinkle finish like Ferrari puts on their engines and Harley Davidson applies to their engine cases. That finish is pretty tough and also hides defects well.
.
Unfortunately, I can't really say. My recollection of the piece, plus zooming in on the few photos I took lead me to believe the seal-groove was painted. It was definitely spotlessly clean. I didn't provide any special instructions regarding the groove. After spending only a few minutes talking to Richard in his shop, it was obvious he is a gearhead and I left it in his hands with total confidence that all would be well. As previously mentioned, he was already aware of BMW engine failures due to internally painted magnesium covers. Plus, as Randy reminded me when handing over the contact info for Richard, "One of the main advantages in dealing with a small shop instead of a large one, is you know the guy discussing the job with you is the guy who will be spraying your powder.....a big house? The people you talk to may be incredibly knowledgeable and experienced... but who will be on the gun? It may be the new 18 yr old trainee on his first day..."


On the underside of the cam cover there is a cover holding the two mesh breathers. My question is how do you clean or replace the mesh breathers if it is not recommended removing the cover because of dealing with the rivets that hold the cover off/reinstalling it.
I've been reading up on everything I can before I take the cam cover off in order to cover all potential problems. While I'm into this project I'm going to install the separator kit JLM20709
Lawrence
I've been reading up on everything I can before I take the cam cover off in order to cover all potential problems. While I'm into this project I'm going to install the separator kit JLM20709
Lawrence
As I posited in pdf#3, IMHO, the best method is a week's worth of soaking & sloshing in a degreasing solution. I think anything left after that is going to stay put and not cause any trouble down the road. You could try pulling them out with needle nose pliers or similar, but I think you risk just tearing them out piece-by-piece that way. If you can source replacements, that'd be fine, I'm pretty confident you could successfully stuff new ones back into the little caverns.
Michael is polishing one. Follow his progress here: https://www.jaguarforums.com/forum/x...polish-180037/
Veteran Member
Joined: Mar 2014
Posts: 3,750
Likes: 688
From: Sanford, NC
I've found a powder coating shop just down that road that is well established and has experience with magnesium, so I'll likely have the valve cover done pretty soon. My number 3 or 4 spark plug well is leaking, so I need to do the gaskets anyway.
The shop is: Final Touch Powder Coating
I sent them a few emails, and they have been very responsive. Their quote was about $200 (including tax) to media blast, degrease, pre treat, pre bake, re-clean if necessary, powder coat with OGF, and powder coat. Here is their reply regarding magnesium powder coating:
I have powder coated a lot of magnesium parts over the years. There are many parts of Porsche, Volkswagen, and Audi that are made from mag, especially on the older cars. Magnesium is a problem metal because it contains so much contaminant in the lower quality alloys. Magnesium rims are a much higher quality alloy than engine parts and usually do not have as much, if any, of those problems. Those contaminants cause adhesion problems for paint and powder coat, and also cause outgassing bubbles in powder coat from those contaminants getting hot during the curing process. I overcome those problems by doing the proper prep work and using a special sealer powder base coat called 'outgas forgiving' (OGF). OGF powder is specially formulated to cure at a lower temperature, sealing the metal before it reaches temps high enough to start the outgassing process. Then the standard powder coat can be applied over the OGF. I have been powder coating since 1999 and have never had a problem using that process.
Now I just need to pick a color. I was thinking of doing some sort of wrinkle red or blue which may also help to hide any imperfections. Red is obvious given the other red highlights, but also my "Titanium Mica" paint has hints of blue so that may look good to tie into. Or I could go with a "chrome" like silver on the valve cover and intake hood. Not sure yet.
As an aside, I still wonder if it makes sense to add some non hardening (or even hardening) gasket maker on either side of the plug well ring gasket to help seal them better and even fill some voids if the plug seal is pitted. Obviously it may make it a bit harder to remove the cover on subsequent removals, and could tear the ring gaskets upon removal if the gasket maker sticks, but that may be a minor price to pay if it seals the ring gaskets better? One would just have to assume the ring gaskets are one time use.
.
Last edited by al_roethlisberger; Apr 16, 2017 at 08:38 AM.
FWIW, I followed Grant's advice with a generous smear of RTV on both sides of the gasket as well as all plug well seals. Not quite a year on and already starting to see traces of oil in #4 of the powder-coat car. Cover still looks great outside, but I fear the plug-wells are starting to deform, breaking the seal.
Veteran Member
Joined: Mar 2014
Posts: 3,750
Likes: 688
From: Sanford, NC
FWIW, I followed Grant's advice with a generous smear of RTV on both sides of the gasket as well as all plug well seals. Not quite a year on and already starting to see traces of oil in #4 of the powder-coat car. Cover still looks great outside, but I fear the plug-wells are starting to deform, breaking the seal.
Did you also replace the cam cover bolt gasket/spacers/isolators (part 9 below) or add a washer as some have suggested?
https://www.jaguarclassicparts.com/u...-3-2-4-0-litre
I ask because sometimes I wonder if there is a relationship with those spacers hardening and shrinking over time under pressure from the bolts. If so, we may not be fully tightening the gaskets to spec. since the shoulder bolts will only tighten so far, and if those gaskets are fully tightened could contribute to leaks.

Veteran Member
Joined: Mar 2014
Posts: 3,750
Likes: 688
From: Sanford, NC
https://www.permatex.com/our-brands/the-right-stuff/
https://www.permatex.com/products/ga...-gasket-maker/
.